By Hathy A and Sharon Campbell

Introduction
A good server administrator looks out for new vulnerabilities. When you run a server with ports open to the public, you should obsess over its security.
Unfortunately, even if you keep up with all the latest security patches for your applications and operating system, your server could still be vulnerable to zero-day attacks: attacks targeting unknown vulnerabilities that don’t have any patches. AppArmor is a Linux kernel module that acts as an access control system that protects your server from such attacks. This module has been available on Ubuntu by default ever since Ubuntu 8.04 was released.
When AppArmor is active for an application, the operating system allows the application to access only those files and folders that are mentioned in its security profile. Thus, with a well planned security profile, even if the application is compromised during an attack, it won’t be able to do much harm.
What This Tutorial Covers
In this tutorial, we will create a simple AppArmor security profile, which is a text file containing permission details for Nginx, a popular HTTP server.
For the sake of demonstrating how AppArmor works, we will configure Nginx to serve static files from two directories: /data/www/safe and /data/www/unsafe, and configure AppArmor to confine Nginx to /data/www/safe.
With this setup, when AppArmor is inactive, an external user will be able to access files from both directories. When AppArmor is active, the user will be able to access only the files in /data/www/safe.
Step One — Install Nginx
Use apt-get to update your server and install Nginx:
sudo apt-get update
sudo apt-get install nginx
Your Nginx server is now operational. The default server will be running on port 80. You can test it in a browser by visiting your Droplet’s IP address as the URL: http://<server-IP>:80. You should see the default Nginx welcome page.
Step 2: Configure Nginx to Serve Static Files
Create the directories from which the static files will be served.
sudo mkdir -p /data/www/safe
sudo mkdir -p /data/www/unsafe
Add a file to the safe directory using nano:
sudo nano /data/www/safe/index.html
Let the file have the following contents:
<html>
    <b>Hello! Accessing this file is allowed.</b>
</html>
Similarly, create another file in /data/www/unsafe named index.html, with the following contents:
<html>
    <b>Hello! Accessing this file is NOT allowed.</b>
</html>
Nginx’s configuration file is located at /etc/nginx/nginx.conf. Edit this file to create a new server that listens on port 8080 and serves files from /data/www. Ignoring the commented lines, after editing, your file should look like the file shown below. You will need to add a hash mark to comment out the include /etc/nginx/sites-enabled/*; line. You will also need to add the entire server block shown in red below:
user www-data;
worker_processes 4;
pid /run/nginx.pid;

events {
    worker_connections 768;
}

http {
    sendfile on;
    tcp_nopush on;
    tcp_nodelay on;
    keepalive_timeout 65;
    types_hash_max_size 2048;

    include /etc/nginx/mime.types;
    default_type application/octet-stream;

    access_log /var/log/nginx/access.log;
    error_log /var/log/nginx/error.log;

    gzip on;
    gzip_disable "msie6";

    include /etc/nginx/conf.d/*.conf;

    server {
        listen 8080;
        location / {
                root /data/www;
        }
    }
}
Save your changes, and load the new configuration by executing the following command:
sudo nginx -s reload
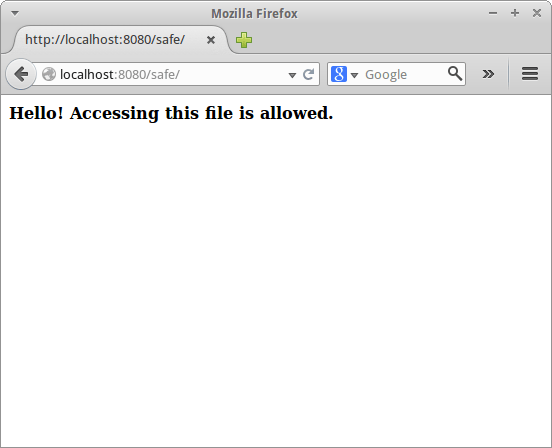
At this point, since AppArmor has not yet been turned on for Nginx, you should be able to visit both http://<server-IP>:8080/safe/index.html and http://<server-IP>:8080/unsafe/index.html. The safe page looks like this:
The Nginx configuration is now complete.
Step Three — Check Existing AppArmor Profiles
Ubuntu 14.04 comes with a few AppArmor profiles pre-loaded. Install more of them with this command:
sudo apt-get install apparmor-profiles
List all available profiles by executing this command:
sudo apparmor_status
You should see quite a few profiles. Some will be in enforce mode, and some in complain mode. When an application’s profile is in complain mode, AppArmor logs the activities of the application without restricting it in any manner.
Once there’s something to log, you’ll find the log files for the Nginx server in the /var/log/nginx directory.
AppArmor restricts what an application can do only when its profile is in enforce mode.
You will also notice that there is no profile present for the Nginx server. We’ll create one in the next step.
Step Four — Create a New AppArmor Profile for Nginx
Install apparmor-utils. These are a collection of utilities that help you manage AppArmor.
sudo apt-get install apparmor-utils
You are now ready to start profiling the activities of Nginx. Use the aa-autodep command to create a new blank profile. The profile will be created in /etc/apparmor.d.
cd /etc/apparmor.d/
sudo aa-autodep nginx
Once the profile is created, use aa-complain to put the profile in complain mode.
sudo aa-complain nginx
Restart Nginx.
sudo service nginx restart
Open a browser, and visit http://<server-IP>:8080/safe/index.html. This will trigger the normal entries for accessing the safe website to appear in your Nginx logs.
Go back to the terminal. Now we’ll use an AppArmor utility to go through the Nginx logs and approve or disapprove each action it finds there.
sudo aa-logprof
This command scans the log files and updates the AppArmor Nginx profile. You will be prompted several times to allow or deny a capability. Assuming your server is not under an attack currently, you can press A every time, since all the capabilities requested are necessary for Nginx to work correctly. Finally, when prompted to save the changes, press S.
This general process for enabling AppArmor for a new application is as follows:
- Create a new blank profile for the application
- Put it into complain mode
- Take normal actions with the application so appropriate entries get added to the logs
- Run the AppArmor utility to go through the logs and approve or disapprove various application actions
Step 5: Edit the AppArmor Nginx Profile
For Nginx specifically, you will need to make some changes to the auto-generated file for it to work properly. Open the /etc/apparmor.d/usr.sbin.nginx file for editing.
sudo nano /etc/apparmor.d/usr.sbin.nginx
You should make at least the following changes:
- Add the
#include <abstractions/apache2-common>line - yes, the hash mark is intentional - Add the capability setgid line
- Add the capability setuid line
- Update the /data/www/safe/ line to include the entire directory with an asterisk (*)
- Add the deny /data/www/unsafe/* r, line, including the comma
- Make sure Nginx can write to the error log by setting w for /var/log/nginx/error.log
The apache2-common include lets Nginx listen on various ports. The new capability lines allow Nginx to start new processes. The deny rule allows us to block Nginx from accessing the /data/www/unsafe/ directory.
One working profile looks like this:
#include <tunables/global>

/usr/sbin/nginx {
  #include <abstractions/apache2-common>
  #include <abstractions/base>
  #include <abstractions/nis>

  capability dac_override,
  capability dac_read_search,
  capability net_bind_service,
  capability setgid,
  capability setuid,

  /data/www/safe/* r,
  deny /data/www/unsafe/* r,
  /etc/group r,
  /etc/nginx/conf.d/ r,
  /etc/nginx/mime.types r,
  /etc/nginx/nginx.conf r,
  /etc/nsswitch.conf r,
  /etc/passwd r,
  /etc/ssl/openssl.cnf r,
  /run/nginx.pid rw,
  /usr/sbin/nginx mr,
  /var/log/nginx/access.log w,
  /var/log/nginx/error.log w,
}
Your profile might look a bit different, since it was generated based on your log file. It’s up to you whether you would rather research and update individual parameters, or copy this file wholesale, with the usual caveats about considering your own server environment. AppArmor permissions can be tricky to get right, so you can use this example file and your auto-generated ones as starting points, but be prepared to do some troubleshooting.
The AppArmor Nginx profile is ready. Use the aa-enforce to put the profile in enforce mode.
sudo aa-enforce nginx
It is recommended that you reload all profiles and restart Nginx to be sure that the latest changes are in effect. Type in the following:
sudo /etc/init.d/apparmor reload
sudo service nginx restart
If you run into errors at any of these stages, read the errors, double-check your configuration files, and check /var/log/syslog to point you in the right direction.
Check AppArmor’s status:
sudo apparmor_status
You should see Nginx processes running in enforce mode.
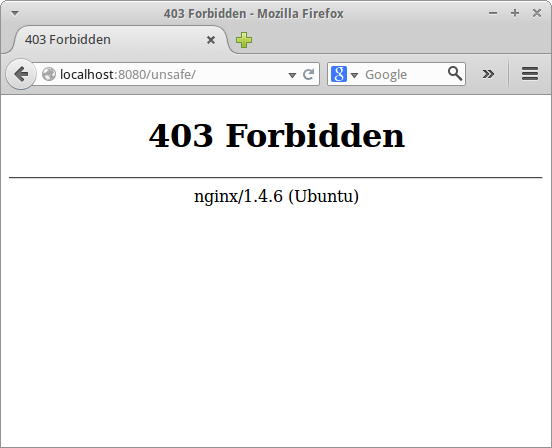
Go back to the browser and visit http://<server-IP>:8080/safe/index.html. You should be able to see the page. Then visit http://<server-IP>:8080/unsafe/index.html. You should see an error page like the one shown below. This proves that our profile is working as expected.
Troubleshooting
If your Nginx server fails to start after you enforce the profile, it is likely that the profile does not include a permission that Nginx needs. You should check:
- The error text
- var/log/syslog
- /var/log/nginx/error.log
You will then have to modify your profile based on those errors.
For example, if you have forgotten to include abstractions/apache2-common in the profile, you will see an error like:
[emerg] 3611#0: socket() 0.0.0.0:8080 failed (13: Permission denied)
In a real-world scenario, arriving at a useful AppArmor profile for a new application involves much trial and error, and is quite time-consuming as well.
Conclusion
With this tutorial, you have learned to create an AppArmor profile from scratch. In a real life scenario, you would want to follow a more rigorous process before enabling AppArmor for a large application.
First, enable complain mode with the aa-complain command. Then, system administrators usually wait for several days before running the aa-logprof command to give the system time to log more common actions for the application. It is recommended that you do the same if you are going to create a profile that will be used in production systems.
Thanks for learning with the DigitalOcean Community. Check out our offerings for compute, storage, networking, and managed databases.
About the author(s)
Hathy is an independent developer and blogger who loves tinkering with new frameworks, SDKs and devices.
Current fan and former Editorial Manager at DigitalOcean. Hi! Expertise in areas including Ubuntu, Docker, Rails, and more.
Still looking for an answer?
This textbox defaults to using Markdown to format your answer.
You can type !ref in this text area to quickly search our full set of tutorials, documentation & marketplace offerings and insert the link!
Is there any way to unforbid a page? I tried setting to deny, and it was forbidden. Then, I tried putting it back (/data/www/safe/* r,), and it still says forbidden, and I can’t get any page to go back to not forbidden. Maybe this is a cache somewhere in nginx? Also, I restarted apparmor and nginx.
If you want to allow all the sub-folders of your public directory add two asterisks /** at the end of the path:
/data/www/** r,
This configuration will allow any /data/www/a/b/c
 This work is licensed under a Creative Commons Attribution-NonCommercial- ShareAlike 4.0 International License.
Become a contributor for community
Get paid to write technical tutorials and select a tech-focused charity to receive a matching donation.

DigitalOcean Documentation
Full documentation for every DigitalOcean product.

Resources for startups and AI-native businesses
The Wave has everything you need to know about building a business, from raising funding to marketing your product.
The developer cloud
Scale up as you grow — whether you're running one virtual machine or ten thousand.

Start building today
From GPU-powered inference and Kubernetes to managed databases and storage, get everything you need to build, scale, and deploy intelligent applications.
