By Ryan Laverdiere and Sharon Campbell

Introduction
This tutorial demonstrates how to create an Elliptic Curve Cryptography (ECC) public and private key pair for use with Nginx, a high performance HTTP server. ECC keys offer a few advantages over traditional RSA keys. ECC keys provide security equivalent to that of larger RSA keys while being smaller in size, reducing the resources needed on the server and offering faster performance for mobile devices.
The use of ECC could improve performance for streaming media, VPN connections, or other high bandwidth applications. Certificate authorities (CAs) like Symantec have begun offering ECC or Elliptic Curve Cryptography certificates. If you have connected to a website before using forward secrecy or perfect forward secrecy, you have used elliptic curve cryptography! This guide details the steps necessary to deploy a self-signed ECC private key and public certificate with Nginx on a Debian Wheezy system, using the prime256v1 curve.
Note: There are a variety of different curves that you could use. We are using the prime256v1 curve for the sake of keeping this article simple.
Requirements
- Droplet with Debian 7.0 Wheezy.
- OpenSSL installed and updated.
Run:
apt-get update && apt-get upgrade
After updating it is a good idea to reboot your Droplet.
- A modern browser: Internet Explorer 7+ (Windows Vista, Windows 7), Firefox 19+ (Linux, Mac, Windows), or Chrome 25+ (Android, Linux, Mac, Windows). We will be using Firefox for testing in this tutorial.
All of the commands below should be executed as the root user.
Step 1: Install Nginx
Install Nginx with the apt-get package manager. Nginx is a high performance HTTP server that can handle a large number of concurrent requests without eating up a large amount of memory on your Droplet. Additional packages will need to be installed. To accept installation, enter Y, then press the Enter key.
apt-get install nginx
Step 2: Generate and Sign an ECC Private Key
Create a directory to store the private key, certificate signing request, and server certificate. I recommend creating the directory /etc/nginx/ssl. Then move into the directory.
mkdir /etc/nginx/ssl
cd /etc/nginx/ssl
Generate an ECC private key using OpenSSL’s ecparam tool. This command generates a 256-bit private key using the prime256v1 ECC curve, and saves the key inside a file named privatekey.key. This 256-bit key is equivalent to a 2048-bit RSA private key.
openssl ecparam -out privatekey.key -name prime256v1 -genkey
Use OpenSSL to generate a certificate signing request.
openssl req -new -key privatekey.key -out csr.pem
Upon running this command you will be presented with a few questions. For the Common Name prompt, make sure to enter your server’s IP address or hostname. Do not supply a challenge password. All other fields may be filled with information as you see fit.
You are about to be asked to enter information that will be incorporated into your certificate request.
What you are about to enter is what is called a Distinguished Name or a DN.
There are quite a few fields but you can leave some blank
For some fields there will be a default value,
If you enter '.', the field will be left blank.
-----
Country Name (2 letter code) [AU]:US
State or Province Name (full name) [Some-State]:New York
Locality Name (eg, city) []:New York
Organization Name (eg, company) [Internet Widgits Pty Ltd]:Digital Ocean Tutorial
Organizational Unit Name (eg, section) []:ECC Certificate Test
Common Name (e.g. server FQDN or YOUR name) []:example.com
Email Address []:

Please enter the following 'extra' attributes to be sent with your certificate request
A challenge password []:
An optional company name []:
Note: At this point you can submit your certificate to an authority for signing. Follow the instructions provided by your CA of choice. Symantec is currently offering ECC certificates, and more certificate authorities are expected to offer ECC certificates in the future. For the purpose of this guide, a self-signed certificate will be created instead.
Create a certificate or public key. The certificate is used by the client to encrypt data that only the server can read. The OpenSSL x509 tool is used to create a self-signed certificate using a certificate signing request (CSR). If you want to make the certificate valid for a longer period of time, you could change the -days value from 365 to 3650, creating a certificate valid for 10 years.
openssl req -x509 -days 365 -key privatekey.key -in csr.pem -out certificate.pem
Set the file permissions so that no other users can gain access to your private key and certificate.
chmod 600 /etc/nginx/ssl/*
###Step 3: Configure Nginx with the ECC Key and Certificate
Open up the default Nginx virtual host configuration using the text editor of your choice. By default, the Nginx package configuration file is set to serve HTTP requests only. Now we will configure Nginx to serve HTTPS requests.
vi /etc/nginx/sites-enabled/default
Near the bottom of the Nginx default virtual host configuration file is a sample configuration for an HTTPS server that has the line listen 443; near the top. Uncomment the lines and update your HTTPS server block to match the example shown below. You will be editing most of the lines, so pay attention!
When changing values, make sure you leave the semicolons (;) at the end of each line.
#HTTPS server
#
server {
	listen 443;
	server_name Your IP Address or Hostname;
#
	root /usr/share/nginx/www;
	index index.html index.htm;
#
	ssl on;
	ssl_certificate /etc/nginx/ssl/certificate.pem;
	ssl_certificate_key /etc/nginx/ssl/privatekey.key;
#
	ssl_session_timeout 5m;
#
	ssl_protocols TLSv1 TLSv1.1 TLSv1.2;
	ssl_ciphers HIGH+kEECDH+AESGCM:HIGH+kEECDH:HIGH+kEDH:HIGH:!aNULL;
	ssl_prefer_server_ciphers on;
#
	location / {
		try_files $uri $uri/ =404;
	}
}
Once your HTTPS server block matches the example above, save your changes.
Note that additional changes to the HTTPS server block may be required depending on your cloud Droplet’s existing configuration. For example, if your cloud server is running PHP, you will want to copy the lines that you added to your HTTP block to support PHP into your HTTPS block.
Restart Nginx to apply the changes.
service nginx restart
###Step 4: Test Nginx with ECC
We’ll use Firefox for testing, although any modern web browser will work for visiting your site and using the ECC encryption.
Use Firefox to browse to the IP address or hostname of your cloud server. After accepting the self-signed certificate warning, you should see the “Welcome to nginx!” page. You will receive a certificate warning because the server’s certificate has been self-signed and has not been signed by a certificate authority recognized by your web browser.
See the initial warning below:

Accept the certificate.
If you are using Mozilla Firefox, click on the padlock near the https:// prefix in the address bar. The connection information window will appear.

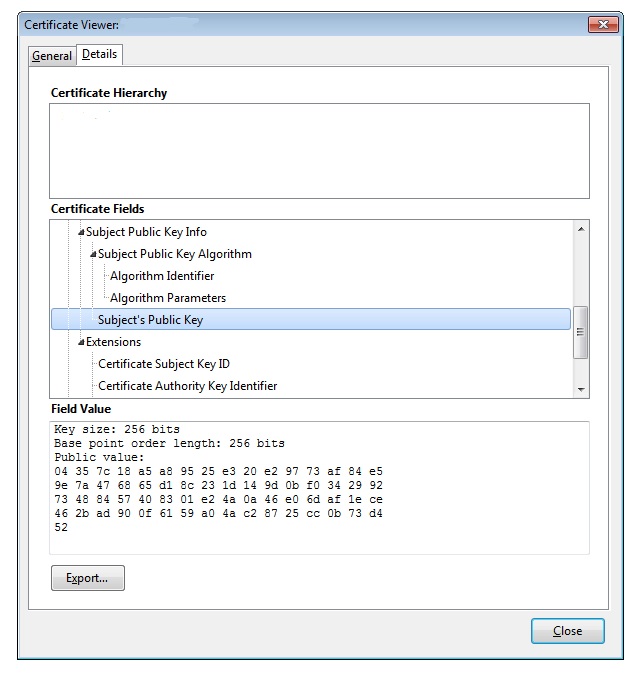
Click on the More Information… button. In the new window, under the Security tab, click on the View Certificate button. Choose the Details tab. Scroll down and select the Algorithm Parameters field. In the Field Value text area below, you should see text that includes elliptic curve prime256v1, which indicates an ECC certificate.

The Subject’s Public Key field will show a public key size of 256 bits.
Congratulations! Your Nginx server is now configured with an ECC private key and certificate!
Thanks for learning with the DigitalOcean Community. Check out our offerings for compute, storage, networking, and managed databases.
About the author(s)
Current fan and former Editorial Manager at DigitalOcean. Hi! Expertise in areas including Ubuntu, Docker, Rails, and more.
Still looking for an answer?
This textbox defaults to using Markdown to format your answer.
You can type !ref in this text area to quickly search our full set of tutorials, documentation & marketplace offerings and insert the link!
Hi Ryan – A 256-bit ECC key is equivalent to a 3,072-bit RSA key, not a 2,048-bit as stated in the article. There’s a handy table in this Linux Journal article.
 This work is licensed under a Creative Commons Attribution-NonCommercial- ShareAlike 4.0 International License.
Become a contributor for community
Get paid to write technical tutorials and select a tech-focused charity to receive a matching donation.

DigitalOcean Documentation
Full documentation for every DigitalOcean product.

Resources for startups and AI-native businesses
The Wave has everything you need to know about building a business, from raising funding to marketing your product.
The developer cloud
Scale up as you grow — whether you're running one virtual machine or ten thousand.

Start building today
From GPU-powered inference and Kubernetes to managed databases and storage, get everything you need to build, scale, and deploy intelligent applications.
