
The author selected the Free and Open Source Fund to receive a donation as part of the Write for DOnations program.
Introduction
Flask is a lightweight Python web framework that provides useful tools and features for creating web applications in the Python Language. It gives developers flexibility and is an accessible framework for new developers because you can build a web application quickly using only a single Python file. Flask is also extensible and doesn’t force a particular directory structure or require complicated boilerplate code before getting started.
Learning Flask will allow you to quickly create web applications in Python. You can take advantage of Python libraries to add advanced features to your web application, like storing your data in a database, or validating web forms.
In this tutorial, you’ll build a small web application that renders HTML text on the browser. You’ll install Flask, write and run a Flask application, and run the application in development mode. You’ll use routing to display various web pages that serve different purposes in your web application. You’ll also use view functions to allow users to interact with the application through dynamic routes. Finally, you’ll use the debugger to troubleshoot errors.
Prerequisites
-
A local Python 3 programming environment. Follow the tutorial for your distribution in How To Install and Set Up a Local Programming Environment for Python 3 series. In this tutorial we’ll call our project directory
flask_app. -
An understanding of basic Python 3 concepts, such as data types, lists, functions, and other such concepts. If you are not familiar with Python, check out our How To Code in Python 3 series.
-
An understanding of basic HTML concepts. You can review the How To Build a Website with HTML tutorial series for background knowledge.
Step 1 — Installing Flask
In this step, you’ll activate your Python environment and install Flask using the pip package installer.
First, activate your programming environment if you haven’t already:
- source env/bin/activate
Once you have activated your programming environment, install Flask using the pip install command:
- pip install flask
Once the installation is complete, you will see a list of installed packages in the last parts of the output, similar to the following:
Output...

Installing collected packages: Werkzeug, MarkupSafe, Jinja2, itsdangerous, click, flask
Successfully installed Jinja2-3.0.1 MarkupSafe-2.0.1 Werkzeug-2.0.1 click-8.0.1 flask-2.0.1 itsdangerous-2.0.1
This means that installing Flask also installed several other packages. These packages are dependencies Flask needs to perform different functions.
You’ve created the project folder, a virtual environment, and installed Flask. You can now move on to setting up a simple application.
Step 2 — Creating a Simple Application
Now that you have your programming environment set up, you’ll start using Flask. In this step, you’ll make a small Flask web application inside a Python file, in which you’ll write HTML code to display on the browser.
In your flask_app directory, open a file named app.py for editing, use nano or your favorite text editor:
- nano app.py
Write the following code inside the app.py file:
from flask import Flask

app = Flask(__name__)


@app.route('/')
def hello():
    return '<h1>Hello, World!</h1>'
Save and close the file.
In the above code block, you first import the Flask object from the flask package. You then use it to create your Flask application instance, giving it the name app. You pass the special variable __name__, which holds the name of the current Python module. This name tells the instance where it’s located; you need this because Flask sets up some paths behind the scenes.
Once you create the app instance, you can use it to handle incoming web requests and send responses to the user. @app.route is a decorator that turns a regular Python function into a Flask view function, which converts the function’s return value into an HTTP response to be displayed by an HTTP client, such as a web browser. You pass the value '/' to @app.route() to signify that this function will respond to web requests for the URL /, which is the main URL.
The hello() view function returns the string '<h1>Hello, World!</h1>' as an HTTP response.
You now have a simple Flask application in a Python file called app.py, in the next step, you will run the application to see the result of the hello() view function rendered in a web browser.
Step 3 — Running the Application
After creating the file that contains the Flask application, you’ll run it using the Flask command line interface to start the development server and render on the browser the HTML code you wrote as a return value for the hello() view function in the previous step.
First, while in your flask_app directory with your virtual environment activated, tell Flask where to find the application (app.py in your case) using the FLASK_APP environment variable with the following command (on Windows, use set instead of export):
- export FLASK_APP=app
Then specify that you want to run the application in development mode (so you can use the debugger to catch errors) with the FLASK_ENV environment variable:
- export FLASK_ENV=development
Lastly, run the application using the flask run command:
- flask run
Once the application is running, the output will be something like this:
Output * Serving Flask app "app" (lazy loading)
 * Environment: development
 * Debug mode: on
 * Running on http://127.0.0.1:5000/ (Press CTRL+C to quit)
 * Restarting with stat
 * Debugger is active!
 * Debugger PIN: 296-353-699
The preceding output has several pieces of information, such as:
- The name of the application you’re running (
"app"). - The environment in which the application is being run (
development). Debug mode: onsignifies that the Flask debugger is running. This is useful when developing because it provides detailed error messages when things go wrong, which makes troubleshooting easier.- The application is running locally on the URL
http://127.0.0.1:5000/.127.0.0.1is the IP that represents your machine’slocalhostand:5000is the port number.
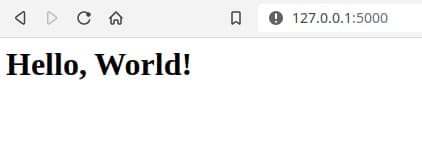
Open a browser and type in the URL http://127.0.0.1:5000/. You will see the text Hello, World! in an <h1> heading as a response. This confirms that your application is successfully running.
If you want to stop the development server, press CTRL+C.
Warning: Flask uses a simple web server to serve your application in a development environment, which also means that the Flask debugger is running to make catching errors easier. You should not use this development server in a production deployment. See the Deployment Options page on the Flask documentation for more information. You can also check out this Flask deployment tutorial with Gunicorn or this one with uWSGI or you can use DigitalOcean App Platform to deploy your Flask application by following the How To Deploy a Flask App Using Gunicorn to App Platform tutorial.
To continue developing the app.py application, leave the development server running and open another terminal window. Move into the flask_app directory, activate the virtual environment, set the environment variables FLASK_ENV and FLASK_APP, and continue to the next steps. (These commands are listed earlier in this step.)
Note: When opening a new terminal, or when you close the one you are running the development server on and want to rerun it, it is important to remember activating the virtual environment and setting the environment variables FLASK_ENV and FLASK_APP for the flask run command to work properly.
You only need to run the server once in one terminal window.
While a Flask application’s development server is already running, it is not possible to run another Flask application with the same flask run command. This is because flask run uses the port number 5000 by default, and once it is taken, it becomes unavailable to run another application on so you would receive an error similar to the following:
OutputOSError: [Errno 98] Address already in use
To solve this problem, either stop the server that’s currently running via CTRL+C, then run flask run again, or if you want to run both applications at the same time, you can pass a different port number to the -p argument, for example, to run another application on port 5001 use the following command:
- flask run -p 5001
With this you can have one application running on http://127.0.0.1:5000/ and another one on http://127.0.0.1:5001/ if you want to.
You now have a small Flask web application. You’ve run your application and displayed information on the web browser. Next, you’ll learn about routes and how to use them to serve multiple web pages.
Step 4 — Routes and View Functions
In this step, you’ll add a few routes to your application to display different pages depending on the requested URL. You’ll also learn about view functions and how to use them.
A route is a URL you can use to determine what the user receives when they visit your web application on their browser. For example, http://127.0.0.1:5000/ is the main route that might be used to display an index page. The URL http://127.0.0.1:5000/about may be another route used for an about page that gives the visitor some information about your web application. Similarly, you can create a route that allows users to sign in to your application at http://127.0.0.1:5000/login.
Your Flask application currently has one route that serves users who request the main URL (http://127.0.0.1:5000/). To demonstrate how to add a new web page to your application, you will edit your application file to add another route that provides information on your web application at http://127.0.0.1:5000/about.
First, open your app.py file for editing:
- nano app.py
Edit the file by adding the following highlighted code at the end of the file:
from flask import Flask

app = Flask(__name__)


@app.route('/')
def hello():
    return '<h1>Hello, World!</h1>'


@app.route('/about/')
def about():
    return '<h3>This is a Flask web application.</h3>'
Save and close the file.
You added a new function called about(). This function is decorated with the @app.route() decorator that transforms it into a view function that handles requests for the http://127.0.0.1:5000/about endpoint.
With the development server running, visit the following URL using your browser:
http://127.0.0.1:5000/about
You will see the text This is a Flask web application. rendered in an <h3> HTML heading.
You can also use multiple routes for one view function. For example, you can serve the index page at both / and /index/. To do this, open your app.py file for editing:
- nano app.py
Edit the file by adding another decorator to the hello() view function:
from flask import Flask

app = Flask(__name__)

@app.route('/')
@app.route('/index/')
def hello():
    return '<h1>Hello, World!</h1>'

@app.route('/about/')
def about():
    return '<h3>This is a Flask web application.</h3>'
Save and close the file.
After adding this new decorator, you can access the index page at both http://127.0.0.1:5000/ and http://127.0.0.1:5000/index.
You now understand what routes are, how to use them to make view functions, and how to add new routes to your application. Next, you’ll use dynamic routes to allow users to control the application’s response.
Step 5 — Dynamic Routes
In this step, you’ll use dynamic routes to allow users to interact with the application. You’ll make a route that capitalizes words passed through the URL, and a route that adds two numbers together and displays the result.
Normally, users don’t interact with a web application by manually editing the URL. Rather, the user interacts with elements on the page that lead to different URLs depending on the user’s input and action, but for the purposes of this tutorial, you will edit the URL to demonstrate how to make the application respond differently with different URLs.
First, open your app.py file for editing:
- nano app.py
If you allow the user to submit something to your web application, such as a value in the URL as you are going to do in the following edit, you should always keep in mind that your app should not directly display untrusted data (data the user submits). To display user data safely, use the escape() function that comes with the markupsafe package, which was installed along with Flask.
Edit app.py and add the following line to the top of the file, above the Flask import:
from markupsafe import escape
from flask import Flask

# ...
Then, add the following route to the end of the file:
# ...

@app.route('/capitalize/<word>/')
def capitalize(word):
    return '<h1>{}</h1>'.format(escape(word.capitalize()))
Save and close the file.
This new route has a variable section <word>. This tells Flask to take the value from the URL and pass it to the view function. The URL variable <word> passes a keyword argument to the capitalize() view function. The argument has the same name as the URL variable (word in this case). With this you can access the word passed through the URL and respond with a capitalized version of it using the capitalize() method in Python.
You use the escape() function you imported earlier to render the word string as text. This is important to avoid Cross Site Scripting (XSS) attacks. If the user submits malicious JavaScript instead of a word, escape() will it render as text and the browser will not run it, keeping your web application safe.
To display the capitalized word inside an <h1> HTML heading, you use the format() Python method, for more on this method, see How To Use String Formatters in Python 3
With the development server running, open your browser and visit the following URLs. You can replace the highlighted words with any word of your choice.
http://127.0.0.1:5000/capitalize/hello
http://127.0.0.1:5000/capitalize/flask
http://127.0.0.1:5000/capitalize/python
You can see the word in the URL capitalized in an <h1> tag on the page.
You can also use multiple variables in a route. To demonstrate this, you will add a route that adds two positive integer numbers together and displays the result.
Open your app.py file for editing:
- nano app.py
Add the following route to the end of the file:
# ...

@app.route('/add/<int:n1>/<int:n2>/')
def add(n1, n2):
    return '<h1>{}</h1>'.format(n1 + n2)
Save and close the file.
In this route, you use a special converter int with the URL variable (/add/<int:n1>/<int:n2>/) which only accepts positive integers. By default, URL variables are assumed to be strings and are treated as such.
With the development server running, open your browser and visit the following URL:
http://127.0.0.1:5000/add/5/5/
The result will be the sum of the two numbers (10 in this case).
You now have an understanding of how to use dynamic routes to display different responses in a single route depending on the requested URL. Next, you’ll learn how to troubleshoot and debug your Flask application in case of an error.
Step 6 — Debugging A Flask Application
When developing a web application, you will frequently run into situations where the application displays an error instead of the behavior you expect. You may misspell a variable or forget to define or import a function. To make fixing these problems easier, Flask provides a debugger when running the application in development mode. In this step, you will learn how to fix errors in your application using the Flask debugger.
To demonstrate how to handle errors, you will create a route that greets a user from a list of usernames.
Open your app.py file for editing:
- nano app.py
Add the following route to the end of the file:
# ...

@app.route('/users/<int:user_id>/')
def greet_user(user_id):
    users = ['Bob', 'Jane', 'Adam']
    return '<h2>Hi {}</h2>'.format(users[user_id])
Save and close the file.
In the route above, the greet_user() view function receives a user_id argument from the user_id URL variable. You use the int converter to accept positive integers. Inside the function, you have a Python list called users, which contains three strings representing usernames. The view function returns a string that is constructed depending on the provided user_id. If the user_id is 0, the response will be Hi Bob in an <h2> tag because Bob is the first item in the list (the value of users[0]).
With the development server running, open your browser and visit the following URLs:
http://127.0.0.1:5000/users/0
http://127.0.0.1:5000/users/1
http://127.0.0.1:5000/users/2
You will receive the following responses:
OutputHi Bob
Hi Jane
Hi Adam
This works well so far, but it can go wrong when you request a greeting for a user who doesn’t exist. To demonstrate how the Flask debugger works, visit the following URL:
http://127.0.0.1:5000/users/3
You’ll see a page that looks like this:
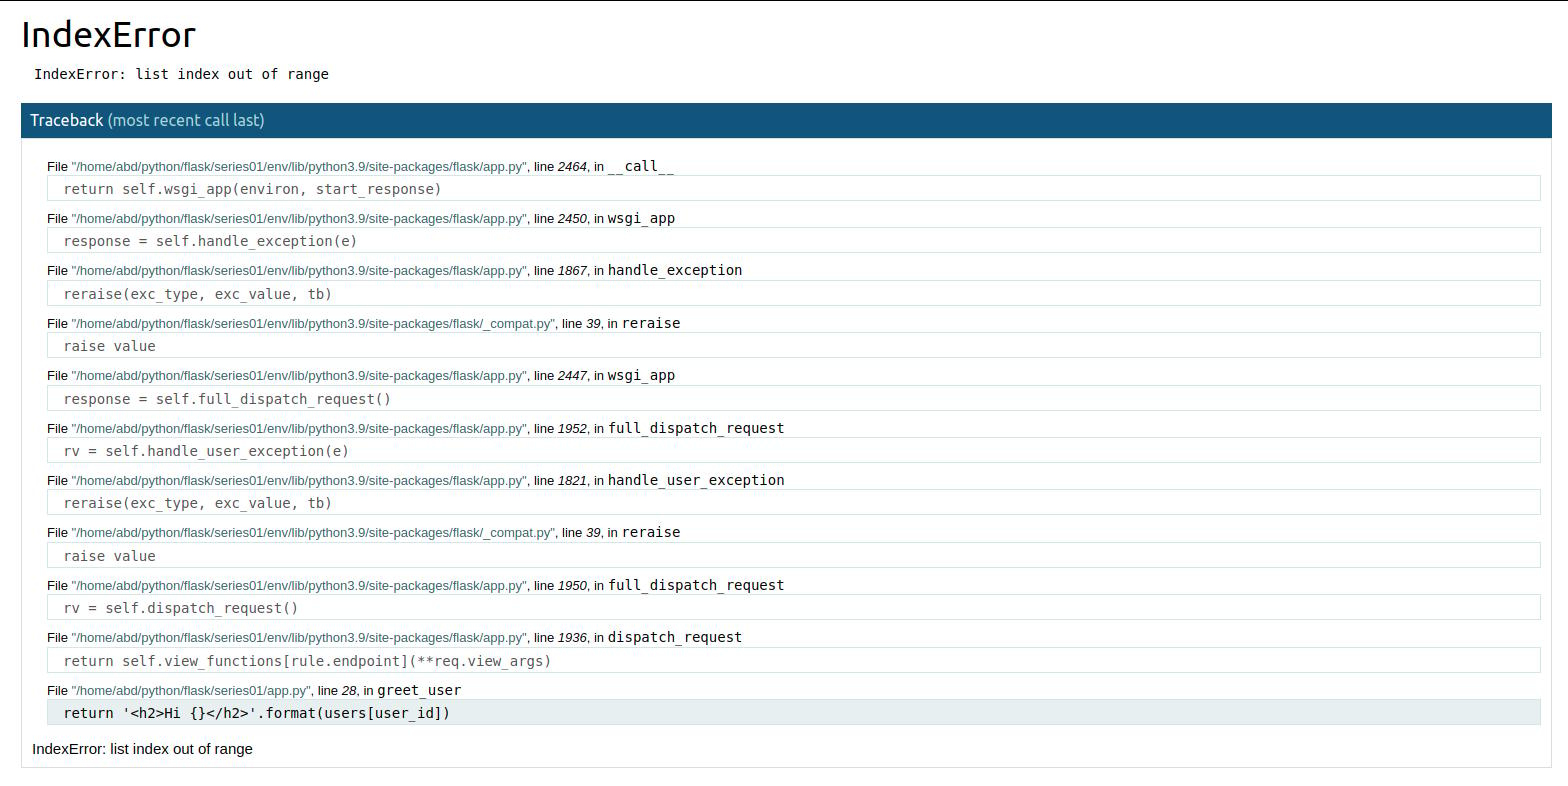
At the top, the page gives you the name of the Python exception, which is IndexError, indicating that the list index (3 in this case) is out of the list’s range (which is only from 0 to 2 because the list has only three items). In the debugger, you can see the traceback that tells you the lines of code that raised this exception.
The last two lines of the traceback usually give the source of the error. In your case the lines may be something like the following:
File "/home/USER/flask_app/app.py", line 28, in greet_user
    return '<h2>Hi {}</h2>'.format(users[user_id])
This tells you that the error originates from the greet_user() function inside the app.py file, specifically in the return line.
Knowing the original line that raises the exception will help you determine what went wrong in your code, and decide what to do to fix it.
In this case you can use a simple try...except clause to fix this error. If the requested URL has an index outside the list’s range, the user will receive a 404 Not Found error, which is an HTTP error that tells the user the page they are looking for does not exist.
Open your app.py file for editing:
- nano app.py
To respond with an HTTP 404 error, you will need Flask’s abort() function, which can be used to make HTTP error responses. Change the second line in the file to also import this function:
from markupsafe import escape
from flask import Flask, abort
Then edit the greet_user() view function to look as follows:
# ...

@app.route('/users/<int:user_id>/')
def greet_user(user_id):
    users = ['Bob', 'Jane', 'Adam']
    try:
        return '<h2>Hi {}</h2>'.format(users[user_id])
    except IndexError:
        abort(404)
You use try above to test the return expression for errors. If there was no error, meaning that user_id has a value that matches an index in the users list, the application will respond with the appropriate greeting. If the value of user_id is outside the list’s range, an IndexError exception will be raised, and you use except to catch the error and respond with an HTTP 404 error using the abort() Flask helper function.
Now, with the development server running, visit the URL again:
http://127.0.0.1:5000/users/3
This time you’ll see a standard 404 error page informing the user that the page does not exist.
By the end of this tutorial, your app.py file will look like this:
from markupsafe import escape
from flask import Flask, abort

app = Flask(__name__)


@app.route('/')
@app.route('/index/')
def hello():
    return '<h1>Hello, World!</h1>'


@app.route('/about/')
def about():
    return '<h3>This is a Flask web application.</h3>'

@app.route('/capitalize/<word>/')
def capitalize(word):
    return '<h1>{}</h1>'.format(escape(word.capitalize()))

@app.route('/add/<int:n1>/<int:n2>/')
def add(n1, n2):
    return '<h1>{}</h1>'.format(n1 + n2)

@app.route('/users/<int:user_id>/')
def greet_user(user_id):
    users = ['Bob', 'Jane', 'Adam']
    try:
        return '<h2>Hi {}</h2>'.format(users[user_id])
    except IndexError:
        abort(404)
You now have a general idea of how to use the Flask debugger to troubleshoot your errors and help you determine the appropriate course of action to fix them.
Conclusion
You now have a general understanding of what Flask is, how to install it, and how to use it to write a web application, how to run the development server, and how to use routes and view functions to display different web pages that serve specific purposes. You’ve also learned how to use dynamic routes to allow users to interact with your web application via the URL, and how to use the debugger to troubleshoot errors.
If you would like to read more about Flask, check out the Flask topic page.
Thanks for learning with the DigitalOcean Community. Check out our offerings for compute, storage, networking, and managed databases.
Tutorial Series: How To Build Web Applications with Flask

Flask is a lightweight Python web framework that provides useful tools and features for creating web applications in the Python Language. It gives developers flexibility and is an accessible framework for new developers because you can build a web application quickly using only a single Python file. Flask is also extensible and doesn’t force a particular directory structure or require complicated boilerplate code before getting started. Learning Flask will allow you to quickly create web applications in Python. You can take advantage of Python libraries to add advanced features to your web application, like storing your data in a database, or validating web forms.
Browse Series: 13 tutorials
About the author
Web developer. I mostly use Python & JavaScript. I like Flask and I am currently learning React. You can say hi on Twitter :)
Still looking for an answer?
This textbox defaults to using Markdown to format your answer.
You can type !ref in this text area to quickly search our full set of tutorials, documentation & marketplace offerings and insert the link!
 This work is licensed under a Creative Commons Attribution-NonCommercial- ShareAlike 4.0 International License.
Become a contributor for community
Get paid to write technical tutorials and select a tech-focused charity to receive a matching donation.

DigitalOcean Documentation
Full documentation for every DigitalOcean product.

Resources for startups and AI-native businesses
The Wave has everything you need to know about building a business, from raising funding to marketing your product.
The developer cloud
Scale up as you grow — whether you're running one virtual machine or ten thousand.

Start building today
From GPU-powered inference and Kubernetes to managed databases and storage, get everything you need to build, scale, and deploy intelligent applications.
