By Romke van der Meulen and Hazel Virdó

Introduction
Shipyard is a management tool for Docker servers. Docker is a cutting-edge piece of software used for containerization. Shipyard allows you to see which containers each of your servers are running, in order to start or stop existing containers or create new ones.
Once you’ve set up Shipyard on your server you can access it using a graphic interface, a command-line interface, or an API. Shipyard lacks some of the advanced features of other Docker orchestration tools, but it’s very simple to set up, free to use, and you can manage and host it yourself.
This tutorial covers how to install Shipyard, connect it to your Docker servers, and use it to create and launch new containers. By the end, you should have Shipyard running on your server to manage your Docker hosts.
Prerequisites
To follow this tutorial, you will need:
- One Ubuntu 14.04 Droplet with the Docker 1.5.0 image.
You can find the Docker 1.5.0 image option on the Droplet creation page, in the Applications tab under Select Image. You can also install Docker on an existing Droplet by following this tutorial.
Note: the docker.io package from the standard repository for Ubuntu 14.04 is very old (version 0.9.1). To use Shipyard, you will need to install the most recent version of Docker using one of the methods listed above.
Step 1 — Installing Shipyard
In this step, we will install Shipyard. The commands in this tutorial will all require root privileges, so it will be easiest to simply log in to your Droplet as the root user. If you’re logged in as a non-root user, you can run sudo su to switch to the root user.
Once you have Docker running, it is quite easy to install Shipyard because it ships as Docker images. All you need to do is pull the images from the Docker registry and run the necessary containers. First we will create a data volume container to hold Shipyard’s database data. This container won’t do anything by itself; it is a convenient label for the location of all of Shipyard’s data.
docker create --name shipyard-rethinkdb-data shipyard/rethinkdb
Now that the data volume container is created, we can launch the database server for Shipyard and link them together.
docker run -it -d --name shipyard-rethinkdb --restart=always --volumes-from shipyard-rethinkdb-data -p 127.0.0.1:49153:8080 -p 127.0.0.1:49154:28015 -p 127.0.0.1:29015:29015 shipyard/rethinkdb
This launches a container running RethinkDB, a distributed database, and makes sure it can only be accessed locally on the server itself. If you try to visit http://your_server_ip:49153 in your browser, you shouldn’t see anything.
Now that Shipyard’s database is up, we can run Shipyard itself by launching another container and linking it to the database.
docker run -it -p 8080:8080 -d --restart=always --name shipyard --link shipyard-rethinkdb:rethinkdb shipyard/shipyard
We can now access our running Shipyard instance using port 8080.
Step 2 — Accessing Shipyard
Now that Shipyard is running, we need to access it. Shipyard can be accessed via the GUI, command-line interface (CLI), or API. We’ll start by accessing the CLI.
Accessing Shipyard Using the CLI
We can get access to the Shipyard CLI by running another container.
docker run -ti --rm shipyard/shipyard-cli
The -ti flag makes sure the container is interactive, and the --rm flag makes this a disposable container, which means it will be automatically removed once we’re done with it.
You should now see the Shipyard CLI prompt, which looks like this: shipyard cli>. To get a list of available commands you can enter shipyard help.
This command prompt hasn’t been connected yet to the Shipyard instance that we set up in step 1, so let’s connect it first:
shipyard login
It will prompt you for a URL. Enter http://your_server_ip:8080. Next, you’ll be prompted for a username and password. The username and password are set by default; enter admin for the username, and shipyard for the password. You’ll then be returned to the Shipyard prompt.
Now you’re logged in to your Shipyard instance as admin. Leaving the default password in place is a huge security risk, so let’s change it.
shipyard change-password
You’ll need to choose and confirm your new password. Make sure your new password is secure and that you’ll be able to remember it. You can now press CTRL+D to exit the Shipyard CLI.
Because the Shipyard command line has to be connected to your Shipyard instance each time, you can run the Shipyard command line on any system capable of running Docker containers and connect it to the Shipyard instance running on your server.
Accessing Shipyard Using the GUI
Next, we’ll take a look at Shipyard’s graphic interface. To access it, open http://your_server_ip:8080 in your browser. This should show you the login screen. Use the username admin and the new password you’ve chosen.
Once you’re logged in, Shipyard will display the Engines tab and warn you that there are no engines in your Shipyard cluster yet. An engine is a Docker host capable of running containers. Here we will add each Docker server that you want to manage with Shipyard.
Step 3 — Adding an Engine
The Droplet that we’ve just deployed Shipyard on is also a Docker host, so we’ll be able to manage it with Shipyard. Before we can do that; however, we’ll need to add the server to Shipyard as an engine.
By default, Docker is configured to listen on Unix socket /var/run/docker.sock, but that socket can’t be accessed from our Shipyard instance. We’ll need to configure Docker to also listen to requests on a port. To do this, edit the Docker configuration file using your favorite text editor. (Here, we use nano.)
nano /etc/default/docker
At the end, add this line:
DOCKER_OPTS="-H tcp://your_server_ip:4243 -H unix:///var/run/docker.sock"
This will ensure that Docker accepts connections on port 4243, but only from your server itself. Now restart Docker to load the new configuration:
service docker restart
This will also restart your Shipyard containers. Since we ran the containers with --restart=always they should come back up automatically. You can verify this by running:
docker ps
If for some reason the Shipyard containers didn’t restart, you can restart them manually by running docker start shipyard-rethinkdb shipyard.
Now that your Docker host is properly configured, we can add it to Shipyard as an engine. Access your Shipyard GUI and go to the Engines tab. Click on the + Add button. It will look like this:
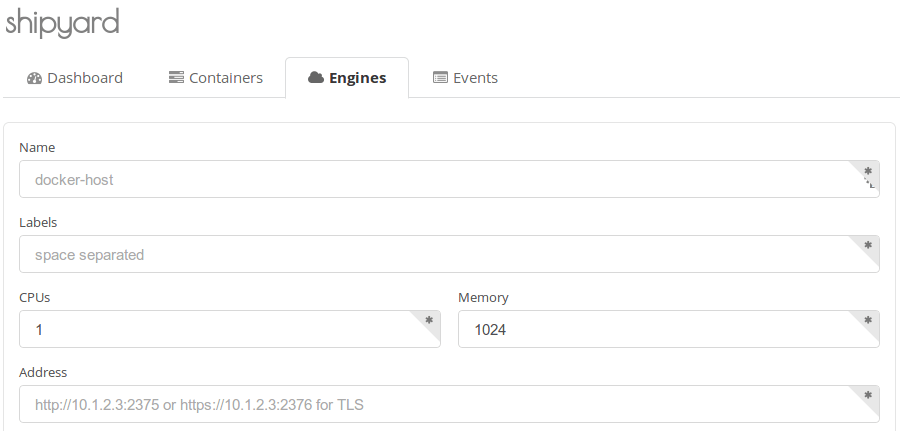
Add the following fields.
- Name: Use a name that will allow you to recognize the engine as your current Droplet, like your Droplet’s hostname.
- Labels: The labels you add to your engine will allow you to control which containers are allowed to run on it. Depending on what you want to use this Droplet for, you can use labels like production or test.
- Address: Use the Docker port we just opened:
http://your_server_ip:4243
Now click the Add button at the bottom. Shipyard will now connect to your Docker host, verify the connection, and add it as an engine. Once this is done, you’ll be directed back to the Engines tab. The engine will be listed as offline at first. Wait a second or two and refresh the page, and you should now be able to see the details of your Docker host.
Step 4 — Deploying Containers Using Shipyard
Now that we’ve added our Docker host to Shipyard as an engine, we can use Shipyard to start, stop and deploy containers.
Access the Shipyard GUI and take a look at the Containers tab. This lists all containers running on every Docker host you’ve added to Shipyard. If you’ve done nothing else, this tab should show at least three containers, of which two are running:

Let’s try deploying a new Wordpress blog. Using the official Docker repo images, we’ll need to deploy a MySQL and Wordpress container.
Click the + Deploy button. The next screen will allow us to configure the container to deploy. Enter the information in the fields specified below.

- Image: Enter
mariadb. (MariaDB is an open-source fork of MySQL.) - Container Name: You can use whatever you like, e.g.
mysql-test. - Environment: The image description will tell you which environment variables you can use. In this case, use
MYSQL_ROOT_PASSWORD=6f23b328e7.
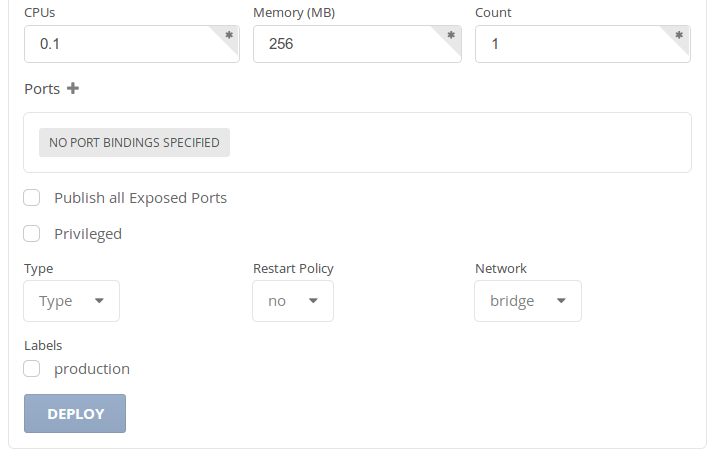
- Type: This determines how the container should be deployed across multiple engines. In this case, use
service. - Labels: This will be used to match containers to engines. Just check one of the labels you’ve assigned to your engine.
- Restart Policy: This determines whether the container should be automatically restarted after an error or a Docker reboot. In this case, leave it on
no.
Now click on Deploy. It will take a while for the container to launch. You should be redirected back to the container list, which should now have a container named mysql-test (or whichever name you used) in it.
You’ve just deployed your first Docker container using Shipyard!
Now we’re going to use the same process to deploy a WordPress container, linked to our MySQL container. Click the + Deploy button again and fill in the following:
- Image:
wordpress - Name:
wordpress-test - Links:
mysql-test:mysql - Type:
service - Labels: Check any of the ones you’ve used for your engine.
- Restart Policy: Leave this on
no.
There’s one more thing to do: we want to be able to reach this WordPress container’s web content from anywhere, so we have to expose its port 80. To do this, click on the plus sign next to the heading Port.
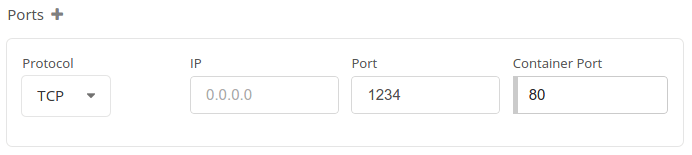
Choose TCP under Protocol, leave IP blank, enter 1234 as Port and 80 as Container Port.
Now you can click Deploy. Once again it will take a while before you’ll be redirected back to the container list. The list should now also show a container named wordpress-test. Click the link next to it to see more details.
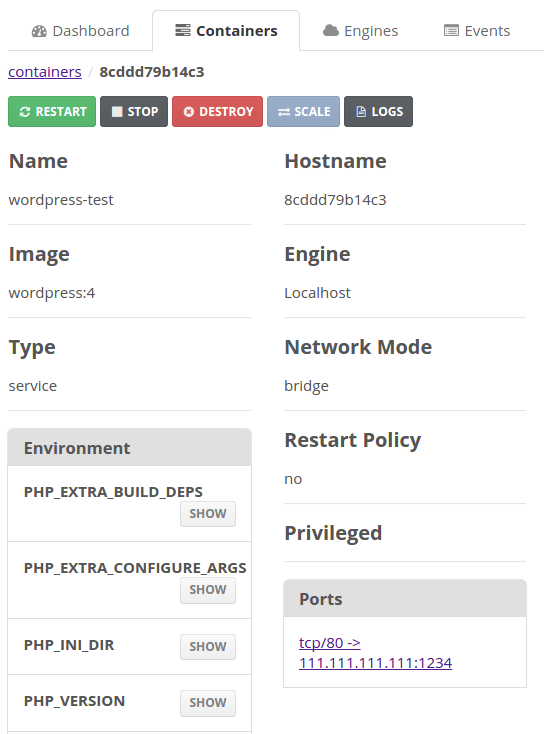
Under Ports, you’ll see that the WordPress container’s port 80 is now published to your server’s port 1234. Shipyard is helpful in directly making this listing a clickable link which you can use to go to the published address.
Click this link. This will bring you to the WordPress installation wizard. Once you fill out the fields on that page, you’ll be able to log in to your brand new WordPress blog and also see it as a website.
Conclusion
You’ve now succesfully used Shipyard to deploy an actual application on your Docker host!
You have Shipyard up and running on your server. You should also be able to configure additional servers with Docker and connect them to your Shipyard instance for management. You’ve also learned how to connect to your Shipyard instance using the CLI and the GUI, and learned how to deploy new containers on your Docker host using the GUI.
Now you’re free to try out any of the thousands of web applications available on the Docker Registry. For instance, you can deploy an Nginx container to host your new WordPress blog on a more readable URL as described in this tutorial.
Thanks for learning with the DigitalOcean Community. Check out our offerings for compute, storage, networking, and managed databases.
About the author(s)
A Dutch student of Man and Machine, Science and Faith, Philosophy and Life.
former DO tech editor publishing articles here with the community, then founded the DO product docs team (https://do.co/docs). to all of my authors: you are incredible. working with you was a gift. love is what makes us great.
Still looking for an answer?
This textbox defaults to using Markdown to format your answer.
You can type !ref in this text area to quickly search our full set of tutorials, documentation & marketplace offerings and insert the link!
I was able to get all of this up and running - great tutorial!
However, I’m having an issue logging in via the GUI. I’ve changed my password a couple of times to test. Everything is fine from the command line, but the GUI just reloads and leaves me stuck at the login page. No error.
I’ve opened an issue on Github but was wondering if you had run across this issue at all?
This tutorial is awesome. I just needed 15 minutes to setup all of it. It helped me and i learned a lot about a new docker organize feature.
But i have one question: Imagine i have 2 wordpress blogs:
wordpress1 192.178.0.1:5000 wordpress2 192.178.0.1:5001
Furthermore i have an dns mapping like:
myblog.com 192.178.0.1
How can i serve wordpress1 and wordpress2 without setting the ports in the url?
Thank you very much.
“The username and password are set by default; enter admin for the username, and shipyard for the password.” Are you shure about this login/password. Becouse I can’t login . Output: shipyard cli> shipyard login URL: http://192.168.0.71:8080 Username: admin Password: FATA[0019] invalid username/password
Thanks for great article!
P/S, For anyone has these issues:
Error sending to shipyard: connection refused.
or
Can't connect to 192.168.59.103:2375 (connect: No route to host).
You need to enable port 2375 (or 4243 as this article) for binding Docker. Start Docker with this:
docker -d -H tcp://0.0.0.0:2375 -H unix:///var/run/docker.sock
Hello, I got error at step using shipyard login. After input URL, username and password, it said FATA [0019] Post https//my-server-ip:8080/auth/login: dial tcp connection refused Someone please tell me what to do next.
 This work is licensed under a Creative Commons Attribution-NonCommercial- ShareAlike 4.0 International License.
Become a contributor for community
Get paid to write technical tutorials and select a tech-focused charity to receive a matching donation.

DigitalOcean Documentation
Full documentation for every DigitalOcean product.

Resources for startups and AI-native businesses
The Wave has everything you need to know about building a business, from raising funding to marketing your product.
The developer cloud
Scale up as you grow — whether you're running one virtual machine or ten thousand.

Start building today
From GPU-powered inference and Kubernetes to managed databases and storage, get everything you need to build, scale, and deploy intelligent applications.
