By Alex Garnett
Senior DevOps Technical Writer

Introduction
There are many common errors you may encounter when configuring your domain name or HTTPS support. DNS, the Domain Name System, can be challenging to troubleshoot, and it’s hard to conclusively attribute errors to DNS when they could be caused by a different part of your stack.
An infamous “sysadmin’s haiku” goes like this:
It's not DNS
There's no way it's DNS
It was DNS
The most common time to encounter DNS problems is when trying to configure SSL/HTTPS support for your servers. For example, when using Let’s Encrypt. This tutorial will review some common errors you may encounter when dealing with DNS, HTTPS, or Let’s Encrypt specifically. These recommendations will apply whether you are using DigitalOcean DNS or another provider.
DNS Records
DNS is the system that assigns and directs traffic to web servers using domain names like your_domain.com rather than requiring the use of IP addresses everywhere. All domain registrars (including DigitalOcean) will provide their own interface for managing DNS records, though they use similar syntax and rules across the board.
For a complete overview of DNS record types, refer to An Introduction to DNS Terminology, Components, and Concepts.
The most common DNS record is an A record, which is a primary link from a domain name to a server address. For this tutorial, and for assigning canonical domain names to server IP addresses, you will mostly be concerned with A records.
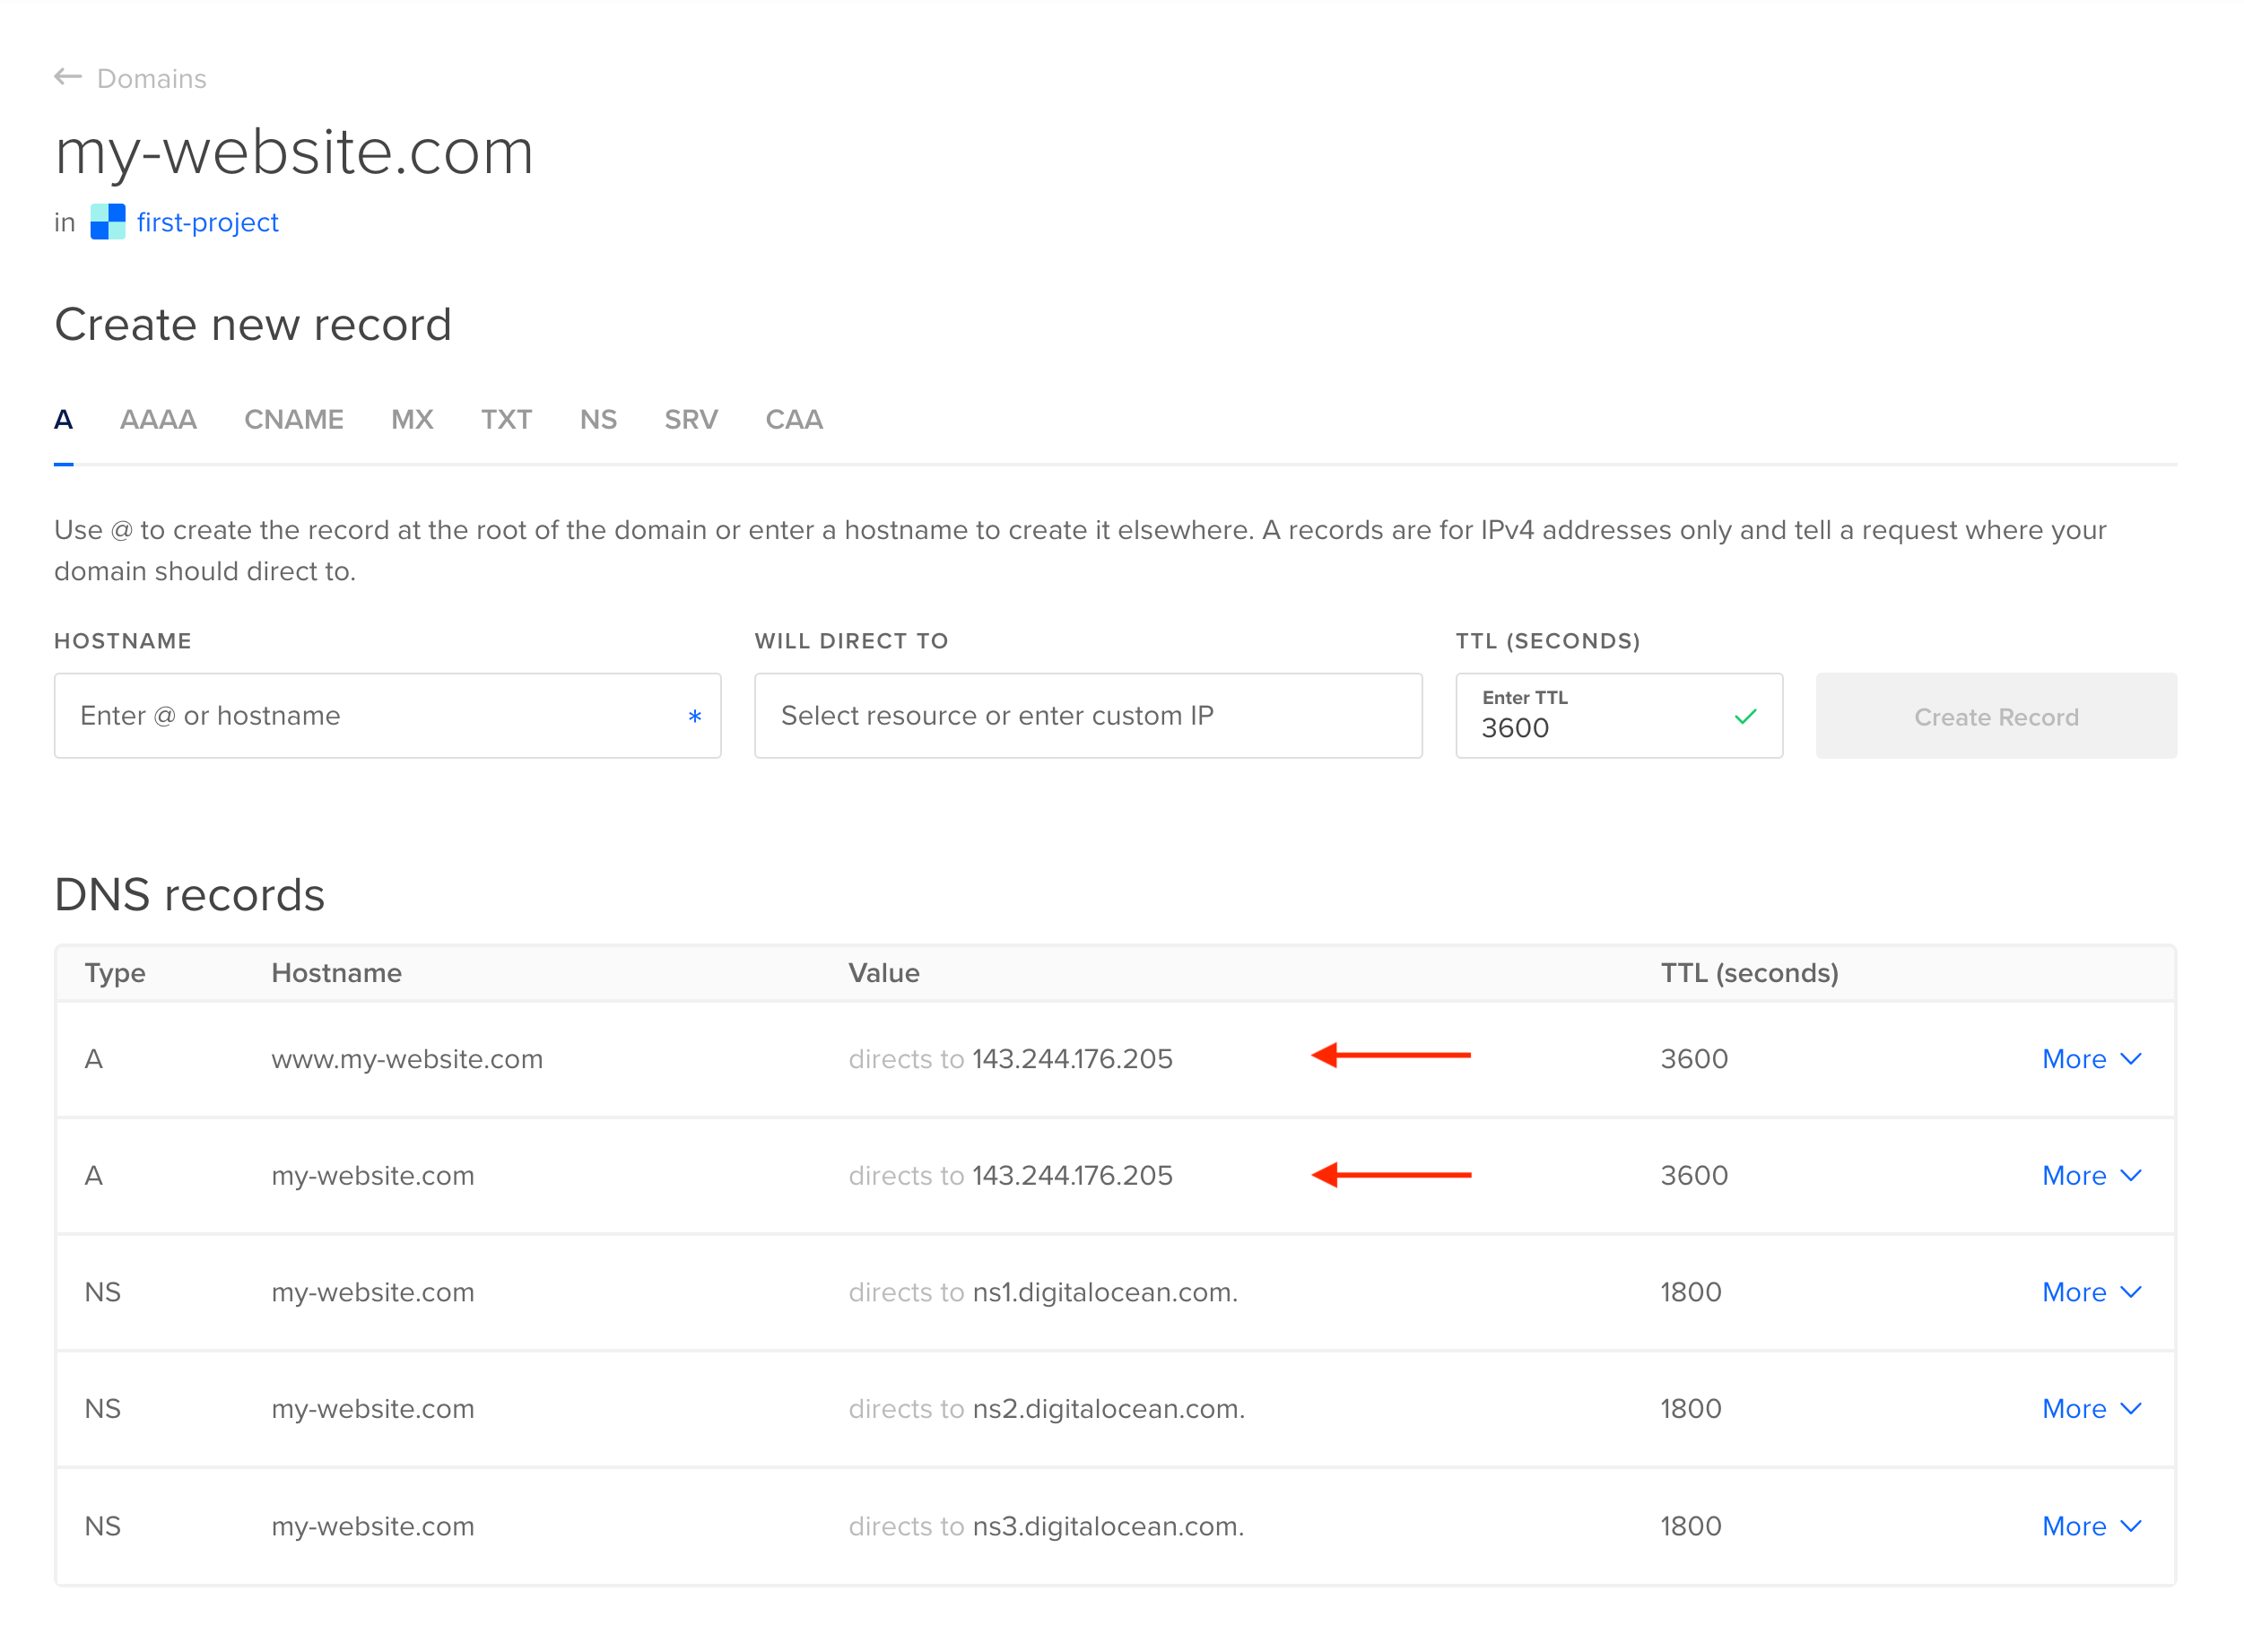
If you are using DigitalOcean’s DNS, a configured A record looks like this:
Updating or Migrating DNS Records
Making updates to your DNS can take a little while to take effect. Usually, it should take less than half an hour, but because you can’t test DNS immediately after making changes, errors can be misleading. You will not be able to configure LetsEncrypt for your domain until after DNS changes have propagated to most or all global name servers.
You can also use a website like whatsmydns.net to test whether a DNS change has propagated to most or all of the global name servers used for DNS lookups. If DNS isn’t resolving for you locally, you can verify whether it should be working for most locations. Your ISP may be slower to make updates than some of these servers, but it should only be a few minutes in most cases.
If you are testing within a short window when your DNS changes have propagated to some servers but not others, it’s possible that you could receive different results from your remote server and from your local web browser, which is even more confusing. This can happen if your remote server or droplet’s DNS updates before your ISP’s does. To rule out these errors, you can also use the nslookup command to test which IP address a particular domain name is resolving to:
- nslookup digitalocean.com
Output…
Name:    digitalocean.com
Addresses:  2606:4700::6810:b50f
          2606:4700::6810:b60f
          104.16.181.15
          104.16.182.15
This way, you can confirm whether your local results match the global DNS resolvers.
Configuring your DNS with a longer TTL, or Time-To-Live value, will also make it take longer to update. The default TTL value configured by most domain name registrars is 3600 seconds, or 1 hour. This will typically be listed right next to your A record. A longer TTL value helps cache requests more efficiently, but can make DNS changes take longer to propagate. You may want to set your TTL temporarily lower if you are planning to make or test DNS changes.
Browser Errors and HTTPS Configuration Problems
Sometimes, you may think that you’ve configured HTTPS and your DNS properly, but you or your users will still receive errors in their browser when trying to use your website.
For a general guide to HTTP error codes, see How To Troubleshoot Common HTTP Error Codes. Most of these will not directly indicate HTTPS errors, but they can still result from improper configurations. For example, if you are using an Nginx Reverse Proxy to provide an HTTPS gateway to another application running on your server, and the gateway is misconfigured, you might receive a 502 error.
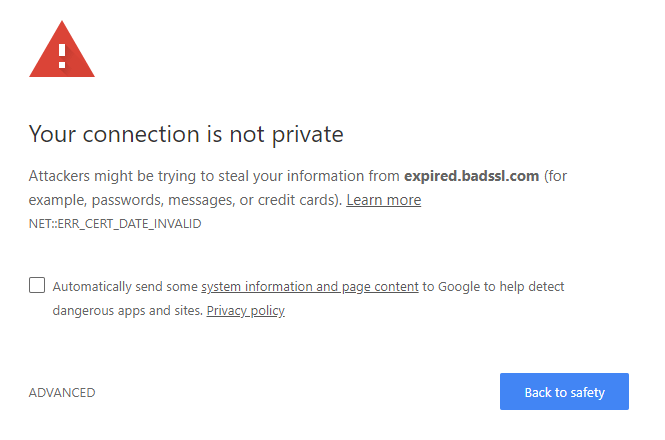
Another error you may encounter is an expired certificate. Unlike commercial HTTPS certificates, LetsEncrypt certificates are only valid for 3 months, and failing to renew a certificate before its expiry date will cause an error for anyone trying to access your website.
Usually, this will produce an ERR_CERT_DATE_INVALID error. In Chrome, that may look like this:
When you initially configure LetsEncrypt, it should set up a background process to automatically renew your certificate. LetsEncrypt will also typically send you an email when your certificate is about to expire.
However, if this process is misconfigured, or fails to trigger, you can always renew your certificates manually by re-running certbot with the renew argument:
- sudo certbot renew --nginx -d example.com -d www.example.com
You may need to restart your web server after renewing your certificates. If you have not made any other changes to your web server’s configuration, you can safely automate this (for example, by adding it to a scheduled cron), by running systemctl restart nginx after your certificate is renewed.
Mixed Content
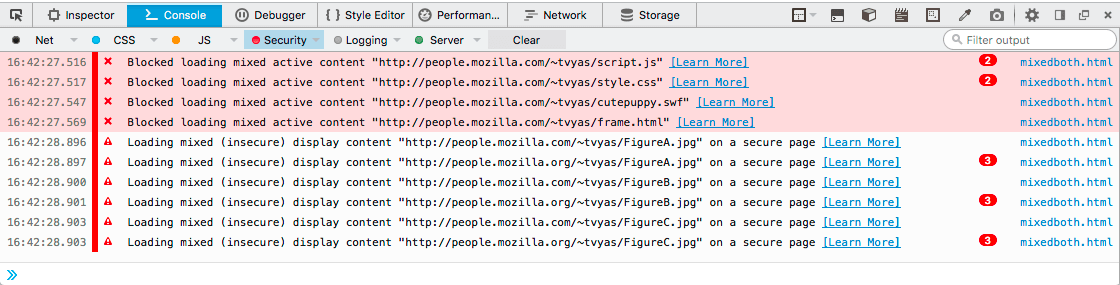
If you are migrating a complex stack from HTTP to HTTPS, you may notice some images or other site assets failing to display. If you open the browser’s developer console, you will find these errors being attributed to “mixed content”:
This is due to a default web policy that HTTP content should not be included on websites being served over HTTPS. This can happen when one site loads content from two different web servers, or when a web application is being served from behind an Nginx gateway but SSL forwarding is not working properly.
If you are using Nginx, and you are forwarding traffic to another application running behind your web server and encountering mixed content warnings, you can try adding some additional SSL forwarding configuration to a location block:
…
    location / {
        proxy_set_header X-Forwarded-For $proxy_add_x_forwarded_for;
        proxy_set_header X-Real-IP $remote_addr;
        proxy_set_header X-Forwarded-Host $host;
        proxy_set_header X-Forwarded-Proto https;
    }
Beyond that, make sure that every site that you are serving is configured with HTTPS. You can also refer to the MDN documentation on Mixed Content Errors.
Errors Running LetsEncrypt’s Certbot Script
You may also encounter errors running Let’sEncrypt’s certbot script itself. Sometimes these errors will have descriptive output that you can follow directly. Others may be less clear. If the script is “timing out”, it is most likely a firewall problem, and will say that:
- certbot --nginx -d example.com -d www.example.com
OutputPress Enter to Continue
Waiting for verification…
Cleaning up challenges
Failed authorization procedure. example.com (http-01): urn:ietf:params:acme:error:connection :: The server could not connect to the client to verify the domain :: Fetching http://example.com/.well-known/acme-challenge/EWbLNaAWwRZGM1UCqSvbIIxFFaoH09wPUEwVuYucCb0: 93 Timeout during connect (likely firewall problem)
Usually, a timeout is caused by a connection that cannot get a response at all, but is getting no confirmation of this, because a firewall is deliberately dropping all traffic. Verify that your firewall is not blocking port 80 or 443 before attempting to run certbot. Some documentation will suggest that you only need one of port 80 or 443 open, but to rule out any errors, you should try opening both. If you are using UFW with Nginx, you can do this by enabling the Nginx Full configuration:
- sudo ufw allow 'Nginx Full'
Try re-running certbot after changing your firewall settings. If you re-ran certbot several times in quick succession to try to rule out an error, you may receive a “failed validation limit” message like this:
Outputtoo many failed authorizations recently: see https://letsencrypt.org/docs/failed-validation-limit/
You will be required to wait up to an hour until your account is no longer rate-limited in this case. For more information on validation limits and other certbot errors, refer to the Certbot documentation.
If you receive any other certbot errors that do not involve DNS, timeouts, or connection problems, they are probably issues with the Python environment on your server that was configured by certbot to run in the first place.
These can almost always be resolved by removing certbot and reinstalling from scratch. To do this, follow Step 1 of How To Secure Nginx with Let’s Encrypt on Ubuntu 22.04. This will not affect your existing HTTPS configuration, only the tools that are used to maintain and renew it.
HTTPS Not Working with No Visible Errors
If you have verified that Certbot and your DNS are both working correctly, but your site has seemingly not switched from using HTTP to using HTTPS, it is usually an issue with your web server configuration. Certbot tries to automatically update your web server configuration files when first run. This is why you would normally specify nginx in a Certbot command, so that it knows what kind of web server configuration to update after retrieving a certificate. However, if your existing web server configuration is very complex, Certbot may fail to update it to reflect HTTPS, and you will need to make your own changes.
First, make sure you have included server_name block in your web server configuration file as in Step 2 of How To Secure Nginx with Let’s Encrypt on Ubuntu 20.04. Without this, certbot won’t know which configuration file to update. If you still have trouble after that, you may need to run certbot in Standalone mode to retrieve a certificate only, and then manually configure your web server to use HTTPS afterward.
A baseline Nginx HTTPS configuration will include listen 443 ssl and the path to an SSL certificate and key, like so:
…
    listen 443 ssl;
    # RSA certificate
    ssl_certificate /etc/letsencrypt/live/your_domain/fullchain.pem;
    ssl_certificate_key /etc/letsencrypt/live/your_domain/privkey.pem;

    # Redirect non-https traffic to https
    if ($scheme != "https") {
        return 301 https://$host$request_uri;
    }
…
If you are configuring Nginx, remember that you can verify any changes to your Nginx configuration by running nginx -t to validate them before restarting the web server. When you are finished making changes, you can restart Nginx with the new configuration by running systemctl restart nginx.
- sudo systemctl restart nginx
Conclusion
The goal of LetsEncrypt is to provide HTTPS to everyone, everywhere, at no cost to them. When this works automatically, it is very useful, but when it doesn’t, it can be confusing, especially if you have limited experience configuring SSL or DNS. In this tutorial, you reviewed several common error scenarios for LetsEncrypt, as well as troubleshooting steps.
Next, you can read more about SSL Certificate Authorities.
Thanks for learning with the DigitalOcean Community. Check out our offerings for compute, storage, networking, and managed databases.
About the author
Former Senior DevOps Technical Writer at DigitalOcean. Expertise in topics including Ubuntu 22.04, Linux, Rocky Linux, Debian 11, and more.
Still looking for an answer?
This textbox defaults to using Markdown to format your answer.
You can type !ref in this text area to quickly search our full set of tutorials, documentation & marketplace offerings and insert the link!
 This work is licensed under a Creative Commons Attribution-NonCommercial- ShareAlike 4.0 International License.
Become a contributor for community
Get paid to write technical tutorials and select a tech-focused charity to receive a matching donation.

DigitalOcean Documentation
Full documentation for every DigitalOcean product.

Resources for startups and AI-native businesses
The Wave has everything you need to know about building a business, from raising funding to marketing your product.
The developer cloud
Scale up as you grow — whether you're running one virtual machine or ten thousand.

Start building today
From GPU-powered inference and Kubernetes to managed databases and storage, get everything you need to build, scale, and deploy intelligent applications.
