By rkoli and Caitlin Postal

The author selected the Free and Open Source Fund to receive a donation as part of the Write for DOnations program.
Introduction
Unique identifiers (UIDs), or identifiers, can be a string value or an integer, and API developers often use them to address unique resources in an API. API consumers then use these identifiers to fetch a single resource from a collection of resources. Without a unique identifier, separating the resources and calling them as required is almost impossible. Identifiers can refer to database structural elements, like the names of tables, fields (columns) in a table, or constraints, and can be further specified to a unique item in the database. For example, in a database related to a hotel booking portal, Hotel(id) might point to an identifier that refers to a unique hotel. With Hotel(id=1234, name="Hyatt"), you would be able to identify this specific hotel by the ID 1234 or the name "Hyatt".
In API Design Patterns, John J. Geewax identifies seven fundamental characteristics to a good identifier. These characteristics are important to consider when generating a unique ID:
- Easy to use: an identifier should avoid reserved characters like the forward slash (
/) as these characters perform specific meaning in URLs. - Unique: an identifier should be able to refer to a single resource in an API.
- Fast to generate: the ID generation process should perform in a predictable manner for consistency when scaling.
- Unpredictable: when an identifier is unpredictable, it provides security benefits for vulnerability management.
- Readable: an identifier should be human-readable, which is achieved by avoiding the digit
1, lowercaseL, uppercaseI, or the pipe character (|) as these characters may create confusion if someone needs to check the ID manually. - Verifiable: a checksum character can be used to verify the ID during an integrity check.
- Permanent: once assigned, the identifiers should not change.
Note: Changing the identifier can create unexpected confusion. If you have an identifier that specifies Hotel(id=1234, name="Hyatt") and that later changes to Hotel(id=5678, name="Hyatt"), the prior ID might be available for reuse. If the prior identifier is available and a new hotel is created as Hotel(id=1234, name="Grand Villa"), this new hotel reuses the original identifier (1234). Then, when you ask for hotel 1234, you may receive different results than expected.
In this tutorial, you will generate a unique custom resource identifier fulfilling these characteristics and an associated checksum using Node.JS. A checksum is a hash of a digital fingerprint of a file or digital data obtained using a hash function on the digital object. This tutorial’s checksum will be a single alphanumeric character derived by an algorithmic process of encoding (or hashing) on the size of bytes corresponding to your resource.
Prerequisites
Before you begin this tutorial, you’ll need the following:
- Node.js installed on your machine, which you can set up by following How To Install Node.js. This tutorial has been tested with Node.JS version 16.16.0.
- Familiarity with Node.js. Learn more in the How To Code in Node.js series.
- Familiarity with APIs. For a comprehensive tutorial on working with APIs, you can review How to Use Web APIs in Python3. Though written for Python, the article will help you understand the core concepts for working with APIs.
- A text editor that supports JavaScript syntax highlighting, such as Atom, Visual Studio Code, or Sublime Text. This tutorial uses the command line editor
nano.
Step 1 — Generating an Encoded ID
In this step, you will write a function to generate an identifier from random bytes into a unique alphanumeric string. Your identifier will be encoded using base32 encoding, but it will not have a checksum affiliated until later in the tutorial. The encoding process will create a unique identifier of a specified length based on the number of bytes you choose, building an ID that incorporates some of the characteristics of a good ID.
Start by making a new folder for this project, then move into that folder:
- mkdir checksum
- cd checksum
The project folder will be called checksum for this tutorial.
Create and open a package.json file in your project folder (using your favorite editor):
- nano package.json
Then add the following lines of code:
{
  "name": "checksum",
  "version": "1.0.0",
  "main": "index.js",
  "type": "module"
}
In this file, you define the project name as checksum, and you consider the code version "1.0.0". You define the main JavaScript file as index.js. When you have "type": "module" in the package.json file, your source code should use import syntax. In this file, you use the JSON data format, which you can learn more about in How to Work with JSON in JavaScript.
Save and close the file.
You’ll use a few Node.js modules to generate the ID: crypto and base32-encode, with its corresponding decoder base32-decode. The crypto module is packaged with Node.JS, but you will need to install base32-encode and base32-decode for use later in this tutorial. Encoding is putting a sequence of characters (letters, numbers, punctuation, and certain symbols) into a specialized format for efficient transmission or storage. Decoding is the opposite process: converting an encoded format back into the original sequence of characters. Base32 encoding uses a 32-character set, which makes it a textual 32-symbol notation for expressing numbers.
In a terminal session, install these module packages in the project folder with the following command:
- npm i base32-encode base32-decode
You will receive an output that indicates these modules have been added:
Outputadded 3 packages, and audited 5 packages in 2s

found 0 vulnerabilities
If you encounter issues during installation, you can refer to How To Use Node.js Modules with npm and package.json for support.
Still in your project folder, create a new file called index.js:
- nano index.js
Add the following lines of JavaScript code to the index.js file:
import crypto from 'crypto';
import base32Encode from 'base32-encode';
import base32Decode from 'base32-decode';

function generate_Id(byte_size) {
    const bytes = crypto.randomBytes(byte_size);
    return base32Encode(bytes, 'Crockford');
}

console.log('ID for byte size = 1:',generate_Id(1), '\n');
console.log('ID for byte size = 12:',generate_Id(12), '\n');
console.log('ID for byte size = 123:',generate_Id(123), '\n');
The import command loads the required modules. To generate bytes from the number, you define a generate_Id function to take the bytes’ size of bytes and then create random bytes of this size using the randomBytes function from the crypto module. The generate_Id function then encodes these bytes using the Crockford implementation of base32 encoding.
For instructional purposes, a few IDs are generated and then logged to the console. The base32-decode module will be used to decode the resource ID in the next steps.
Save your index.js file, then run the code in a terminal session with this command:
node index.js
You will receive an output response similar to this:
OutputID for byte size = 1: Y8

ID for byte size = 12: JTGSEMQH2YZFD3H35HJ0

ID for byte size = 123: QW2E2KJKM8QZ7174DDB1Q3JMEKV7328EE8T79V1KG0TEAE67DEGG1XS4AR57FPCYTS24J0ZRR3E6TKM28AM8FYZ2AZTZ55C9VVQTABE0R7QRH7QBY7V3GBYBNN5D9JK0QMD9NXSWZN95S0772DHN43Q003G0QNTPA2J3AFA3P7Q167C1VNR92Z85PCDXCMEY0M7WA
Your ID values might differ due to the randomness of generated bytes. The generated ID may be shorter or longer in length, depending on the byte size you select.
Back in index.js, comment out the console outputs using the JavaScript commenting feature (adding a double slash // before the line):
...
//console.log('ID for byte size = 1:',generate_Id(1), '\n');
//console.log('ID for byte size = 12:',generate_Id(12), '\n');
//console.log('ID for byte size = 123:',generate_Id(123), '\n');
These lines demonstrate how encoding will output different identifiers based on the bytes associated. Because these lines will not be used in the following sections, you can comment them out as demonstrated in this code block or delete them entirely.
In this step, you created an encoded ID by encoding random bytes. In the next step, you will combine the encoded bytes and a checksum, creating a unique identifier.
Step 2 — Generating a Resource Identifier
Now you will create an ID with a checksum character. Generating the checksum character is a two step process. For instructional purposes, each function that creates the composite function will be built separately in the following subsections. First, you will write a function that runs a modulo operation. Then, you will write another function that maps the results to a checksum character, which is how you will generate the checksum for your resource ID. Finally, you will verify the identifier and checksum to ensure that the resource identifier is accurate.
Running a Modulo Operation
In this section, you will convert the bytes corresponding to the number ID to a number between 0-36 (limits inclusive, which means any number between 0 to 36, including 0 and 36). The bytes corresponding to the number ID are converted to an integer as a result of a modulo operation. The modulo operation will return the remainder of the dividend obtained by converting the bytes to BigInteger (BigInt) values.
To implement this procedure, add the following lines of code to the bottom of the index.js file:
...

function calculate_checksum(bytes) {
    const intValue = BigInt(`0x${bytes.toString('hex')}`);
    return Number(intValue % BigInt(37));
}
The function calculate_checksum works with the bytes defined earlier in the file. This function will convert bytes to hexadecimal values, which are further converted to BigInteger BigInt values. The BigInt data type represents numbers greater than those represented by the primitive data type number in Javascript. For example, although integer 37 is relatively small, it is converted to BigInt for the modulo operation.
To achieve this conversion, you first set the intValue variable with the BigInt conversion method, using the toString method to set bytes to hex. Then, you return a numerical value with the Number constructor, in which you run the modulo operation with the % symbol to find the remainder between the intValue and BigInt using the sample value of 37. That integer value (in this example, 37) acts as an index to select an alphanumeric character from a custom-built string of alphanumeric characters.
If intValue value is 123 (depending on the bytes), the module operation will be 123 % 37. The result of this operation with 37 as the integer value will be a remainder of 12 and a quotient of 3. With a value of 154 for the resource ID, the operation 154 % 37 will result in a remainder of 6.
This function maps the incoming bytes to the modulo result. Next, you will write a function to map the modulo result to a checksum character.
Obtaining a Checksum Character
After obtaining the modulo result in the previous section, you can map it to a checksum character.
Add the following lines of code to the index.js file just below the previous code:
...

function get_checksum_character(checksumValue) {
    const alphabet = '0123456789ABCDEFG' +
        'HJKMNPQRSTVWXYZ*~$=U';
    return alphabet[Math.abs(checksumValue)]; //
}
For the function get_checksum_character, you call checksumValue as a parameter. Within this function, you define a string constant named alphabet as a custom-built string of alphanumeric characters. Depending on the value set for the checksumValue, this function will return a value that pairs the defined string from the alphabet constant with the absolute value of the checksumValue.
Next, you will write a function that uses the two functions written in these sections to generate an ID from the encoding of bytes combined with a checksum character.
Add the following lines of code to the index.js file:
...

function generate_Id_with_checksum(bytes_size) {
    const bytes = crypto.randomBytes(bytes_size);
    const checksum = calculate_checksum(bytes);
    const checksumChar = get_checksum_character(checksum);
    console.log("checksum character: ", checksumChar);
    const encoded = base32Encode(bytes, 'Crockford');
    return encoded + checksumChar;
}

const Hotel_resource_id =generate_Id_with_checksum(132)
console.log("Hotel resource id: ",Hotel_resource_id)
This section of code combines your two previous functions, calculate_checksum and get_checksum_character (which are used to generate checksum characters), with the encoding function into a new function aptly named generate_Id_with_checksum that will create an ID with a checksum character.
Save the file, then run the code in a separate terminal session:
- node index.js
You will receive an output similar to this:
Output
checksum character:  B
Hotel resource id:  9V99B9P55K7M4DN5XYP4VTJYJGENZKJ0F9Q6EEEZ07X49G0V14AXJS3RYXBT3J1WJZXWGM76C6H7G895TJT27AW77BHBX2D16QNQ2ZNBY9MQHWG9NJ1WWVTNRCKRBX6HC3M7BB3JG0V413VJ767JN6FT0GFS5VQJ9X7KSP1KM29B02NAGXN3FP30WA8Y63N1XJAMGDPEE1RNHRTWH6P0B
The same checksum character appears at the end of the ID, indicating that the checksums match.
This schematic chart provides a structural representation of how this composite function works:
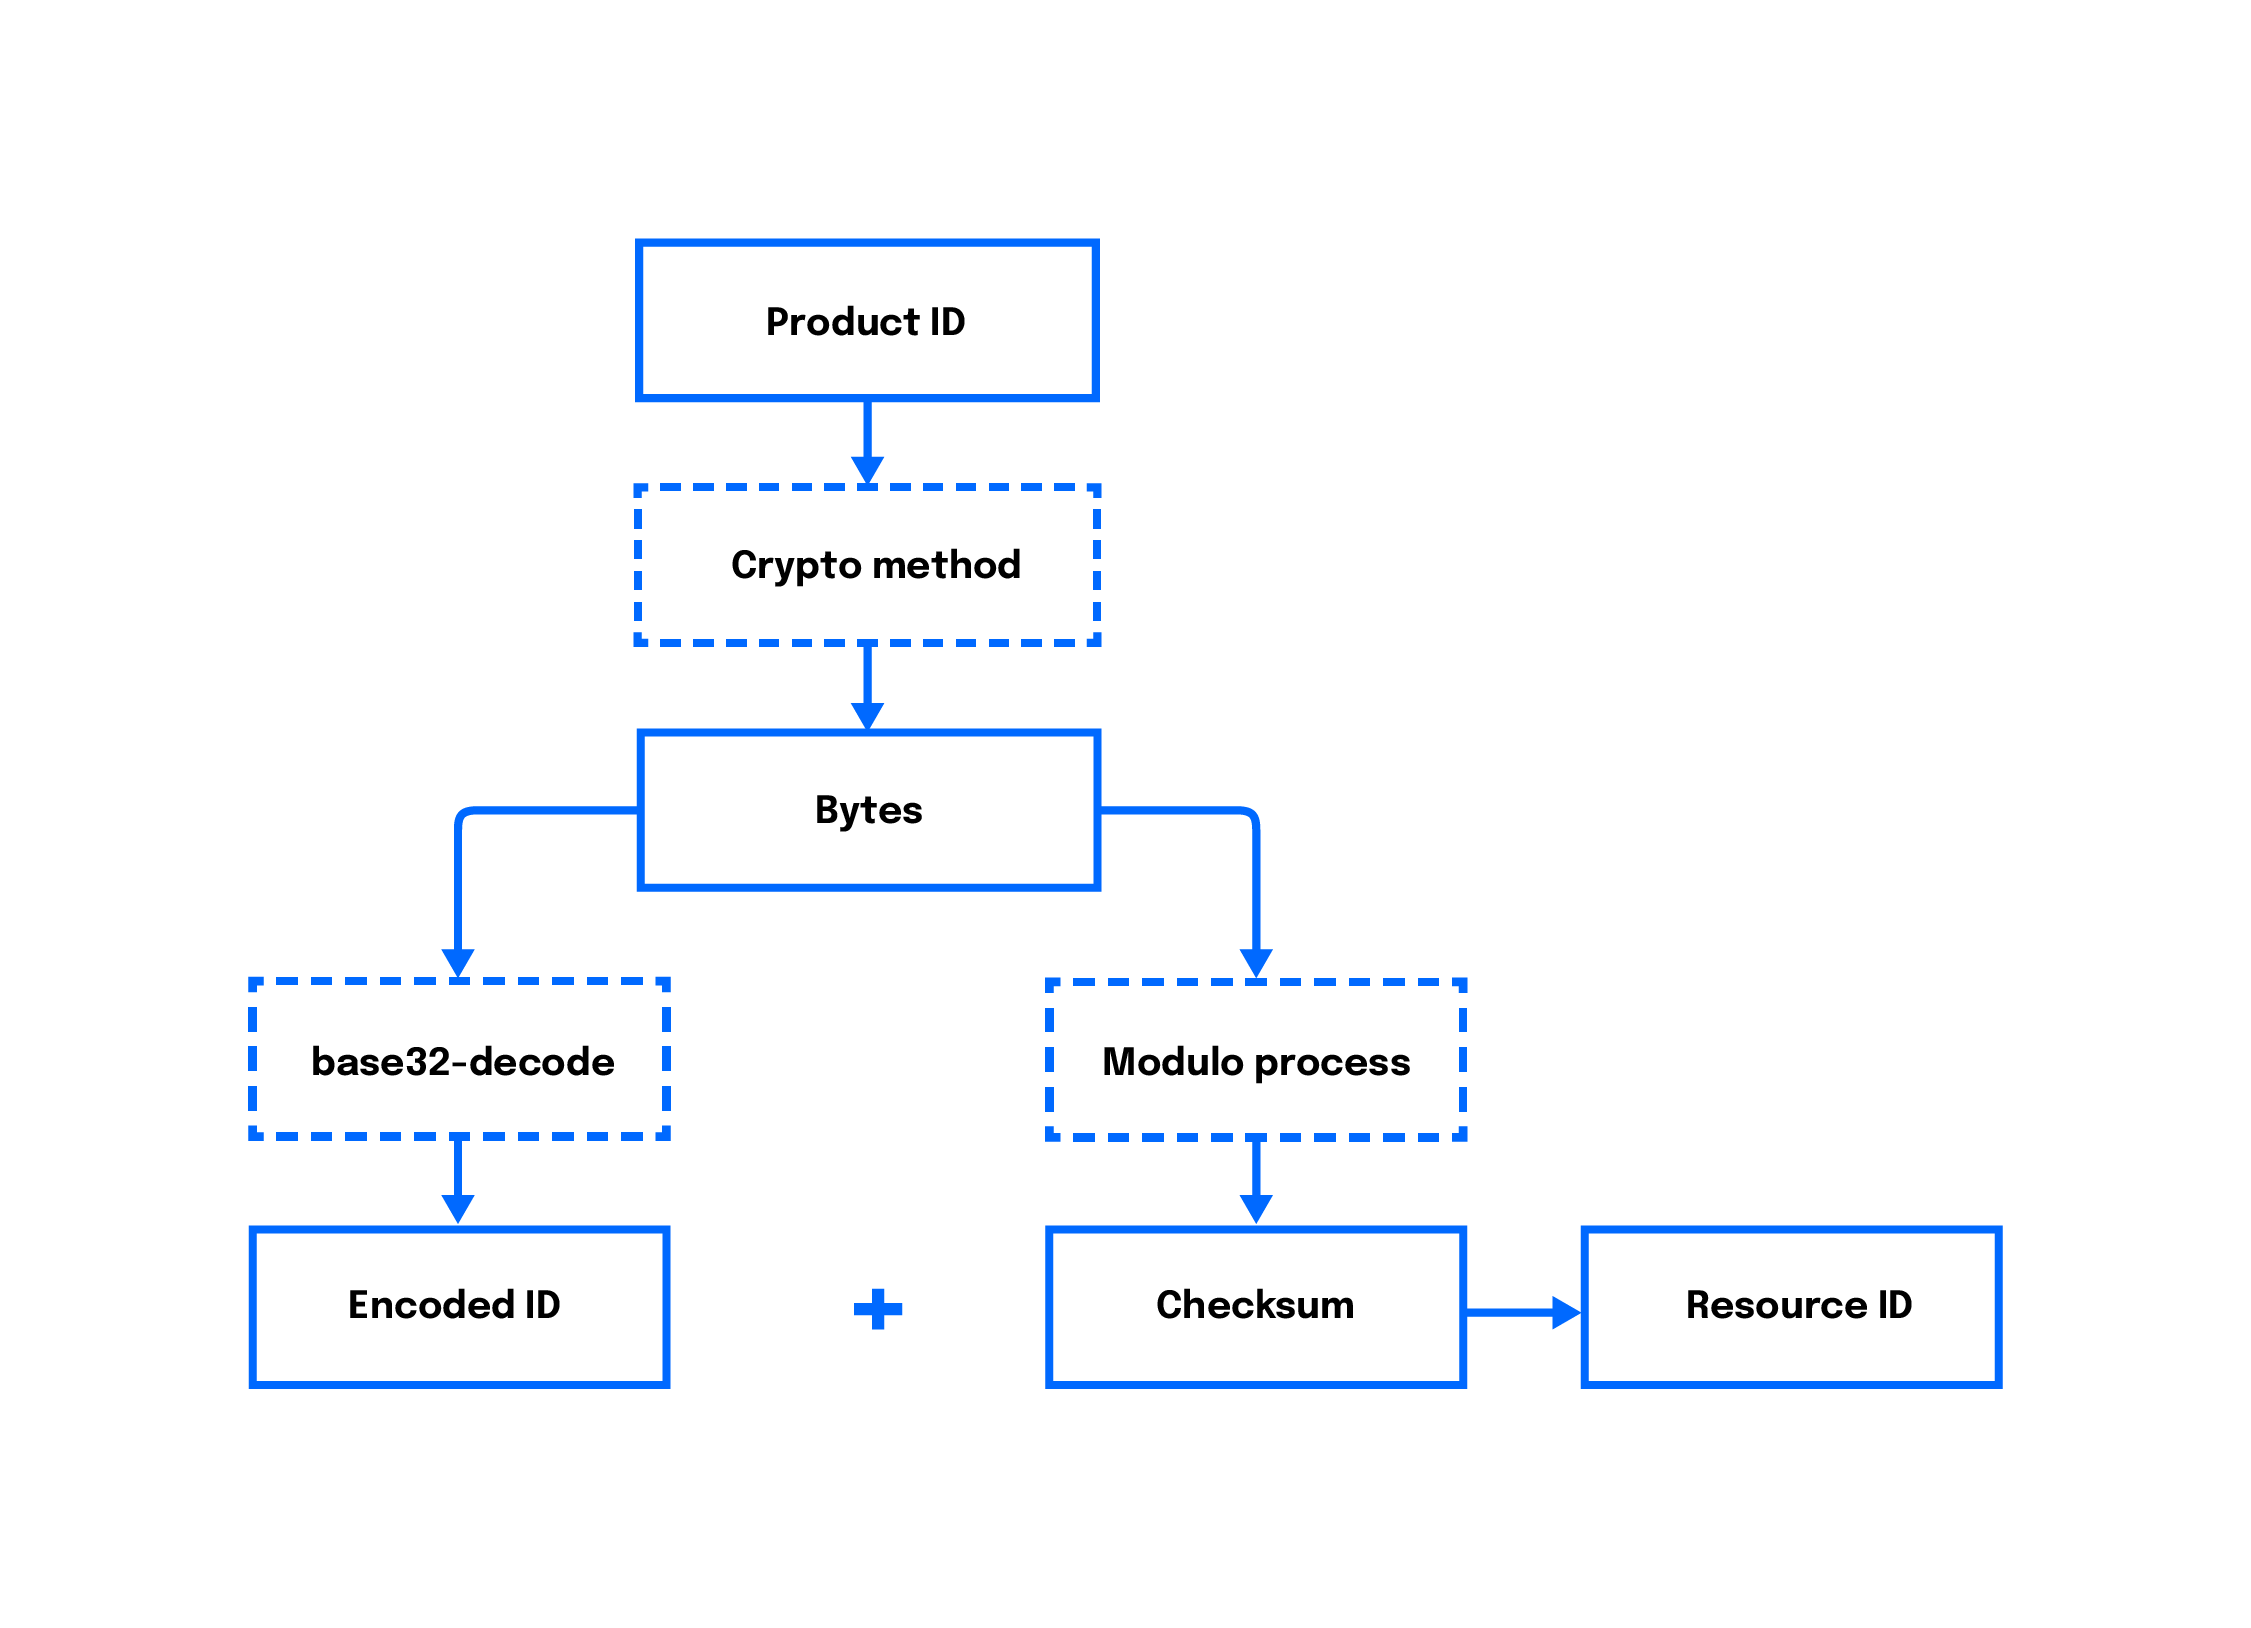
This flowchart demonstrates how a product ID, which is an identifier that was manually created by a counter for the resource, is transformed into a unique resource ID through the encoding and modulo process. The crypto method in the diagram refers to the crypto.randomBytes() function.
You created an ID based on the byte size that will include the checksum character. In the next section, you will implement an identifier function to verify the integrity of the ID with base32-decoding.
Checking the Identifier’s Integrity
To ensure integrity, you will now compare the checksum character (the last character from the identifier) with the checksum generated, using a new function called verify_Id. Comparing the checksum character is an essential step to check the integrity of the original ID and ascertain that it has not been tampered with.
Add these lines to your index.js file:
...
function verify_Id(identifier) {
    const value = identifier.substring( 0, identifier.length-1);
    const checksum_char = identifier[identifier.length-1];
    const buffer = Buffer.from( base32Decode(value, 'Crockford'));
    const calculated_checksum_char = get_checksum_character(calculate_checksum(buffer));
    console.log(calculated_checksum_char);
    const flag =calculated_checksum_char== checksum_char;
    return (flag);
     }
console.log('\n');
console.log("computing checksum")
const flag = verify_Id(Hotel_resource_id);
if (flag) console.log("Checksums matched.");
else console.log("Checksums did not match.");
The verify_Id function checks the integrity of the ID by checking the checksum. The remaining characters of the identifier are decoded into a buffer, and then calculate_checksum and get_checksum_character are run subsequently on this buffer to extract the checksum character for the comparison (with calculated_checksum_char== checksum_char).
This schematic chart demonstrates how the composite function works:
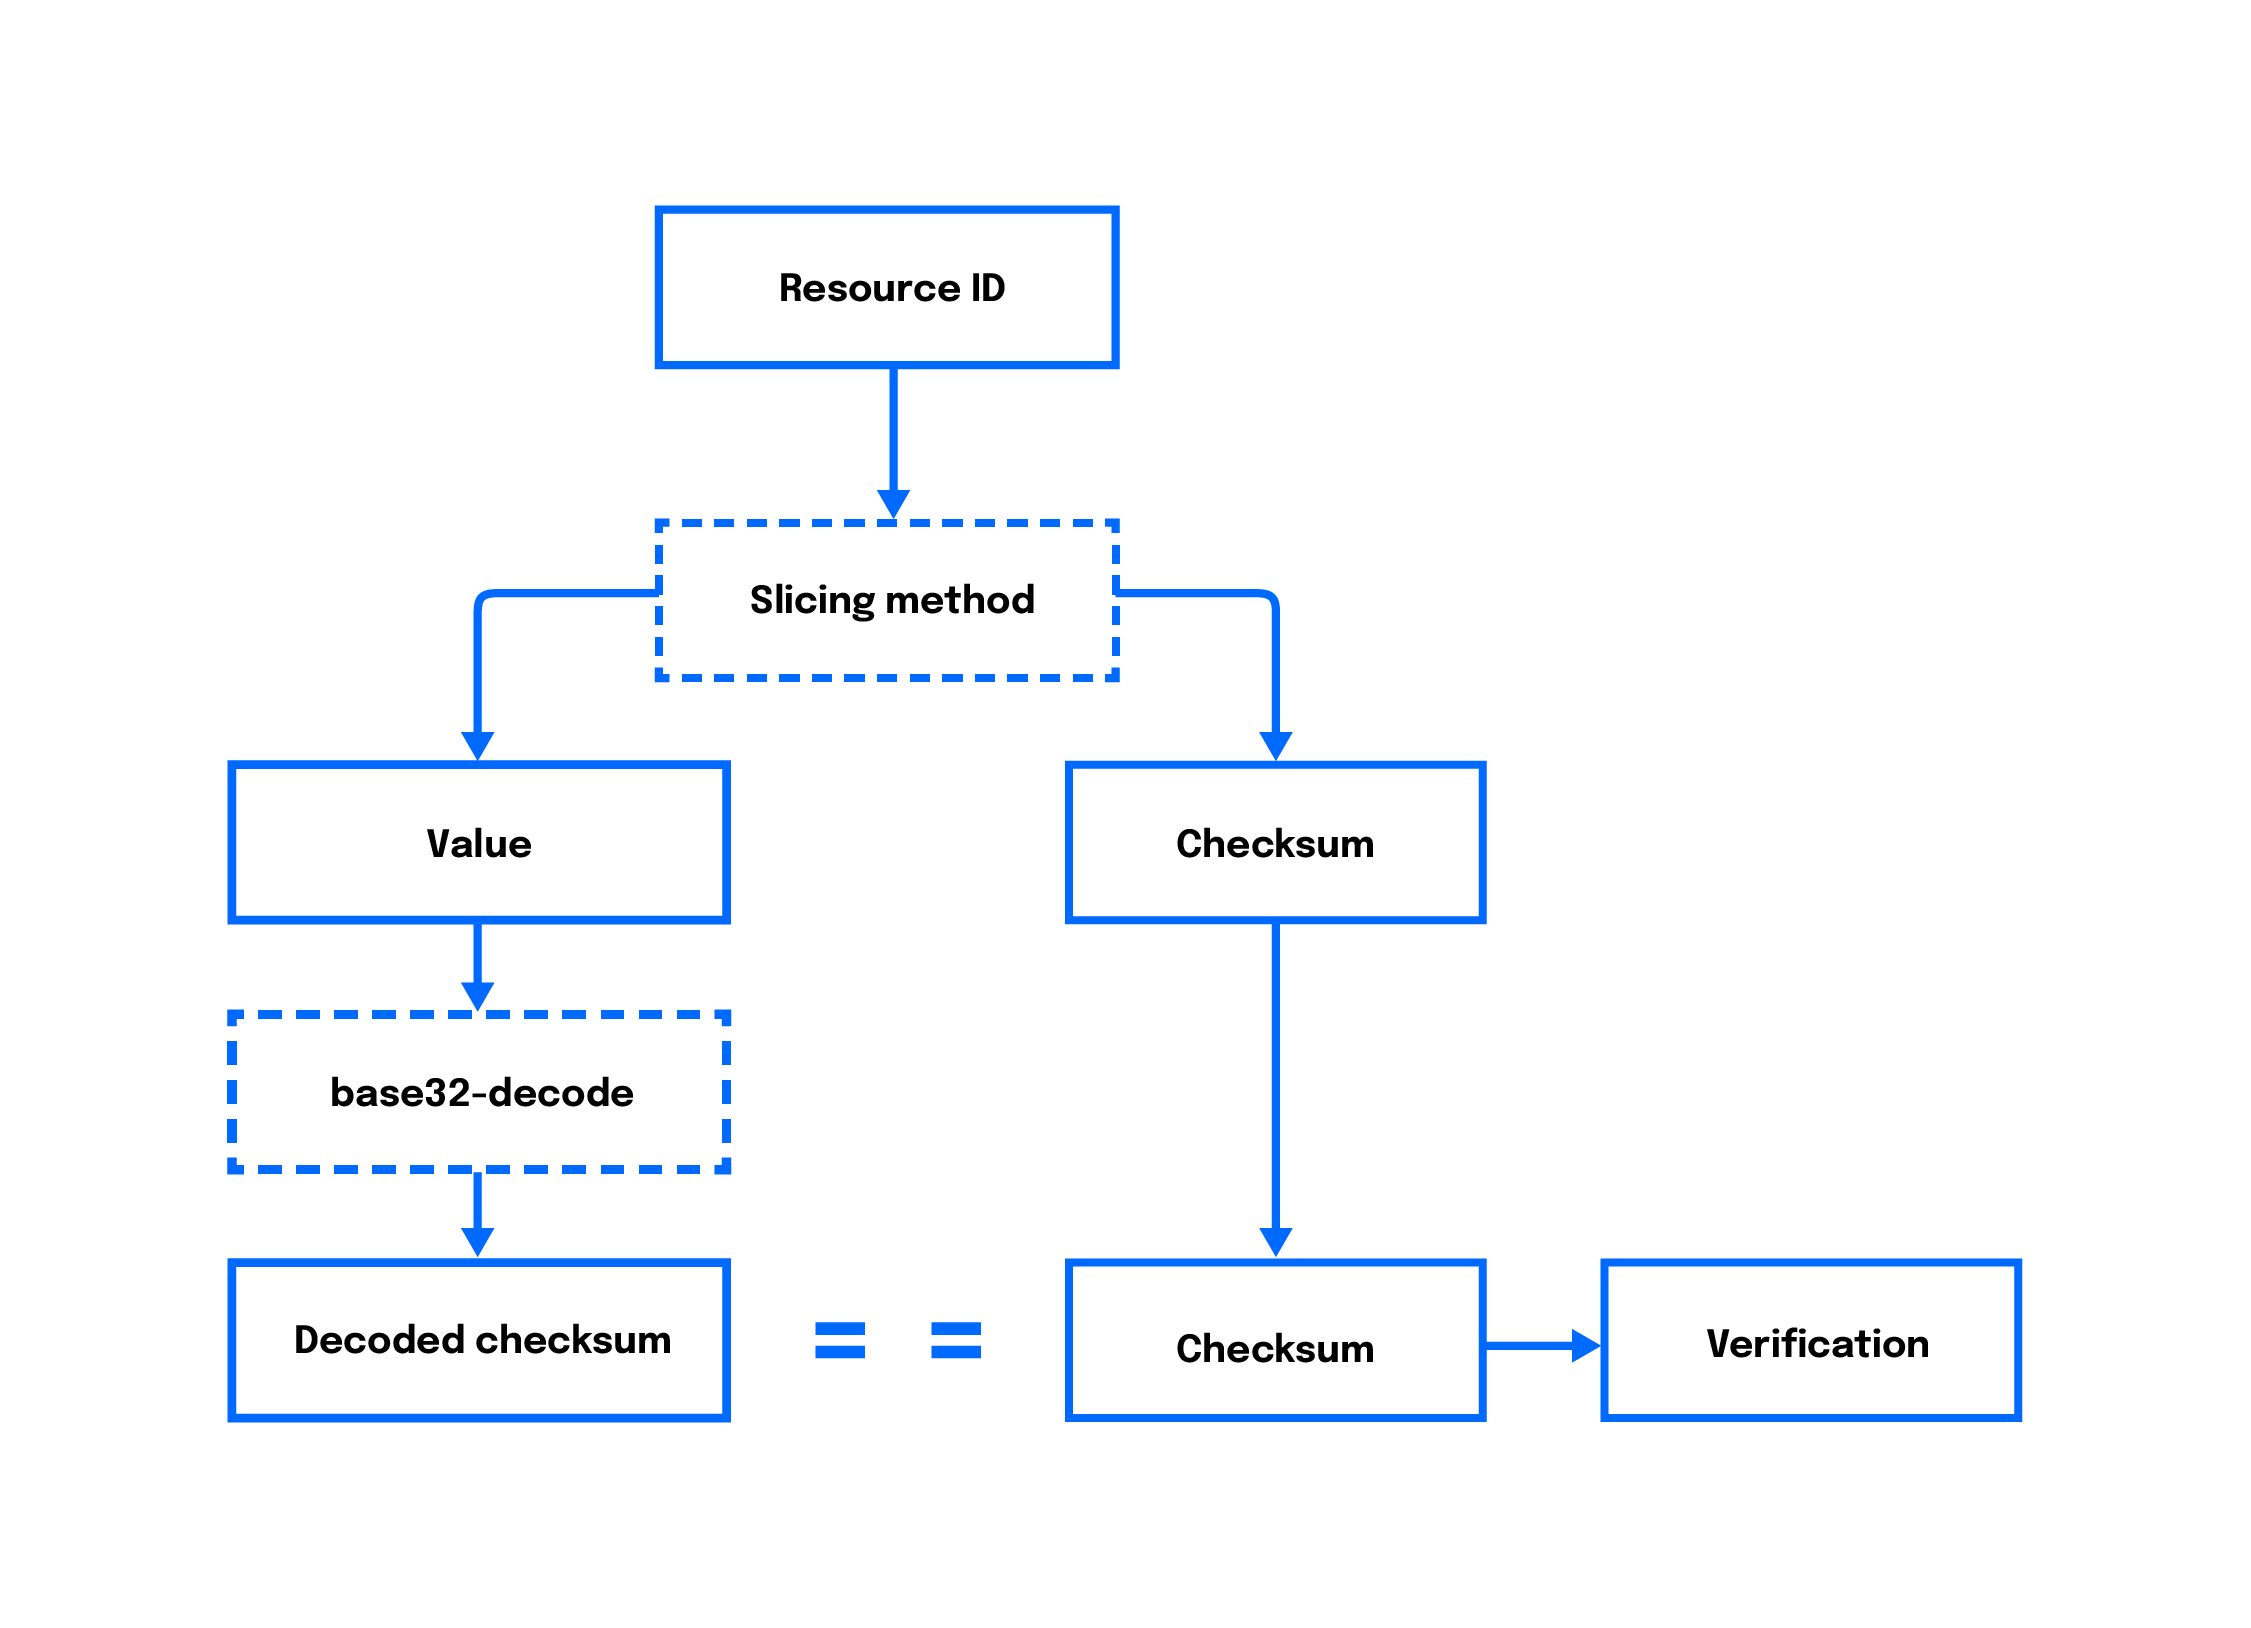
In this chart, slicing refers to separating the ID value (value) from the checksum character (checksum). In your earlier code block, the function identifier.substring( 0, identifier.length-1) picks up the the ID value, whereas identifier[identifier.length-1] takes the last character from the resource ID.
Your index.js file should now match the following code:
import crypto from 'crypto';  // for generating bytes from the number
import base32Encode from 'base32-encode'; // for encoding the bytes into Unique ID as string type
import base32Decode from 'base32-decode';// for decoding the ID into bytes

function generate_Id(byte_size) {
    const bytes = crypto.randomBytes(byte_size);
    return base32Encode(bytes, 'Crockford');
}

//console.log('ID for byte size = 1:',generate_Id(1), '\n');
//console.log('ID for byte size = 12:',generate_Id(12), '\n');
//console.log('ID for byte size = 123:',generate_Id(123), '\n');

function calculate_checksum(bytes) {
    const intValue = BigInt(`0x${bytes.toString('hex')}`);
    return Number(intValue % BigInt(37));
}

function get_checksum_character(checksumValue) {
    const alphabet = '0123456789ABCDEFG' +
        'HJKMNPQRSTVWXYZ*~$=U'; // custom-built string  consisting of alphanumeric character
    return alphabet[Math.abs(checksumValue)]; // picking out an alphanumeric character
}

function generate_Id_with_checksum(bytes_size) {
    const bytes = crypto.randomBytes(bytes_size);
    const checksum = calculate_checksum(bytes);
    const checksumChar = get_checksum_character(checksum);
    console.log("checksum character: ", checksumChar);
    const encoded = base32Encode(bytes, 'Crockford');
    return encoded + checksumChar;
}

const Hotel_resource_id =generate_Id_with_checksum(132)
console.log("Hotel resource id: ",Hotel_resource_id)

function verify_Id(identifier) {
    const value = identifier.substring( 0, identifier.length-1);
    const checksum_char = identifier[identifier.length-1];
    //console.log(value,checksum_char);
    const buffer = Buffer.from( base32Decode(value, 'Crockford'));
    const calculated_checksum_char = get_checksum_character(calculate_checksum(buffer));
    console.log(calculated_checksum_char);
    const flag =calculated_checksum_char== checksum_char;

    return (flag);

     }

console.log('\n');
console.log("computing checksum")
const flag = verify_Id(Hotel_resource_id);
if (flag) console.log("Checksums matched.");
else console.log("Checksums did not match.");
Now you can run this code:
node index.js
You will receive the following output:
Output...
computing checksum
AW75SY7FVC7TKT7VP5ZF0M8C67CN36YZK27BXHVFHSDXJFKH54HK2AXQFMPN89Q5YQRPGNHGAYQ5JFKVD40EKTXCET97Q0FEPX6MX1ZTNWGCA08SBRSHP8B0037ACJG6F6472FEVARCAWM6P5MRJ2F6WTRPXHYS9N1JEDZVH41D33RA5365VNFC5G5VYEFPFJJD8151B28XXDBRHAF80 H
H
Checksums matched.
You now have a function called verify_Id that checks the integrity of your identifier using a checksum character. Next, for instructional purposes, you can alter the resource ID so that the function will give a non-matching result to assess what happens when a check fails.
(Optional) Step 3 — Altering the Identifier for a Non-matching Result
You will now alter the value for the identifier to check if the checksums will get matched. The alteration in this step will always result in a non-matching checksum, as the integrity is not maintained if any character in the ID is manipulated. An alteration like this may result from transmission errors or malicious behavior. This alteration is for instructional purposes and is not recommended for production builds but will enable you to assess a non-matching checksum result.
In your index.js file, modify the Hotel_resource_id by adding the highlighted lines:
...
const altered_Hotel_resource_id= Hotel_resource_id.replace('P','H');
console.log("computing checksum")
const flag = verify_Id(altered_Hotel_resource_id);
if (flag) console.log("Checksum matched.");
else console.log("Checksums did not match.");
In the above code, you replace any P with H in the ID and rename the variable from Hotel_resource_ID to altered_Hotel_resource_id. Again, these changes are for informational purposes and can be reverted at the end of this step to ensure matching integrity.
Save the file, then rerun the code with the alterations for the resource ID:
- node index.js
You will receive an output that the checksums do not match:
OutputChecksums did not match.
In this step, you created a function to verify if the checksum passes the integrity test or not, and you encountered both cases. The non-matching checksum indicates that the resource ID has been manipulated. The notification enables a developer to take action against malicious behavior, such as blocking a user request or reporting the request related to the resource ID, depending upon the application requirements.
To revert your function to the matching checksums result, delete the additional code added at the beginning of this step so that the code matches the file at the end of Step 2.
When you need a custom unique ID with a checksum, you can use this tutorial to help you generate data models, version your APIs, and more.
Conclusion
In this tutorial, you developed resource IDs that align with the characteristics of a good identifier. You also created a unique resource ID with checksum in a Node.js environment using base32-encoding. Finally, you verified the integrity of the ID by decoding it with base32-decoding.
For cross-confirmation, you can compare your final files with those in the DigitalOcean community repository. You can also git-clone the repository if you are familiar with the git versioning system or by following the Introduction to GitHub and Open-Source Projects series.
Now that you understand the fundamentals of checksum, you can experiment with other encoding algorithms, such as MD5.
Thanks for learning with the DigitalOcean Community. Check out our offerings for compute, storage, networking, and managed databases.
About the author(s)
I am a web developer with working knowledge of linux. Primarily I develop using JavaScript's frameworks. I find coding UI designs engaging and fun.
Still looking for an answer?
This textbox defaults to using Markdown to format your answer.
You can type !ref in this text area to quickly search our full set of tutorials, documentation & marketplace offerings and insert the link!
 This work is licensed under a Creative Commons Attribution-NonCommercial- ShareAlike 4.0 International License.
Become a contributor for community
Get paid to write technical tutorials and select a tech-focused charity to receive a matching donation.

DigitalOcean Documentation
Full documentation for every DigitalOcean product.

Resources for startups and AI-native businesses
The Wave has everything you need to know about building a business, from raising funding to marketing your product.
The developer cloud
Scale up as you grow — whether you're running one virtual machine or ten thousand.

Start building today
From GPU-powered inference and Kubernetes to managed databases and storage, get everything you need to build, scale, and deploy intelligent applications.
