
The author selected OWASP Foundation to receive a donation as part of the Write for DOnations program.
Introduction
Protecting website passwords is an essential skill any developer should have. JavaScript provides an option to ensure the safe storage and processing of passwords or other sensitive data using the hashing algorithms provided by the BcryptJS module of JavaScript.
In this tutorial, you will learn about BcryptJS and hashing to set up a basic express server that will store passwords as hashes in a database instead of raw strings and retrieve them to authenticate the password.
Prerequisites
To continue with this tutorial, you should have the following setup.
-
A stable version of Node.js installed on your computer with version 12.x or higher. You can use this DigitalOcean tutorial to install the latest Node Js version on your computer.
-
You should know how to code in JavaScript.
-
_You should have Express JS installed on your computer. You can use this guide to learn how to set up an Express server.
-
Lastly, you will need the MongoDB community or Atlas database to complete this tutorial. You can install it using one of these DigitalOcean guides on_ how to install MongoDB.
Why use BcryptJS?
Bcrypt is a hashing algorithm to create hashes for passwords to store them in case of a data breach. This advanced hashing algorithm uses salts, making it hard to crack by attacks such as brute-forcing.
BcryptJS is the JavaScript implementation of the Bcrypt hashing algorithm, allowing you to use the hash encryption without having to meddle with complex hashing functions. Some of the reasons that make BcryptJS a great choice for password security are the following:
-
Security – BcryptJS implements the Bcrypt algorithm, a slow algorithm(which in hashing is a good thing) and requires intense computational power. This makes it a rigorous task for attackers to crack the password hash, ensuring the safety of passwords even in case of a data breach._
-
Salting – BcryptJS handles the generation of random salts for passwords to ensure storage security (We will learn about hashes and salts in the next section in more detail). Salts make the hash of a relatively weak password more complex, making it harder to decrypt.
-
Ease to Use – BcryptJS provides JavaScript developers with a tool to encrypt their passwords without requiring a deep understanding of hashing._
In the next step, we shall learn briefly about hashes and salts.
How does Hashing work?
Before using these concepts in your projects, you must understand how hashing and salting work.
Hashing
Hashing is converting a simple string or plaintext into a string of random characters (encryption). This allows for secure storing and/or transmission of sensitive data. Hashing involves the following key steps:
Data Input – Firstly, data that could be of any type (binary, character, decimal, etc.) as plain text or string is stored.
The Hash Function – The hash function is a mathematical algorithm that takes input from the data and converts it into a set of characters or hash codes. Hash functions are deterministic (produce the same output for the same input) and one-way functions (This means that it is near impossible to reverse engineer the output of hash functions, i.e., a hash into its input data).
Collision Resistance – This means that a hash function is created by keeping the idea of collision resistance in mind, i.e., two different inputs cannot have the same output (hash code).
Authentication – The hash functions are deterministic, producing the same hash for the same input. Thus, when authenticating a password stored as a hash, the general idea is that if the password to authenticate matches the hash stored in the database, the password is correct.
Salting
Since hashing has been around for decades, there have been developments such as rainbow tables, which contain billions of data entries containing data strings and their respective hashes based on different hashing algorithms.
Now, consider a situation where a user creating an account on your website creates a weak password. Thus, in case of a data breach, an attacker can look up the hashes of your users and find the match of the hash for the user account with a weak password. This would prove disastrous in high-security applications. To prevent such a thing from happening, salts are used.
Salting is an additional layer of security added to hashes by adding a random string of characters to the hash of a password before storing it in a database. Thus, even if the data is leaked in a breach, it will be hard for an attacker to decrypt a hash containing salt. Consider the following example:
- Password = ‘sammy’
- Hash = £%$^&£!23!3%!!
- Salt = 2vqw£4Df$%sdfk
- Hash + Salt = £%$^&£!23!3%!!2vqw£4Df$%sdfk
As we can see clearly, the password stored with salt is more unlikely to crack due to the deterministic nature of hashes. Therefore, if an attacker, for example, looks up this hash+password string in a rainbow table, he will not get the actual password string but something completely different.
Now, you are ready to use BcryptJS and secure your passwords in an industry-standard way.
Installing BcryptJS and Other required modules
Now that you know about hashing and salting, all remains for you to get your computer and start coding. The project structure will be as follows:
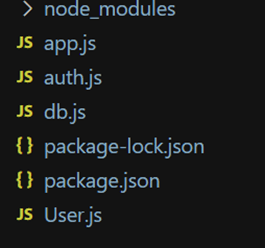
First, we shall start by creating an npm project with the following steps:
-
Open a folder and create a file,
app.js. -
Open a terminal window in this folder and type the command
npm init
After this, you will be asked for inputs but can press Enter without providing any inputs.
- Then, create 3 more files, namely
auth.jsdb.jsUser.js
- In the same terminal window, type in the following command to install the necessary packages.
npm install express mongoose BcryptJS nodemon
You now have a complete project environment setup to follow in this tutorial. In the following step, you will learn how to create a server to use BcryptJS for securely storing and authenticating passwords with MongoDB.
Setting up a Server with Express JS
Now that you have set up the project structure, you can create a server that uses bcrytjs to secure passwords by storing them as hashes and authenticating them. We will create the server with the following proper steps.
Step 1 – Creating a connection to the MongoDB database
To connect to mongoDB, we are using the community edition. To keep the project organized, you will save the code for setting up a connection in the db.js file.
- const mongoose = require("mongoose");
- const mongoURI = "mongodb://127.0.0.1:27017/bcrypt_database";
- const connectMongo = async () => {
-
- try {
- await mongoose.connect(mongoURI);
- console.log("Connected to MongoDB!");
- } catch (error) {
- console.error("Error connecting to MongoDB: ", error.message);
- }
- };
-
- module.exports = connectMongo;
Here, you import the mongoose package, which provides an API to connect javascript to MongoDB. Also, in this case the connection URI is for a local installation of mongoDB, if you are using a cloud database(like Atlas) you only need to change the URI to your specific database’s URI.
Info An URI is similar to a server URL with the difference that a URI can identify the name and identity of the resources and their location on the internet. In contrast, a URL is a subset of a URI capable of doing only the latter.
The connectToMongo function is an async function because mongoose.connect returns a javascript promise. This function will give a connection to successful execution. Else, it will return an error.
Finally, we use module.exports to export this function whenever the db.js module is imported.
Step 2 – Creating a User Schema
You will need a basic Schema to create or authenticate users with a MongoDB database. If you do not know what a schema is, you can use this excellent DO guide to understand and create the schema in MongoDB. We will only use two fields for our schema, email and password.
Use the following code in your User.js module.
- const mongoose = require("mongoose");
- const UserSchema = new mongoose.Schema({
- email:{
- type:String,
- required:true,
- unique:true
- },
- password:{
- type:String,
- required:true
- }
- });
- module.exports = mongoose.model('user', UserSchema)
We create two fields in this schema, email and password. Both of them are required fields and of string data type. Also, email is a unique field, meaning that one email can be used only once for having an account on this server.
Finally, we export a model named users. A model represents a schema on the database end of things. You can think of a schema as a rule for defining a model, whereas the model is stored as a collection in the MongoDB database.
You can convert a schema to a model using the model() function of mongoose library.
Step 3 – Setting up the server in app.js
After following the previous steps, you have successfully created a model and a module to make a connection to the MongoDB database. Now, you will learn to set up the server. Use the following code in your app.js file.
- const connectToMongo = require("./db");
- const express = require("express");
- const app = express();
- connectToMongo();
- app.use(express.json());
- app.use("/auth", require("./auth"));
- const port = 3300;
- app.listen(port, () => {
- console.log(`Listening at http://localhost:${port}`);
- });
Here, we import the express and db.js modules to connect to MongoDB. Then, we use the express.json() middleware for handling JSON responses. The routes are created in a different module (auth.js) to keep the code clean and organized. Then, finally, we create an endpoint for the server to listen on port 3300 on localhost. (You can use any port of your choice)
Encrypting Passwords and Storing Them in a MongoDB Database
Up to this point, the server is almost ready, and now you will create endpoints for the server. We will create two endpoints – signup and login. In the signup endpoint, we will take the email and password from a new user and store it with encryption for a password using BcryptJS.
In the auth.js file, type the following code:
- const express = require("express");
- const router = express.Router();
- const User = require("./User");
- const bcrypt = require("bcryptjs");
-
- // ROUTE 1:
- router.post("/signup", async (req, res) => {
- const salt = await bcrypt.genSalt(10);
- const secPass = await bcrypt.hash(req.body.password, salt);
- let user = await User.create({
- email: req.body.email,
- password: secPass,
- });
- res.json({ user });
- });
- module.exports = router;
We make the necessary imports and then set up the express router to create the /signup endpoint. We are using the POST method so that the credentials are not disclosed in the URL in the application. After that, we create a Salt using the genSalt function of the scripts package; the parameter passed to genSalt() functions contains the length of the salt character. Then, we use the hash() function of BcryptJS, which takes a required parameter, the password string to be converted to hash code, and an optional argument, the salt string. And then it returns a hash that contains both password and salt.
After this, we use the create() function of the mongoose module to create a document in our database defined by the rules of users model. It takes a Javascript object containing email and password, but instead of giving it a raw string, we give the secPass (password hash + salt) to be stored in the database. This way, we have securely stored a password in the database using its hash combined with a salt instead of a raw string. Ultimately, we return a JSON response containing the user model. (This method of sending responses is only for the development phase; in production, you will replace this with an authentication token or something else).
To test this endpoint, you must run the server first, which can be done by typing the following command in the terminal.
cd <path to your project folder>
nodemon ./app.js
This command will run your server on localhost and port 3300 (or whichever port you specify). Then, you can send an HTTP request to the URL http://localhost:3300/auth/signup with the following body:
- {
- "email":"sammy@digitalocean.com",
- "password":"sammy"
- }
This will produce the following output/response:
{
  "user": {
    "email": "sammy@digitalocean.com",
    "password": "$2a$10$JBka/WyJD0ohkzyu5Wu.JeCqQm33UIx/1xqIeNJ1AQI9kYZ0Gr0IS",
    "_id": "654510cd8f1edaa59a8bb589",
    "__v": 0
  }
}
Note: The password hash and ID will not be the same, as they are always unique.
In the following section, you will learn how to access the stored hash for the password and authenticate it with a password provided at login/authentication.
Accessing the encrypted password and using it for authentication
So far, you have learned about BcryptJS, hashing, salting, and developing an express server that creates new users with passwords stored as hashes. Now, you will learn how to use the stored password and authenticate a user when it tries to log in to the application.
To add an authentication method, append the following route in your auth.js after the /signup route:
- // ROUTE 2:
- router.post("/login", async (req, res) => {
- let user = await User.findOne({ email: req.body.email });
- if (!user) {
- return res.status(400).json({ error: "Login with proper credentials!" });
- }
-
- const passwordCompare = await bcrypt.compare(req.body.password, user.password);
- if (!passwordCompare) {
- return res
- .status(400)
- .json({ error: "Login with proper credentials!" });
- }
-
- res.json({ success: "Authenticated!" });
- });
Here, we use the /auth/login sub-path to perform a login authentication for an already existing user. Similar to the /auth/signup endpoint, this will be an async-await function as BcryptJS returns promises.
Firstly, we use the findOne function of the Mongoose library, which is used to find a document in a collection based on a given search query. In this instance, we are searching for the user based on the email. If no user with the provided email exists, then this will send a response with status code 400 for invalid credentials. (It is not a good practice to provide which parameter is incorrect during login, as attackers can use that information to find existing accounts).
If the user with the provided email exists, the program moves to password comparison. For this purpose, BcryptJS provides the compare() method, which takes a raw string as the first argument and a hash (with or without salt) for the second argument. Then, it returns a Boolean promise; true if the password matches the hash and false if they do not. Then, you can add a simple check using an if statement and return success or error based on the comparison.
Finally, you will export the express router using module.exports for the app.js starting point to use it for routes.
To test this route, you can send another HTTP response to this URL http://localhost:3300/auth/login with the body as follows:
- {
- "email":"sammy@digitalocean.com",
- "password":"sammy"
- }
This request will give the following response:
{
  "success": "Authenticated!"
}
Final, auth.js will look like:
- const express = require("express");
- const router = express.Router();
- const User = require("./User");
- const bcrypt = require("bcryptjs");
-
- // ROUTE 1:
- router.post("/signup", async (req, res) => {
- const salt = await bcrypt.genSalt(10);
- const secPass = await bcrypt.hash(req.body.password, salt);
- let user = await User.create({
- email: req.body.email,
- password: secPass,
- });
- res.json({ user });
- });
-
- // ROUTE 2:
- router.post("/login", async (req, res) => {
- let user = await User.findOne({ email: req.body.email });
- if (!user) {
- return res.status(400).json({ error: "Login with proper credentials!" });
- }
- const passwordCompare = await bcrypt.compare(req.body.password, user.password);
- if (!passwordCompare) {
- return res
- .status(400)
- .json({ error: "Login with proper credentials!" });
- }
- res.json({ success: "Authenticated!" });
- });
- module.exports = router;
Conclusion
This tutorial created a server to explain the usage of BcryptJS for securely storing and accessing database passwords. You can take this further by:
-
Implementing more routes for other tasks such as fetching user credentials, updating user credentials, etc.
-
Implementing authentication tokens to send as responses, etc.
This starts your journey to deal with passwords safely; you can always add more security with different techniques and technologies, allowing you to create more secure and resilient applications.
Thanks for learning with the DigitalOcean Community. Check out our offerings for compute, storage, networking, and managed databases.
About the author(s)
Anish is a Sr Technical Content Strategist and Team Lead at DigitalOcean with 7+ years of experience as an DevOps SRE at Nutanix and Cloud consultant at AMEX, and technical writing at DOCN, and shipping deep infra and AI inference tutorials that help developers deploy production‑ready applications on DigitalOcean.
Still looking for an answer?
This textbox defaults to using Markdown to format your answer.
You can type !ref in this text area to quickly search our full set of tutorials, documentation & marketplace offerings and insert the link!
 This work is licensed under a Creative Commons Attribution-NonCommercial- ShareAlike 4.0 International License.
Become a contributor for community
Get paid to write technical tutorials and select a tech-focused charity to receive a matching donation.

DigitalOcean Documentation
Full documentation for every DigitalOcean product.

Resources for startups and AI-native businesses
The Wave has everything you need to know about building a business, from raising funding to marketing your product.
The developer cloud
Scale up as you grow — whether you're running one virtual machine or ten thousand.

Start building today
From GPU-powered inference and Kubernetes to managed databases and storage, get everything you need to build, scale, and deploy intelligent applications.
