By anondon and Rachel Lee
Not using Ubuntu 22.04?
Choose a different version or distribution.
The author selected the Electronic Frontier Foundation to receive a donation as part of the Write for DOnations program.
Introduction
Cloudflare is a service that sits between the visitor and the website owner’s server, acting as a reverse proxy for websites. Cloudflare provides a Content Delivery Network (CDN), as well as DDoS mitigation and distributed domain name server services.
Nginx is a popular web server responsible for hosting some of the largest and highest-traffic sites on the internet. It’s common for organizations to serve websites with Nginx and use Cloudflare as a CDN and DNS provider.
In this tutorial, you will secure your website served by Nginx with an Origin CA certificate from Cloudflare and then configure Nginx to use authenticated pull requests. The advantages of using this setup are that you benefit from Cloudflare’s CDN and fast DNS resolution while ensuring that all connections pass through Cloudflare. This prevents any malicious requests from reaching your server.
Prerequisites
To complete this tutorial, you’ll need the following:
- One Ubuntu 22.04 server set up by following the Ubuntu 22.04 initial server setup guide, including a
sudonon-root user and a firewall. - Nginx installed on your server. You can follow our guide on how to install Nginx on Ubuntu 22.04.
- A Cloudflare account.
- A registered domain added to your Cloudflare account that points to your Nginx server. Our guide on how to mitigate DDoS attacks against your website with Cloudflare can help you set this up. Our introduction to DNS terminology, components, and concepts can also provide assistance.
- An Nginx Server Block configured for your domain, which you can do by following Step 5 of How To Install Nginx on Ubuntu 22.04.
Step 1 — Generating an Origin CA TLS Certificate
The Cloudflare Origin CA lets you generate a free TLS certificate signed by Cloudflare to install on your Nginx server. By using the Cloudflare generated TLS certificate you can secure the connection between Cloudflare’s servers and your Nginx server.
To generate a certificate with Origin CA, log in to your Cloudflare account in a web browser. Select the domain that you want to secure and navigate to the SSL/TLS section of your Cloudflare dashboard. From there, navigate to the Origin Server tab and click on the Create Certificate button:
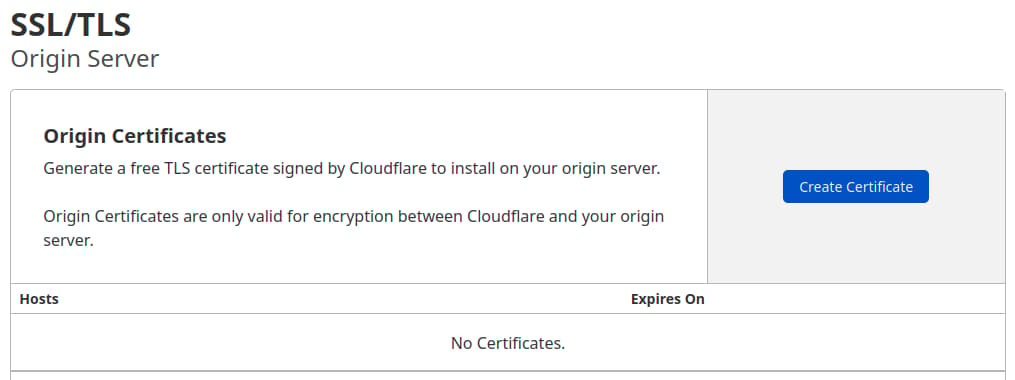
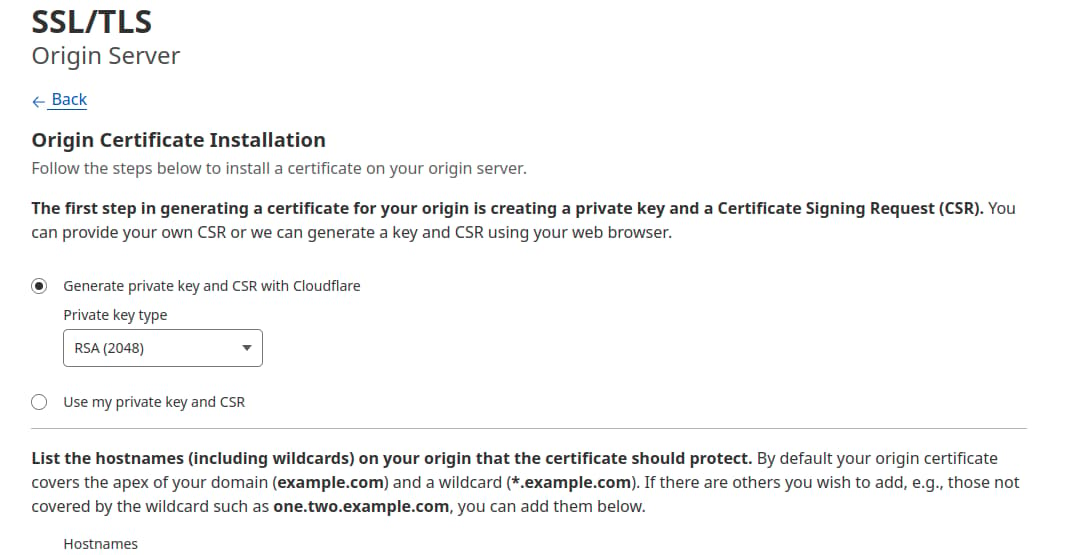
Leave the default option of Generate private key and CSR with Cloudflare selected.
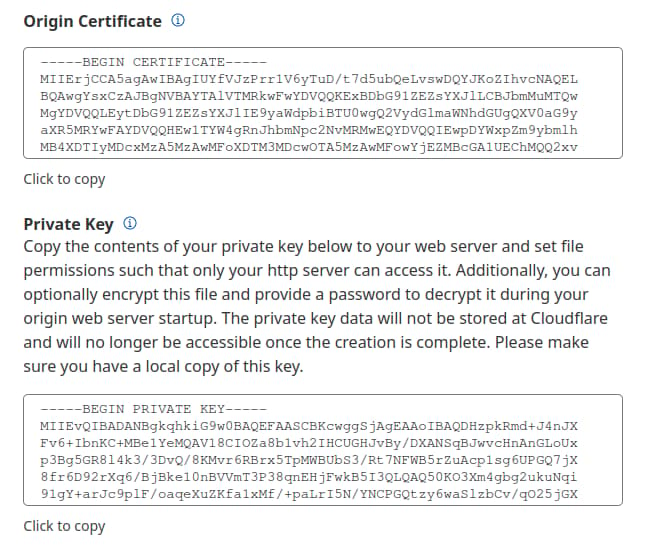
Click Create and you will see a dialog with the Origin Certificate and Private key. You need to transfer both the origin certificate and private key from Cloudflare to your server. For security reasons, the Private Key information will not be displayed again, so copy the key to your server before clicking Ok.
You’ll use the /etc/ssl directory on the server to hold the origin certificate and the private key files. The folder already exists on the server.
First, copy the contents of the Origin Certificate displayed in the dialog box in your browser.
Then, on your server, open /etc/ssl/cert.pem in your preferred text editor:
- sudo nano /etc/ssl/cert.pem
Paste the certificate contents into the file. Then save and exit the editor. If you are using nano, press Ctrl+X, then when prompted, Y and then Enter.
Then return to your browser and copy the contents of the Private key. Open the file /etc/ssl/key.pem for editing:
- sudo nano /etc/ssl/key.pem
Paste the private key into the file, save the file, and exit the editor.
Note: Sometimes, when you copy the certificate and key from the Cloudflare dashboard and paste it into the relevant files on the server, blank lines are inserted. Nginx will treat such certificates and keys as invalid, so ensure that there are no blank lines in your files.
Warning: Cloudflare’s Origin CA Certificate is only trusted by Cloudflare and therefore should only be used by origin servers that are actively connected to Cloudflare. If at any point you pause or disable Cloudflare, your Origin CA certificate will throw an untrusted certificate error.
Now that you copied the key and certificate files to your server, you need to update the Nginx configuration to use them.
Step 2 — Installing the Origin CA Certificate in Nginx
In the previous section, you generated an origin certificate and private key using Cloudflare’s dashboard and saved the files to your server. Now you’ll update the Nginx configuration for your site to use the origin certificate and private key to secure the connection between Cloudflare’s servers and your server.
First, make sure that UFW will allow HTTPS traffic. Enable Nginx Full, which will open both port 80 (HTTP) and port 443 (HTTPS):
- sudo ufw allow 'Nginx Full'
Now reload UFW:
- sudo ufw reload
Finally, check that your new rules are allowed and that UFW is active:
- sudo ufw status
You will see an output like this:
OutputStatus: active

To                         Action      From
--                         ------      ----
OpenSSH                    ALLOW       Anywhere
Nginx Full                ALLOW       Anywhere
OpenSSH (v6)               ALLOW       Anywhere (v6)
Nginx Full (v6)           ALLOW       Anywhere (v6)
Now you are ready to adjust your Nginx server block. Nginx creates a default server block during installation. Remove it if it still exists, as you’ve already configured a custom server block for your domain:
- sudo rm /etc/nginx/sites-enabled/default
Next, open the Nginx configuration file for your domain:
- sudo nano /etc/nginx/sites-available/your_domain
The file should look like this:
server {
        listen 80;
        listen [::]:80;

        root /var/www/your_domain/html;
        index index.html index.htm index.nginx-debian.html;

        server_name your_domain www.your_domain;

        location / {
                try_files $uri $uri/ =404;
        }
}
You’ll modify the Nginx configuration file to do the following:
- Listen on port
80and redirect all requests to usehttps. - Listen on port
443and use the origin certificate and private key added in the previous section.
Modify the file so it looks like the following:
server {
    listen 80;
    listen [::]:80;
    server_name your_domain www.your_domain;
    return 302 https://$server_name$request_uri;
}

server {

    # SSL configuration

    listen 443 ssl http2;
    listen [::]:443 ssl http2;
    ssl_certificate         /etc/ssl/cert.pem;
    ssl_certificate_key     /etc/ssl/key.pem;

    server_name your_domain www.your_domain;

    root /var/www/your_domain/html;
    index index.html index.htm index.nginx-debian.html;


    location / {
            try_files $uri $uri/ =404;
    }
}
Save the file and exit the editor.
Next, test to ensure that there are no syntax errors in any of your Nginx configuration files:
- sudo nginx -t
If you found no problems, restart Nginx to enable your changes:
- sudo systemctl restart nginx
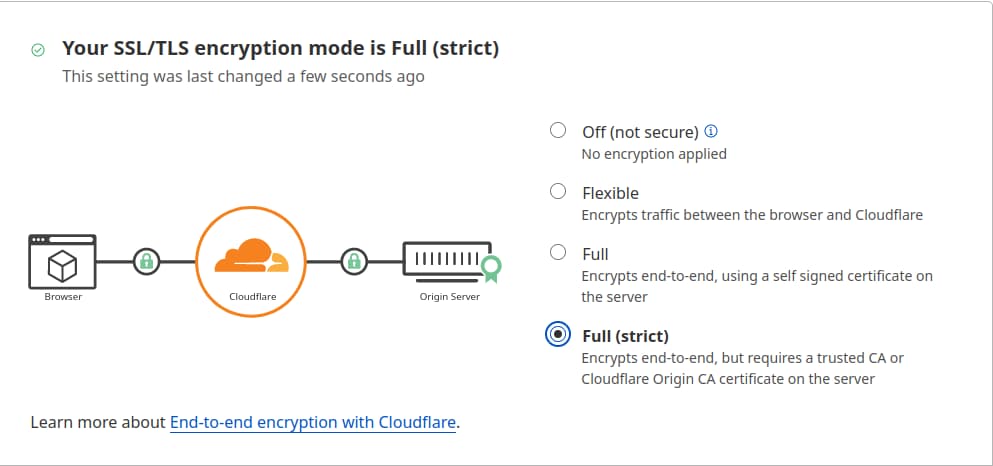
Now go to the Cloudflare dashboard’s SSL/TLS section, navigate to the Overview tab, and change SSL/TLS encryption mode to Full (strict). This informs Cloudflare to always encrypt the connection between Cloudflare and your origin Nginx server.
Now visit your website at https://your_domain to verify that it’s set up properly. You’ll see your home page displayed, and the browser will report that the site is secure.
To view the details of your certificate, access your browser’s Developer Tools, select the Security tab, and then View Certificate.
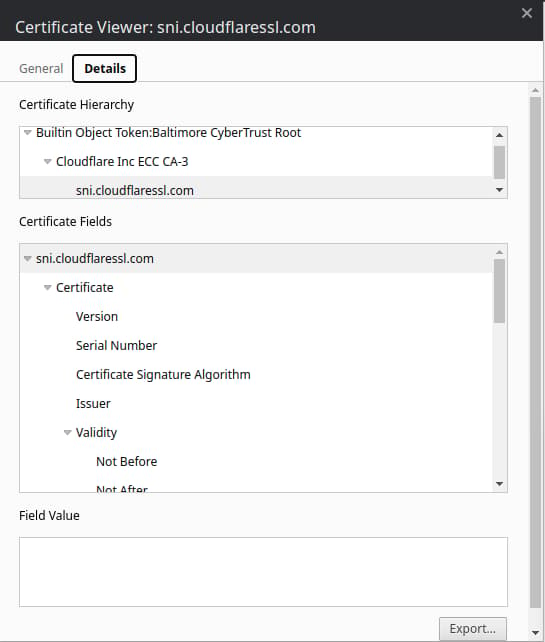
Note: You may notice that your certificate does not list Cloudflare as the issuer. This is because Cloudflare may use other certificate authorities, such as Let’s Encrypt. For a complete list, check out Cloudflare’s product documentation for certificate authorities.
In the next section, you will set up Authenticated Origin Pulls to verify that your origin server is indeed talking to Cloudflare and not some other server. By doing so, Nginx will be configured to only accept requests that use a valid client certificate from Cloudflare; all requests that have not passed through Cloudflare will be dropped.
Step 3 — Setting Up Authenticated Origin Pulls
The Origin CA certificate will help Cloudflare verify that it is talking to the correct origin server. This step will use TLS Client Authentication to verify that your origin Nginx server is talking to Cloudflare.
In a client-authenticated TLS handshake, both sides provide a certificate to be verified. The origin server is configured to only accept requests that use a valid client certificate from Cloudflare. Requests which have not passed through Cloudflare will be dropped as they will not have Cloudflare’s certificate. This means that attackers cannot circumvent Cloudflare’s security measures and directly connect to your Nginx server.
Cloudflare presents certificates signed by a CA with the following certificate:
-----BEGIN CERTIFICATE-----
MIIGCjCCA/KgAwIBAgIIV5G6lVbCLmEwDQYJKoZIhvcNAQENBQAwgZAxCzAJBgNV
BAYTAlVTMRkwFwYDVQQKExBDbG91ZEZsYXJlLCBJbmMuMRQwEgYDVQQLEwtPcmln
aW4gUHVsbDEWMBQGA1UEBxMNU2FuIEZyYW5jaXNjbzETMBEGA1UECBMKQ2FsaWZv
cm5pYTEjMCEGA1UEAxMab3JpZ2luLXB1bGwuY2xvdWRmbGFyZS5uZXQwHhcNMTkx
MDEwMTg0NTAwWhcNMjkxMTAxMTcwMDAwWjCBkDELMAkGA1UEBhMCVVMxGTAXBgNV
BAoTEENsb3VkRmxhcmUsIEluYy4xFDASBgNVBAsTC09yaWdpbiBQdWxsMRYwFAYD
VQQHEw1TYW4gRnJhbmNpc2NvMRMwEQYDVQQIEwpDYWxpZm9ybmlhMSMwIQYDVQQD
ExpvcmlnaW4tcHVsbC5jbG91ZGZsYXJlLm5ldDCCAiIwDQYJKoZIhvcNAQEBBQAD
ggIPADCCAgoCggIBAN2y2zojYfl0bKfhp0AJBFeV+jQqbCw3sHmvEPwLmqDLqynI
42tZXR5y914ZB9ZrwbL/K5O46exd/LujJnV2b3dzcx5rtiQzso0xzljqbnbQT20e
ihx/WrF4OkZKydZzsdaJsWAPuplDH5P7J82q3re88jQdgE5hqjqFZ3clCG7lxoBw
hLaazm3NJJlUfzdk97ouRvnFGAuXd5cQVx8jYOOeU60sWqmMe4QHdOvpqB91bJoY
QSKVFjUgHeTpN8tNpKJfb9LIn3pun3bC9NKNHtRKMNX3Kl/sAPq7q/AlndvA2Kw3
Dkum2mHQUGdzVHqcOgea9BGjLK2h7SuX93zTWL02u799dr6Xkrad/WShHchfjjRn
aL35niJUDr02YJtPgxWObsrfOU63B8juLUphW/4BOjjJyAG5l9j1//aUGEi/sEe5
lqVv0P78QrxoxR+MMXiJwQab5FB8TG/ac6mRHgF9CmkX90uaRh+OC07XjTdfSKGR
PpM9hB2ZhLol/nf8qmoLdoD5HvODZuKu2+muKeVHXgw2/A6wM7OwrinxZiyBk5Hh
CvaADH7PZpU6z/zv5NU5HSvXiKtCzFuDu4/Zfi34RfHXeCUfHAb4KfNRXJwMsxUa
+4ZpSAX2G6RnGU5meuXpU5/V+DQJp/e69XyyY6RXDoMywaEFlIlXBqjRRA2pAgMB
AAGjZjBkMA4GA1UdDwEB/wQEAwIBBjASBgNVHRMBAf8ECDAGAQH/AgECMB0GA1Ud
DgQWBBRDWUsraYuA4REzalfNVzjann3F6zAfBgNVHSMEGDAWgBRDWUsraYuA4REz
alfNVzjann3F6zANBgkqhkiG9w0BAQ0FAAOCAgEAkQ+T9nqcSlAuW/90DeYmQOW1
QhqOor5psBEGvxbNGV2hdLJY8h6QUq48BCevcMChg/L1CkznBNI40i3/6heDn3IS
zVEwXKf34pPFCACWVMZxbQjkNRTiH8iRur9EsaNQ5oXCPJkhwg2+IFyoPAAYURoX
VcI9SCDUa45clmYHJ/XYwV1icGVI8/9b2JUqklnOTa5tugwIUi5sTfipNcJXHhgz
6BKYDl0/UP0lLKbsUETXeTGDiDpxZYIgbcFrRDDkHC6BSvdWVEiH5b9mH2BON60z
0O0j8EEKTwi9jnafVtZQXP/D8yoVowdFDjXcKkOPF/1gIh9qrFR6GdoPVgB3SkLc
5ulBqZaCHm563jsvWb/kXJnlFxW+1bsO9BDD6DweBcGdNurgmH625wBXksSdD7y/
fakk8DagjbjKShYlPEFOAqEcliwjF45eabL0t27MJV61O/jHzHL3dknXeE4BDa2j
bA+JbyJeUMtU7KMsxvx82RmhqBEJJDBCJ3scVptvhDMRrtqDBW5JShxoAOcpFQGm
iYWicn46nPDjgTU0bX1ZPpTpryXbvciVL5RkVBuyX2ntcOLDPlZWgxZCBp96x07F
AnOzKgZk4RzZPNAxCXERVxajn/FLcOhglVAKo5H0ac+AitlQ0ip55D2/mf8o72tM
fVQ6VpyjEXdiIXWUq/o=
-----END CERTIFICATE-----
You can also download the certificate directly from Cloudflare’s documentation.
Copy this certificate.
Then create the file /etc/ssl/cloudflare.crt file to hold Cloudflare’s certificate:
- sudo nano /etc/ssl/cloudflare.crt
Add the certificate to the file. Then save the file and exit the editor.
Now update your Nginx configuration to use TLS Authenticated Origin Pulls. Open the configuration file for your domain:
- sudo nano /etc/nginx/sites-available/your_domain
Add the ssl_client_certificate and ssl_verify_client directives as shown in the following example:
. . .

server {

    # SSL configuration

    listen 443 ssl http2;
    listen [::]:443 ssl http2;
    ssl_certificate         /etc/ssl/cert.pem;
    ssl_certificate_key     /etc/ssl/key.pem;
    ssl_client_certificate /etc/ssl/cloudflare.crt;
    ssl_verify_client on;

    . . .
Save the file and exit the editor.
Next, test Nginx to make sure that there are no syntax errors in your Nginx configuration:
- sudo nginx -t
If no problems were found, restart Nginx to enable your changes:
- sudo systemctl restart nginx
Finally, to enable Authenticated Pulls, open the SSL/TLS section in the Cloudflare dashboard, navigate to the Origin Server tab and toggle the Authenticated Origin Pulls option .

Now visit your website at https://your_domain to verify that it was set up properly. As before, you’ll see your home page displayed.
To verify that your server will only accept requests signed by Cloudflare’s CA, toggle the Authenticated Origin Pulls option to disable it and then reload your website. You should get the following error message :
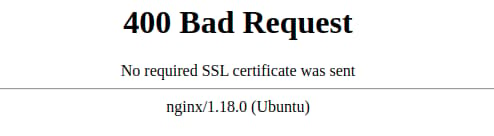
Your origin server raises an error if Cloudflare’s CA does not sign a request.
Note: Most browsers will cache requests, so to see the above change you can use Incognito/Private browsing mode in your browser. To prevent Cloudflare from caching requests while you set up your website, navigate to Overview in the Cloudflare dashboard and toggle Development Mode.
Now that you know it works properly return to the SSL/TLS section in the Cloudflare dashboard, navigate to the Origin Server tab and toggle the Authenticated Origin Pulls option again to enable it.
Conclusion
In this tutorial, you secured your Nginx-powered website by encrypting traffic between Cloudflare and the Nginx server using an Origin CA certificate from Cloudflare. You then set up Authenticated Origin Pulls on the Nginx server to ensure that it only accepts Cloudflare servers’ requests, preventing anyone else from directly connecting to the Nginx server.
Thanks for learning with the DigitalOcean Community. Check out our offerings for compute, storage, networking, and managed databases.
About the author(s)
Still looking for an answer?
This textbox defaults to using Markdown to format your answer.
You can type !ref in this text area to quickly search our full set of tutorials, documentation & marketplace offerings and insert the link!
I shows that “400 Bad request No required SSL certificate was sent nginx/1.18.0 (Ubuntu)”
The website wroks fine before the ssl installation
Authenticated Origin Pulls : ✅ Full (strict)✅ SSL/TLS Recommender✅
server {
    listen 80;
    listen [::]:80;
    server_name domain.xyz www.domain.xyz;
    return 302 https://$server_name$request_uri;
}
server {

    # SSL configuration

    listen 443 ssl http2;
    listen [::]:443 ssl http2;

    ssl_certificate         /etc/ssl/cert.pem;
    ssl_certificate_key     /etc/ssl/key.pem;
    ssl_client_certificate /etc/ssl/cloudflare.crt;
    ssl_verify_client on;


    server_name domain.xyz www.domain.xyz;

    location = /favicon.ico { access_log off; log_not_found off; }


    location / {
        include proxy_params;
        proxy_pass http://unix:/run/gunicorn.sock;
    }


}
Please Help…
Hi The website i want to host is using nextjs. To do this i’ve setup a reverse proxy however i don’t know the correct way todo it. I have followed your guide and others online but i only receive the ‘Bad gateway’ message when trying to access the page. I guess what i’m trying to say is that a guide on how to create a revers proxy with nginx and cloudflare would be nice or even just some insight as to where i’ve gone wrong.
server {

    server_name domain;

    location / {
         proxy_pass             http://127.0.0.1:8080; # Where my nextjs website is runnning
         proxy_read_timeout     60;
         proxy_connect_timeout  60;
         proxy_redirect         off;

         # Allow the use of websockets
         proxy_http_version 1.1;
         proxy_set_header Upgrade $http_upgrade;
         proxy_set_header Connection 'upgrade';
         proxy_set_header Host $host;
         proxy_cache_bypass $http_upgrade;
    }


    listen [::]:443 ssl ipv6only=on;
    listen 443 ssl default_server;

    # SSL configuration
    ssl_certificate         /etc/ssl/cert.pem;
    ssl_certificate_key     /etc/ssl/key.pem;
    ssl_client_certificate /etc/ssl/cloudflare.crt;
    ssl_verify_client on;

 }
server {
    if ($host = www.DOMAINNAME.com) {
        return 301 https://$host$request_uri;
    }

    if ($host = DOMAINNAME.com) {
        return 301 https://$host$request_uri;
    }

    listen 80 ;
    listen [::]:80 ;
    server_name domain;
    return 301 https://$host$request_uri;
}
Not working!, the 400 bad request has no fix. wasted hours of my time.
 This work is licensed under a Creative Commons Attribution-NonCommercial- ShareAlike 4.0 International License.
Become a contributor for community
Get paid to write technical tutorials and select a tech-focused charity to receive a matching donation.

DigitalOcean Documentation
Full documentation for every DigitalOcean product.

Resources for startups and AI-native businesses
The Wave has everything you need to know about building a business, from raising funding to marketing your product.
The developer cloud
Scale up as you grow — whether you're running one virtual machine or ten thousand.

Start building today
From GPU-powered inference and Kubernetes to managed databases and storage, get everything you need to build, scale, and deploy intelligent applications.
