By Tom Stoneham and Mark Drake
Not using Ubuntu 16.04?
Choose a different version or distribution.
An earlier version of this tutorial was written by Mateusz Papiernik.
The author selected the Wikimedia Foundation to receive a $200 donation as part of the Write for DOnations program.
Introduction
Caddy is a web server designed around simplicity and security that comes with a number of features that are useful for hosting websites. For example, it can automatically obtain and manage TLS certificates from Let’s Encrypt to enable HTTPS, and includes support for HTTP/2. HTTPS is a system for securing traffic between your users and your server, and is quickly becoming a basic expectation of any website running in production — without it, Chrome and Firefox will warn that your website is “Not Secure” if users try to submit login information.
Previously, the recommended method for installing Caddy was to download prebuilt binaries from the Caddy project website. However, recent changes in how Caddy’s licensing works means that you’re no longer allowed to use these prebuilt binaries for commercial purposes unless you pay a license fee, even if you’re just using Caddy internally within a business. Luckily, the Caddy source code is still fully open-source and you can build Caddy yourself to avoid running into licensing issues.
In this tutorial, you’ll build Caddy from source and use it to host a website secured with HTTPS. Then you’ll configure Caddy using a Caddyfile, install Caddy plugins, and learn how to upgrade your installation when a new version is released.
Prerequisites
Before you start this guide, you’ll need to have the following:
- An Ubuntu 16.04 server configured according to our Initial Server Setup guide. You should be able to connect to the server over SSH, log in as a non-root user with sudo privileges, and have a working firewall set up using UFW.
- A domain name set up to use DigitalOcean’s DNS management. You can buy a domain name from any domain registrar and follow our guide on Pointing a Domain to DigitalOcean Nameservers to manage your DNS through DigitalOcean.
- An “A” record pointing from your domain to your server and, optionally, an “AAAA” record if you wish to enable IPv6. Our guide on Setting Up a Host Name with DigitalOcean explains how to do this.
- The Go language toolchain installed on your server. Follow our guide on How to Install Go 1.6 to set up Go. You should also have some understanding of how to compile Go code and how the
gocommand line tool functions. Follow our guide on Building Go Executables to learn about this.
Step 1 — Building Caddy
In this step, you’ll fetch Caddy’s source code and make sure that you’re able to compile it. Caddy is written in Go, so use the go get command line tool to fetch Caddy’s source from GitHub and save it to $GOPATH/src/github.com/mholt/caddy:
go get github.com/mholt/caddy/caddy
go get uses Git to clone the code from GitHub. Git is a version control system, meaning it records a project’s state as you make changes and allows you to return to any previous state in the project’s history. By default, the go get command downloads the latest version of the source code, but it would be a good idea to use the latest stable release of Caddy rather than the most recent addition to the repository, which will likely be midway between releases. Unreleased versions can have bugs or half-implemented, broken features. The latest stable version, on the other hand, is more likely to compile and run correctly.
To view all the previous versions, first navigate to the directory where you saved Caddy’s source:
cd $GOPATH/src/github.com/mholt/caddy
Next, view all the previous releases of Caddy using the git tag command:
git tag
You’ll see output similar to the following:
Outputv0.10.0
v0.10.1
v0.10.10
v0.10.11
v0.10.12
v0.10.2
v0.10.3
v0.10.4
v0.10.5
. . .
Whenever a stable version of Caddy is released, the authors will signify this in Git by adding a tag. You can use Git to revert the code to how it was at the time of the last stable release. Find the highest version number in the output; at the time of writing, this is v0.10.12.
Since you will be modifying the source later on in order to install some plugins, create a new branch to store your changes. In Git, branches are ways of working on different versions of code simultaneously. They allow you to switch between a version of the code with your personal changes and the “official” version of the code. To create a new branch, use the git checkout command, which switches branches. The -b option will instruct Git to create a new branch with name adding_plugins from version v0.10.12. Replace adding_plugins with whatever you wish to name the branch and v0.10.12 with the latest stable version you identified previously:
git checkout -b "adding_plugins" "v0.10.12"
This will revert your version of the Caddy source code back to the last stable version and you will be in a new branch where you can keep your changes to the code. When you update Caddy in the future, you’ll merge changes into this new branch.
At this point, you’re all set to build Caddy by using the go install tool to compile the source code into a binary. While the command syntax may seem like it will install Caddy from a website (github.com), this actually refers to the local path on the server where we’ve just been working with the Git repository ($GOPATH/src/github.com/mholt/caddy):
go install github.com/mholt/caddy/caddy
After compiling the source code, run the caddy command to start the server. Note that in order for this to work correctly, your Go path should be set to $GOPATH/bin, as described in the prerequisites:
caddy
This command will produce the following output:
OutputActivating privacy features... done.
http://:2015
WARNING: File descriptor limit 1024 is too low for production servers. At least 8192 is recommended. Fix with "ulimit -n 8192".
The warning can be ignored for the time being, as we’ll resolve it when we set up the various configuration files required by Caddy. Press CTRL+C to exit this command.
To demonstrate that Caddy is being built from your source, add a line to the Caddy source code to print some text when Caddy is run. Use nano or your preferred editor to open $GOPATH/src/github.com/mholt/caddy/caddy/caddymain/run.go.:
nano $GOPATH/src/github.com/mholt/caddy/caddy/caddymain/run.go
This file processes any options passed to the Caddy command, and is one of the first things executed when you run Caddy.
Locate the Run() function, and add the highlighted text as the first line within the curly brackets. This will print out the text “Hello from Caddy!” before the server runs:
. . .
// Run is Caddy's main() function.
func Run() {
        fmt.Println("Hello from Caddy!")

        flag.Parse()

        caddy.AppName = appName
        . . .
}
Press CTRL + X, Y, then ENTER to save and close the file. If you run the go install and caddy commands again, you will see the message you added to the Run() function at the top of the output:
go install github.com/mholt/caddy/caddy
caddy
OutputHello from Caddy!
Activating privacy features... done.
http://:2015
WARNING: File descriptor limit 1024 is too low for production servers. At least 8192 is recommended. Fix with "ulimit -n 8192".
With that, you have successfully built Caddy from source. You can remove the added line from $GOPATH/src/github.com/mholt/caddy/caddy/caddymain/run.go if you wish, but if you do so you’ll need to recompile the code. In the next step, you’ll install Caddy as a service so that it starts automatically at boot, and then adjust its ownership and permissions settings to ensure the server’s security.
Step 2 — Installing Caddy
Now that you’ve verified you’re able to build Caddy, it’s time to configure a systemd service so that Caddy can be launched automatically on system startup. Systemd is a comprehensive solution for managing processes on Linux. Caddy comes installed with a caddy.service file which systemd can use to manage the Caddy service. This service file makes some assumptions about the environment in which Caddy will run, so there are a few things that you will likely want to change before installing it.
To begin, copy the Caddy binary to /usr/local/bin, the standard location for binaries that are not managed by Ubuntu’s package manager and aren’t key to system operation:
sudo cp $GOPATH/bin/caddy /usr/local/bin/
Next, change ownership of the Caddy binary over to the root user. Note that while root will own Caddy, it’s advised that you don’t run Caddy with the root account as this could be a major security issue if there is a vulnerability in Caddy. However, having root own the binary will prevent other accounts from modifying it with the permissions we will set. This is desirable because if another process with lower permissions than Caddy is compromised, it will not be able to modify Caddy to gain more control of the system:
sudo chown root:root /usr/local/bin/caddy
Next, set the binary’s file permissions to 755 — this gives root full read/write/execute permissions for the file, while other users will only be able to read and execute it:
sudo chmod 755 /usr/local/bin/caddy
Since the Caddy process will not be running as root, Linux will prevent it from binding to ports :80 or :443 (the standard ports for HTTP and HTTPS, respectively), as these are a privileged operations. In order to be viewable on the web, Caddy needs to be bound to one of these ports. Otherwise, users will need to add a specific port number to the server’s URL in their browser to view the content it will serve.
Using the setcap command can allow the Caddy process to bind to low ports without running as root. setcap is useful for enabling a process to perform a specific privileged operation without giving it full superuser permissions. cap_net_bind_service=+ep specifies that you wish to give the process the CAP_NET_BIND_SERVICE permissions, which enables binding to privileged ports:
sudo setcap 'cap_net_bind_service=+ep' /usr/local/bin/caddy
After setting permissions for the Caddy binary, create a directory where you’ll store Caddy’s configuration files. These should be held in a subdirectory of /etc/, which is the Filesystem Hierarchy Standard’s recommended location for configuration files:
sudo mkdir /etc/caddy
Set the owner of this directory to root, and its group to www-data. www-data is a standard user account for running web servers, and is the account that will run Caddy. Setting ownership in this fashion will ensure that you have read and write access to the binary (via the root account) and the Caddy process can read and write to it as well (since it will run as www-data), but other users will not have access to it. When used with chown, the -R flag changes the ownership of all subdirectories and files within the /etc/caddy directory, rather than just the directory itself:
sudo chown -R root:www-data /etc/caddy
In a later step, this tutorial will go over how to enable automatic TLS with Let’s Encrypt. In preparation for that, make a directory to store any TLS certificates that Caddy will obtain and give it the same ownership rules as the /etc/caddy directory:
sudo mkdir /etc/ssl/caddy
sudo chown -R root:www-data /etc/ssl/caddy
Caddy must be able to write certificates to this directory and read from it in order to encrypt requests. For this reason, modify the permissions for the /etc/ssl/caddy directory so that it’s only accessible by root and www-data:
sudo chmod 0770 /etc/ssl/caddy
Next, create a directory to store the files that Caddy will host. /var/www/ is the de facto standard location to store files served over HTTP:
sudo mkdir /var/www
Then set the directory’s owner and group to www-data, the default user for web server operations on Ubuntu:
- sudo chown www-data:www-data /var/www
Caddy is configured via a file called Caddyfile; it may be helpful to think of this as similar to httpd.conf in Apache or the Nginx sites-available configuration directory. The systemd service for Caddy will expect this file to be stored in /etc/caddy, so create Caddyfile there using touch:
sudo touch /etc/caddy/Caddyfile
To install the Caddy service, copy the systemd unit file from the Caddy source code to /etc/systemd/system, the location for systemd services. Doing so will give systemd the ability to discover and control the Caddy service:
sudo cp $GOPATH/src/github.com/mholt/caddy/dist/init/linux-systemd/caddy.service /etc/systemd/system/
Modify the service file’s permissions so it can only be modified by its owner, root:
sudo chmod 644 /etc/systemd/system/caddy.service
Next, use the systemctl command line tool to reload systemd. This will cause systemd to detect the Caddy service, although we will not run it yet:
sudo systemctl daemon-reload
Check whether systemd has detected the Caddy service by running systemctl status:
sudo systemctl status caddy
Output● caddy.service - Caddy HTTP/2 web server
   Loaded: loaded (/etc/systemd/system/caddy.service; disabled; vendor preset: enabled)
   Active: inactive (dead)
     Docs: https://caddyserver.com/docs
If you see this same output, then Caddy was correctly detected by systemd.
The final step in this installation process, before you write the configuration for Caddy, is to adjust your firewall. You should already be running a firewall using UFW, as prescribed in the initial server setup guide. A firewall is an important tool to protect the security of your server, as it allows you to configure which ports are publicly available for any external party to connect to and those which are protected from access. If there are other processes which expose a port on your server, the firewall prevents these from being accessed, reducing the opportunities for an attacker to compromise vulnerable software.
Use the ufw command line tool to disable the firewall for ports :80 and :443, which will allow Caddy to communicate over HTTP and HTTPS, respectively:
sudo ufw allow 80
sudo ufw allow 443
Use ufw status to check whether your changes worked:
sudo ufw status
OutputStatus: active

To                         Action      From
--                         ------      ----
OpenSSH                    ALLOW       Anywhere
80                         ALLOW       Anywhere
443                        ALLOW       Anywhere
OpenSSH (v6)               ALLOW       Anywhere (v6)
80 (v6)                    ALLOW       Anywhere (v6)
443 (v6)                   ALLOW       Anywhere (v6)
Your installation of Caddy is complete, but at this point it isn’t set up to do anything. Next, we’ll look at how to take this clean installation of Caddy and configure it to serve a website.
Step 3 — Configuring Caddy
In order for your Caddy installation to be used as a functional web server, there are a few settings that need to be changed. As we go through making these changes, we’ll consider the syntax of the Caddyfile configuration, explore a couple of configuration scenarios, and serve a placeholder page over HTTP.
To begin configuring Caddy, create a basic HTML file for it to serve. HTML is the language that describes the content of web pages, and this file will function as a placeholder to demonstrate hosting a website with Caddy. If you decide to use Caddy to host your own website, you’ll replace this file with whatever content you want to host. Place this file in the /var/www/ directory you set up earlier. The name index.html is significant, as this refers to the “default” page for most web servers and users navigating to your domain will be served this file first:
sudo touch /var/www/index.html
Open the new file with your preferred editor:
sudo nano /var/www/index.html
Add the following content to the file:
<!DOCTYPE html>
<html>
  <head>
    <title>Hello from Caddy!</title>
  </head>
  <body>
    <h1 style="font-family: sans-serif">This page is being served via Caddy</h1>
  </body>
</html>
This will display a heading with the text “This page is being served via Caddy”.
Save and close the file, then open the Caddyfile configuration file you created earlier:
sudo nano /etc/caddy/Caddyfile
Edit the file to include the following content:
:80 {
    root /var/www
}
On the first line, :80 sets the hostname of the server — in Caddy this is called a label. The hostname is the domain name where Caddy will respond to requests. In this case, set it to :80, meaning port :80 of the server. This prevents the server from running over HTTPS for now, since Caddy will try to enable this automatically, but we want to do this via a plugin.
By default, Caddy attempts to fetch an SSL certificate from Let’s Encrypt by making a resource available over HTTP, like hosting a file. However, if you want to run an internal service using Caddy, you might not want to expose the server to the public internet. Using a plugin allows you to use the Let’s Encrypt DNS challenge. This involves Caddy creating a DNS “TXT” record to prove control of the server and allows you to fetch certificates without necessarily having to accept outside HTTP requests. This leaves you more options for how to run Caddy in the future.
After :80 is a configuration block, enclosed within curly brackets, in which configurations for the site will go. On the next line, we see the root directive. Directives are the actual configuration options for Caddy, and adding them changes Caddy’s behavior when serving the website. Directives can have arguments, which are options for how the directive should take effect. In this case, the root directive has one argument: /var/www. This directive sets the directory where the files Caddy should serve are located. However, directives aren’t required to have arguments. For example, you could add the gzip directive without any arguments to compress web pages before they’re sent to the client, making them load faster.
:80 {
    root /var/www
    gzip
}
Directives can be configured with subdirectives that provide additional functionality. These are placed in their own configuration blocks, again using curly braces. For example, although the gzip directive works on its own, we could use the ext subdirective to only compress certain file types, or the level subdirective to control what level of compression will occur (1 being the lowest and 9 being the highest).
:80 {
    root /var/www
    gzip {
        ext .html .htm .php
        level 6
    }
}
Caddy has a huge number of different directives for many use cases. For example, the fastcgi directive could be useful for enabling PHP. The markdown directive could be used to automatically convert Markdown files to HTML before serving them, which could be useful for creating a simple blog.
Save and close the Caddyfile, and test that everything is working correctly. Use systemctl to start the Caddy service:
sudo systemctl start caddy
Next, run systemctl status to find information about the status of the Caddy service:
sudo systemctl status caddy
You’ll see the following:
Output● caddy.service - Caddy HTTP/2 web server
   Loaded: loaded (/etc/systemd/system/caddy.service; disabled; vendor preset: enabled)
   Active: active (running) since Sat 2018-01-27 11:37:06 UTC; 7min ago
     Docs: https://caddyserver.com/docs
 Main PID: 2973 (caddy)
    Tasks: 6
   Memory: 3.2M
      CPU: 24ms
   CGroup: /system.slice/caddy.service
           └─2973 /usr/local/bin/caddy -log stdout -agree=true -conf=/etc/caddy/Caddyfile -root=/var/tmp

Jan 27 11:37:06 caddy-tutorial-testing-0 systemd[1]: Started Caddy HTTP/2 web server.
Jan 27 11:37:06 caddy-tutorial-testing-0 caddy[2973]: Activating privacy features... done.
Jan 27 11:37:06 caddy-tutorial-testing-0 caddy[2973]: http://
Jan 27 11:37:06 caddy-tutorial-testing-0 caddy[2973]: 2018/01/27 11:37:06 http://
If you browse to your domain you should now see Caddy is running, and your sample web page should display. After confirming this, use systemctl to stop the Caddy service, since there are still some changes to be made:
sudo systemctl stop caddy
While Caddy includes a lot of directives by default, it can’t cater to every possible use case and you may want to add more functionality to the server. Now that we know Caddy is serving content as expected, we will go over how to extend Caddy’s functionality through the use of plugins.
Step 4 — Using Plugins
Plugins are a way of changing Caddy’s behavior. They are generally small snippets of code that we can insert into Caddy to add more directives for specific use cases. The easiest way to understand plugins is to jump straight in and try one out, so we’ll install the minify plugin. This plugin removes excess whitespace and redundant code from some files, reducing the size of each one, and again, helping to speed up loading times.
Start by returning to where Go saved Caddy’s source code, since you’ll need to modify this to install the plugin:
cd $GOPATH/src/github.com/mholt/caddy
Open Caddy’s run.go file again. As we said earlier, this is one of the first parts of Caddy to be run, and it’s the location where plugins are installed.
nano caddy/caddymain/run.go
In this file you will see an import declaration that looks like this:
. . .
import (
	"errors"
	"flag"
	"fmt"
	"io/ioutil"
	"log"
	"os"
	"runtime"
	"strconv"
	"strings"

	"gopkg.in/natefinch/lumberjack.v2"

	"github.com/xenolf/lego/acmev2"

	"github.com/mholt/caddy"
	// plug in the HTTP server type
	_ "github.com/mholt/caddy/caddyhttp"

	"github.com/mholt/caddy/caddytls"
	// This is where other plugins get plugged in (imported)
)
. . .
To install a plugin, add _ "github.com/path/to/plugin" to this import directive. Some plugins may require some slight configuration tweaks, so be sure to read the documentation for whatever ones you install. You can find a list of popular plugins in the left pane of the Caddy documentation, under Plugins.
The minify plugin’s GitHub repository is hacdias/caddy-minify, so add the following at the bottom of the import declaration:
. . .
import (
    . . .
    "github.com/mholt/caddy/caddytls"
    // This is where other plugins get plugged in (imported)

    _ "github.com/hacdias/caddy-minify"
)
You need to commit your code when you make changes to it so that when you merge in any new updates those changes aren’t lost. If you haven’t committed code on this server before, you’ll need to set a name and email so that Git can identify you in the logs. The git config command lets you set these options, and the --global flag applies them for any repositories you may work on in the future. Unless you push code to a public repository such as GitHub, these details won’t be made public.
git config --global user.email "sammy@example.com"
git config --global user.name "Sammy"
Now that you’ve set your username and email, add any files you’ve changed to Git’s stage (a cache used to store the state of the code before you commit) by running the following:
git add -A .
Now run git commit to save your changes to the current branch. The -m option allows you to set a commit message so you can make a note of what you changed. This message can be found by looking through Git’s logs:
git commit -m "Added minify plugin"
You now have the path to the plugin in your code, but you still need to download the plugin locally so that Go can actually access it. This command will automatically fetch all of Caddy’s dependencies when run from the $GOPATH/src/github.com/mholt/caddy directory:
go get ./...
Any time you add a new plugin, you have to rebuild Caddy. This is because Go is a compiled programming language, meaning the source code is transformed into machine code before execution. Your change to the import declaration has altered the source code, but won’t affect the binary until it’s compiled.
Use the go install command to compile Caddy:
go install github.com/mholt/caddy/caddy
If Caddy was built successfully, this command will exit with no output. Copy the generated binary to /usr/local/bin and set up permissions for the binary like you did previously — you must take these steps every time you rebuild Caddy to ensure its functionality and security.
sudo cp $GOPATH/bin/caddy /usr/local/bin/
sudo chown root:root /usr/local/bin/caddy
sudo chmod 755 /usr/local/bin/caddy
sudo setcap 'cap_net_bind_service=+ep' /usr/local/bin/caddy
To demonstrate that the plugin was successfully installed, open your Caddyfile.
sudo nano /etc/caddy/Caddyfile
Enable the plugin by adding the following line to the configuration block:
:80 {
    root /var/www
    gzip
    minify
}
Now start your server using systemctl:
sudo systemctl start caddy
Caddy is now running and will minify any files that it serves, including the index.html file you created earlier. You can observe the ‘minification’ at work using cURL, a command line tool for making web requests. Running curl with no options or flags will fetch the content of a web page and display it in the terminal. Run the following command to request the index.html file from Caddy, replacing example.com with your domain.
curl http://example.com
You’ll see the following output. Notice that all unnecessary space has been removed, showing that the minify plugin has worked.
Output<!doctype html><title>Hello from Caddy!</title><h1 style=font-family:sans-serif>This page is being served via Caddy</h1>
This same installation method will work for other Caddy plugins. You’ll get some more practice with adding plugins by installing the tls.dns.digitalocean plugin to automatically enable secured HTTPS traffic.
Step 5 — Enabling Automatic TLS with Let’s Encrypt
Caddy enables HTTPS by default using Let’s Encrypt, which is useful as it’s easy to get the details of HTTPS wrong. Caddy’s approach to HTTPS is secure and doesn’t force you to delve deep into the configuration to encrypt your traffic. However, Caddy defaults to the HTTP-01 method for verifying with Let’s Encrypt that you actually own your domain. This method involves posting a special file (containing a response to a challenge sent by Let’s Encrypt) to a specific location on the website. While this method works, it requires that your website be publicly accessible. This can be an issue with certain firewall configurations or if you’re running Caddy as an internal service for your business.
As an alternative, you can install the tls.dns.digitalocean Caddy plugin, which will use the DNS-01 verification method instead. This plugin authenticates with Let’s Encrypt by adding a new “TXT” DNS record for your domain which won’t affect how your website functions. It uses DigitalOcean’s API for controlling DNS which gives you the flexibility to fetch a certificate even if your server isn’t publicly accessible. For more information on the different types of DNS records, read our Introduction to DigitalOcean DNS.
The method for installing the tls.dns.digitalocean Caddy plugin is almost identical to how you installed the minify plugin. To begin, open $GOPATH/src/github.com/mholt/caddy/caddy/caddymain/run.go:
nano $GOPATH/src/github.com/mholt/caddy/caddy/caddymain/run.go
Add the plugin’s location:
. . .
import (
    . . .
    "github.com/mholt/caddy/caddytls"
    // This is where other plugins get plugged in (imported)

    _ "github.com/hacdias/caddy-minify"
    _ "github.com/caddyserver/dnsproviders/digitalocean"
)
To update Caddy, navigate into Caddy’s source repository and commit the changes to Git:
cd $GOPATH/src/github.com/mholt/caddy
git add -A .
git commit -m "Add DigitalOcean DNS provider"
Next, install all dependencies and build Caddy, as you have done previously:
go get ./...
go install github.com/mholt/caddy/caddy
Ensure Caddy is stopped via systemctl, then finish installing the plugin by copying the newly built Caddy binary and once more setting its ownership and permissions:
- sudo systemctl stop caddy
- sudo cp $GOPATH/bin/caddy /usr/local/bin/
- sudo chown root:root /usr/local/bin/caddy
- sudo chmod 755 /usr/local/bin/caddy
- sudo setcap 'cap_net_bind_service=+ep' /usr/local/bin/caddy
Next, configure Caddy to work with DigitalOcean’s API to set DNS records. Navigate to the API tab in your DigitalOcean account and select Generate New Token:

Give your token a descriptive name (caddy-dns, for example) and ensure that Write (optional) is selected. Then, press Generate Token:
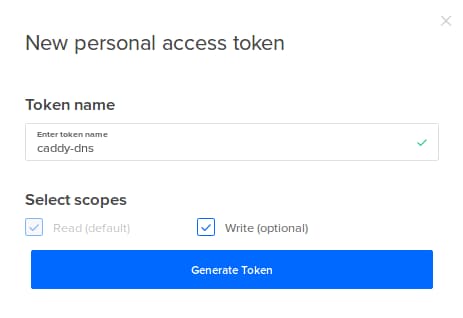
Click on the generated token to copy it, and record it somewhere you won’t lose it. Caddy needs to access this token as an environment variable to configure DigitalOcean’s DNS. systemd’s service files allow you to define environment variables to be included in the process’s environment. Edit the the Caddy service file in the /etc/systemd/system/ directory, rather than the version in the Caddy Git repository. Add your API key to the version of the file outside of the Git repository to avoid accidentally committing the private token to the public Caddy repository:
sudo nano /etc/systemd/system/caddy.service
Find the line beginning with Environment= in the [Service] section. This line defines the environment variables that should be passed to the Caddy process. Add a space at the end of this line, then add a DO_AUTH_TOKEN variable, followed by the token you just generated:
[Service]
Restart=on-abnormal

; User and group the process will run as.
User=www-data
Group=www-data

; Letsencrypt-issued certificates will be written to this directory.
Environment=CADDYPATH=/etc/ssl/caddy DO_AUTH_TOKEN=your_token_here
Save and close this file, then reload the systemd daemon as you did earlier to ensure the configuration is updated:
sudo systemctl daemon-reload
Run systemctl status to check that your configuration changes were okay:
sudo systemctl status caddy
This will produce an output similar to the following. Pay close attention to the line beginning Loaded:. The loaded status indicates that your changes to the service configuration were successful. If an error occurs when configuring a systemd service, this line will instead display an error status along with an explanation why systemd couldn’t interpret the service file. The next line, beginning Active: states whether or not the service is running. Because you stopped Caddy earlier in this step, this displays inactive. When Caddy is run, this will show enabled or running.
Output● caddy.service - Caddy HTTP/2 web server
   Loaded: loaded (/etc/systemd/system/caddy.service; disabled; vendor preset: enabled)
   Active: inactive (dead)
     Docs: https://caddyserver.com/docs
You’ll need to make a couple of slight changes to your Caddyfile, so open it up for editing:
sudo nano /etc/caddy/Caddyfile
Add the highlighted lines to the Caddyfile, making sure to replace example.com with your domain. Using a domain rather than just a port for the hostname will cause Caddy to serve requests over HTTPS. The tls directive configures Caddy’s behavior when using TLS, and the dns subdirective specifies that Caddy should use the DNS-01 system, rather than HTTP-01:
example.com {
    root /var/www
    gzip
    minify
    tls {
        dns digitalocean
    }
}
Your website is ready to be deployed. First, start the server with systemctl and then enable it. This will configure Caddy to start on boot:
sudo systemctl start caddy
sudo systemctl enable caddy
If you browse to your domain, you should be automatically redirected to HTTPS.
Your installation of Caddy is complete and secured. Next, we’ll look at how to update Caddy when a new version is released. When you install software using a package manager, updating it is generally as simple as running a single command and oftentimes the operating system can often install security updates automatically. However, since you’ve built Caddy from source, the process is a bit more involved; you’ll need to rebuild Caddy from an updated version of the source code, then set it up again.
Step 6 — Updating Your Caddy Installation
Keeping software updated is an important security practice, since outdated software often has vulnerabilities. Running the latest version of Caddy will protect you from having your server’s security compromised via any vulnerabilities that might exist in an older version. In this step, we’ll look at how to update your installation of Caddy when a new version comes out. This step should only be followed if a new release of Caddy is pushed to the Caddy GitHub repository.
We’ll use Git to update the state of our source code. First, change to the caddy source directory:
cd $GOPATH/src/github.com/mholt/caddy
Ensure that you’re on the branch that you created in Step 1 by using git checkout:
git checkout adding_plugins
Next, use git fetch to pull the changes from the remote repository. When Git clones the Caddy repository, it will maintain a link to the upstream repository — the central location where changes originate. Git refers to the upstream repository by the name origin, so you need to fetch from origin:
git fetch origin
The changes to the repository are now present on your system, stored under a different branch. Use git tag to see the most recent release, since you should still use released versions of Caddy, rather than code between releases:
git tag
As before, browse through the list until you find the most recent version. Git includes a tool for merging two different code branches — git merge. Type the following to merge the changes from the latest version into your working branch. Be sure to replace adding_plugins with your branch’s name, and version number with the latest one you just identified:
git merge adding_plugins v0.10.13
An editor will appear which you can save and close to complete the merge. However, there is a possibility that merge conflicts could occur where Git is unable to work out how the two different versions of the code should fit together. Git will notify you if this occurs, and you will need to manually edit the conflicting files then commit to resolve the conflict.
Assuming there are no merge conflicts, reinstall Caddy via the same process you’ve followed throughout this tutorial. First, use go install to rebuild the binary:
go install github.com/mholt/caddy/caddy
Next, stop the Caddy service and copy the new binary:
sudo systemctl stop caddy
sudo cp $GOPATH/bin/caddy /usr/local/bin/
Set the binary’s permissions:
sudo chown root:root /usr/local/bin/caddy
sudo chmod 755 /usr/local/bin/caddy
sudo setcap 'cap_net_bind_service=+ep' /usr/local/bin/caddy
Finally, use systemctl to start the Caddy service up again:
- sudo systemctl start caddy
Caddy will continue to start up at boot in the future, as it hasn’t been disabled. With that, Caddy has been successfully updated to the latest version and should continue to work without interruption, at least until the next release.
Conclusion
By following this tutorial, you have successfully deployed a website using Caddy. A good next step would be to find a way of being notified when new versions of Caddy are released. For example, you could use the Atom feed for Caddy releases, or a dedicated service such as Sibbell. Creating a script to automate the process of updating the server would also be a good idea — you could even combine the two and create a build tool that automatically rebuilds Caddy when there’s a new release. Otherwise, you can explore Caddy’s documentation and discover how best to customize it to suit your needs.
Thanks for learning with the DigitalOcean Community. Check out our offerings for compute, storage, networking, and managed databases.
About the author(s)
Former Technical Writer at DigitalOcean. Focused on SysAdmin topics including Debian 11, Ubuntu 22.04, Ubuntu 20.04, Databases, SQL and PostgreSQL.
Still looking for an answer?
This textbox defaults to using Markdown to format your answer.
You can type !ref in this text area to quickly search our full set of tutorials, documentation & marketplace offerings and insert the link!
Hmmm yet another (also free) webserver. I like free stuff. Workz with apache in same droplet?
Thanks, that helped. I would mention the ability of installation with extra plugins:
$ curl https://getcaddy.com | bash -s http.git,http.ratelimit,dns
UPD Just created a subdomain and surprisingly it also works via https. Is it supposed to?
Can I use Digital Ocean $5/ month plan to use Caddy to host a Veu.js front-end app?
Hello,
Can you write a new article for difference between caddy, nginx and apache.
I had to enable Caddy to use 80 and 443 via
sudo setcap CAP_NET_BIND_SERVICE=+eip /usr/local/bin/caddy
This tutorial is NOT compatible with debian, missing large parts necessary to run caddy.
Hi All,
Which email address shall I use for the tls in the Caddyfile?
Just any? E.g. my private one? Or does it have to be one managed via the domain? If the latter, I assume I also need to put it as MX record into my droplet, correct?
Thanks a lot!
when I type “go get github.com/mholt/caddy/caddy” I get this error:
package context: unrecognized import path “context” (import path does not begin with hostname)
 This work is licensed under a Creative Commons Attribution-NonCommercial- ShareAlike 4.0 International License.
Become a contributor for community
Get paid to write technical tutorials and select a tech-focused charity to receive a matching donation.

DigitalOcean Documentation
Full documentation for every DigitalOcean product.

Resources for startups and AI-native businesses
The Wave has everything you need to know about building a business, from raising funding to marketing your product.
The developer cloud
Scale up as you grow — whether you're running one virtual machine or ten thousand.

Start building today
From GPU-powered inference and Kubernetes to managed databases and storage, get everything you need to build, scale, and deploy intelligent applications.
