By Stanley Ulili and Caitlin Postal

The author selected /dev/color to receive a donation as part of the Write for DOnations program.
Introduction
Most applications depend on data, whether it comes from a database or an API. Fetching data from an API sends a network request to the API server and returns the data as the response. These round trips take time and can increase your application response time to users. Furthermore, most APIs limit the number of requests they can serve an application within a specific time frame, a process known as rate limiting.
To get around these problems, you can cache your data so that the application makes a single request to an API, and all the subsequent data requests will retrieve the data from the cache. Redis, an in-memory database that stores data in the server memory, is a popular tool to cache data. You can connect to Redis in Node.js using the node-redis module, which gives you methods to retrieve and store data in Redis.
In this tutorial, you’ll build an Express application that retrieves data from a RESTful API using the axios module. Next, you will modify the app to store the data fetched from the API in Redis using the node-redis module. After that, you will implement the cache validity period so that the cache can expire after a certain amount of time has passed. Finally, you will use the Express middleware to cache data.
Prerequisites
To follow the tutorial, you will need:
-
Node.js environment setup on your server. If you are on Ubuntu 22.04, install the latest version of Node.js and npm by following option 3 in How To Install Node.js on Ubuntu 22.04. For other operating systems, see the How to Install Node.js and Create a Local Development Environment series.
-
Redis installed on your server. If you’re using Ubuntu 22.04, follow steps 1 and 2 of How To Install and Secure Redis on Ubuntu 22.04. If you’re working on another operating system, see How to Install and Secure Redis.
-
Knowledge of asynchronous programming. Follow Understanding the Event Loop, Callbacks, Promises, and Async/Await in JavaScript.
-
Basic knowledge using the Express web framework. See How To Get Started with Node.js and Express.
Step 1 — Setting Up the Project
In this step, you’ll install the dependencies necessary for this project and start an Express server. In this tutorial, you’ll create a wiki containing information about different kinds of fish. We’ll call the project fish_wiki.
First, create the directory for the project using the mkdir command:
- mkdir fish_wiki
Move into the directory:
- cd fish_wiki
Initialize the package.json file using the npm command:
- npm init -y
The -y option accepts all defaults automatically.
When you run the npm init command, it will create the package.json file in your directory with the following contents:
OutputWrote to /home/your_username/<^>fish_wiki<^/package.json:

{
  "name": "fish_wiki",
  "version": "1.0.0",
  "description": "",
  "main": "index.js",
  "scripts": {
    "test": "echo \"Error: no test specified\" && exit 1"
  },
  "keywords": [],
  "author": "",
  "license": "ISC"
}
Next, you will install the following packages:
express: a web server framework for Node.js.axios: a Node.js HTTP client, which is helpful for making API calls.node-redis: a Redis client that allows you to store and access data in Redis.
To install the three packages together, enter the following command:
- npm install express axios redis
After installing the packages, you’ll create a basic Express server.
Using nano or the text editor of your choice, create and open the server.js file:
- nano server.js
In your server.js file, enter the following code to create an Express server:
const express = require("express");

const app = express();
const port = process.env.PORT || 3000;


app.listen(port, () => {
  console.log(`App listening on port ${port}`);
});
First, you import express into the file. In the second line, you set the app variable as an instance of express, which gives you access to methods such as get, post, listen, and many more. This tutorial will focus on the get and listen methods.
In the following line, you define and assign the port variable to the port number you want the server to listen on. If no port number is available in an environmental variables file, port 3000 will be used as the default.
Finally, using the app variable, you invoke the express module’s listen() method to start the server on port 3000.
Save and close the file.
Run the server.js file using the node command to start the server:
- node server.js
The console will log a message similar to the following:
OutputApp listening on port 3000
The output confirms that the server is running and ready to serve any requests on port 3000. Because Node.js does not automatically reload the server when file are changed, you will now stop the server using CTRL+C so that you can update server.js in the next step.
Once you have installed the dependencies and created an Express server, you’ll retrieve data from a RESTful API.
Step 2 — Retrieving Data From a RESTful API Without Caching
In this step, you’ll build upon the Express server from the previous step to retrieve data from a RESTful API without implementing caching, demonstrating what happens when data is not stored in a cache.
To begin, open the server.js file in your text editor:
- nano server.js
Next, you will retrieve data from the FishWatch API. The FishWatch API returns information about fish species.
In your server.js file, define a function that requests API data with the following highlighted code:
const express = require("express");
const axios = require("axios");

const app = express();
const port = process.env.PORT || 3000;

async function fetchApiData(species) {
  const apiResponse = await axios.get(
    `https://www.fishwatch.gov/api/species/${species}`
  );
  console.log("Request sent to the API");
  return apiResponse.data;
}

app.listen(port, () => {
  console.log(`App listening on port ${port}`);
});
In the second line, you import the axios module. Next, you define an asynchronous function fetchApiData(), which takes species as a parameter. To make the function asynchronous, you prefix it with the async keyword.
Within the function, you call the axios module’s get() method with the API endpoint you want the method to retrieve the data from, which is the FishWatch API in this example. Since the get() method implements a promise, you prefix it with the await keyword to resolve the promise. Once the promise is resolved and data is returned from the API, you call the console.log() method. The console.log() method will log a message saying that a request has been sent to the API. Finally, you return the data from the API.
Next, you will define an Express route that accepts GET requests. In your server.js file, define the route with the following code:
...

app.get("/fish/:species", getSpeciesData);

app.listen(port, () => {
  ...
});
In the preceding code block, you invoke the express module’s get() method, which only listens on GET requests. The method takes two arguments:
/fish/:species: the endpoint that Express will be listening on. The endpoint takes a route parameter:speciesthat captures anything entered on that position in the URL.getSpeciesData()(not yet defined): a callback function that will be called when the URL matches the endpoint specified in the first argument.
Now that the route is defined, specify the getSpeciesData callback function:
...
async function getSpeciesData(req, res) {
}
app.get("/fish/:species", getSpeciesData);
...
The getSpeciesData function is an asynchronous handler function passed to the express module’s get() method as a second argument. The getSpeciesData() function takes two arguments: a request object and a response object. The request object contains information about the client, while the response object contains the information that will be sent to the client from Express.
Next, add the highlighted code to call fetchApiData() to retrieve data from an API in the getSpeciesData() callback function:
...
async function getSpeciesData(req, res) {
  const species = req.params.species;
  let results;

  results = await fetchApiData(species);
}
...
In the function, you extract the value captured from the endpoint stored in the req.params object, then assign it to the species variable. In the next line, you define the variable results and set it to undefined.
After that, you invoke the fetchApiData() function with the species variable as an argument. The fetchApiData() function call is prefixed with the await syntax because it returns a promise. When the promise resolves, it returns the data, which is then assigned to the results variable.
Next, add the highlighted code to handle runtime errors:
...
async function getSpeciesData(req, res) {
  const species = req.params.species;
  let results;

  try {
    results = await fetchApiData(species);
  } catch (error) {
    console.error(error);
    res.status(404).send("Data unavailable");
  }
}
...
You define the try/catch block to handle runtime errors. In the try block, you call fetchApiData() to retrieve data from an API.
If an error is encountered, the catch block logs the error and returns a 404 status code with a “Data unavailable” response.
Most APIs return a 404 status code when they have no data for a specific query, which automatically triggers the catch block to execute. However, the FishWatch API returns a 200 status code with an empty array when there is no data for that specific query. A 200 status code means the request was successful, so the catch() block is never triggered.
To trigger the catch() block, you need to check if the array is empty and throw an error when the if condition evaluates to true. When the if conditions evaluate to false, you can send a response to the client containing the data.
To do that, add the highlighted code:
...
async function getSpeciesData(req, res) {
  ...
  try {
    results = await fetchApiData(species);
    if (results.length === 0) {
      throw "API returned an empty array";
    }
    res.send({
      fromCache: false,
      data: results,
    });
  } catch (error) {
    console.error(error);
    res.status(404).send("Data unavailable");
  }
}
...
Once the data is returned from the API, the if statement checks if the results variable is empty. If the condition is met, you use the throw statement to throw a custom error with the message API returned an empty array. After it runs, execution switches to the catch block, which logs the error message and returns a 404 response.
Conversely, if the results variable has data, the if statement condition will not be met. As a result, the program will skip the if block and execute the response object’s send method, which sends a response to the client.
The send method takes an object that has the following properties:
-
fromCache: the property accepts a value that helps you know whether data is coming from the Redis cache or the API. You now assigned afalsevalue because the data comes from an API. -
data: the property is assigned theresultsvariable that contains the data returned from the API.
At this point, your complete code will look like this:
const express = require("express");
const axios = require("axios");

const app = express();
const port = process.env.PORT || 3000;

async function fetchApiData(species) {
  const apiResponse = await axios.get(
    `https://www.fishwatch.gov/api/species/${species}`
  );
  console.log("Request sent to the API");
  return apiResponse.data;
}

async function getSpeciesData(req, res) {
  const species = req.params.species;
  let results;

  try {
    results = await fetchApiData(species);
    if (results.length === 0) {
      throw "API returned an empty array";
    }
    res.send({
      fromCache: false,
      data: results,
    });
  } catch (error) {
    console.error(error);
    res.status(404).send("Data unavailable");
  }
}

app.get("/fish/:species", getSpeciesData);

app.listen(port, () => {
  console.log(`App listening on port ${port}`);
});
Now that everything is in place, save and exit your file.
Start the express server:
- node server.js
The Fishwatch API accepts many species, but we will use only the red-snapper fish species as a route parameter on the endpoint you will be testing throughout this tutorial.
Now launch your favorite web browser on your local computer. Navigate to the http://localhost:3000/fish/red-snapper URL.
Note: If you are following the tutorial on a remote server, you can view the app in your browser using port forwarding.
With the Node.js server still running, open another terminal on your local computer, then enter the following command:
- ssh -L 3000:localhost:3000 your-non-root-user@yourserver-ip
Upon connecting to the server, navigate to http://localhost:3000/fish/red-snapper on your local machine web browser.
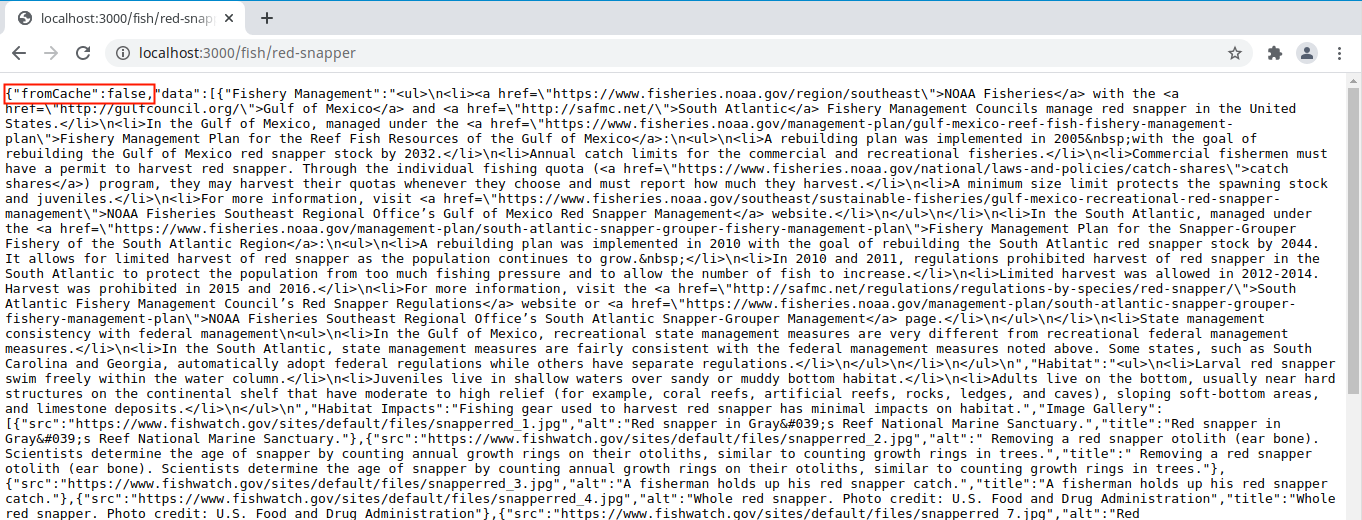
Once the page loads, you should see fromCache set to false.
Now, refresh the URL three more times and look at your terminal. The terminal will log “Request sent to the API” as many times as you have refreshed your browser.
If you refreshed the URL three times after the initial visit, your output will look like this:
Output
App listening on port 3000
Request sent to the API
Request sent to the API
Request sent to the API
Request sent to the API
This output shows that a network request is sent to the API server every time you refresh the browser. If you had an application with 1000 users hitting the same endpoint, that’s 1000 network requests sent to the API.
When you implement caching, the request to the API will only be done once. All subsequent requests will get data from the cache, boosting your application performance.
For now, stop your Express server with CTRL+C.
Now that you can request data from an API and serve it to users, you’ll cache data returned from an API in Redis.
Step 3 — Caching RESTful API Requests Using Redis
In this section, you’ll cache data from the API so that only the initial visit to your app endpoint will request data from an API server, and all the following requests will fetch data from the Redis cache.
Open the server.js file:
- nano server.js
In your server.js file, import the node-redis module:
const express = require("express");
const axios = require("axios");
const redis = require("redis");
...
In the same file, connect to Redis using the node-redis module by adding the highlighted code:
const express = require("express");
const axios = require("axios");
const redis = require("redis");

const app = express();
const port = process.env.PORT || 3000;

let redisClient;

(async () => {
  redisClient = redis.createClient();

  redisClient.on("error", (error) => console.error(`Error : ${error}`));

  await redisClient.connect();
})();

async function fetchApiData(species) {
  ...
}
...
First, you define the redisClient variable with the value set to undefined. After that, you define an anonymous self-invoked asynchronous function, which is a function that runs immediately after defining it. You define an anonymous self-invoked asynchronous function by enclosing a nameless function definition in parenthesis (async () => {...}). To make it self-invoked, you immediately follow it with another set of parenthesis (), which ends up looking like (async () => {...})().
Within the function, you invoke the redis module’s createClient() method that creates a redis object. Since you did not provide the port for Redis to use when you invoked the createClient() method, Redis will use port 6379, the default port.
You also call the Node.js on() method that registers events on the Redis object. The on() method takes two arguments: error and a callback. The first argument error is an event triggered when Redis encounters an error. The second argument is a callback that runs when the error event is emitted. The callback logs the error in the console.
Finally, you call the connect() method, which starts the connection with Redis on the default port 6379. The connect() method returns a promise, so you prefix it with the await syntax to resolve it.
Now that your application is connected to Redis, you’ll modify the getSpeciesData() callback to store data in Redis on the initial visit and retrieve the data from the cache for all the requests that follow.
In your server.js file, add and update the highlighted code:
...
async function getSpeciesData(req, res) {
  const species = req.params.species;
  let results;
  let isCached = false;

  try {
    const cacheResults = await redisClient.get(species);
    if (cacheResults) {
      isCached = true;
      results = JSON.parse(cacheResults);
    } else {
      results = await fetchApiData(species);
      if (results.length === 0) {
        throw "API returned an empty array";
     }
    }

    res.send({
      fromCache: isCached,
      data: results,
    });
  } catch (error) {
    ...
  }
}
...
In the getSpeciesData function, you define the isCached variable with the value false. Within the try block, you call the node-redis module’s get() method with species as the argument. When the method finds the key in Redis that matches the species variable value, it returns the data, which is then assigned to the cacheResults variable.
Next, an if statement checks if the cacheResults variable has data. If the condition is met, the isCache variable is assigned true. Following this, you invoke the parse() method of the JSON object with cacheResults as the argument. The parse() method converts JSON string data into a JavaScript object. After the JSON has been parsed, you invoke the send() method, which takes an object that has the fromCache property set to the isCached variable. The method sends the response to the client.
If the get() method of the node-redis module finds no data in the cache, the cacheResults variable is set to null. As a result, the if statement evaluates to false. When that happens, execution skips to the else block where you call the fetchApiData() function to fetch data from the API. However, once the data is returned from the API, it is not saved in Redis.
To store the data in the Redis cache, you need to use the node-redis module’s set() method to save it. To do that, add the highlighted line:
...
async function getSpeciesData(req, res) {
  const species = req.params.species;
  let results;
  let isCached = false;

  try {
    const cacheResults = await redisClient.get(species);
    if (cacheResults) {
      isCached = true;
      results = JSON.parse(cacheResults);
    } else {
      results = await fetchApiData(species);
      if (results.length === 0) {
        throw "API returned an empty array";
      }
      await redisClient.set(species, JSON.stringify(results));
    }

    res.send({
      fromCache: isCached,
      data: results,
    });
  } catch (error) {
    ...
  }
}
...
Within the else block, once the data has been fetched, you call the node-redis module’s set() method to save the data in Redis under the key name of the value in the species variable.
The set() method takes two arguments, which are key-value pairs: species and JSON.stringify(results).
The first argument, species, is the key that the data will be saved under in Redis. Remember species is set to the value passed to the endpoint you defined. For example, when you visit /fish/red-snapper, species is set to red-snapper, which will be the key in Redis.
The second argument, JSON.stringify(results), is the value for the key. In the second argument, you invoke the JSON’s stringify() method with the results variable as the argument, which contains data returned from the API. The method converts JSON into a string; this is why, when you retrieved data from the cache using the node-redis module’s get() method earlier, you invoked the JSON.parse method with the cacheResults variable as the argument.
Your complete file will now look like the following:
const express = require("express");
const axios = require("axios");
const redis = require("redis");

const app = express();
const port = process.env.PORT || 3000;

let redisClient;

(async () => {
  redisClient = redis.createClient();

  redisClient.on("error", (error) => console.error(`Error : ${error}`));

  await redisClient.connect();
})();

async function fetchApiData(species) {
  const apiResponse = await axios.get(
    `https://www.fishwatch.gov/api/species/${species}`
  );
  console.log("Request sent to the API");
  return apiResponse.data;
}

async function getSpeciesData(req, res) {
  const species = req.params.species;
  let results;
  let isCached = false;

  try {
    const cacheResults = await redisClient.get(species);
    if (cacheResults) {
      isCached = true;
      results = JSON.parse(cacheResults);
    } else {
      results = await fetchApiData(species);
      if (results.length === 0) {
        throw "API returned an empty array";
      }
      await redisClient.set(species, JSON.stringify(results));
    }

    res.send({
      fromCache: isCached,
      data: results,
    });
  } catch (error) {
    console.error(error);
    res.status(404).send("Data unavailable");
  }
}

app.get("/fish/:species", getSpeciesData);

app.listen(port, () => {
  console.log(`App listening on port ${port}`);
});
Save and exit your file, and run the server.js using the node command:
- node server.js
Once the server has started, refresh http://localhost:3000/fish/red-snapper in your browser.
Notice that fromCache is still set to false:
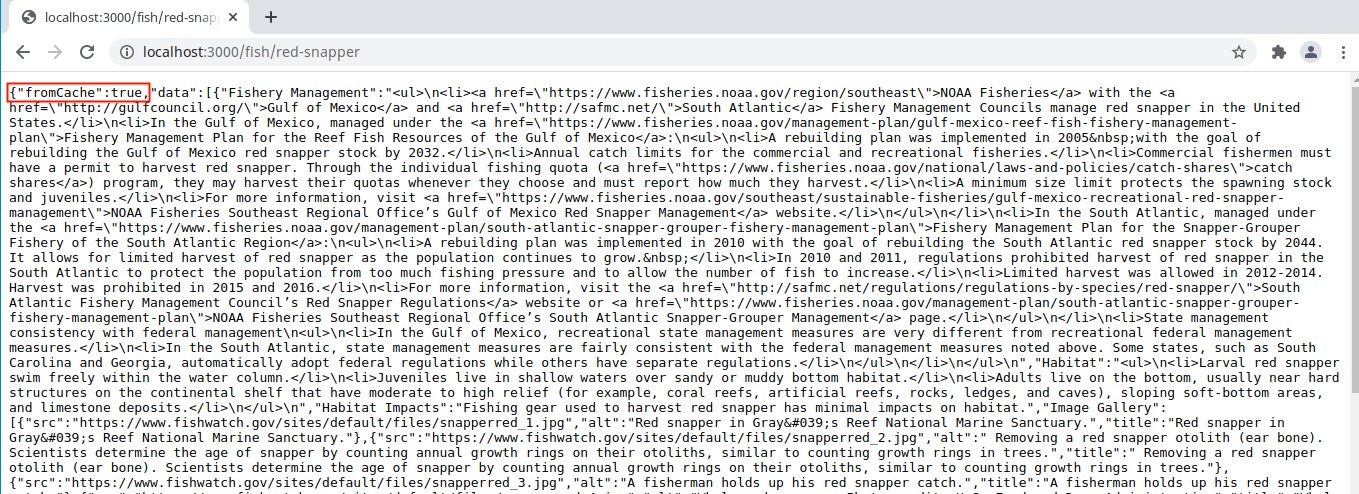
Now refresh the page again to see that this time fromCache is set to true:
Refresh the page five times and go back to the terminal. Your output will look similar to the following:
OutputApp listening on port 3000
Request sent to the API
Now, Request sent to the API has only been logged once after multiple URL refreshes, contrasting with the last section where the message was logged for each refresh. This output confirms that only one request was sent to the server and that subsequently, data is fetched from Redis.
To further confirm that the data is stored in Redis, stop your server using CTRL+C. Connect to the Redis server client with the following command:
- redis-cli
Retrieve the data under the key red-snapper:
- get red-snapper
Your output will resemble the following (edited for brevity):
Output"[{\"Fishery Management\":\"<ul>\\n<li><a...3\"}]"
The output shows the stringified version of JSON data that the API returns when you visit the /fish/red-snapper endpoint, which confirms that the API data is stored in the Redis cache.
Exit the Redis Server client:
- exit
Now that you can cache data from an API, you can also set the cache validity.
Step 4 — Implementing Cache Validity
When caching data, you need to know how often the data changes. Some API data changes in minutes; others in hours, weeks, months, or years. Setting a suitable cache duration ensures that your application serves up-to-date data to your users.
In this step, you’ll set the cache validity for the API data that needs to be stored in Redis. When the cache expires, your application will send a request to the API to retrieve recent data.
You need to consult your API documentation to set the correct expiry time for the cache. Most documentation will mention how frequently the data is updated. However, there are some cases where the documentation doesn’t provide the information, so you might have to guess. Checking the last_updated property of various API endpoints can show how frequently the data is updated.
Once you choose the cache duration, you need to convert it into seconds. For demonstration in this tutorial, you will set the cache duration to 3 minutes or 180 seconds. This sample duration will make testing the cache duration functionality easier.
To implement the cache validity duration, open the server.js file:
- nano server.js
Add the highlighted code:
const express = require("express");
const axios = require("axios");
const redis = require("redis");

const app = express();
const port = process.env.PORT || 3000;

let redisClient;

(async () => {
  ...
})();

async function fetchApiData(species) {
  ...
}

async function getSpeciesData(req, res) {
  const species = req.params.species;
  let results;
  let isCached = false;

  try {
    const cacheResults = await redisClient.get(species);
    if (cacheResults) {
      isCached = true;
      results = JSON.parse(cacheResults);
    } else {
      results = await fetchApiData(species);
      if (results.length === 0) {
        throw "API returned an empty array";
      }
      await redisClient.set(species, JSON.stringify(results), {
        EX: 180,
        NX: true,
      });
    }

    res.send({
      fromCache: isCached,
      data: results,
    });
  } catch (error) {
    console.error(error);
    res.status(404).send("Data unavailable");
  }
}

app.get("/fish/:species", getSpeciesData);

app.listen(port, () => {
  console.log(`App listening on port ${port}`);
});
In the node-redis module’s set() method, you pass a third argument of an object with the following properties:
EX: accepts a value with the cache duration in seconds.NX: when set totrue, it ensures that theset()method should only set a key that doesn’t already exist in Redis.
Save and exit your file.
Go back to the Redis server client to test the cache validity:
- redis-cli
Delete the red-snapper key in Redis:
- del red-snapper
Exit the Redis client:
- exit
Now, start the development server with the node command:
- node server.js
Switch back to your browser and refresh the http://localhost:3000/fish/red-snapper URL. For the next three minutes, if you refresh the URL, the output in the terminal should be consistent with the following output:
OutputApp listening on port 3000
Request sent to the API
After three minutes have passed, refresh the URL in your browser. In the terminal, you should see that “Request sent to the API” has been logged twice.
OutputApp listening on port 3000
Request sent to the API
Request sent to the API
This output shows that the cache expired, and a request to the API was made again.
You can stop the Express server.
Now that you can set the cache validity, you’ll cache data using middleware next.
Step 5 — Caching Data in Middleware
In this step, you’ll use the Express middleware to cache data. Middleware is a function that can access the request object, response object, and a callback that should run after it executes. The function that runs after the middleware also has access to the request and response object. When using middleware, you can modify request and response objects or return a response to the user earlier.
To use middleware in your application for caching, you will modify the getSpeciesData() handler function to fetch data from an API and store it in Redis. You’ll move all the code that looks for data in Redis to the cacheData middleware function.
When you visit the /fish/:species endpoint, the middleware function will run first to search for data in the cache; if found, it will return a response, and the getSpeciesData function won’t run. However, if the middleware does not find the data in the cache, it will call the getSpeciesData function to fetch data from API and store it in Redis.
First, open your server.js:
- nano server.js
Next, remove the highlighted code:
...
async function getSpeciesData(req, res) {
  const species = req.params.species;
  let results;
  let isCached = false;

  try {
    const cacheResults = await redisClient.get(species);
    if (cacheResults) {
      isCached = true;
      results = JSON.parse(cacheResults);
    } else {
      results = await fetchApiData(species);
      if (results.length === 0) {
        throw "API returned an empty array";
      }
      await redisClient.set(species, JSON.stringify(results), {
        EX: 180,
        NX: true,
      });
    }

    res.send({
      fromCache: isCached,
      data: results,
    });
  } catch (error) {
    console.error(error);
    res.status(404).send("Data unavailable");
  }
}
...
In the getSpeciesData() function, you remove all the code that looks for data stored in Redis. You also remove the isCached variable since the function getSpeciesData() function will only fetch data from the API and store it in Redis.
Once the code has been removed, set fromCache to false as highlighted below, so the getSpeciesData() function will look like the following:
...
async function getSpeciesData(req, res) {
  const species = req.params.species;
  let results;

  try {
    results = await fetchApiData(species);
    if (results.length === 0) {
      throw "API returned an empty array";
    }
    await redisClient.set(species, JSON.stringify(results), {
      EX: 180,
      NX: true,
    });

    res.send({
      fromCache: false,
      data: results,
    });
  } catch (error) {
    console.error(error);
    res.status(404).send("Data unavailable");
  }
}
...
The getSpeciesData() function retrieves the data from API, stores it in the cache, and returns a response to the user.
Next, add the following code to define the middleware function for caching data in Redis:
...
async function cacheData(req, res, next) {
  const species = req.params.species;
  let results;
  try {
    const cacheResults = await redisClient.get(species);
    if (cacheResults) {
      results = JSON.parse(cacheResults);
      res.send({
        fromCache: true,
        data: results,
      });
    } else {
      next();
    }
  } catch (error) {
    console.error(error);
    res.status(404);
  }
}

async function getSpeciesData(req, res) {
...
}
...
The cacheData() middleware function takes three arguments: req, res, and next. In the try block, the function checks if the value in the species variable has data stored in Redis under its key. If the data is in Redis, it is returned and set to the cacheResults variable.
Next, the if statement checks if cacheResults has data. The data is saved in the results variable if it evaluates to true. After that, the middleware uses the send() method to return an object with the properties fromCache set to true and data set to the results variable.
However, if the if statement evaluates to false, execution switches to the else block. Within the else block, you call next(), which passes control to the next function that should execute after it.
To make the cacheData() middleware pass control to the getSpeciesData() function when next() is invoked, update the express module’s get() method accordingly:
...
app.get("/fish/:species", cacheData, getSpeciesData);
...
The get() method now takes cacheData as its second argument, which is the middleware that looks for data cached in Redis and returns a response when found.
Now, when you visit the /fish/:species endpoint, cacheData() executes first. If data is cached, it will return the response, and the request-response cycle ends here. However, if no data is found in the cache, the getSpeciesData() will be called to retrieve data from API, store it in the cache, and return a response.
The complete file will now look like this:
const express = require("express");
const axios = require("axios");
const redis = require("redis");

const app = express();
const port = process.env.PORT || 3000;

let redisClient;

(async () => {
  redisClient = redis.createClient();

  redisClient.on("error", (error) => console.error(`Error : ${error}`));

  await redisClient.connect();
})();

async function fetchApiData(species) {
  const apiResponse = await axios.get(
    `https://www.fishwatch.gov/api/species/${species}`
  );
  console.log("Request sent to the API");
  return apiResponse.data;
}

async function cacheData(req, res, next) {
  const species = req.params.species;
  let results;
  try {
    const cacheResults = await redisClient.get(species);
    if (cacheResults) {
      results = JSON.parse(cacheResults);
      res.send({
        fromCache: true,
        data: results,
      });
    } else {
      next();
    }
  } catch (error) {
    console.error(error);
    res.status(404);
  }
}
async function getSpeciesData(req, res) {
  const species = req.params.species;
  let results;

  try {
    results = await fetchApiData(species);
    if (results.length === 0) {
      throw "API returned an empty array";
    }
    await redisClient.set(species, JSON.stringify(results), {
      EX: 180,
      NX: true,
    });

    res.send({
      fromCache: false,
      data: results,
    });
  } catch (error) {
    console.error(error);
    res.status(404).send("Data unavailable");
  }
}

app.get("/fish/:species", cacheData, getSpeciesData);

app.listen(port, () => {
  console.log(`App listening on port ${port}`);
});
Save and exit your file.
To test the caching properly, you can delete the red-snapper key in Redis. To do that, go into the Redis client:
- redis-cli
Remove the red-snapper key:
- del red-snapper
Exit the Redis client:
- exit
Now, run the server.js file:
- node server.js
Once the server starts, go back to the browser and visit the http://localhost:3000/fish/red-snapper again. Refresh it multiple times.
The terminal will log the message that a request was sent to the API. The cacheData() middleware will serve all requests for the next three minutes. Your output will look similar to this if you randomly refresh the URL in a four-minute timespan:
OutputApp listening on port 3000
Request sent to the API
Request sent to the API
The behavior is consistent with how the application worked in the previous section.
You can now cache data in Redis using middleware.
Conclusion
In this article, you built an application that fetches data from an API and returns the data as a response to the client. You then modified the app to cache the API response in Redis on the initial visit and serve the data from the cache for all subsequent requests. You modified that cache duration to expire after a certain amount of time has passed, and then you used middleware to handle the cache data retrieval.
As a next step, you can explore the Node Redis documentation to learn more about the features available in the node-redis module. You can also read the Axios and Express documentation for a deeper look into the topics covered in this tutorial.
To continue building your Node.js skill, see How To Code in Node.js series.
Thanks for learning with the DigitalOcean Community. Check out our offerings for compute, storage, networking, and managed databases.
About the author(s)
Software Engineer with a passion for sharing my knowledge.
Still looking for an answer?
This textbox defaults to using Markdown to format your answer.
You can type !ref in this text area to quickly search our full set of tutorials, documentation & marketplace offerings and insert the link!
This comment has been deleted
 This work is licensed under a Creative Commons Attribution-NonCommercial- ShareAlike 4.0 International License.
Become a contributor for community
Get paid to write technical tutorials and select a tech-focused charity to receive a matching donation.

DigitalOcean Documentation
Full documentation for every DigitalOcean product.

Resources for startups and AI-native businesses
The Wave has everything you need to know about building a business, from raising funding to marketing your product.
The developer cloud
Scale up as you grow — whether you're running one virtual machine or ten thousand.

Start building today
From GPU-powered inference and Kubernetes to managed databases and storage, get everything you need to build, scale, and deploy intelligent applications.
