 Stack on FreeBSD 10.1")
Introduction
A FAMP stack, which is similar to a LAMP stack on Linux, is a group of open source software that is typically installed together to enable a FreeBSD server to host dynamic websites and web apps. FAMP is an acronym that stands for FreeBSD (operating system), Apache (web server), MySQL (database server), and PHP (to process dynamic PHP content).
In this guide, we’ll get a FAMP stack installed on a FreeBSD 10.1 cloud server using pkg, the FreeBSD package manager.
Note: As of July 1, 2022, DigitalOcean no longer supports the creation of new FreeBSD Droplets through the Control Panel or API. However, you can still spin up FreeBSD Droplets using a custom image. Learn how to import a custom image to DigitalOcean by following our product documentation.
Prerequisites
Before you begin this guide, you should have a FreeBSD 10.1 server. Also, you must connect to your FreeBSD server as a user with superuser privileges (i.e. is allowed to use sudo or change to the root user).
Step One — Install Apache
The Apache web server is currently the most popular web server in the world, which makes it a great choice for hosting a website.
We can install Apache easily using FreeBSD’s package manager, pkg. A package manager allows us to install most software pain-free from a repository maintained by FreeBSD. You can learn more about how to use pkg here.
To install Apache 2.4 using pkg, use this command:
sudo pkg install apache24
Enter y at the confirmation prompt.
This installs Apache and its dependencies.
To enable Apache as a service, add apache24_enable="YES" to the /etc/rc.conf file. We will use this sysrc command to do just that:
sudo sysrc apache24_enable=yes
Now start Apache:
sudo service apache24 start
You can do a spot check right away to verify that everything went as planned by visiting your server’s public IP address in your web browser (see the note under the next heading to find out what your public IP address is if you do not have this information already):
http://your_server_IP_address/
You will see the default FreeBSD Apache web page, which is there for testing purposes. It should say: “It Works!”, which indicates that your web server is correctly installed.
How To find Your Server’s Public IP Address
If you do not know what your server’s public IP address is, there are a number of ways that you can find it. Usually, this is the address you use to connect to your server through SSH.
A universal way to look up the IP address is to use the ifconfig command, on the server itself. The ifconfig command will print out information about your network interfaces. In order to narrow down the output to only the server’s public IP address, use this command (note that the highlighted part is the name of the network interface, and may vary):
ifconfig vtnet0 | grep "inet " | awk '{ print $2 }'
Now that you have the public IP address, you may use it in your web browser’s address bar to access your web server.
Step Two — Install MySQL
Now that we have our web server up and running, it is time to install MySQL, the relational database management system. The MySQL server will organize and provide access to databases where our server can store information.
Again, we can use pkg to acquire and install our software.
To install MySQL 5.6 using pkg, use this command:
sudo pkg install mysql56-server
Enter y at the confirmation prompt.
This installs the MySQL server and client packages.
To enable MySQL server as a service, add mysql_enable="YES" to the /etc/rc.conf file. This sysrc command will do just that:
sudo sysrc mysql_enable=yes
Now start the MySQL server:
sudo service mysql-server start
Now that your MySQL database is running, you will want to run a simple security script that will remove some dangerous defaults and slightly restrict access to your database system. Start the interactive script by running this command:
sudo mysql_secure_installation
The prompt will ask you for your current root password (the MySQL admin user, root). Since you just installed MySQL, you most likely won’t have one, so leave it blank by pressing RETURN. Then the prompt will ask you if you want to set a root password. Go ahead and enter Y, and follow the instructions:
Enter current password for root (enter for none): [RETURN]
OK, successfully used password, moving on...

Setting the root password ensures that nobody can log into the MySQL
root user without the proper authorization.

Set root password? [Y/n] Y
New password: password
Re-enter new password: password
Password updated successfully!
For the rest of the questions, you should simply hit the RETURN key at each prompt to accept the default values. This will remove some sample users and databases, disable remote root logins, and load these new rules so that MySQL immediately respects the changes we have made.
At this point, your database system is now set up and we can move on.
Step Three — Install PHP
PHP is the component of our setup that will process code to display dynamic content. It can run scripts, connect to MySQL databases to get information, and hand the processed content over to the web server to display.
We can once again leverage the pkg system to install our components. We’re going to include the mod_php, php-mysql, and php-mysqli package as well.
To install PHP 5.6 with pkg, run this command:
sudo pkg install mod_php56 php56-mysql php56-mysqli
Enter y at the confirmation prompt. This installs the php56, mod_php56, php56-mysql, and php56-mysqli packages.
Now copy the sample PHP configuration file into place with this command:
sudo cp /usr/local/etc/php.ini-production /usr/local/etc/php.ini
Now run the rehash command to regenerate the system’s cached information about your installed executable files:
rehash
Before using PHP, you must configure it to work with Apache.
Install PHP Modules (Optional)
To enhance the functionality of PHP, we can optionally install some additional modules.
To see the available options for PHP 5.6 modules and libraries, you can type this into your system:
pkg search php56
The results will be mostly PHP 5.6 modules that you can install. :
mod_php56-5.6.3
php56-5.6.3
php56-bcmath-5.6.3
php56-bz2-5.6.3
php56-calendar-5.6.3
php56-ctype-5.6.3
php56-curl-5.6.3
php56-dba-5.6.3
php56-dom-5.6.3
php56-exif-5.6.3
...
To get more information about each module does, you can either search the internet, or you can look at the long description of the package by typing:
pkg search -f package_name
There will be a lot of output, with one field called Comment which will have an explanation of the functionality that the module provides.
For example, to find out what the php56-calendar package does, we could type this:
pkg search -f php56-calendar
Along with a large amount of other information, you’ll find something that looks like this:
php56-calendar-5.6.3
Name           : php56-calendar
Version        : 5.6.3
...
Comment        : The calendar shared extension for php
...
If, after researching, you decide that you would like to install a package, you can do so by using the pkg install command like we have been doing for the other software.
For example, if we decide that php56-calendar is something that we need, we could type:
sudo pkg install php56-calendar
If you want to install more than one module at a time, you can do that by listing each one, separated by a space, following the pkg install command, like this:
sudo pkg install package1 package2 ...
Step Four — Configure Apache to Use PHP Module
Before Apache will process PHP pages, we must configure it to use mod_php.
Open the Apache configuration file:
sudo vi /usr/local/etc/apache24/Includes/php.conf
First, we will configure Apache to load index.php files by default by adding the following lines:
<IfModule dir_module>
    DirectoryIndex index.php index.html
Next, we will configure Apache to process requested PHP files with the PHP processor. Add these lines to the end of the file:
    <FilesMatch "\.php$">
        SetHandler application/x-httpd-php
    </FilesMatch>
    <FilesMatch "\.phps$">
        SetHandler application/x-httpd-php-source
    </FilesMatch>
</IfModule>
Save and exit.
Now restart Apache to put the changes into effect:
sudo service apache24 restart
At this point, your FAMP stack is installed and configured. Let’s test your PHP setup now.
Step Five — Test PHP Processing
In order to test that our system is configured properly for PHP, we can create a very basic PHP script.
We will call this script info.php. In order for Apache to find the file and serve it correctly, it must be saved under a very specific directory–DocumentRoot–which is where Apache will look for files when a user accesses the web server. The location of DocumentRoot is specified in the Apache configuration file that we modified earlier (/usr/local/etc/apache24/httpd.conf).
By default, the DocumentRoot is set to /usr/local/www/apache24/data. We can create the info.php file under that location by typing:
sudo vi /usr/local/www/apache24/data/info.php
This will open a blank file. Insert this PHP code into the file:
<?php phpinfo(); ?>
Save and exit.
Now we can test whether our web server can correctly display content generated by a PHP script. To try this out, we just have to visit this page in our web browser. You’ll need your server’s public IP address again.
The address you want to visit will be:
http://your_server_IP_address/info.php
The page that you see should look something like this:
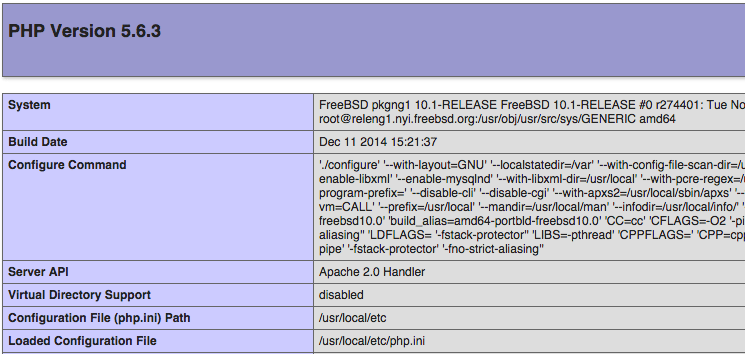
This page basically gives you information about your server from the perspective of PHP. It is useful for debugging and to ensure that your settings are being applied correctly.
If this was successful, then your PHP is working as expected.
You probably want to remove this file after this test because it could actually give information about your server to unauthorized users. To do this, you can type this:
sudo rm /usr/local/www/apache24/data/info.php
You can always recreate this page if you need to access the information again later.
Conclusion
Now that you have a FAMP stack installed, you have many choices for what to do next. Basically, you’ve installed a platform that will allow you to install most kinds of websites and web software on your server.
If you are interested in setting up WordPress on your new FAMP stack, check out this tutorial: How To Install WordPress with Apache on FreeBSD 10.1.
Thanks for learning with the DigitalOcean Community. Check out our offerings for compute, storage, networking, and managed databases.
About the author
Software Engineer @ DigitalOcean. Former Señor Technical Writer (I no longer update articles or respond to comments). Expertise in areas including Ubuntu, PostgreSQL, MySQL, and more.
Still looking for an answer?
This textbox defaults to using Markdown to format your answer.
You can type !ref in this text area to quickly search our full set of tutorials, documentation & marketplace offerings and insert the link!
As Always… Nice Tutorial Mitchell… :) But I was trying to understand one thing… In Step 2 What have you actually installed MariaDB v5.5 or v10.0 or is it mysql v5.6…??? Your description talks about mariadb… but “pkg install” command is pulling in mysql…
Thanks this really did help I have bin wanting to do this but I was not shore on how about geting into it. Thanks keep posting!!!
Dear Mitchell,
There is a broken link in the step one. In the “how to use pkg here”, the hyperlink points to :
https://www.digitalocean.com/community/tutorials/how-to-use-pkg-on-freebsd-10
but the correct link is:
https://www.digitalocean.com/community/tutorials/how-to-manage-packages-on-freebsd-10-1-with-pkg
Cheers,
Pimenta
Thanks for the howto
I’m running FreeBSD-RELEASE-10.1 on i386
To make php work I found I had to switch on mod_mime_magic in httpd.conf, which was commented out in the default installation ie
LoadModule mime_magic_module libexec/apache24/mod_mime_magic.so
and add these lines to the file /usr/local/etc/apache24/mime.types
application/x-httpd-php php application/x-httpd-php-source phps
Thanks for the great tutorial. Everything flowed smoothly.
For the PHP integration into Apache I would recommend to use a seperate approach with a dedicate configuration file. At the end of the HTTP configuration any file located in the directory /usr/local/etc/apache24/Includes/ is automatically sourced. This helps to keep the HTTP configuration clean and it is much easier to upgrade to a new Apache version.
E.g. a file _ /usr/local/etc/apache24/Includes/php.conf_ with your recommendations looks like:
<IfModule php5_module>
  #
  # DirectoryIndex: sets the file that Apache will serve if a directory
  # is requested.
  #
  # Override the default behaviour
  #
  <IfModule dir_module>
    DirectoryIndex index.php index.html
  </IfModule>

  #
  # Special treatment of PHP files
  #
  <FilesMatch "\.php$">
    SetHandler application/x-httpd-php
  </FilesMatch>
  <FilesMatch "\.phps$">
    SetHandler application/x-httpd-php-source
  </FilesMatch>
</IfModule>
This comment has been deleted
I followed all the instructions above(supposedly)and Apache works,MySQL works,but,when I type :http://website/info.php,it just shows the contents.It seems the php is not being processed?
 This work is licensed under a Creative Commons Attribution-NonCommercial- ShareAlike 4.0 International License.
Become a contributor for community
Get paid to write technical tutorials and select a tech-focused charity to receive a matching donation.

DigitalOcean Documentation
Full documentation for every DigitalOcean product.

Resources for startups and AI-native businesses
The Wave has everything you need to know about building a business, from raising funding to marketing your product.
The developer cloud
Scale up as you grow — whether you're running one virtual machine or ten thousand.

Start building today
From GPU-powered inference and Kubernetes to managed databases and storage, get everything you need to build, scale, and deploy intelligent applications.
