By Wayne Hartmann and Sharon Campbell
 on Ubuntu 14.04")
Introduction
Mumble is a free and open-source Voice Over IP (VoIP) application designed primarily to be used by gamers. Mumble is similar to TeamSpeak and Ventrilo. Mumble uses a client-server architecture which allows users to talk to each other when connected to the same server. It has a simple administration interface, and features low-latency, high-quality codecs. In this tutorial we will learn how to install and configure Murmur, which is the server component of Mumble.
Murmur allows you to run your own private or public voice chat server for the Mumble client.
Prerequisites
Droplet Requirements
- 512 MB Droplet
- Ubuntu 14.04
This tutorial is written for Ubuntu 14.04; however, the process is the same for any recent Ubuntu distributions that have the mumble and mumble-server packages in the repositories. A server with 512 MB of RAM should be plenty to run Murmur with 50 clients in high quality. If you are using the same Droplet for other tasks, more RAM is recommended. Murmur does not consume much CPU.
Root Access
The rest of this tutorial will assume you are connected to your server with the root user account, or a user account with sudo privileges.
To enter the root shell from another account:
sudo su
Step One — Install Updates
Before proceding, it is always a good idea to make sure you have the latest updates installed.
Update the package database:
apt-get update
Install any new packages:
apt-get upgrade
You will be asked to confirm installing any packages. Enter Y and press Enter.
Step Two — Install Murmur
In the Official Ubuntu Repositories, Murmur has the package name mumble-server .
To install the package:
apt-get install mumble-server
You will be asked to confirm installing any packages. Enter Y and press Enter.
Step Three — Basic Configuration Wizard
After the installation is done, we will run the package reconfiguration command to create some basic server and user settings. You can use your arrow keys to select your answer, then press Enter to continue.
Run the Configuration Wizard with:
dpkg-reconfigure mumble-server
Start at Boot
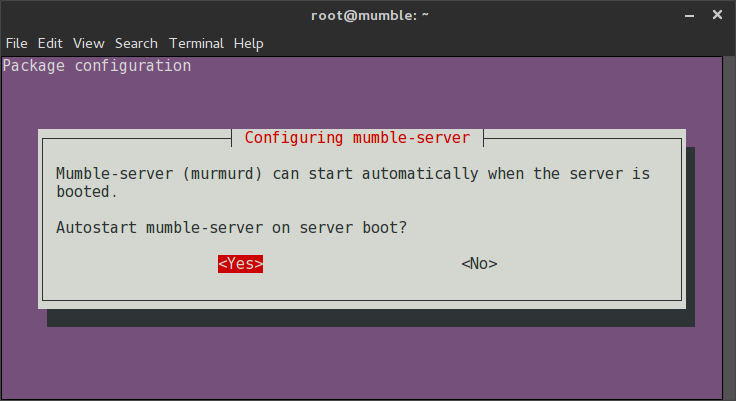
We will accept the default value of Yes because we want Murmur to run when the server boots.
Network Priority

Even if this will be a dedicated Mumble Server, it is a good idea to select Yes since this will ensure the lowest possible latency.
Mumble SuperUser Password
The user named SuperUser is the highest-level administrative account for the server. You’ll need to log in to Mumble with this user when you want to manage the server.
It is highly recommended you change the default password for this account. Leaving the password field blank will not change the password.
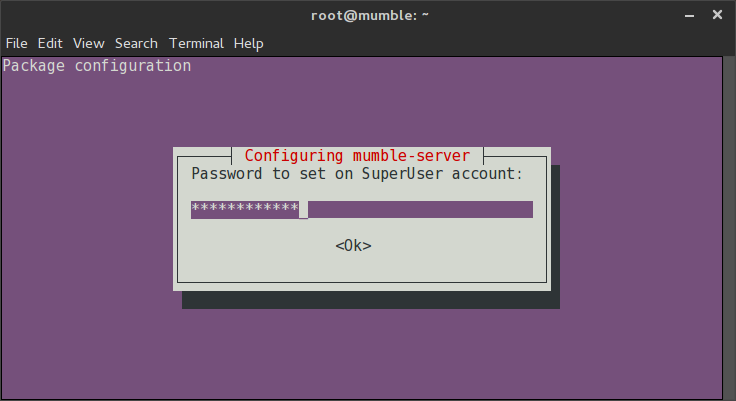
Enter a password, press Tab to select Ok, and press Enter to finish the setup wizard.
At this point we now have a working Mumble server with one user account (SuperUser).
Step Four — Advanced Configuration
The server will work now if you’re happy with the defaults.
If you would like to customize your server even further we will need to edit the configuration file located at /etc/mumble-server.ini.
To open the file:
nano /etc/mumble-server.ini
Murmur has several configuration options, and the file is well commented if you have any questions about what a particular setting is for.
There are some commonly changed values listed below as a reference. To enable some of these settings, you will have to remove the preceding # character. This is referred to as un-commenting the line. Lines that start with # are not processed by the server.
- autobanAttempts, autobanTimeframe, autobanTime - These three values are used to prevent bruteforcing attempts, and will ban the IP for the specified amount of time after the other two conditions are met.
- welcometext - This is the welcome message every user receives when connecting to the server. It is useful for informing users of rules, linking to your website, etc. You can use most HTML characters and tags; just make sure the entire entry is encapsulated in quotes.
- port - The default Mumble port is 64738. You can change this value, but make sure to inform your users to enter the correct port when connecting to the server manually.
- host - By default Mumble will bind to any host name automatically. If you want it to use a single host name, you enter that host name here.
- bandwidth - This is the amount of bandwidth each user is allowed to consume. Keep in mind that if you set a higher value, each user will consume more RAM. Values between 60000-72000 are good for hosting 50 users on 512 MB of RAM.
- users - The maximum number of simultaneous users that can connect to the server. For 512 MB of RAM, the recommended setting is 50 users for 60Kbps-72Kbps bandwidth per user.
- textmessagelength - Not enabled by default; will limit the number of characters a user can send per message.
- imagemessagelength - Not enabled by default; will set the maximum file size for images a user is allowed to send.
- allowhtml - Not enabled by default; allows HTML in messages, comments, and channel descriptions.
- registerName, RegisterUrl - If enabled, this will allow your server to be found on the public list available in the Mumble Client. Otherwise the user will need to know the host name or IP address of the server to be able to connect.
When you are happy with your configuration changes, press Ctrl+X, press Y to save, and press Enter to overwrite the existing file. You will need to restart Murmur before your settings will take effect. Any Mumble users on the server will be disconnected.
To restart Murmur:
service mumble-server restart
If you need help configuring other server settings, it is recommend you read the Mumble Wiki.
Step Five — Connect to your Mumble Server
These steps will help you connect to your new Mumble server as the SuperUser. Other users can connect using the same steps. Other users can pick their own usernames, and do not need a password - just the IP address and port number.
Download the Mumble client.
Open the Mumble client on your computer.
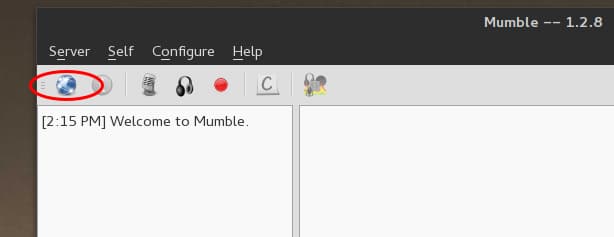
Click the Connect button.
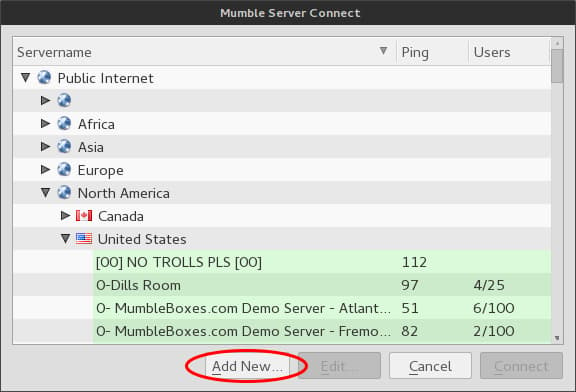
Click the Add New button.
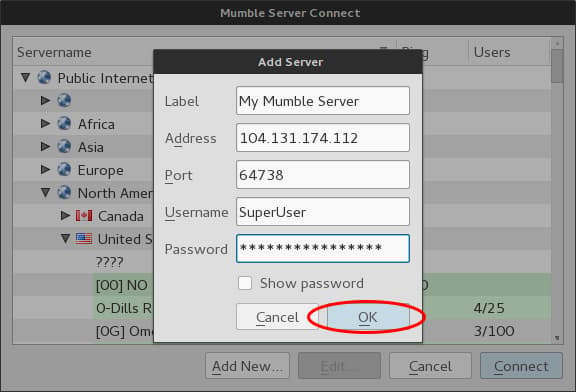
Enter the information for your Mumble server. The address can be a host name or the IP address of your server. If you did not use a custom port, it will be the default port of 64738. Click OK to save settings.
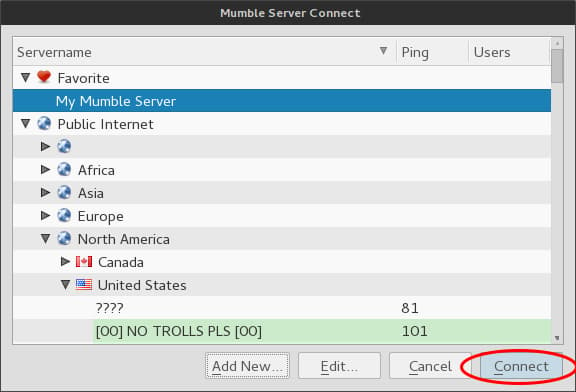
The server will be saved to your favorites list. Click on your server then click Connect.
If you did not set up a signed certificate for this server, you will have to accept the certificate.
You should get the message Connected once you are successfully connected.
Now you can chat with any other users on this server.
Thanks for learning with the DigitalOcean Community. Check out our offerings for compute, storage, networking, and managed databases.
About the author(s)
Current fan and former Editorial Manager at DigitalOcean. Hi! Expertise in areas including Ubuntu, Docker, Rails, and more.
Still looking for an answer?
This textbox defaults to using Markdown to format your answer.
You can type !ref in this text area to quickly search our full set of tutorials, documentation & marketplace offerings and insert the link!
How much bandwidth per month do you see running a murmur server of 50 users? Surely this would be quite costly if it exceeds the 1TB transfer per month?
Thanks for the guide it was quite informative!
Love the detailed information here! I tried to setup up a Ubuntu 12.04 Mumble server and ran into all kinds of problems. The guide I was going by IMO the steps was out of order or just not enough detail about the packages required at the start. I’m stuck running Ubuntu 12 (14.04 was just to much for it) on K7 processor 2.3mhz, 2 gig ram, 40 gig HD, with and NVidia FX5200 graphic card I believe. Looks like the Ubuntu 14.04 is much easier to setup and config but I’m afraid my hardware is just old to be supported anymore. . http://wiki.mumble.info/wiki/Ice#How_to_Setup_Ice_for_PHP_with_Apache_on_Debian.2FUbuntu
Could you help me put together exactly what all I need and what order it should be installed and configured. They called for PHP5, apache2, Ice 3.4, ZeroC Ice.
Sorry for bugging you about this but that author isn’t available for questioning
Great tutorial! I just found that you can use HTML in the welcome message to display an image for a mumble logo.
Thank you! If anyone has any tips or guides on installing MuMo (Mumble Moderator) for auto AFK Please let me know! I can’t figure it out and am not that great with Linux at all.
I think that adding the information below will make the document more comprehensive and helpful for beginners.
- TCP/UDP traffic must be allowed through the server firewall UFW if installed in order for the connection to be successful. The following command will add a rule to the firewall to allow the connection:
sudo ufw allow 64738/tcp sudo ufw allow 64738/udp
Thx for an exellent guide!!!
Only one question, to be able to see server on my site i need: Channel View Protcol URL
How can i get that???
Regards
Olof
Hi,
New to mumble and digital ocean.
Looking to run a password protected mumble server for my children and my friend’s children to play together.
Used the digital ocean tutorial, and a few others to cobble together something that matched the dialogues I was getting, as they were not the same.
I set up a user mumble_admin and added to group wheel. I then used this user to download and install mumble using apt_get. I used the debian/ubuntu config to reconfig the server, then restarted. No evidence of any issues so far.
Using a standard ubuntu droplet from digital ocean. I set up SSH keys and can now ssh into it from the command line passwordlessly. (New to that as well).
Then downloaded and installed the mumble client on my Linux Mint laptop. The settings options look a little different from the tutorial - missing password option. Using the IP from the DO droplet so it should be in computer speak not human speak, It loops round attempting to reconnect.
Downloaded and installed the mumble client on a Win10 laptop, similar - the layout on the screen is swapped the user and the server name, but very similar to the tutorials. No connection to the server.
I opened ports on my router, no luck.
I white listed the IP for the DO droplet on my pi hole set up. No luck.
I wondered if I had to open ports on the client and server (did not think i had to). down loaded and ran nmap on my local laptop and remotely on the DO droplet. neither had the port 64738 open. Did not change this though as I was under the impression the software itself runs opens the port. The mumble server on the DO droplet is run by the user mumble_admin.
Disabled the firewall on the router - no luck.
I found a public mumble server and logged in successfully, no one there but I logged in. Switched off the port forward rule, could still log into the public server. Reactivated the router firewall. Could still log onto the public server.
My client does not have a password, so must be logging onto servers with some sort of authentication? I have read about ICE I don’t really get what is going on here. Why does the ubuntu client want ssh authentication? won’t passwords do? Is there a good place to read about what to look out to figure what I have built and what I need?
Any thoughts?
 This work is licensed under a Creative Commons Attribution-NonCommercial- ShareAlike 4.0 International License.
Become a contributor for community
Get paid to write technical tutorials and select a tech-focused charity to receive a matching donation.

DigitalOcean Documentation
Full documentation for every DigitalOcean product.

Resources for startups and AI-native businesses
The Wave has everything you need to know about building a business, from raising funding to marketing your product.
The developer cloud
Scale up as you grow — whether you're running one virtual machine or ten thousand.

Start building today
From GPU-powered inference and Kubernetes to managed databases and storage, get everything you need to build, scale, and deploy intelligent applications.
