By Erika Heidi and Hazel Virdó

Introduction
Symfony is a full-stack, open source PHP framework. It’s well known for its independent components which can be easily integrated into any other PHP project. The Symfony framework is suitable for building PHP applications of any size, including console applications meant to run only on the command line.
In this tutorial, we will see how to install, configure, and get started with a Symfony 2 application on Ubuntu 14.04.
This is a development setup, intended to make you familiar with Symfony and get you started writing your first Symfony project. We’ll walk you through the setup and installation of a brand new Symfony project.
Prerequisites
For this tutorial, you will need:
- One Ubuntu 14.04 server
- A sudo non-root user, which you can set up by following the Initial Server Setup tutorial
Step 1 — Installing PHP
Before we get started, we’ll need to install PHP for the command line environment. There’s no need to install a full-featured web server such as Apache or Nginx because Symfony comes with a console command that makes it trivial to run and manage PHP’s built-in web server while you are developing your application. It´s a simple and efficient way to run the application while it’s in development mode.
First, let’s update the package manager cache:
- sudo apt-get update
Now, in order to use and execute PHP scripts via the command line, install the php5-cli package.
- sudo apt-get install php5-cli
You should now have PHP installed on your server. To check if it was successfully installed, run:
- php -v
And you should get output similar to this:
OutputPHP 5.5.9-1ubuntu4.11 (cli) (built: Jul 2 2015 15:23:08)
Copyright (c) 1997-2014 The PHP Group
Zend Engine v2.5.0, Copyright (c) 1998-2014 Zend Technologies
with Zend OPcache v7.0.3, Copyright (c) 1999-2014, by Zend Technologies
Step 2 — Configuring date.timezone in php.ini
Symfony requires that the option date.timezone is set in your php.ini file(s). If you are testing this tutorial on a fresh server, this option is not defined yet. If that’s the case, your Symfony application won’t run.
We’ll need to edit the server’s php.ini file to make sure we have this option defined. This file should be located at /etc/php5/cli/php.ini.
Open the php.ini file using nano or your favorite command line editor:
- sudo nano /etc/php5/cli/php.ini
Search for the line containing date.timezone. Uncomment the directive by removing the ; sign in the beginning of the line, and add the appropriate timezone for your application. In this example we’ll use Europe/Amsterdam, but you can choose any supported timezone.
[Date]
; Defines the default timezone used by the date functions
; http://php.net/date.timezone
date.timezone = Europe/Amsterdam
Save the file and exit.
Step 3 — Getting the Symfony Installer
The easiest way to create a new Symfony project is by using the official Symfony Installer. It’s a simple script created to facilitate the bootstrap of new Symfony applications.
The following command will download the Symfony Installer and place it on your /usr/local/bin path:
- sudo curl -LsS http://symfony.com/installer -o /usr/local/bin/symfony
Now, you’ll need to make the script executable with the next command:
- sudo chmod a+x /usr/local/bin/symfony
To test the Symfony Installer, run:
- symfony
The output should look like this:
Output
 Symfony Installer (1.1.7)
 =========================

 This is the official installer to start new projects based on the
 Symfony full-stack framework.

 To create a new project called blog in the current directory using
 the latest stable version of Symfony, execute the following command:

   symfony new blog

. . .
Step 4 — Creating a new Symfony Project
Now that we have the Symfony Installer in place, we can proceed and create a new Symfony project. Because this is a development setup and we will be using PHP’s built-in web server, you can go ahead an create the project inside your home directory. For this example, we’ll create a project named “myproject”, but you can use your own project name in the next command.
- cd ~
- symfony new myproject
This will create a new folder myproject inside your home directory, containing a brand new Symfony application. The command will produce output similar to this:
Output
 Downloading Symfony...

 Preparing project...

 ✔  Symfony 2.7.3 was successfully installed. Now you can:

    * Change your current directory to /home/sammy/myproject

    * Configure your application in app/config/parameters.yml file.

    * Run your application:
        1. Execute the php app/console server:run command.
        2. Browse to the http://localhost:8000 URL.

    * Read the documentation at http://symfony.com/doc
Step 5 — Running the Application with the Symfony Console
The built-in web server that comes with PHP (since PHP 5.4) is suited for running PHP applications while in development, for testing, or for demonstrations. It enables a more frictionless experience because you won’t need to bother configuring a full-featured web server like Apache or Nginx.
Symfony comes with a console command that facilitates the process of starting / stopping PHP’s built-in web server, also allowing (since Symfony 2.6) you to run the web server in the background.
The Symfony console is a CLI script that has several commands to help you build and test your application. You can even include your own commands written in PHP!
The web server can be initiated anytime with the console command server:run. However, the default settings used by the Symfony command will only accept connections to localhost on port 8000. If you are following this tutorial on an external development / testing server or a local virtual machine, you’ll need to provide an extra parameter to the command, telling the web server to listen to a different IP address.
To allow connections coming from both internal and external networks, run this command from inside the project directory:
- php app/console server:run 0.0.0.0:8000
OutputServer running on http://0.0.0.0:8000

Quit the server with CONTROL-C.
This will start PHP’s built-in web server, listening to all network interfaces on port 8000.
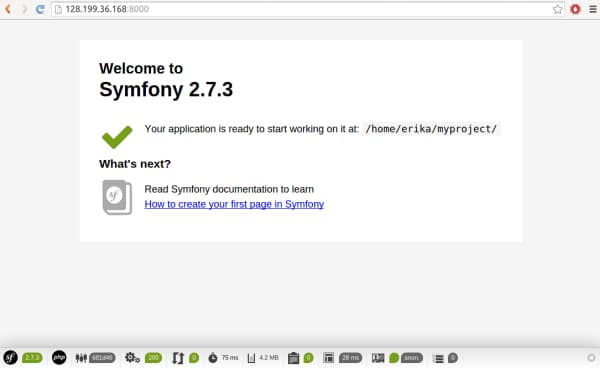
Now you should be able to access the application if you point your browser to http://your_server_ip:8000. You should see a page like this:
The command will keep running in the active terminal until you terminate its execution with CTRL+C. To make the web server run in the background, you should use the server:start command instead:
- php app/console server:start 0.0.0.0:8000
OutputWeb server listening on http://0.0.0.0:8000
This will make the web server run in the background, leaving your terminal session free for executing other commands. To stop the server, you should use:
- php app/console server:stop 0.0.0.0:8000
OutputStopped the web server listening on http://0.0.0.0:8000
You can also check the status of the web server with:
- php app/console server:status 0.0.0.0:8000
When the server is not running, this is the output you should get:
OutputNo web server is listening on http://0.0.0.0:8000
When there’s an active server running in the specified IP and port, you should get output like this:
OutputWeb server still listening on http://0.0.0.0:8000
Just remember that the server:stop and server:status commands should include the same IPADDRESS:PORT portion you used when initiating the server with server:start.
Conclusion
Symfony is a full-stack PHP framework suited for building applications of any size. In this tutorial, we saw how to install and get started with Symfony 2 on a fresh Ubuntu 14.04 server using PHP’s built-in web server to run the application. For more information on how to build PHP applications using Symfony, have a look at their official documentation.
Thanks for learning with the DigitalOcean Community. Check out our offerings for compute, storage, networking, and managed databases.
About the author(s)
Dev/Ops passionate about open source, PHP, and Linux. Former Senior Technical Writer at DigitalOcean. Areas of expertise include LAMP Stack, Ubuntu, Debian 11, Linux, Ansible, and more.
former DO tech editor publishing articles here with the community, then founded the DO product docs team (https://do.co/docs). to all of my authors: you are incredible. working with you was a gift. love is what makes us great.
Still looking for an answer?
This textbox defaults to using Markdown to format your answer.
You can type !ref in this text area to quickly search our full set of tutorials, documentation & marketplace offerings and insert the link!
Symfony 3 is apparently out at some point this month; would be great to see a follow-up
This comment has been deleted
I really have to learn Symfony :). Just tried it a little, few months ago. Anyway it looks like a good framework ! Thanks for this post.
This comment has been deleted
With Symfony 3, all instances of: php app/console
Should be changed to: php bin/console
had to sudo apt install php-xml when attempting to run server http://stackoverflow.com/questions/38019372/php-bin-console-symfony-commands-give-a-fatal-error
also had to change from dev env to prd env by running php bin/console server:run 0.0.0.0:8000 --env=prod as i was getting error reading > You are not allowed to access this file. Check app_dev.php for more information.
 This work is licensed under a Creative Commons Attribution-NonCommercial- ShareAlike 4.0 International License.
Become a contributor for community
Get paid to write technical tutorials and select a tech-focused charity to receive a matching donation.

DigitalOcean Documentation
Full documentation for every DigitalOcean product.

Resources for startups and AI-native businesses
The Wave has everything you need to know about building a business, from raising funding to marketing your product.
The developer cloud
Scale up as you grow — whether you're running one virtual machine or ten thousand.

Start building today
From GPU-powered inference and Kubernetes to managed databases and storage, get everything you need to build, scale, and deploy intelligent applications.
