By Marko Mudrinić and Kathleen Juell

The author selected the Diversity in Tech Fund to receive a donation as part of the Write for DOnations program.
Introduction
Serverless architecture hides server instances from the developer and usually exposes an API that allows developers to run their applications in the cloud. This approach helps developers deploy applications quickly, as they can leave provisioning and maintaining instances to the appropriate DevOps teams. It also reduces infrastructure costs, since with the appropriate tooling you can scale your instances per demand.
Applications that run on serverless platforms are called serverless functions. A function is containerized, executable code that’s used to perform specific operations. Containerizing applications ensures that you can reproduce a consistent environment on many machines, enabling updating and scaling.
OpenFaaS is a free and open-source framework for building and hosting serverless functions. With official support for both Docker Swarm and Kubernetes, it lets you deploy your applications using the powerful API, command-line interface, or Web UI. It comes with built-in metrics provided by Prometheus and supports auto-scaling on demand, as well as scaling from zero.
In this tutorial, you’ll set up and use OpenFaaS with Docker Swarm running on Ubuntu 16.04, and secure its Web UI and API by setting up Traefik with Let’s Encypt. This ensures secure communication between nodes in the cluster, as well as between OpenFaaS and its operators.
Prerequisites
To follow this tutorial, you’ll need:
- Ubuntu 16.04 running on your local machine. You can use other distributions and operating systems, but make sure you use the appropriate OpenFaaS scripts for your operating system and install all of the dependencies listed in these prerequisites.
git,curl, andjqinstalled on your local machine. You’ll usegitto clone the OpenFaaS repository,curlto test the API, andjqto transform raw JSON responses from the API to human-readable JSON. To install the required dependencies for this setup, use the following commands:sudo apt-get update && sudo apt-get install git curl jq- Docker installed, following Steps 1 and 2 of How To Install and Use Docker on Ubuntu 16.04.
- A Docker Hub account. To deploy functions to OpenFaaS, they will need to be published on a public container registry. We’ll use Docker Hub for this tutorial, since it’s both free and widely used. Be sure to authenticate with Docker on your local machine by using the
docker logincommand. - Docker Machine installed, following How To Provision and Manage Remote Docker Hosts with Docker Machine on Ubuntu 16.04.
- A DigitalOcean personal access token. To create a token, follow these instructions.
- A Docker Swarm cluster of 3 nodes, provisioned by following How to Create a Cluster of Docker Containers with Docker Swarm and DigitalOcean on Ubuntu 16.04.
- A fully registered domain name with an A record pointing to one of the instances in the Docker Swarm. Throughout the tutorial, you’ll see example.com as an example domain. You should replace this with your own domain, which you can either purchase on Namecheap, or get for free on Freenom. You can also use a different domain registrar of your choice.
Step 1 — Downloading OpenFaaS and Installing the OpenFaaS CLI
To deploy OpenFaaS to your Docker Swarm, you will need to download the deployment manifests and scripts. The easiest way to obtain them is to clone the official OpenFaas repository and check out the appropriate tag, which represents an OpenFaaS release.
In addition to cloning the repository, you’ll also install the FaaS CLI, a powerful command-line utility that you can use to manage and deploy new functions from your terminal. It provides templates for creating your own functions in most major programming languages. In Step 7, you’ll use it to create a Python function and deploy it on OpenFaaS.
For this tutorial, you’ll deploy OpenFaaS v0.8.9. While the steps for deploying other versions should be similar, make sure to check out the project changelog to ensure there are no breaking changes.
First, navigate to your home directory and run the following command to clone the repository to the ~/faas directory:
- cd ~
- git clone https://github.com/openfaas/faas.git
Navigate to the newly-created ~/faas directory:
- cd ~/faas
When you clone the repository, you’ll get files from the master branch that contain the latest changes. Because breaking changes can get into the master branch, it’s not recommended for use in production. Instead, let’s check out the 0.8.9 tag:
- git checkout 0.8.9
The output contains a message about the successful checkout and a warning about committing changes to this branch:
OutputNote: checking out '0.8.9'.

You are in 'detached HEAD' state. You can look around, make experimental
changes and commit them, and you can discard any commits you make in this
state without impacting any branches by performing another checkout.

If you want to create a new branch to retain commits you create, you may
do so (now or later) by using -b with the checkout command again. Example:

  git checkout -b <new-branch-name>

HEAD is now at 8f0d2d1 Expose scale-function endpoint
If you see any errors, make sure to resolve them by following the on-screen instructions before continuing.
With the OpenFaaS repository downloaded, complete with the necessary manifest files, let’s proceed to installing the FaaS CLI.
The easiest way to install the FaaS CLI is to use the official script. In your terminal, navigate to your home directory and download the script using the following command:
- cd ~
- curl -sSL -o faas-cli.sh https://cli.openfaas.com
This will download the faas-cli.sh script to your home directory. Before executing the script, it’s a good idea to check the contents:
- less faas-cli.sh
You can exit the preview by pressing q. Once you have verified content of the script, you can proceed with the installation by giving executable permissions to the script and executing it. Execute the script as root so it will automatically copy to your PATH:
- chmod +x faas-cli.sh
- sudo ./faas-cli.sh
The output contains information about the installation progress and the CLI version that you’ve installed:
Outputx86_64
Downloading package https://github.com/openfaas/faas-cli/releases/download/0.6.17/faas-cli as /tmp/faas-cli
Download complete.

Running as root - Attempting to move faas-cli to /usr/local/bin
New version of faas-cli installed to /usr/local/bin
Creating alias 'faas' for 'faas-cli'.
  ___                   _____           ____
 / _ \ _ __   ___ _ __ |  ___|_ _  __ _/ ___|
| | | | '_ \ / _ \ '_ \| |_ / _` |/ _` \___ \
| |_| | |_) |  __/ | | |  _| (_| | (_| |___) |
 \___/| .__/ \___|_| |_|_|  \__,_|\__,_|____/
      |_|

CLI:
 commit:  b5597294da6dd98457434fafe39054c993a5f7e7
 version: 0.6.17
If you see an error, make sure to resolve it by following the on-screen instructions before continuing with the tutorial.
At this point, you have the FaaS CLI installed. To learn more about commands you can use, execute the CLI without any arguments:
- faas-cli
The output shows available commands and flags:
Output  ___                   _____           ____
 / _ \ _ __   ___ _ __ |  ___|_ _  __ _/ ___|
| | | | '_ \ / _ \ '_ \| |_ / _` |/ _` \___ \
| |_| | |_) |  __/ | | |  _| (_| | (_| |___) |
 \___/| .__/ \___|_| |_|_|  \__,_|\__,_|____/
      |_|


Manage your OpenFaaS functions from the command line

Usage:
  faas-cli [flags]
  faas-cli [command]

Available Commands:
  build          Builds OpenFaaS function containers
  cloud          OpenFaaS Cloud commands
  deploy         Deploy OpenFaaS functions
  help           Help about any command
  invoke         Invoke an OpenFaaS function
  list           List OpenFaaS functions
  login          Log in to OpenFaaS gateway
  logout         Log out from OpenFaaS gateway
  new            Create a new template in the current folder with the name given as name
  push           Push OpenFaaS functions to remote registry (Docker Hub)
  remove         Remove deployed OpenFaaS functions
  store          OpenFaaS store commands
  template       Downloads templates from the specified github repo
  version        Display the clients version information

Flags:
      --filter string   Wildcard to match with function names in YAML file
  -h, --help            help for faas-cli
      --regex string    Regex to match with function names in YAML file
  -f, --yaml string     Path to YAML file describing function(s)

Use "faas-cli [command] --help" for more information about a command.
You have now successfully obtained the OpenFaaS manifests and installed the FaaS CLI, which you can use to manage your OpenFaaS instance from your terminal.
The ~/faas directory contains files from the 0.8.9 release, which means you can now deploy OpenFaaS to your Docker Swarm. Before doing so, let’s modify the deployment manifest file to include Traefik, which will secure your OpenFaaS setup by setting up Let’s Encrypt.
Step 2 — Configuring Traefik
Traefik is a Docker-aware reverse proxy that comes with SSL support provided by Let’s Encrypt. SSL protocol ensures that you communicate with the Swarm cluster securely by encrypting the data you send and receive between nodes.
To use Traefik with OpenFaaS, you need to modify the OpenFaaS deployment manifest to include Traefik and tell OpenFaaS to use Traefik instead of directly exposing its services to the internet.
Navigate back to the ~/faas directory and open the OpenFaaS deployment manifest in a text editor:
- cd ~/faas
- nano ~/faas/docker-compose.yml
Note: The Docker Compose manifest file uses YAML formatting, which strictly forbids tabs and requires two spaces for indentation. The manifest will fail to deploy if the file is incorrectly formatted.
The OpenFaaS deployment is comprised of several services, defined under the services directive, that provide the dependencies needed to run OpenFaaS, the OpenFaaS API and Web UI, and Prometheus and AlertManager (for handling metrics).
At the beginning of the services section, add a new service called traefik, which uses the traefik:v1.6 image for the deployment:
version: "3.3"
services:
    traefik:
        image: traefik:v1.6
    gateway:
         ...
The Traefik image is coming from the Traefik Docker Hub repository, where you can find a list of all available images.
Next, let’s instruct Docker to run Traefik using the command directive. This will run Traefik, configure it to work with Docker Swarm, and provide SSL using Let’s Encrypt. The following flags will configure Traefik:
--docker.*: These flags tell Traefik to use Docker and specify that it’s running in a Docker Swarm cluster.--web=true: This flag enables Traefik’s Web UI.--defaultEntryPointsand--entryPoints: These flags define entry points and protocols to be used. In our case this includes HTTP on port80and HTTPS on port443.--acme.*: These flags tell Traefik to use ACME to generate Let’s Encrypt certificates to secure your OpenFaaS cluster with SSL.
Make sure to replace the example.com domain placeholders in the --acme.domains and --acme.email flags with the domain you’re going to use to access OpenFaaS. You can specify multiple domains by separating them with a comma and space. The email address is for SSL notifications and alerts, including certificate expiry alerts. In this case, Traefik will handle renewing certificates automatically, so you can ignore expiry alerts.
Add the following block of code below the image directive, and above gateway:
...
    traefik:
        image: traefik:v1.6
        command: -c --docker=true
            --docker.swarmmode=true
            --docker.domain=traefik
            --docker.watch=true
            --web=true
            --defaultEntryPoints='http,https'
            --entryPoints='Name:https Address::443 TLS'
            --entryPoints='Name:http Address::80'
            --acme=true
            --acme.entrypoint='https'
            --acme.httpchallenge=true
            --acme.httpchallenge.entrypoint='http'
            --acme.domains='example.com, www.example.com'
            --acme.email='sammy@example.com'
            --acme.ondemand=true
            --acme.onhostrule=true
            --acme.storage=/etc/traefik/acme/acme.json
...
With the command directive in place, let’s tell Traefik what ports to expose to the internet. Traefik uses port 8080 for its operations, while OpenFaaS will use port 80 for non-secure communication and port 443 for secure communication.
Add the following ports directive below the command directive. The port-internet:port-docker notation ensures that the port on the left side is exposed by Traefik to the internet and maps to the container’s port on the right side:
        ...
        command:
            ...
		ports:
            - 80:80
            - 8080:8080
            - 443:443
        ...
Next, using the volumes directive, mount the Docker socket file from the host running Docker to Traefik. The Docker socket file communicates with the Docker API in order to manage your containers and get details about them, such as number of containers and their IP addresses. You will also mount the volume called acme, which we’ll define later in this step.
The networks directive instructs Traefik to use the functions network, which is deployed along with OpenFaaS. This network ensures that functions can communicate with other parts of the system, including the API.
The deploy directive instructs Docker to run Traefik only on the Docker Swarm manager node.
Add the following directives below the ports directive:
		...
		volumes:
            - "/var/run/docker.sock:/var/run/docker.sock"
            - "acme:/etc/traefik/acme"
        networks:
            - functions
        deploy:
            placement:
                constraints: [node.role == manager]
At this point, the traefik service block should look like this:
version: "3.3"
services:
    traefik:
        image: traefik:v1.6
        command: -c --docker=true
            --docker.swarmmode=true
            --docker.domain=traefik
            --docker.watch=true
            --web=true
            --defaultEntryPoints='http,https'
            --entryPoints='Name:https Address::443 TLS'
            --entryPoints='Name:http Address::80'
            --acme=true
            --acme.entrypoint='https'
            --acme.httpchallenge=true
            --acme.httpchallenge.entrypoint='http'
            --acme.domains='example.com, www.example.com'
            --acme.email='sammy@example.com'
            --acme.ondemand=true
            --acme.onhostrule=true
            --acme.storage=/etc/traefik/acme/acme.json
        ports:
            - 80:80
            - 8080:8080
            - 443:443
        volumes:
            - "/var/run/docker.sock:/var/run/docker.sock"
            - "acme:/etc/traefik/acme"
        networks:
          - functions
        deploy:
          placement:
            constraints: [node.role == manager]

	gateway:
		...
While this configuration ensures that Traefik will be deployed with OpenFaaS, you also need to configure OpenFaaS to work with Traefik. By default, the gateway service is configured to run on port 8080, which overlaps with Traefik.
The gateway service provides the API gateway you can use to deploy, run, and manage your functions. It handles metrics (via Prometheus) and auto-scaling, and hosts the Web UI.
Our goal is to expose the gateway service using Traefik instead of exposing it directly to the internet.
Locate the gateway service, which should look like this:
...
    gateway:
        ports:
            - 8080:8080
        image: openfaas/gateway:0.8.7
        networks:
            - functions
        environment:
            functions_provider_url: "http://faas-swarm:8080/"
            read_timeout:  "300s"        # Maximum time to read HTTP request
            write_timeout: "300s"        # Maximum time to write HTTP response
            upstream_timeout: "300s"     # Maximum duration of upstream function call - should be more than read_timeout and write_timeout
            dnsrr: "true"               # Temporarily use dnsrr in place of VIP while issue persists on PWD
            faas_nats_address: "nats"
            faas_nats_port: 4222
            direct_functions: "true"    # Functions are invoked directly over the overlay network
            direct_functions_suffix: ""
            basic_auth: "${BASIC_AUTH:-true}"
            secret_mount_path: "/run/secrets/"
            scale_from_zero: "false"
        deploy:
            resources:
                # limits:   # Enable if you want to limit memory usage
                #     memory: 200M
                reservations:
                    memory: 100M
            restart_policy:
                condition: on-failure
                delay: 5s
                max_attempts: 20
                window: 380s
            placement:
                constraints:
                    - 'node.platform.os == linux'
        secrets:
            - basic-auth-user
            - basic-auth-password
...
Remove the ports directive from the service to avoid exposing the gateway service directly.
Next, add the following lables directive to the deploy section of the gateway service. This directive exposes the /ui, /system, and /function endpoints on port 8080 over Traefik:
		...
        deploy:
            labels:
            	- traefik.port=8080
            	- traefik.frontend.rule=PathPrefix:/ui,/system,/function
            resources:
			...
The /ui endpoint exposes the OpenFaaS Web UI, which is covered in the Step 6 of this tutorial. The /system endpoint is the API endpoint used to manage OpenFaaS, while the /function endpoint exposes the API endpoints for managing and running functions. Step 5 of this tutorial covers the OpenFaaS API in detail.
After modifications, your gateway service should look like this:
...
    gateway:
        image: openfaas/gateway:0.8.7
        networks:
            - functions
        environment:
            functions_provider_url: "http://faas-swarm:8080/"
            read_timeout:  "300s"        # Maximum time to read HTTP request
            write_timeout: "300s"        # Maximum time to write HTTP response
            upstream_timeout: "300s"     # Maximum duration of upstream function call - should be more than read_timeout and write_timeout
            dnsrr: "true"               # Temporarily use dnsrr in place of VIP while issue persists on PWD
            faas_nats_address: "nats"
            faas_nats_port: 4222
            direct_functions: "true"    # Functions are invoked directly over the overlay network
            direct_functions_suffix: ""
            basic_auth: "${BASIC_AUTH:-true}"
            secret_mount_path: "/run/secrets/"
            scale_from_zero: "false"
        deploy:
            labels:
            	- traefik.port=8080
            	- traefik.frontend.rule=PathPrefix:/ui,/system,/function
            resources:
                # limits:   # Enable if you want to limit memory usage
                #     memory: 200M
                reservations:
                    memory: 100M
            restart_policy:
                condition: on-failure
                delay: 5s
                max_attempts: 20
                window: 380s
            placement:
                constraints:
                    - 'node.platform.os == linux'
        secrets:
            - basic-auth-user
            - basic-auth-password
...
Finally, let’s define the acme volume used for storing Let’s Encrypt certificates. We can define an empty volume, meaning data will not persist if you destroy the container. If you destroy the container, the certificates will be regenerated the next time you start Traefik.
Add the following volumes directive on the last line of the file:
...
volumes:
    acme:
Once you’re done, save the file and close your text editor. At this point, you’ve configured Traefik to protect your OpenFaaS deployment and Docker Swarm. Now you’re ready to deploy it along with OpenFaaS on your Swarm cluster.
Step 3 — Deploying OpenFaaS
Now that you have prepared the OpenFaaS deployment manifest, you’re ready to deploy it and start using OpenFaaS. To deploy, you’ll use the deploy_stack.sh script. This script is meant to be used on Linux and macOS operating systems, but in the OpenFaaS directory you can also find appropriate scripts for Windows and ARM systems.
Before deploying OpenFaaS, you will need to instruct docker-machine to execute Docker commands from the script on one of the machines in the Swarm. For this tutorial, let’s use the Swarm manager.
If you have the docker-machine use command configured, you can use it:
- docker-machine use node-1
If not, use the following command:
- eval $(docker-machine env node-1)
The deploy_stack.sh script deploys all of the resources required for OpenFaaS to work as expected, including configuration files, network settings, services, and credentials for authorization with the OpenFaaS server.
Let’s execute the script, which will take several minutes to finish deploying:
- ~/faas/deploy_stack.sh
The output shows a list of resources that are created in the deployment process, as well as the credentials you will use to access the OpenFaaS server and the FaaS CLI command.
Write down these credentials, as you will need them throughout the tutorial to access the Web UI and the API:
OutputAttempting to create credentials for gateway..
roozmk0y1jkn17372a8v9y63g
q1odtpij3pbqrmmf8msy3ampl
[Credentials]
 username: admin
 password: your_openfaas_password
 echo -n your_openfaas_password | faas-cli login --username=admin --password-stdin

Enabling basic authentication for gateway..

Deploying OpenFaaS core services
Creating network func_functions
Creating config func_alertmanager_config
Creating config func_prometheus_config
Creating config func_prometheus_rules
Creating service func_alertmanager
Creating service func_traefik
Creating service func_gateway
Creating service func_faas-swarm
Creating service func_nats
Creating service func_queue-worker
Creating service func_prometheus
If you see any errors, follow the on-screen instructions to resolve them before continuing the tutorial.
Before continuing, let’s authenticate the FaaS CLI with the OpenFaaS server using the command provided by the deployment script.
The script outputted the flags you need to provide to the command, but you will need to add an additional flag, --gateway, with the address of your OpenFaaS server, as the FaaS CLI assumes the gateway server is running on localhost:
- echo -n your_openfaas_password | faas-cli login --username=admin --password-stdin --gateway https://example.com
The output contains a message about successful authorization:
OutputCalling the OpenFaaS server to validate the credentials...
credentials saved for admin https://example.com
At this point, you have a fully-functional OpenFaaS server deployed on your Docker Swarm cluster, as well as the FaaS CLI configured to use your newly deployed server. Before testing how to use OpenFaaS, let’s deploy some sample functions to get started.
Step 4 — Deploying OpenFaaS Sample Functions
Initially, OpenFaaS comes without any functions deployed. To start testing and using it, you will need some functions.
The OpenFaaS project hosts some sample functions, and you can find a list of available functions along with their deployment manifests in the OpenFaaS repository. Some of the sample functions include nodeinfo, for showing information about the node where a function is running, wordcount, for counting the number of words in a passed request, and markdown, for converting passed markdown input to HTML output.
The stack.yml manifest in the ~/faas directory deploys several sample functions along with the functions mentioned above. You can deploy it using the FaaS CLI.
Run the following faas-cli command, which takes the path to the stack manifest and the address of your OpenFaaS server:
- faas-cli deploy -f ~/faas/stack.yml --gateway https://example.com
The output contains status codes and messages indicating whether or not the deployment was successful:
OutputDeploying: wordcount.

Deployed. 200 OK.
URL: https://example.com/function/wordcount

Deploying: base64.

Deployed. 200 OK.
URL: https://example.com/function/base64

Deploying: markdown.

Deployed. 200 OK.
URL: https://example.com/function/markdown

Deploying: hubstats.

Deployed. 200 OK.
URL: https://example.com/function/hubstats

Deploying: nodeinfo.

Deployed. 200 OK.
URL: https://example.com/function/nodeinfo

Deploying: echoit.

Deployed. 200 OK.
URL: https://example.com/function/echoit
If you see any errors, make sure to resolve them by following the on-screen instructions.
Once the stack deployment is done, list all of the functions to make sure they’re deployed and ready to be used:
- faas-cli list --gateway https://example.com
The output contains a list of functions, along with their replica numbers and an invocations count:
OutputFunction                        Invocations     Replicas
markdown                        0               1
wordcount                       0               1
base64                          0               1
nodeinfo                        0               1
hubstats                        0               1
echoit                          0               1
If you don’t see your functions here, make sure the faas-cli deploy command executed successfully.
You can now use the sample OpenFaaS functions to test and demonstrate how to use the API, Web UI, and CLI. In the next step, you’ll start by using the OpenFaaS API to list and run functions.
Step 5 — Using the OpenFaaS API
OpenFaaS comes with a powerful API that you can use to manage and execute your serverless functions. Let’s use Swagger, a tool for architecting, testing, and documenting APIs, to browse the API documentation, and then use the API to list and run functions.
With Swagger, you can inspect the API documentation to find out what endpoints are available and how you can use them. In the OpenFaaS repository, you can find the Swagger API specification, which can be used with the Swagger editor to convert the specification to human-readable form.
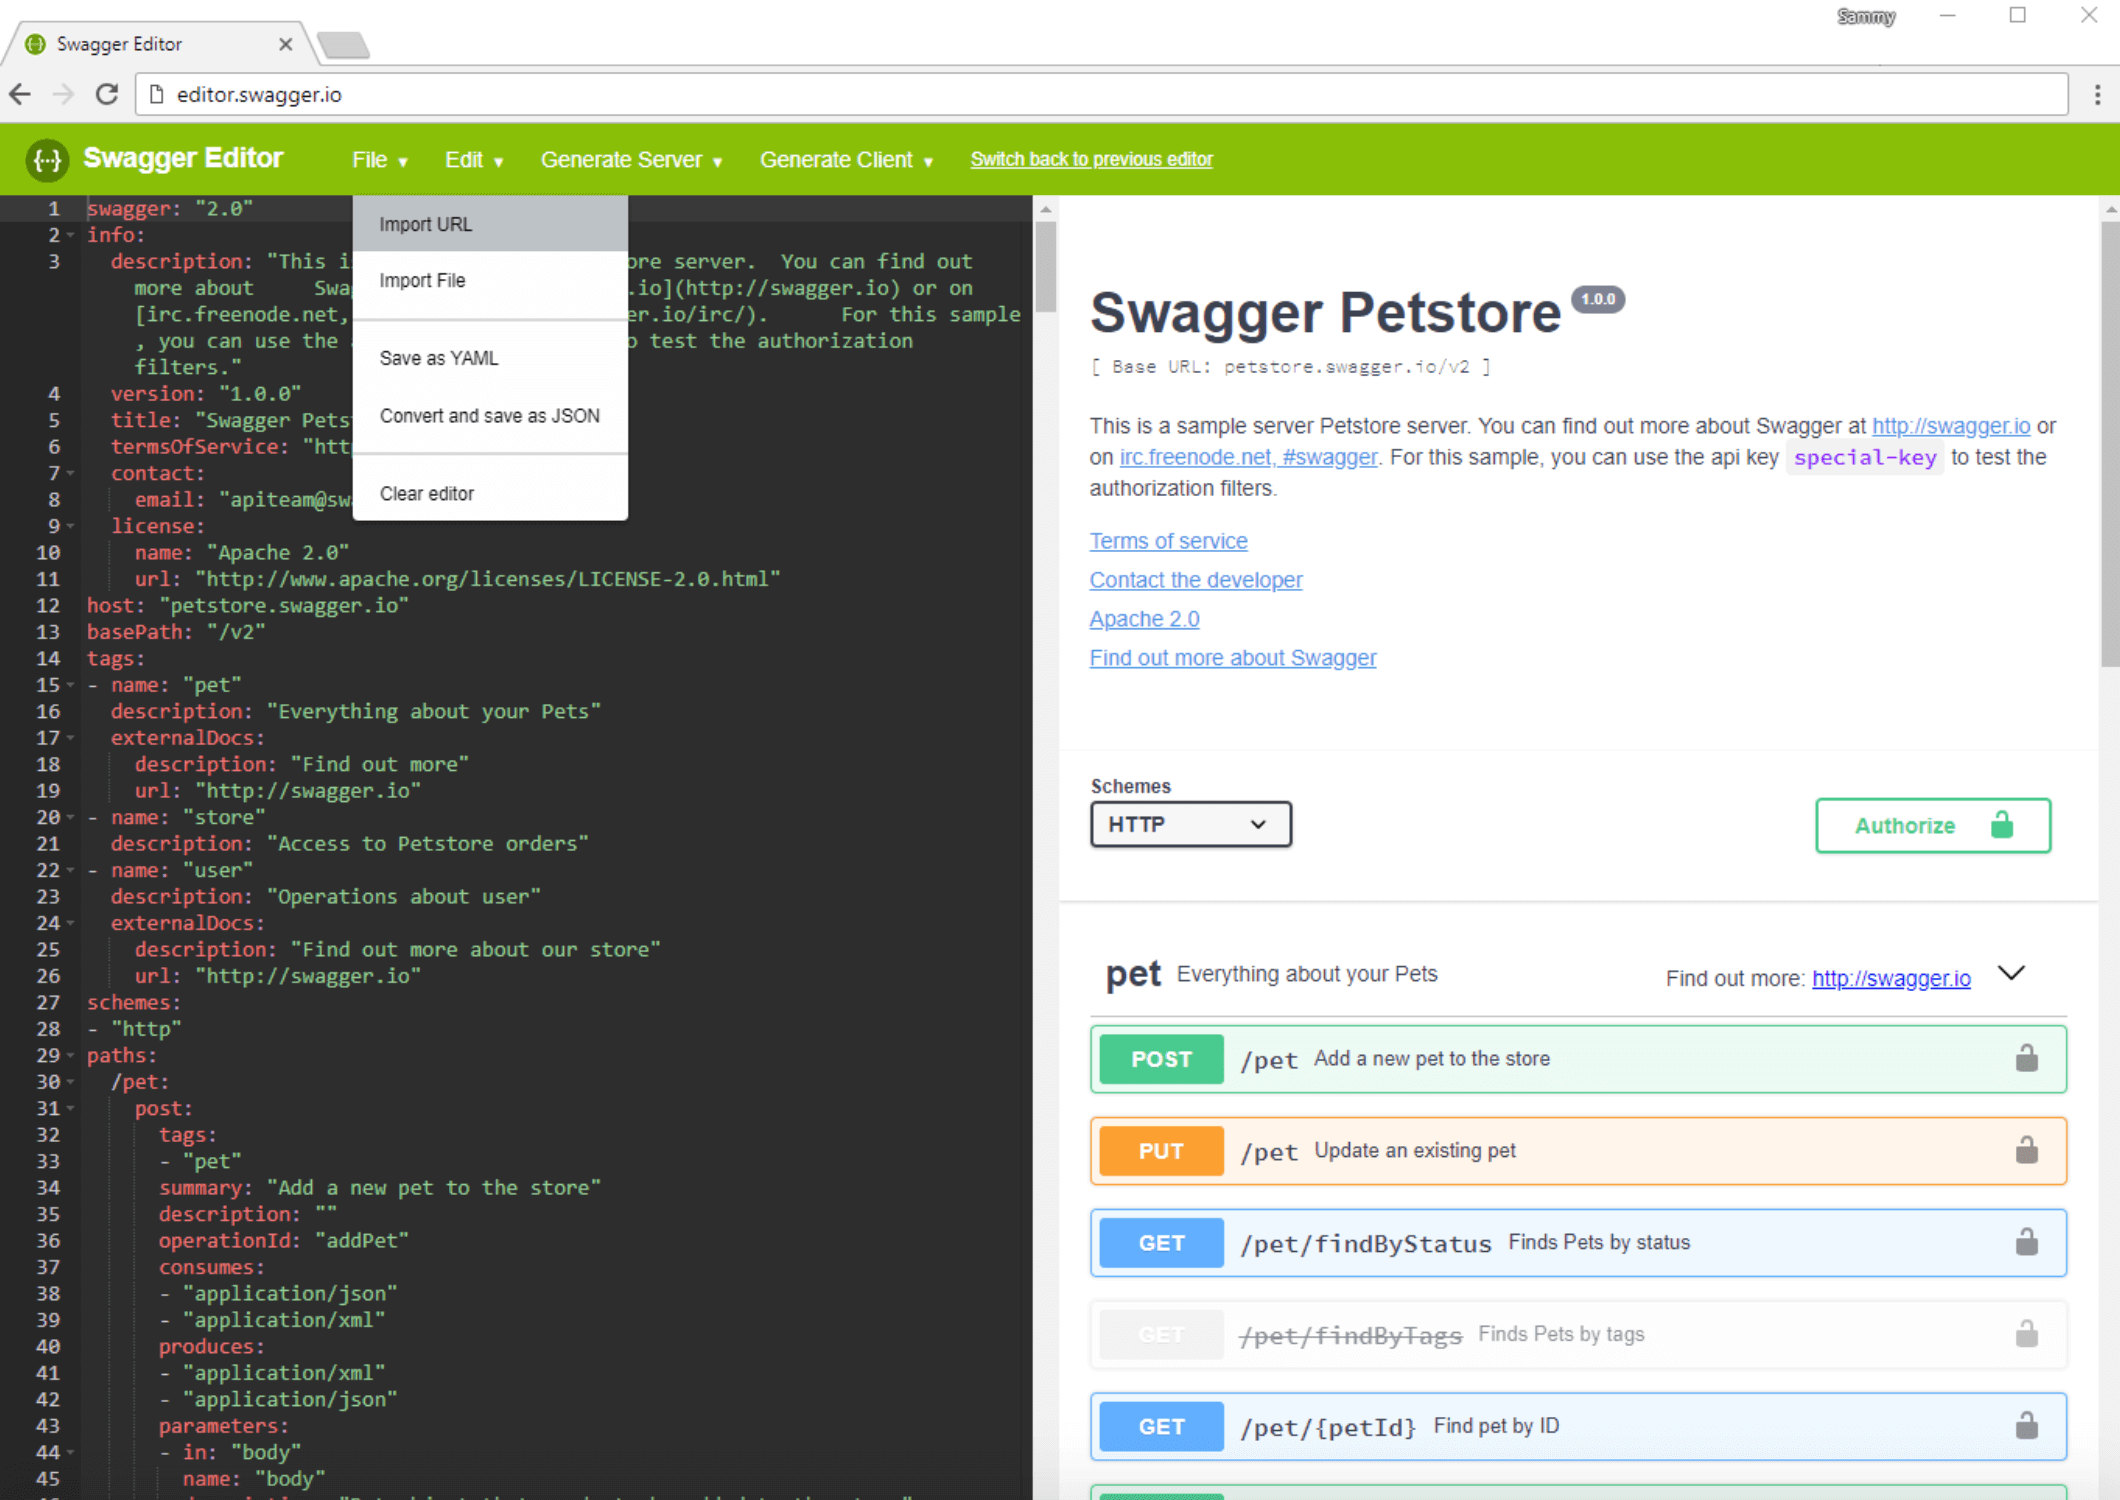
Navigate your web browser to http://editor.swagger.io/. You should be welcomed with the following screen:

Here you’ll find a text editor containing the source code for the sample Swagger specification, and the human-readable API documentation on the right.
Let’s import the OpenFaaS Swagger specification. In the top menu, click on the File button, and then on Import URL:
You’ll see a pop-up, where you need to enter the address of the Swagger API specification. If you don’t see the pop-up, make sure pop-ups are enabled for your web browser.
In the field, enter the link to the Swagger OpenFaaS API specification: https://raw.githubusercontent.com/openfaas/faas/master/api-docs/swagger.yml

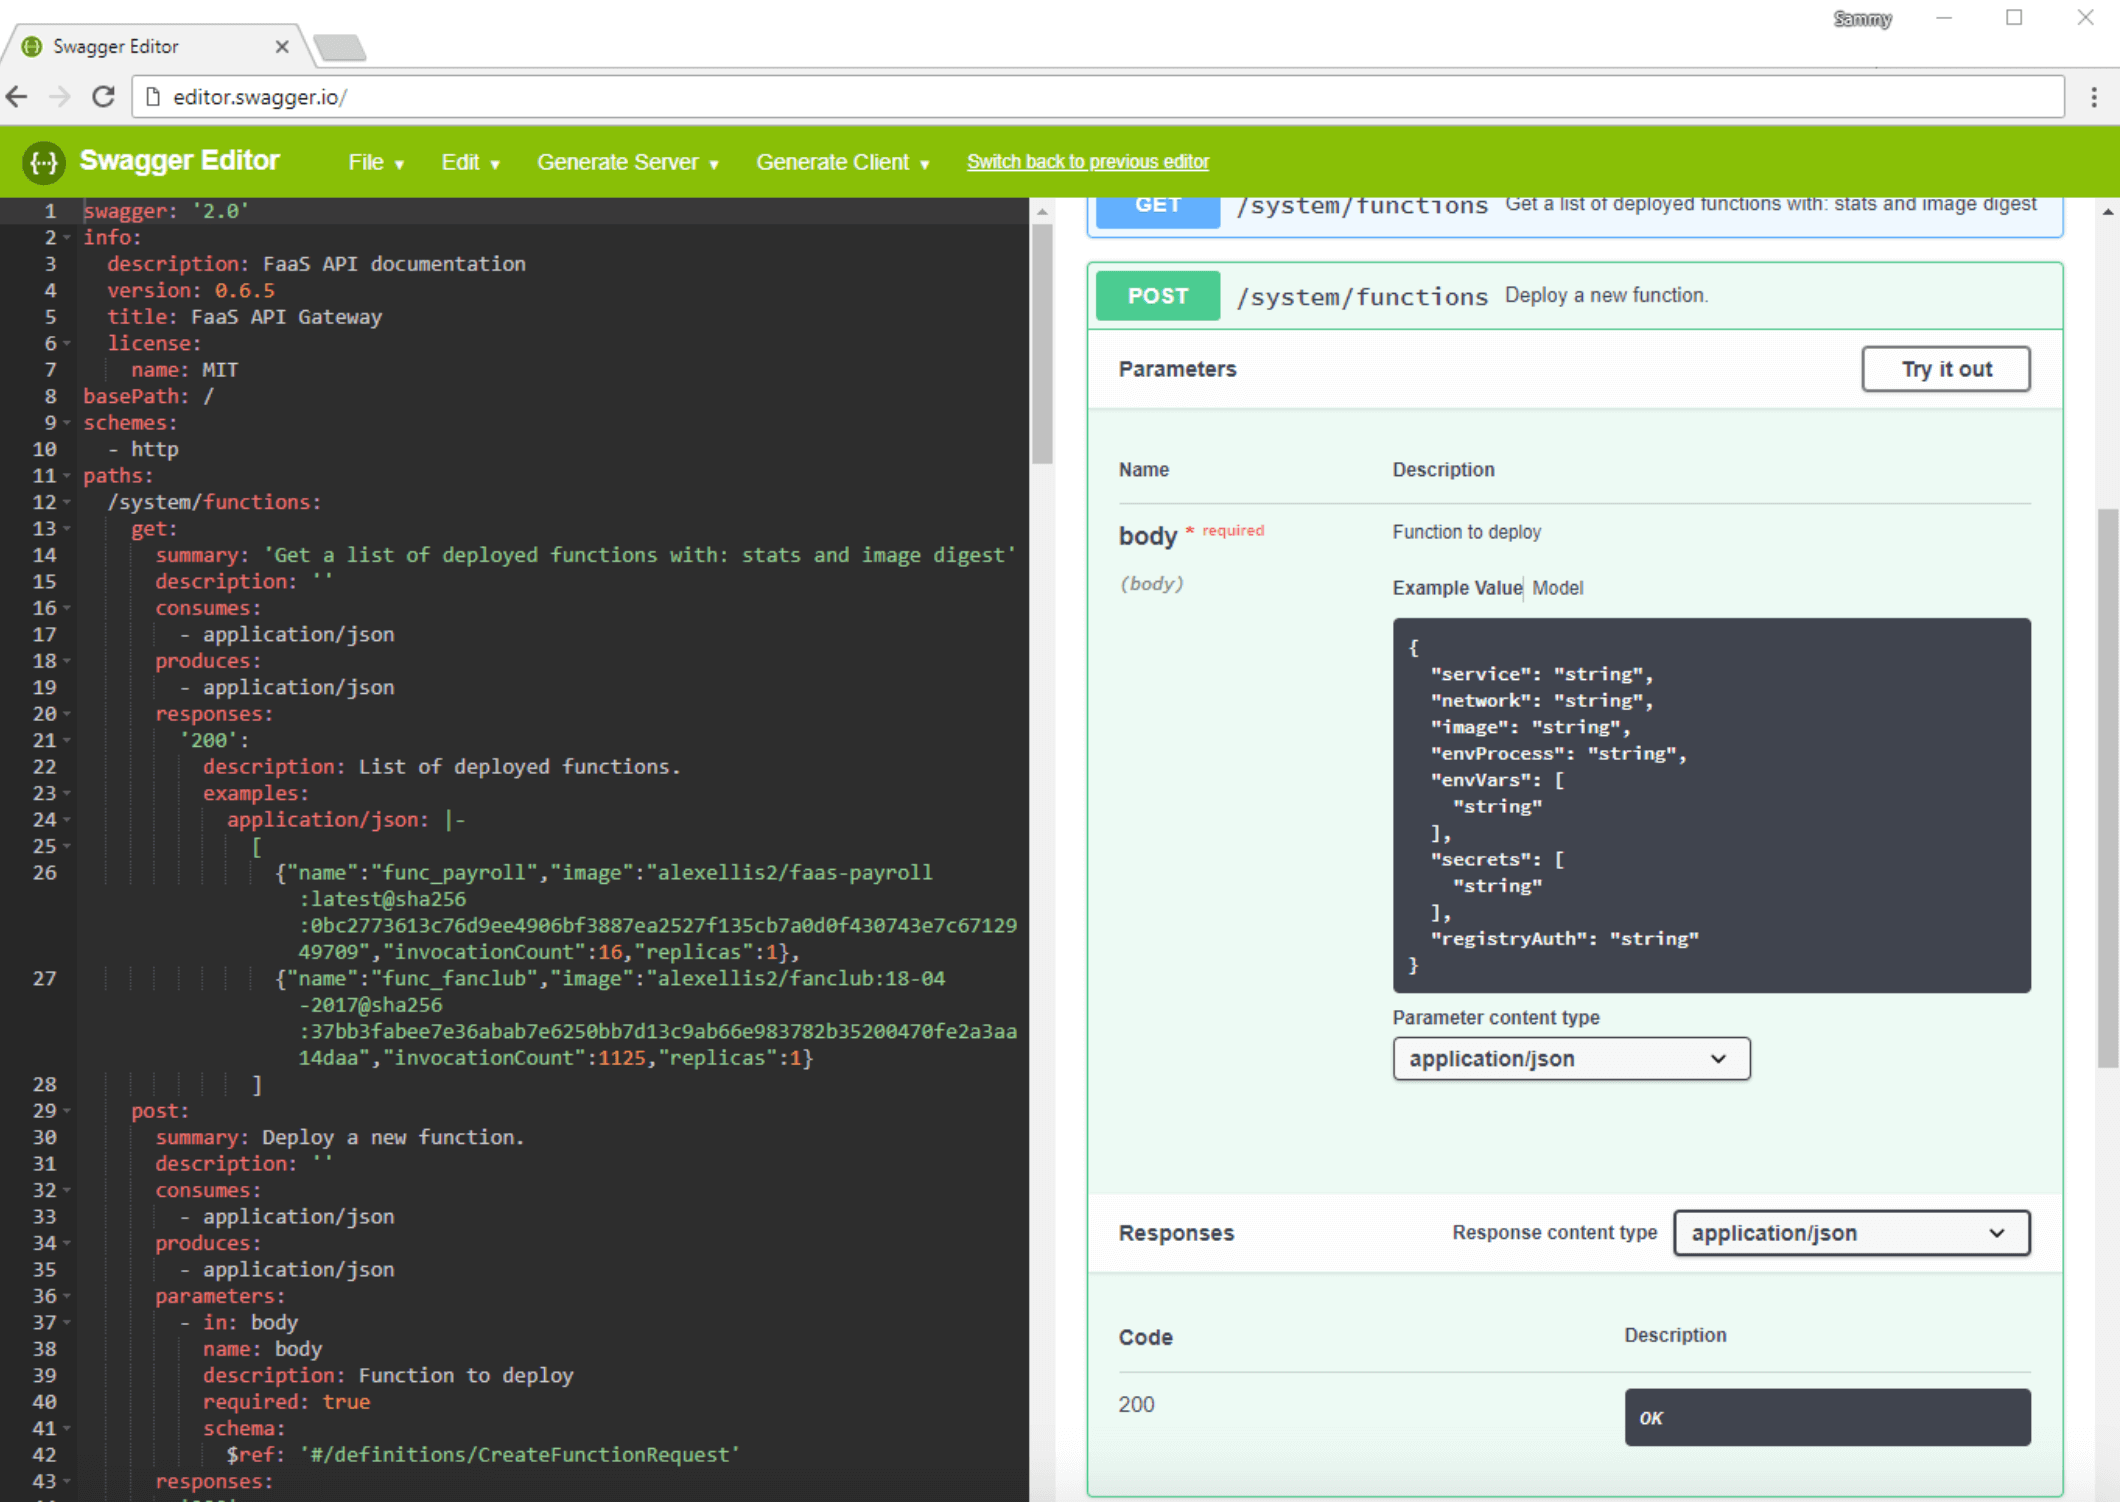
After clicking on the OK button, the Swagger editor will show you the API reference for OpenFaaS, which should look like this:

On the left side you can see the source of the API reference file, while on the right side you can see a list of endpoints, along with short descriptions. Clicking on an endpoint shows you more details about it, including what parameters it takes, what method it uses, and possible responses:
Once you know what endpoints are available and what parameters they expect, you can use them to manage your functions.
Next, you’ll use a curl command to communicate with the API, so navigate back to your terminal. With the -u flag, you will be able to pass the admin:your_openfaas_password pair that you got in Step 3, while the -X flag will define the request method. You will also pass your endpoint URL, https://example.com/system/functions:
- curl -u admin:your_openfaas_password -X GET https://example.com/system/functions
You can see the required method for each endpoint in the API docs.
In Step 4, you deployed several sample functions, which should appear in the output:
Output[{"name":"base64","image":"functions/alpine:latest","invocationCount":0,"replicas":1,"envProcess":"base64","availableReplicas":0,"labels":{"com.openfaas.function":"base64","function":"true"}},{"name":"nodeinfo","image":"functions/nodeinfo:latest","invocationCount":0,"replicas":1,"envProcess":"","availableReplicas":0,"labels":{"com.openfaas.function":"nodeinfo","function":"true"}},{"name":"hubstats","image":"functions/hubstats:latest","invocationCount":0,"replicas":1,"envProcess":"","availableReplicas":0,"labels":{"com.openfaas.function":"hubstats","function":"true"}},{"name":"markdown","image":"functions/markdown-render:latest","invocationCount":0,"replicas":1,"envProcess":"","availableReplicas":0,"labels":{"com.openfaas.function":"markdown","function":"true"}},{"name":"echoit","image":"functions/alpine:latest","invocationCount":0,"replicas":1,"envProcess":"cat","availableReplicas":0,"labels":{"com.openfaas.function":"echoit","function":"true"}},{"name":"wordcount","image":"functions/alpine:latest","invocationCount":0,"replicas":1,"envProcess":"wc","availableReplicas":0,"labels":{"com.openfaas.function":"wordcount","function":"true"}}]
If you don’t see output that looks like this, or if you see an error, follow the on-screen instructions to resolve the problem before continuing with the tutorial. Make sure you’re sending the request to the correct endpoint using the recommended method and the right credentials. You can also check the logs for the gateway service using the following command:
- docker service logs func_gateway
By default, the API response to the curl call returns raw JSON without new lines, which is not human-readable. To parse it, pipe curl’s response to the jq utility, which will convert the JSON to human-readable form:
- curl -u admin:your_openfaas_password -X GET https://example.com/system/functions | jq
The output is now in human-readable form. You can see the function name, which you can use to manage and invoke functions with the API, the number of invocations, as well as information such as labels and number of replicas, relevant to Docker:
Output[
  {
    "name": "base64",
    "image": "functions/alpine:latest",
    "invocationCount": 0,
    "replicas": 1,
    "envProcess": "base64",
    "availableReplicas": 0,
    "labels": {
      "com.openfaas.function": "base64",
      "function": "true"
    }
  },
  {
    "name": "nodeinfo",
    "image": "functions/nodeinfo:latest",
    "invocationCount": 0,
    "replicas": 1,
    "envProcess": "",
    "availableReplicas": 0,
    "labels": {
      "com.openfaas.function": "nodeinfo",
      "function": "true"
    }
  },
  {
    "name": "hubstats",
    "image": "functions/hubstats:latest",
    "invocationCount": 0,
    "replicas": 1,
    "envProcess": "",
    "availableReplicas": 0,
    "labels": {
      "com.openfaas.function": "hubstats",
      "function": "true"
    }
  },
  {
    "name": "markdown",
    "image": "functions/markdown-render:latest",
    "invocationCount": 0,
    "replicas": 1,
    "envProcess": "",
    "availableReplicas": 0,
    "labels": {
      "com.openfaas.function": "markdown",
      "function": "true"
    }
  },
  {
    "name": "echoit",
    "image": "functions/alpine:latest",
    "invocationCount": 0,
    "replicas": 1,
    "envProcess": "cat",
    "availableReplicas": 0,
    "labels": {
      "com.openfaas.function": "echoit",
      "function": "true"
    }
  },
  {
    "name": "wordcount",
    "image": "functions/alpine:latest",
    "invocationCount": 0,
    "replicas": 1,
    "envProcess": "wc",
    "availableReplicas": 0,
    "labels": {
      "com.openfaas.function": "wordcount",
      "function": "true"
    }
  }
]
Let’s take one of these functions and execute it, using the API /function/function-name endpoint. This endpoint is available over the POST method, where the -d flag allows you to send data to the function.
For example, let’s run the following curl command to execute the echoit function, which comes with OpenFaaS out of the box and outputs the string you’ve sent it as a request. You can use the string "Sammy The Shark" to demonstrate:
- curl -u admin:your_openfaas_password -X POST https://example.com/function/func_echoit -d "Sammy The Shark"
The output will show you Sammy The Shark:
OutputSammy The Shark
If you see an error, follow the on-screen logs to resolve the problem before continuing with the tutorial. You can also check the gateway service’s logs.
At this point, you’ve used the OpenFaaS API to manage and execute your functions. Let’s now take a look at the OpenFaaS Web UI.
Step 6 — Using the OpenFaaS Web UI
OpenFaaS comes with a Web UI that you can use to add new and execute installed functions. In this step, you will install a function for generating QR Codes from the FaaS Store and generate a sample code.
To begin, point your web browser to https://example.com/ui/. Note that the trailing slash is required to avoid a “not found” error.
In the HTTP authentication dialogue box, enter the username and password you got when deploying OpenFaaS in Step 3.
Once logged in, you will see available functions on the left side of the screen, along with the Deploy New Functions button used to install new functions.
Click on Deploy New Functions to deploy a new function. You will see the FaaS Store window, which provides community-tested functions that you can install with a single click:
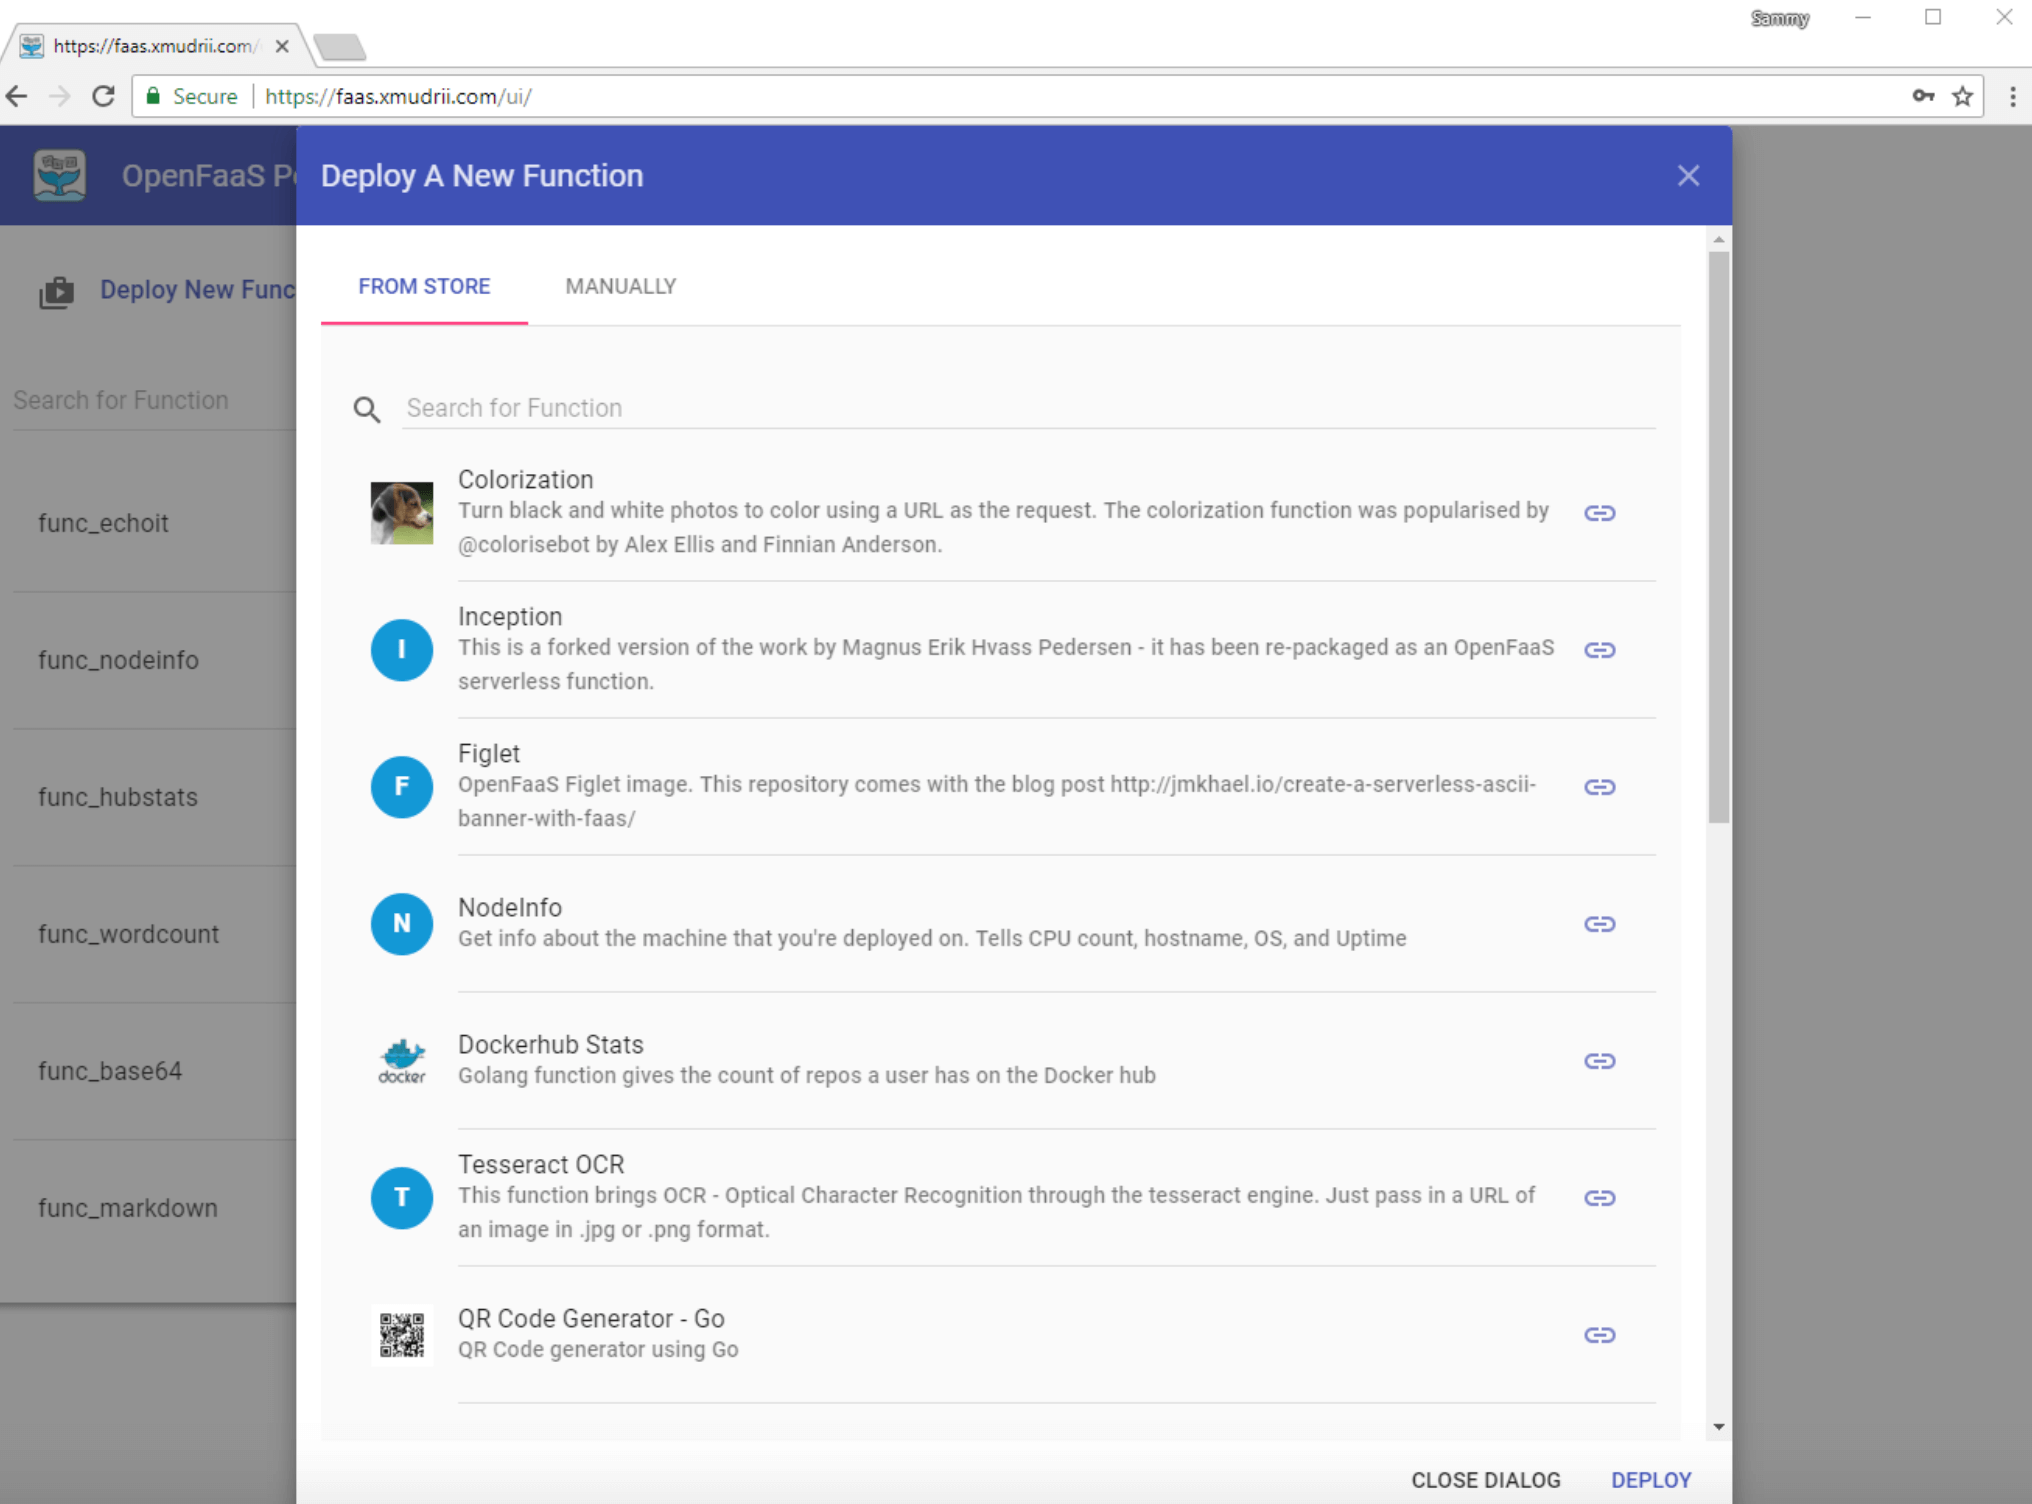
In addition to these functions, you can also deploy functions manually from a Docker image.
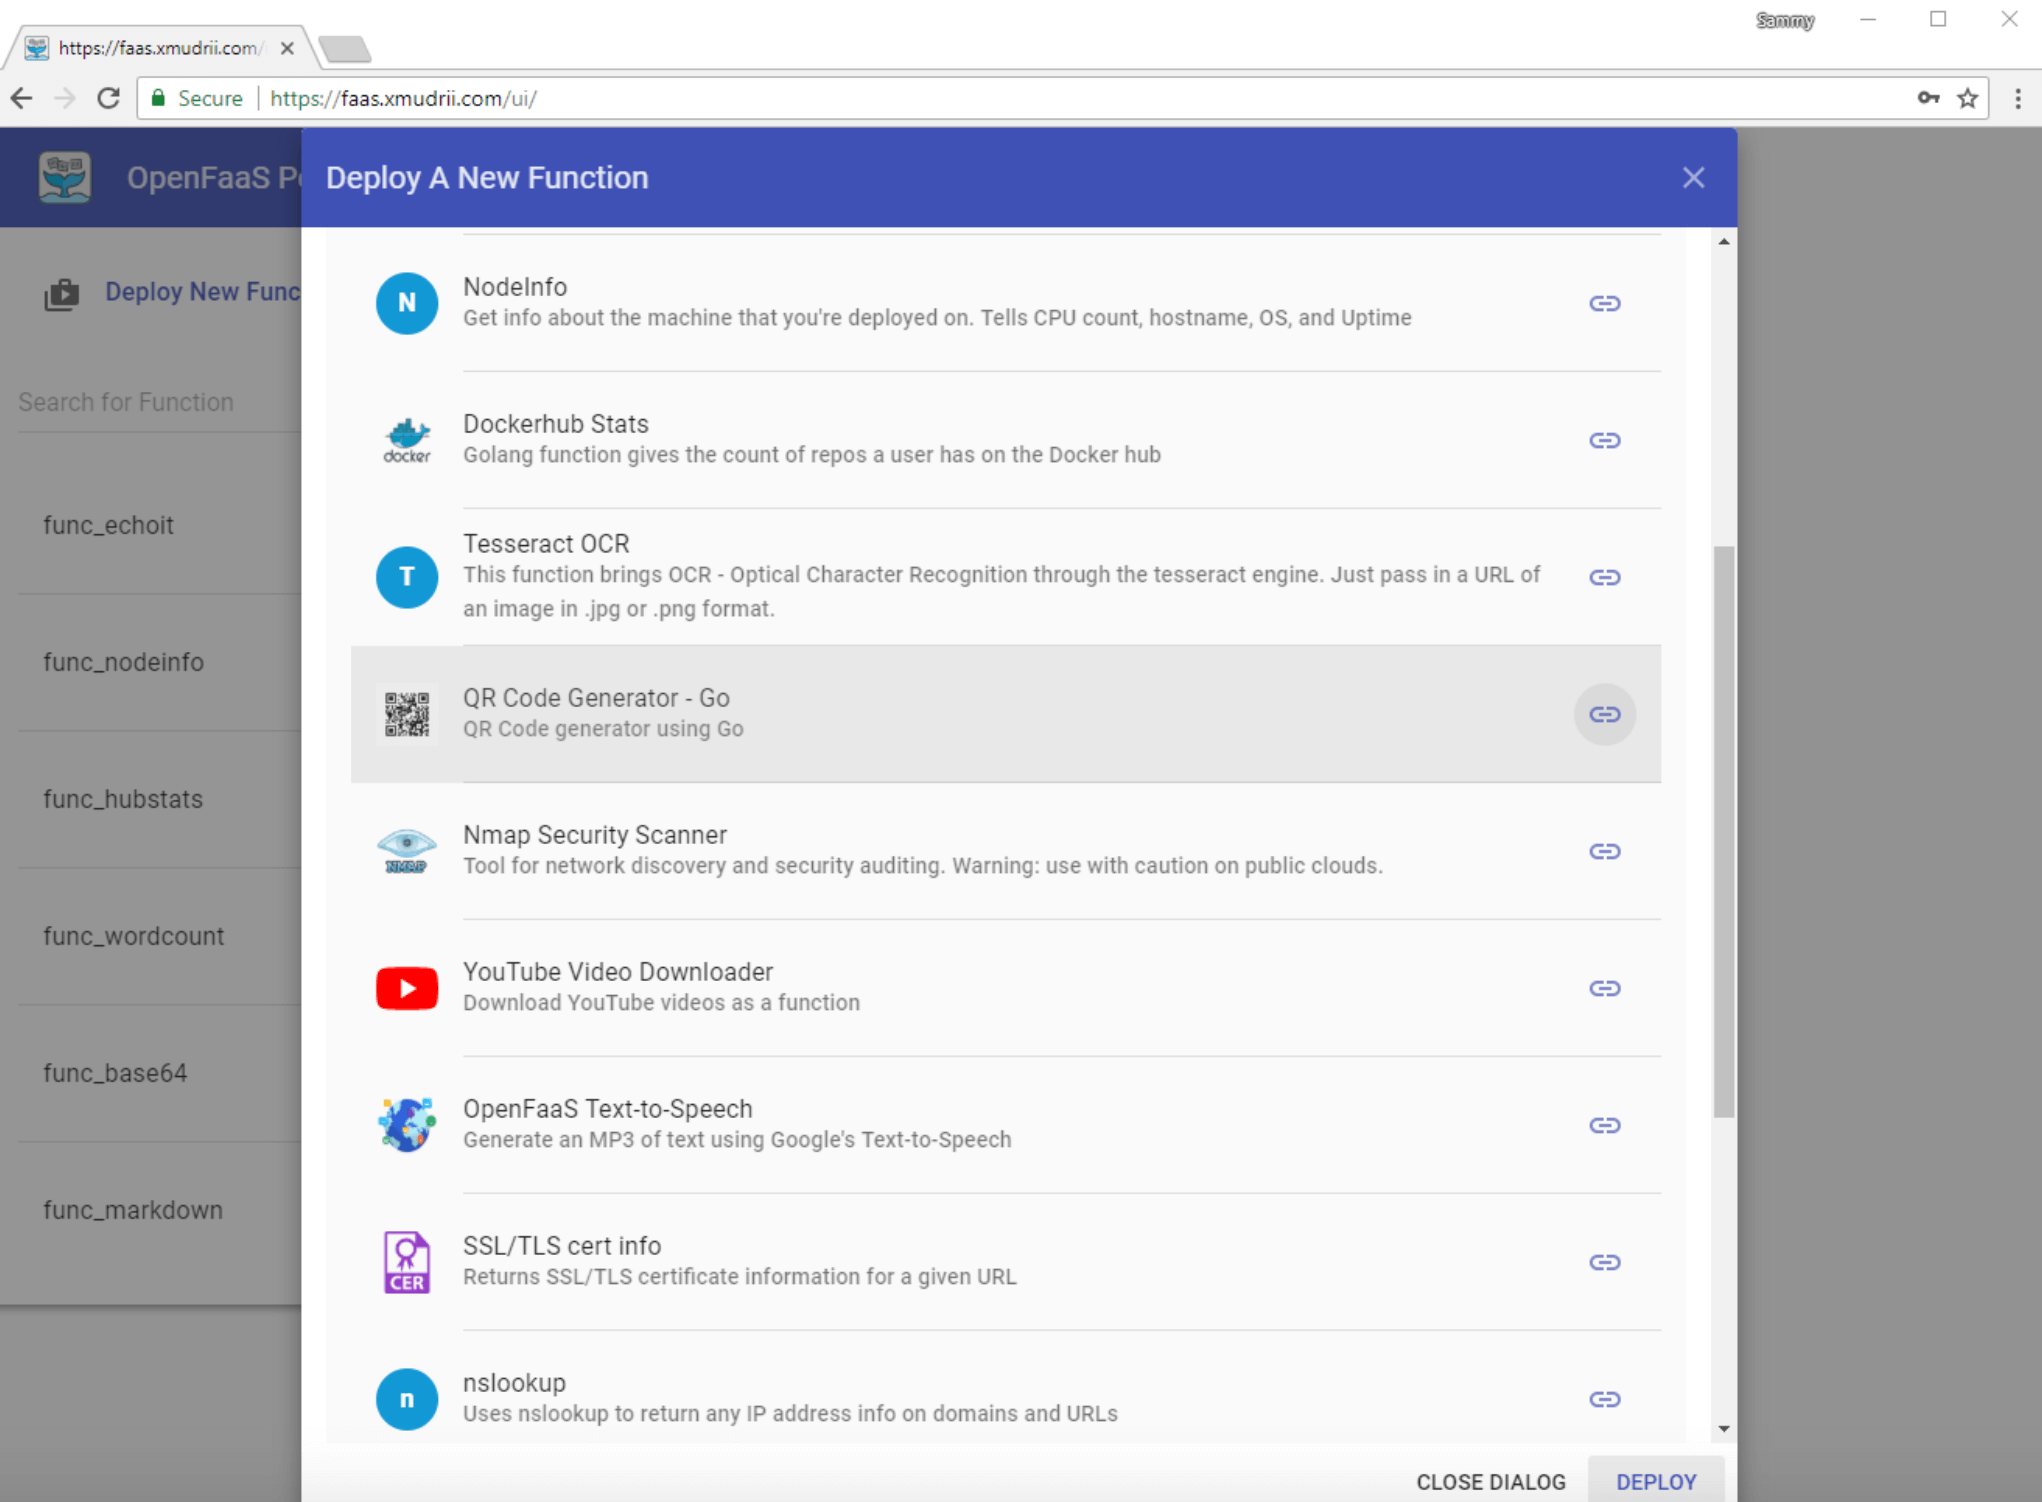
For this tutorial, you will deploy the QR Code Generator function from the FaaS Store. Locate the QR Code Generator - Go item in the list, click on it, and then click the Deploy button at the bottom of the window:
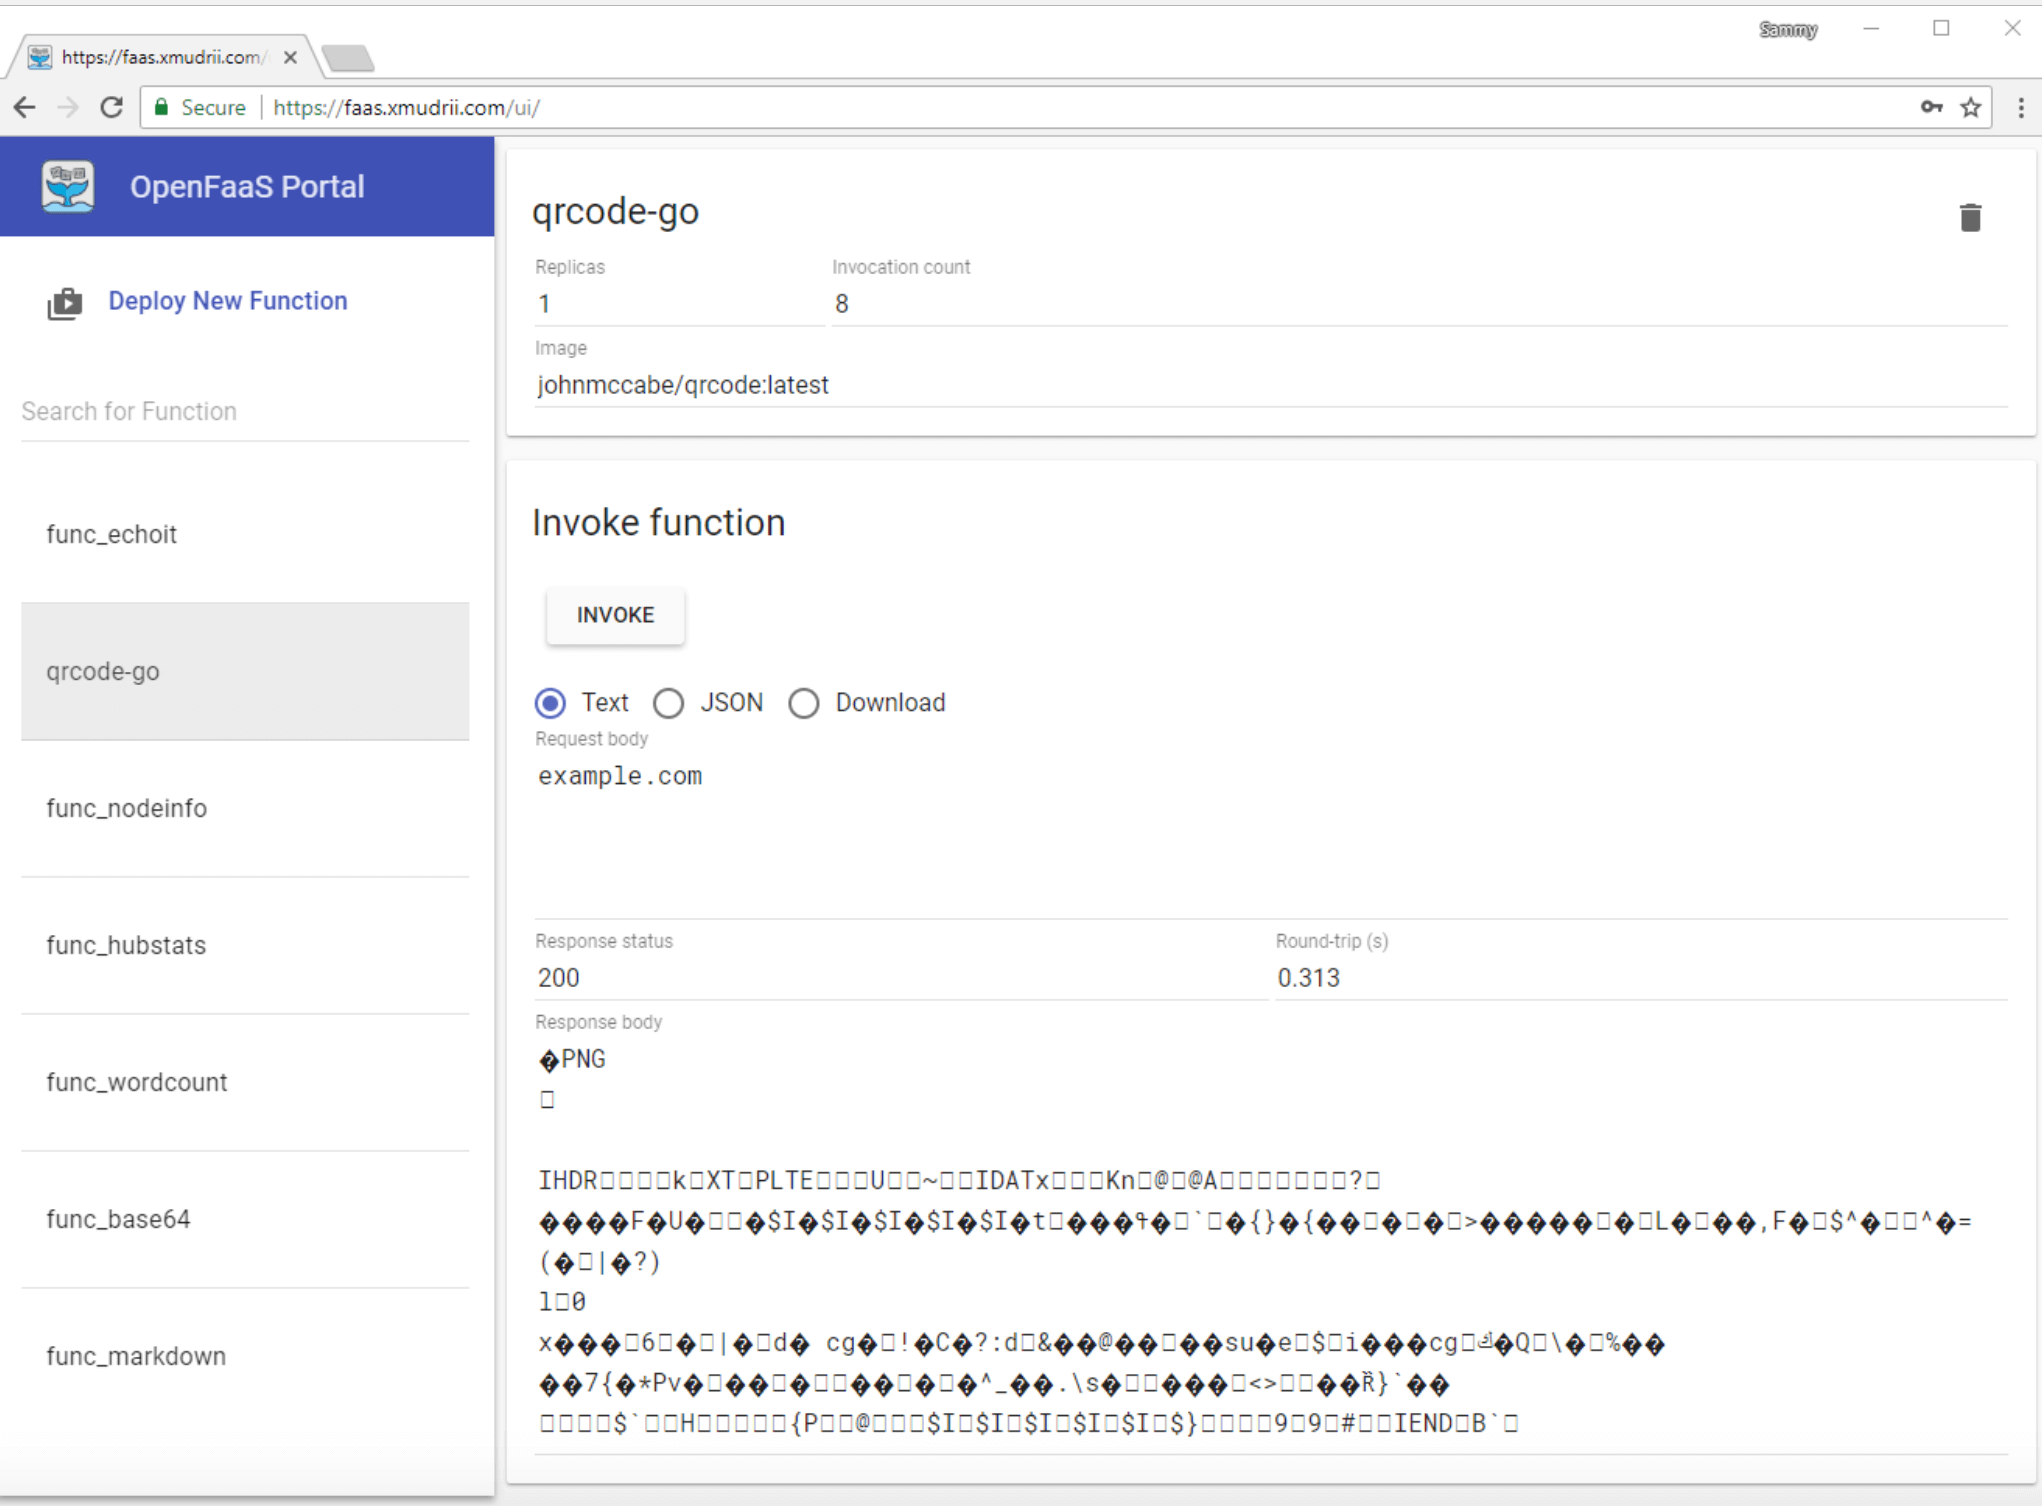
After clicking Deploy, the Deploy A New Function window will close and the function will be deployed. In the list at the left side of the window you will see a listing for the qrcode-go function. Click on this entry to select it. The main function window will show the function name, number of replicas, invocation count, and image, along with the option to invoke the function:

Let’s generate a QR code containing the URL with your domain. In the Request body field, type the content of the QR code you’d like to generate; in our case, this will be “example.com”. Once you’re done, click the Invoke button.
When you select either the Text or JSON output option, the function will output the file’s content, which is not usable or human-readable:
You can download a response. which in our case will be a PNG file with the QR code. To do this, select the Download option, and then click Invoke once again. Shortly after, you should have the QR code downloaded, which you can open with the image viewer of your choice:

In addition to deploying functions from the FaaS store or from Docker images, you can also create your own functions. In the next step, you will create a Python function using the FaaS command-line interface.
Step 7 — Creating Functions With the FaaS CLI
In the previous steps, you configured the FaaS CLI to work with your OpenFaaS server. The FaaS CLI is a command-line interface that you can use to manage OpenFaaS and install and run functions, just like you would over the API or using the Web UI.
Compared to the Web UI or the API, the FaaS CLI has templates for many programming languages that you can use to create your own functions. It can also build container images based on your function code and push images to an image registry, such as Docker Hub.
In this step, you will create a function, publish it to Docker Hub, and then run it on your OpenFaaS server. This function will be similar to the default echoit function, which returns input passed as a request.
We will use Python to write our function. If you want to learn more about Python, you can check out our How To Code in Python 3 tutorial series and our How To Code in Python eBook.
Before creating the new function, let’s create a directory to store FaaS functions and navigate to it:
- mkdir ~/faas-functions
- cd ~/faas-functions
Execute the following command to create a new Python function called echo-input. Make sure to replace your-docker-hub-username with your Docker Hub username, as you’ll push the function to Docker Hub later:
- faas-cli new echo-input --lang python --prefix your-docker-hub-username --gateway https://example.com
The output contains confirmation about the successful function creation. If you don’t have templates downloaded, the CLI will download templates in your current directory:
Output2018/05/13 12:13:06 No templates found in current directory.
2018/05/13 12:13:06 Attempting to expand templates from https://github.com/openfaas/templates.git
2018/05/13 12:13:11 Fetched 12 template(s) : [csharp dockerfile go go-armhf node node-arm64 node-armhf python python-armhf python3 python3-armhf ruby] from https://github.com/openfaas/templates.git
Folder: echo-input created.
  ___                   _____           ____
 / _ \ _ __   ___ _ __ |  ___|_ _  __ _/ ___|
| | | | '_ \ / _ \ '_ \| |_ / _` |/ _` \___ \
| |_| | |_) |  __/ | | |  _| (_| | (_| |___) |
 \___/| .__/ \___|_| |_|_|  \__,_|\__,_|____/
      |_|


Function created in folder: echo-input
Stack file written: echo-input.yml
The result of the faas-cli new command is a newly-created ~/faas-fucntions/echo-input directory containing the function’s code and the echo-input.yml file. This file includes information about your function: what language it’s in, its name, and the server you will deploy it on.
Navigate to the ~/faas-fucntions/echo-input directory:
- cd ~/faas-fucntions/echo-input
To see content of the directory, execute:
- ls
The directory contains two files: handler.py, which contains the code for your function, and requirements.txt, which contains the Python modules required by the function.
Since we don’t currently require any non-default Python modules, the requirements.txt file is empty. You can check that by using the cat command:
- cat requirements.txt
Next, let’s write a function that will return a request as a string.
The handler.py file already has the sample handler code, which returns a received response as a string. Let’s take a look at the code:
- nano handler.py
The default function is called handle and takes a single parameter, req, that contains a request that’s passed to the function when it’s invoked. The function does only one thing, returning the passed request back as the response:
def handle(req):
    """handle a request to the function
    Args:
        req (str): request body
    """

    return req
Let’s modify it to include additional text, replacing the string in the return directive as follows:
return "Received message: " + req
Once you’re done, save the file and close your text editor.
Next, let’s build a Docker image from the function’s source code. Navigate to the faas-functions directory where the echo-input.yml file is located:
- cd ~/faas-functions
The following command builds the Docker image for your function:
- faas-cli build -f echo-input.yml
The output contains information about the build progress:
Output[0] > Building echo-input.
Clearing temporary build folder: ./build/echo-input/
Preparing ./echo-input/ ./build/echo-input/function
Building: sammy/echo-input with python template. Please wait..
Sending build context to Docker daemon  7.168kB
Step 1/16 : FROM python:2.7-alpine
 ---> 5fdd069daf25
Step 2/16 : RUN apk --no-cache add curl     && echo "Pulling watchdog binary from Github."     && curl -sSL https://github.com/openfaas/faas/releases/download/0.8.0/fwatchdog > /usr/bin/fwatchdog     && chmod +x /usr/bin/fwatchdog     && apk del curl --no-cache
 ---> Using cache
 ---> 247d4772623a
Step 3/16 : WORKDIR /root/
 ---> Using cache
 ---> 532cc683d67b
Step 4/16 : COPY index.py           .
 ---> Using cache
 ---> b4b512152257
Step 5/16 : COPY requirements.txt   .
 ---> Using cache
 ---> 3f9cbb311ab4
Step 6/16 : RUN pip install -r requirements.txt
 ---> Using cache
 ---> dd7415c792b1
Step 7/16 : RUN mkdir -p function
 ---> Using cache
 ---> 96c25051cefc
Step 8/16 : RUN touch ./function/__init__.py
 ---> Using cache
 ---> 77a9db274e32
Step 9/16 : WORKDIR /root/function/
 ---> Using cache
 ---> 88a876eca9e3
Step 10/16 : COPY function/requirements.txt	.
 ---> Using cache
 ---> f9ba5effdc5a
Step 11/16 : RUN pip install -r requirements.txt
 ---> Using cache
 ---> 394a1dd9e4d7
Step 12/16 : WORKDIR /root/
 ---> Using cache
 ---> 5a5893c25b65
Step 13/16 : COPY function           function
 ---> eeddfa67018d
Step 14/16 : ENV fprocess="python index.py"
 ---> Running in 8e53df4583f2
Removing intermediate container 8e53df4583f2
 ---> fb5086bc7f6c
Step 15/16 : HEALTHCHECK --interval=1s CMD [ -e /tmp/.lock ] || exit 1
 ---> Running in b38681a71378
Removing intermediate container b38681a71378
 ---> b04c045b0994
Step 16/16 : CMD ["fwatchdog"]
 ---> Running in c5a11078df3d
Removing intermediate container c5a11078df3d
 ---> bc5f08157c5a
Successfully built bc5f08157c5a
Successfully tagged sammy/echo-input:latest
Image: your-docker-hub-username/echo-input built.
[0] < Building echo-input done.
[0] worker done.
If you get an error, make sure to resolve it by following the on-screen instructions before deploying the function.
You will need to containerize your OpenFaaS function in order to deploy it. Containerizing applications ensures that the environment needed to run your application can be easily reproduced, and your application can be easily deployed, scaled, and updated.
For this tutorial, we’ll use Docker Hub, as it’s a free solution, but you can use any container registry, including your own private registry.
Run the following command to push the image you built to your specified repository on Docker Hub:
- faas-cli push -f echo-input.yml
Pushing will take several minutes, depending on your internet connection speed. The output contains the image’s upload progress:
Output[0] > Pushing echo-input.
The push refers to repository [docker.io/sammy/echo-input]
320ea573b385: Pushed
9d87e56f5d0c: Pushed
6f79b75e7434: Pushed
23aac2d8ecf2: Pushed
2bec17d09b7e: Pushed
e5a0e5ab3be6: Pushed
e9c8ca932f1b: Pushed
beae1d55b4ce: Pushed
2fcae03ed1f7: Pushed
62103d5daa03: Mounted from library/python
f6ac6def937b: Mounted from library/python
55c108c7613c: Mounted from library/python
e53f74215d12: Mounted from library/python
latest: digest: sha256:794fa942c2f593286370bbab2b6c6b75b9c4dcde84f62f522e59fb0f52ba05c1 size: 3033
[0] < Pushing echo-input done.
[0] worker done.
Finally, with your image pushed to Docker Hub, you can use it to deploy a function to your OpenFaaS server.
To deploy your function, run the deploy command, which takes the path to the manifest that describes your function, as well as the address of your OpenFaaS server:
- faas-cli deploy -f echo-input.yml --gateway https://example.com
The output shows the status of the deployment, along with the name of the function you’re deploying and the deployment status code:
OutputDeploying: echo-input.

Deployed. 200 OK.
URL: https://example.com/function/echo-input
If the deployment is successful, you will see a 200 status code. In the case of errors, follow the provided instructions to fix the problem before continuing.
At this point your function is deployed and ready to be used. You can test that it is working as expected by invoking it.
To invoke a function with the FaaS CLI, use the invoke command by passing the function name and OpenFaaS address to it. After executing the command, you’ll be asked to enter the request you want to send to the function.
Execute the following command to invoke the echo-input function:
- faas-cli invoke echo-input --gateway https://example.com
You’ll be asked to enter the request you want to send to the function:
OutputReading from STDIN - hit (Control + D) to stop.
Enter the text you want to send to the function, such as:
Sammy The Shark!
Once you’re done, press ENTER and then CTRL + D to finish the request. The CTRL + D shortcut in the terminal is used to register an End-of-File (EOF). The OpenFaaS CLI stops reading from the terminal once EOF is received.
After several seconds, the command will output the function’s response:
OutputReading from STDIN - hit (Control + D) to stop.
Sammy The Shark!
Received message: Sammy The Shark!
If you don’t see the output or you get an error, retrace the preceding steps to make sure you’ve deployed the function as explained and follow the on-screen instructions to resolve the problem.
At this point, you’ve interacted with your function using three methods: the Web UI, the API, and the CLI. Being able to execute your functions with any of these methods offers you the flexibility of deciding how you would like to integrate functions into your existing workflows.
Conclusion
In this tutorial, you’ve used serverless architecture and OpenFaaS to deploy and manage your applications using the OpenFaaS API, Web UI, and CLI. You also secured your infrastructure by leveraging Traefik to provide SSL using Let’s Encrypt.
If you want to learn more about the OpenFaaS project, you can check out their website and the project’s official documentation.
Thanks for learning with the DigitalOcean Community. Check out our offerings for compute, storage, networking, and managed databases.
About the author(s)
Software Developer @ Loodse. Former GSoC student with CNCF (Kubernetes). Kubicorn Project Maintainer. Gopher and student.
Former Developer at DigitalOcean community. Expertise in areas including Ubuntu, Docker, Ruby on Rails, Debian, and more.
Still looking for an answer?
This textbox defaults to using Markdown to format your answer.
You can type !ref in this text area to quickly search our full set of tutorials, documentation & marketplace offerings and insert the link!
 This work is licensed under a Creative Commons Attribution-NonCommercial- ShareAlike 4.0 International License.
Become a contributor for community
Get paid to write technical tutorials and select a tech-focused charity to receive a matching donation.

DigitalOcean Documentation
Full documentation for every DigitalOcean product.

Resources for startups and AI-native businesses
The Wave has everything you need to know about building a business, from raising funding to marketing your product.
The developer cloud
Scale up as you grow — whether you're running one virtual machine or ten thousand.

Start building today
From GPU-powered inference and Kubernetes to managed databases and storage, get everything you need to build, scale, and deploy intelligent applications.
