By Mark Weiman

Prerequisites
This guide assumes that a LAMP stack is installed and configured on the system. Click here to get that set up. If at any time a command or file requires changes, the text that needs to be changed will be in red.
What is ownCloud?
ownCloud is an open source online storage solution, similar to Dropbox or Google Drive. The benefit to ownCloud is that the server is on a location that you install it to, not on someone else’s server.
The benefit of using Arch Linux to install ownCloud is that the official repository “Community” has an ownCloud package that is easily installed and configured.
Installation
You will need to have LAMP installed (as previously stated) and the MDB2 pear module installed.
pacman -Sy php-pear
pear install MDB2
You will then install ownCloud from the repos.
pacman -Sy owncloud
You will then need to copy the sample configuration file to make it usable.
#
cp /etc/webapps/owncloud/apache.example.conf /etc/httpd/conf/extra/owncloud.conf
Then you need to make it available to Apache. Just add the following line to /etc/httpd/conf/httpd.conf.
Include /etc/httpd/conf/extra/owncloud.conf
You will then need to enable the following list of php extensions in /etc/php/php.ini. All of the lines that need to be uncommented will look like ;extension=module.so. Just remove the semicolon (;) to uncomment it.
You will also want to disable the built in Webdav in apache. Open /etc/httpd/conf/httpd.conf and find the lines LoadModule dav_module modules/mod_dav.so and LoadModule dav_fs_module modules/mod_dav_fs.so and comment them both out with a hash.
# LoadModule dav_module modules/mod_dav.so
# LoadModule dav_fs_module modules/mod_dav_fs.so
You will then open /etc/httpd/conf/extra/owncloud.conf and edit the
file to your liking.
<IfModule mod_alias.c>
Alias /owncloud /usr/share/webapps/owncloud/
</IfModule>
<Directory /usr/share/webapps/owncloud/>
   Options FollowSymlinks
   Order allow,deny
   AllowOverride all
   allow from all
   php_admin_value open_basedir
"/srv/http/:/home/:/tmp/:/usr/share/pear/:/usr/$
</Directory>
<VirtualHost *:80>
    ServerAdmin email@example.com
    DocumentRoot /usr/share/webapps/owncloud
    ServerName owncloud.example.com
    ErrorLog logs/owncloud.foo.info-error_log
    CustomLog logs/owncloud.foo.info-access_log common
</VirtualHost>
Then you will need to create a mysql database for ownCloud.
$ mysql -u root -p
sql> CREATE DATABASE owncloud;
sql> CREATE USER 'owncloud'@'localhost' IDENTIFIED BY '<span
style="color: red">password';
sql> GRANT ALL PRIVILEGES ON owncloud TO 'owncloud'@'localhost' WITH
GRANT OPTION;
sql> \q
Now, just restart (or start, just replace restart with start) httpd and the installation will be complete.
# systemctl restart httpd
Configuring
You will want to make the owncloud webapp folder readable to the http user.
# chown -R http.http /usr/share/webapps/owncloud
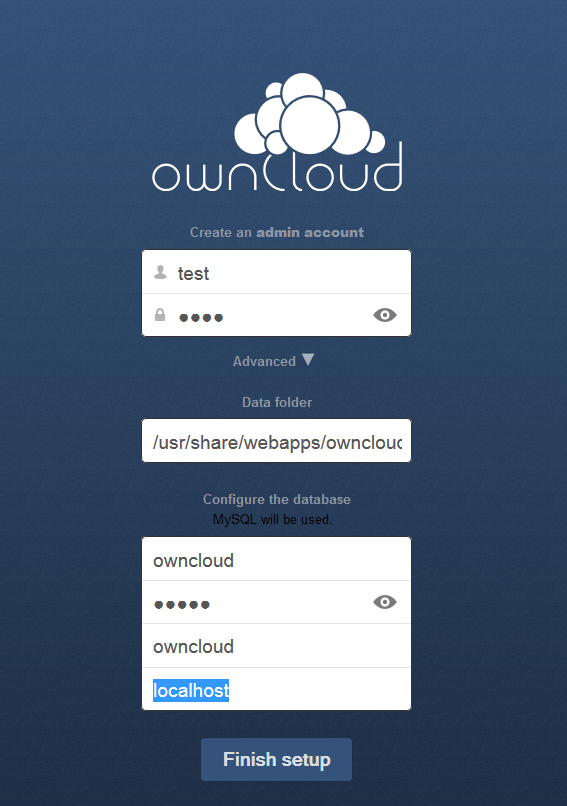
Open a web browser (Firefox, Google Chrome, etc.) and visit your IP or domain name and the path to whatever alias you set in /etc/httpd/conf/extra/owncloud.conf (e.g. http://example.com/owncloud). And input your desired username, password, and all the database information like in the image below).
Congratulations, ownCloud is set up and ready!
<div class=“author”>Submitted by: <a href=“http://markzz.com/”>Mark Weiman</a></div>
Thanks for learning with the DigitalOcean Community. Check out our offerings for compute, storage, networking, and managed databases.
About the author
Still looking for an answer?
This textbox defaults to using Markdown to format your answer.
You can type !ref in this text area to quickly search our full set of tutorials, documentation & marketplace offerings and insert the link!
<span style=“color: red”>
in the above doesn't show up correctly, or is it my browser?

*  ```sql> GRANT ALL PRIVILEGES ON owncloud TO 'owncloud'@'localhost' WITH
GRANT OPTION;```

should read


```sql> GRANT ALL PRIVILEGES ON owncloud,* TO 'owncloud'@'localhost' WITH
GRANT OPTION;``` This work is licensed under a Creative Commons Attribution-NonCommercial- ShareAlike 4.0 International License.
Become a contributor for community
Get paid to write technical tutorials and select a tech-focused charity to receive a matching donation.

DigitalOcean Documentation
Full documentation for every DigitalOcean product.

Resources for startups and AI-native businesses
The Wave has everything you need to know about building a business, from raising funding to marketing your product.
The developer cloud
Scale up as you grow — whether you're running one virtual machine or ten thousand.

Start building today
From GPU-powered inference and Kubernetes to managed databases and storage, get everything you need to build, scale, and deploy intelligent applications.
