By Elliot Cooper and Kathryn Hancox

The author selected the Open Internet/Free Speech Fund to receive a donation as part of the Write for DOnations program.
Introduction
Prosody is an XMPP chat server that supports TLS encrypted one-to-one chat and group chat rooms. XMPP (Extensible Messaging and Presence Protocol) is an open messaging protocol formally known as Jabber. This means that any XMPP chat client will be able to connect to a Prosody server and start chatting.
XMPP is a mature and open standard maintained by the Internet Engineering Task Force (IETF). It is actively maintained and deployed in many applications, such as Google Talk, which is used by millions of users. XMPP servers, like Prosody, are a flexible option for a chat server that has been around for over two decades.
In this tutorial, you will install and configure a Prosody server that supports one-to-one and group chat sessions and the ability to upload files into the chat panel to share. All of the chat sessions will be protected by a TLS cryptographic certificate so your personal data stays private.
Prerequisites
Before you begin this guide you’ll need the following:
- One Ubuntu 18.04 server with at least 512MB of RAM set up by following the Initial Server Setup with Ubuntu 18.04 guide, including a sudo-enabled, non-root user and a firewall.
- An XMPP chat client installed on your local system. Any of the chat applications listed on this XMPP Clients page will be compatible with your Prosody server.
- Two hostnames that point to your server. You need two hostnames because Prosody uses one for direct chat and another for group chat rooms. Learn how to point hostnames to DigitalOcean Droplets by following our DNS How-Tos. This guide will use the following two example hostnames:
chat.your-domain: The one-to-one chat hostname.room.your-domain: The group chat room hostname.
Log in to your server as the sudo-enabled, non-root user to start this guide.
Step 1 — Installing Prosody
In this step, you will add the custom Prosody APT repository to your server and then install Prosody from it. You’re using the Prosody repository to ensure installation of the most up-to-date packages.
First, create and open a new repository file with your text editor. This file holds the Prosody repository information for the APT package manager:
- sudo nano /etc/apt/sources.list.d/prosody.list
Add the following line into your file:
deb https://packages.prosody.im/debian bionic main
Now, you need to download and install the Prosody APT public key. Your server will use this to confirm that the Prosody package was created by the Prosody team and has not been tampered with.
The following command uses the wget utility to download the key to your current directory:
- wget https://prosody.im/files/prosody-debian-packages.key
Use the apt-key add command to add Prosody’s key to APT’s keyring:
- sudo apt-key add prosody-debian-packages.key
You can now delete the key as you no longer need it:
- rm prosody-debian-packages.key
Update your server’s package database so that it includes the newer package versions from the Prosody repository:
- sudo apt update
You are now ready to install the Prosody server package and some additional optional packages:
- sudo apt install prosody prosody-modules lua-dbi-sqlite3 lua-event
The packages you installed are as follows:
prosody: The prosody server.prosody-modules: Additional Prosody modules that extend the functionality of the Prosody server.lua-dbi-sqlite3: Enables Prosody to use an SQLite database.lua-event: Enables Prosody to handle more simultaneous clients.
You have now completed the installation of Prosody. In the next step, you will get two TLS certificates that Prosody will use to encrypt your data as it crosses the internet to and from the Prosody server.
Step 2 — Obtaining TLS Certificates
Prosody uses TLS certificates to encrypt the connections between the server and the clients. These certificates are the same ones that you use any time you visit a website with an HTTPS URL. Let’s Encrypt is a non-profit organization that supplies free TLS certificates. They also provide the certbot utility to get and manage their certificates. In this step, you will install the certbot utility and use it to get a pair of certificates for the two hostnames you pointed to your server.
You’ll install certbot from the Let’s Encrypt Ubuntu PPA repository to ensure you’re using the latest packages.
First, run the following command to add the custom repository:
- sudo add-apt-repository ppa:certbot/certbot
Now, install certbot:
- sudo apt install certbot
Next, allow HTTP traffic through the UFW so that certbot can validate your certificate application:
- sudo ufw allow http
Run the following certbot command, which will get the certificate for one of your hostnames:
- sudo certbot certonly --standalone --agree-tos --email your_email -d chat.your-domain
These options are:
--certonly: Get the certificate and do not make any other changes on the server.--standalone: Start a temporary web server for the certificate validation.--agree-tos: Automatically agrees to the Let’s Encrypt Terms of Service.--email your_email: The email address that you will submit to Let’s Encrypt that they will use to notify you about security issues, certificate expiry notices, and other important information.-d chat.your-domain: The hostname that you intend to use for your Prosody server.
When you run this command you will be asked if you want to share your email address with the Electronic Frontier Foundation, which is optional. Then the registration of the certificate will continue with the following output:
OutputSaving debug log to /var/log/letsencrypt/letsencrypt.log
Plugins selected: Authenticator standalone, Installer None
Obtaining a new certificate

IMPORTANT NOTES:
 - Congratulations! Your certificate and chain have been saved at:
   /etc/letsencrypt/live/chat.your-domain/fullchain.pem
   Your key file has been saved at:
   /etc/letsencrypt/live/chat.your-domain/privkey.pem
   Your cert will expire on 2020-07-26. To obtain a new or tweaked
   version of this certificate in the future, simply  run certbot
   again. To non-interactively renew *all* of your certificates, run
   "certbot renew"
 - If you like Certbot, please consider supporting our work by:

   Donating to ISRG / Let's Encrypt:   https://letsencrypt.org/donate
   Donating to EFF:                    https://eff.org/donate-le
Run the same command again to get a certificate for your second hostname.
You now have two directories at:
/etc/letsencrypt/live/room.your-domain/etc/letsencrypt/live/chat.your-domain
These contain the certificate and key files for your hostnames.
As the Prosody server does not run as the root user, the ownership and permissions of the directories and the key files need changing so that the Prosody server can read and use them.
The permissions of files and directories on Linux allow control of which users and processes can read, write, and execute directories and folders. This control protects the system from being modified by a non-authorized user and also protects private files, such as the TLS private key, from being read by a non-authorized user.
If you are unfamiliar with Linux users and permissions the article An Introduction to Linux Permissions provides an excellent introduction.
The first step is to change the group owner of the private keys to the Prosody server’s group prosody with the following commands:
- sudo chgrp prosody /etc/letsencrypt/live/room.your-domain/privkey.pem
- sudo chgrp prosody /etc/letsencrypt/live/chat.your-domain/privkey.pem
The chgrp utility changes the group owner of files and directories. Here, you changed the group from the default root to prosody.
Next, change the permissions of the directories that contain the TLS certificate files to 0755. These directories are owned by the root user and the root group. The following command will change the permissions on these directories:
- sudo chmod 0755 /etc/letsencrypt/archive
- sudo chmod 0755 /etc/letsencrypt/live
The new permissions of 0755 on these directories mean that the root user has read, write, and execute permissions. Members of the root group have read and execute permissions. All other users and groups on the system have read and execute permissions.
Now, change the permissions of the TLS private keys:
- sudo chmod 0640 /etc/letsencrypt/live/room.your-domain/privkey.pem
- sudo chmod 0640 /etc/letsencrypt/live/chat.your-domain/privkey.pem
The 0640 permissions on these files mean that the root user has read and write permissions on the file. Members of the prosody group have read permissions on the file. The prosody group has one member, the prosody user. This is the user that the Prosody server runs as and the user it will access the file as. All other users on the system have no permission to access the file.
These two commands use the chmod utility that modifies which users and groups have read, write, and execute permissions on files and directories.
You can test that Prosody can read the private keys by using sudo to read the private key files with cat as the prosody user:
- sudo -u prosody cat /etc/letsencrypt/live/chat.your-domain/privkey.pem
If this is successful then you will see the contents of the key file displayed on your screen.
Prosody uses a single file containing the certificate and private key to encrypt the file upload and download connections. This file is not created by certbot automatically so you must create it manually.
You will first move into the directory that contains the key and certificate files, then use cat to combine their contents into a new file key-and-cert.pem:
- cd /etc/letsencrypt/live/chat.your-domain/
- sudo sh -c 'cat privkey.pem fullchain.pem >key-and-cert.pem'
The beginning of this command, sudo sh -c, opens a new sub-shell that has root user’s permissions and so can write the new file to /etc/letsencrypt/live/chat.your-domain/.
Now, change the group and permissions of this new file to match the group and permission that you set for the other private key file with the following command:
- sudo chmod 0640 key-and-cert.pem
- sudo chgrp prosody key-and-cert.pem
Move back to your user’s home directory:
- cd
Finally, this file must be re-created every time the certificate is renewed or it will contain an expired certificate.
certbot comes with a mechanism called a “hook” that allows a script to be run before or after a certificate is renewed. You can use this mechanism to run a script that will re-create the command you ran after every certificate renewal.
Open the new script file called /etc/letsencrypt/renewal-hooks/post/key-and-cert-combiner.sh with a text editor:
- sudo nano /etc/letsencrypt/renewal-hooks/post/key-and-cert-combiner.sh
Then, add the following into the editor:
#!/usr/bin/env bash
set -e

# combines the certificate and key into a single file with cat
cat /etc/letsencrypt/live/chat.your-domain/privkey.pem \
    /etc/letsencrypt/live/chat.your-domain/fullchain.pem \
   >/etc/letsencrypt/live/chat.your-domain/key-and-cert.pem
This is how your Bash script breaks down:
#!/usr/bin/env bash: Tells the system to use the Bash interpreter to run the script.set -e: Causes the script to exit if any command fails.>: Redirects the output of thecatcommand into the new file on the right.
The script can’t be run until you give it execute permissions with the following command:
- sudo chmod +x /etc/letsencrypt/renewal-hooks/post/key-and-cert-combiner.sh
The +x gives the script execute permissions.
Next, test that the certificates are installed correctly and that the post-renewal hook script is working by running the following certbot command:
- sudo certbot renew --dry-run
This command tells certbot to renew the certificates but with the --dry-run option that stops certbot from making any changes. If everything is successful then you will see the following output:
OutputCongratulations, all renewals succeeded. The following certs have been renewed:
  /etc/letsencrypt/live/chat.your-domain/fullchain.pem (success)
  /etc/letsencrypt/live/room.your-domain/fullchain.pem (success)
** DRY RUN: simulating 'certbot renew' close to cert expiry
**          (The test certificates above have not been saved.)
- - - - - - - - - - - - - - - - - - - - - - - - - - - - - - - - - - - - - - - -
Running post-hook command: /etc/letsencrypt/renewal-hooks/post/key-and-cert-combiner.sh
You have now got the TLS certificates for your Prosody server. In the next step, you will edit Prosody’s main configuration file.
Step 3 — Configuring Prosody
Prosody has a lot of configuration options and this is reflected in the large size of the main configuration file /etc/prosody/prosody.cfg.lua. To keep this section manageable you will work from the start of the file downward, making edits to the file.
Before you start editing a large configuration file it is a good idea to make a copy so that you have the original to refer to and to restore from. Make a copy of the configuration file with the cp command:
- sudo cp /etc/prosody/prosody.cfg.lua /etc/prosody/prosody.cfg.lua.original
You now have a copy of the original file at /etc/prosody/prosody.cfg.lua.original.
Next, open the configuration file with a text editor:
- sudo nano /etc/prosody/prosody.cfg.lua
The configuration changes are broken into smaller tasks in the following sections.
Creating an Administrator
Prosody administrators are users that can make changes to the Prosody server from their chat client, message all users, and complete other privileged actions.
The Prosody server administrators are set with the following line:
...
admins = { }
...
In this example line, the user admin will be added to the example serverchat.your-domain:
...
admins = { "admin@chat.your-domain" }
...
If you want to add another user then you must put a comma after the first:
...
admins = { "admin@chat.your-domain", "sammy@chat.your-domain" }
...
Enabling Prosody Modules
The Prosody developers put many features into modules that can be enabled or disabled.
A module is enabled by removing the -- that precedes it. For example, here, the tls module is disabled:
Module Disabled --"tls"; -- Add support for secure TLS on c2s/s2s connections
And here it is enabled:
Module Enabled "tls"; -- Add support for secure TLS on c2s/s2s connections
Following this paragraph is the edited modules section of the Prosody configuration file with the edited lines highlighted:
...
modules_enabled = {

        -- Generally required
                "roster"; -- Allow users to have a roster. Recommended ;)
                "saslauth"; -- Authentication for clients and servers. Recommended if you want to log in.
                "tls"; -- Add support for secure TLS on c2s/s2s connections
                "dialback"; -- s2s dialback support
                "disco"; -- Service discovery

        -- Not essential, but recommended
                "carbons"; -- Keep multiple clients in sync
                "pep"; -- Enables users to publish their avatar, mood, activity, playing music and more
                "private"; -- Private XML storage (for room bookmarks, etc.)
                "blocklist"; -- Allow users to block communications with other users
                "vcard4"; -- User profiles (stored in PEP)
                "vcard_legacy"; -- Conversion between legacy vCard and PEP Avatar, vcard

        -- Nice to have
                "version"; -- Replies to server version requests
                "uptime"; -- Report how long server has been running
                "time"; -- Let others know the time here on this server
                "ping"; -- Replies to XMPP pings with pongs
                "register"; -- Allow users to register on this server using a client and change passwords
                "mam"; -- Store messages in an archive and allow users to access it
                "csi_simple"; -- Simple Mobile optimizations

        -- Admin interfaces
                "admin_adhoc"; -- Allows administration via an XMPP client that supports ad-hoc commands
                --"admin_telnet"; -- Opens telnet console interface on localhost port 5582

        -- HTTP modules
                --"bosh"; -- Enable BOSH clients, aka "Jabber over HTTP"
                --"websocket"; -- XMPP over WebSockets
                "http_files"; -- Serve static files from a directory over HTTP
                "http_upload"; -- Enables file sharing between users

        -- Other specific functionality
                --"limits"; -- Enable bandwidth limiting for XMPP connections
                "groups"; -- Shared roster support
                --"server_contact_info"; -- Publish contact information for this service
                "announce"; -- Send announcement to all online users
                --"welcome"; -- Welcome users who register accounts
                --"watchregistrations"; -- Alert admins of registrations
                --"motd"; -- Send a message to users when they log in
                --"legacyauth"; -- Legacy authentication. Only used by some old clients and bots.
                --"proxy65"; -- Enables a file transfer proxy service which clients behind NAT can use
}
...
The modules you enabled are the following:
mam: Stores chat messages on the server so users can retrieve them.csi_simple: Enables optimizations for mobile clients.http_files: Enables file sharing.http_uploads: Enables file sharing.groups: Enables user visibility.announce: Enables admins to send announcements to all users.
Setting Up Database Storage
The next section that you need to edit sets where Prosody saves users’ messages and other data. The default setting is to use text files, but a more scaleable configuration is to save the messages in a database.
Prosody offers three choices for databases; MySQL, PostgreSQL, and SQLite. SQLite is the easiest to set up and maintain, uses the fewest resources, and is suitable for smaller deployments.
Enable the following two lines by removing the leading -- as shown following:
...
storage = "sql" -- Default is "internal"
...
sql = { driver = "SQLite3", database = "prosody.sqlite" } -- Default. 'database' is the filename.
...
Message Archiving
You can decide how long the server will store old chat messages by editing the following line:
...
archive_expires_after = "1w" -- Remove archived messages after 1 week
...
The default period of 1w (one week) is shown. Use d for days, w for weeks, and y for years.
Encrypting File Uploads and Downloads
The https_certificate line tells Prosody where to look for the combined certificate and key you created earlier to use for file transfers.
Edit it so that it uses the path to your combined file:
...
https_certificate = "/etc/letsencrypt/live/chat.your-domain/key-and-cert.pem"
...
Removing localhost
In the default configuration, Prosody listens on localhost or 127.0.0.1 for chat connections. This is not needed on a remote server.
Disable this behavior by adding -- to the line so that it looks like the following after editing:
...
--VirtualHost "localhost"
...
Changing the Maximum File Upload Size
Your Prosody server supports users sharing files by attaching them into chat windows. The default maximum size of files that users can share is 1MB.
Set this to a higher value by adding the following line to the end of the configuration:
...
http_upload_file_size_limit = 10485760
...
The number at the end of the line is the maximum file size in bytes. The size shown here is 10485760 Bytes or 10MB. The GbMb website provides a handy tool for converting MB to Bytes.
If you want to allow uploads of files larger than 10MB then you must add another line that sets the http_max_content_size variable. The http_max_content_size must be larger than the maximum file upload size.
Here, the maximum file size is set to 20MB (20971520 Bytes) and the http_max_content_size is set to 30MB:
...
http_upload_file_size_limit = 20971520
http_max_content_size = 31457280
...
Set http_max_content_size to be 50% larger than the maximum file size.
Configuring the Groups File
Thegroups module that you enabled in the modules section allows chat clients to see each other.
The groups module reads a file that holds the group names and their members. Set the location and name of the file by adding the following line to the bottom of the configuration:
...
groups_file = "/etc/prosody/sharedgroups.txt"
...
This line configures Prosody to read a file at /etc/prosody/sharedgroups.txt to gather group information. You will populate this file with users and groups in Step 4.
Create this file with the following command in a different terminal:
- sudo touch /etc/prosody/sharedgroups.txt
The touch utility creates an empty file when no additional options are used.
Adding the Chat Server VirtualHost Configuration
Prosody uses a block of configuration that begins with VirtualHost to start the chat server that uses your hostname.
Add the following configuration block to the bottom of the configuration:
...
VirtualHost "chat.your-domain"
    ssl = {
            key = "/etc/letsencrypt/live/chat.your-domain/privkey.pem";
            certificate = "/etc/letsencrypt/live/chat.your-domain/fullchain.pem";
    }
...
The configuration options:
VirtualHost: The hostname that Prosody will use for the chat server.key: The TLS private key to use to secure the chat connections.certificate: The TLS private certificate to use to secure the chat connections.
Adding a Chat Room Server
This configuration enables Prosody to offer multi-user chat rooms to your users. Add the following block of configuration to the bottom of the configuration file in a new section:
...
Component "room.your-domain" "muc"
    modules_enabled = { "mam_muc"; }
    storage = { muc_log = "sql"; }
    ssl = {
          key = "/etc/letsencrypt/live/room.your-domain/privkey.pem";
          certificate = "/etc/letsencrypt/live/room.your-domain/fullchain.pem";
    }
...
The options used:
Component: Enables themuc(Multi-User Chat) group chat module to use theroom.your-domainhostname.modules_enabled = { "mam_muc"; }: Enables message archiving of the group chats.storage: Archives chat messages into the SQLite database.key: The TLS private key to use to secure the chat connections.certificate: The TLS private certificate to use to secure the chat connections.
Save and exit the editor.
Now, restart Prosody to put the new configuration live:
- sudo systemctl restart prosody.service
You have now completed editing Prosody’s main configuration file. In the next step, you will add a Prosody user and add them to a group.
Step 4 — Adding Prosody Users and Groups
You have to add Prosody users to your Prosody server on the command line before they can log in. You’ll use the prosodyctl tool that was supplied with the prosody package to help manage the Prosody server.
Use the following prosodyctl command to add a new user:
- sudo prosodyctl register sammy chat.your-domain password
This user can now connect to your Prosody server.
Your users will appreciate it if you create some groups that allow them to see each other and see their status. You do this by creating groups and adding users to them with the group file you defined earlier.
Open the group file:
- sudo nano /etc/prosody/sharedgroups.txt
A group is set by putting its name between square brackets. The members of the group are placed on a new line under the group name. You can create as many groups as you want and users can be members of more than one group.
Here, is a group called Everyone that has two members: sammy and admin.
[Everyone]
sammy@chat.your-domain
admin@chat.your-domain
All the members of the same group will be able to “see” the other members whether they are online or not.
You must restart the Prosody server any time you add new users or modify the group information:
- sudo systemctl restart prosody.service
All that remains for server configuration is to allow Prosody to communicate through the firewall, which you will do in the next section.
Step 5 — Allowing Prosody Traffic Through the Firewall
Prosody listens for connections from clients on TCP ports 5222 and 5322. Use the following command to open these ports in your UFW:
- sudo ufw allow 5222,5322/tcp
The prosody server is now fully installed and configured.
You can now connect to your Prosody server with a chat client. In the next step, you will configure an XMPP client on your local system or smart phone to connect to your Prosody server.
Step 6 — Configuring an XMPP Chat Client
In this step, you will configure your XMPP client to your Prosody server. You’ll need to enter your username, server hostname, and password to connect.
You configured your Prosody server to use the standard XMPP ports and the TLS security will be taken care of automatically so you will not need to set them to connect to your client.
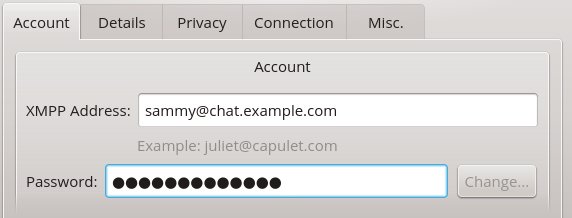
Different chat clients may ask for the username, password, and server hostname in different formats. The username and server hostname are sometimes put together like an email address, like sammy@chat.your-domain. The email-like address can be called the Username or an XMPP Address.
This image shows the login screen for the PSI client that requires the username and server hostname to be entered in email address form.
Whereas, the following screenshot of the account login screen for the Linux XMPP client Gajim shows the username and hostname are given separate input fields.

XMPP clients do not need any more details than the username, password, and server hostname to log in. After you have logged in you will be able to find the other members of the chat group and you will also be able to create group chat rooms where this is supported by your client.
Conclusion
In this article you set up a Prosody server with the following features:
- TLS Encryption
- One-to-one chat and group chat rooms.
- File sharing
You also configured an XMPP chat client to use all of these features giving you a feature-rich chat with your friends and colleagues.
If you’re looking for further open-source alternatives to remote communication, check out our How To Install Jitsi Meet tutorials.
Thanks for learning with the DigitalOcean Community. Check out our offerings for compute, storage, networking, and managed databases.
About the author(s)
I have been a Linux Systems Administrator and technical content creator for more than 20 years. I am passionate about using and promoting OSS.
Former Senior Technical Editor at DigitalOcean, with a strong focus on DevOps and System Administration content. Areas of expertise include Terraform, PyTorch, Python, and Django.
Still looking for an answer?
This textbox defaults to using Markdown to format your answer.
You can type !ref in this text area to quickly search our full set of tutorials, documentation & marketplace offerings and insert the link!
Thank you for a very detailed walkthrough! I am very much a novice, but I was able to follow this fairly well.
Under step 2, when group ownership is being changed for the private keys, the command listed is:
sudo chgrp prosody /etc/letsencrypt/live/root.your-domain/privkey.pem
Should “root” be “room” instead? I had difficulty issuing the command with “root.my.domain” but “room.my.domain” worked, and appeared to fit the rest of the walkthrough.
Thanks again! Brandy
Hello, I have already installed Jitsi on my ubuntu server following this guidline https://www.digitalocean.com/community/tutorials/how-to-install-jitsi-meet-on-ubuntu-20-04 (works fine) and now I need to install/configure my XMPP service on the same server. Since Prosody is already installed how I could configure everything not impacting my Jitsi set up? Thank you.
 This work is licensed under a Creative Commons Attribution-NonCommercial- ShareAlike 4.0 International License.
Become a contributor for community
Get paid to write technical tutorials and select a tech-focused charity to receive a matching donation.

DigitalOcean Documentation
Full documentation for every DigitalOcean product.

Resources for startups and AI-native businesses
The Wave has everything you need to know about building a business, from raising funding to marketing your product.
The developer cloud
Scale up as you grow — whether you're running one virtual machine or ten thousand.

Start building today
From GPU-powered inference and Kubernetes to managed databases and storage, get everything you need to build, scale, and deploy intelligent applications.
