Not using Ubuntu 16.04?
Choose a different version or distribution.
Introduction
R is a popular open source programming language that specializes in statistical computing and graphics. It is widely used for developing statistical software and performing data analysis. R is easily extensible, and the community is known for continuously adding user-generated packages for specific areas of study, which makes it applicable to many fields.
In this tutorial, we’ll show you how to install devtools and use it to install a package directly from GitHub.
Prerequisites
To follow along, you will need R, installed on an Ubuntu 16.04 server with a minimum of 1GB of RAM and a non-root user with sudo privileges. How to Set Up R on Ubuntu 16.04 can help you.
Step 1 — Installing System Dependencies for devtools
We’ll install devtools from the interactive shell, but before we do, we’ll need to install these system dependencies:
- sudo apt-get install build-essential libcurl4-gnutls-dev libxml2-dev libssl-dev
Once this is complete, we’re ready to proceed.
Step 2 — Installing the Devtools Package
Devtools will enable us to install and build packages directly from GitHub, BitBucket, local files, as well as to install specific versions from CRAN. To make devtools available site-wide, we’ll enter R’s shell as root:
- sudo -i R
From within the monitor, we’ll use the install.packages() function to install devtools from the official Comprehensive R Archive Network (CRAN).
- install.packages('devtools')
When prompted, we’ll select 1 for 0-Cloud, which will connect us to the Content Delivery Network (CDN) provided by RStudio, in order to get the geographically closest mirror. After making our selection, installation will begin. This may take a while. When it’s finished, near the end of the installation output, we should see:
Output...
** testing if installed package can be loaded
* DONE (devtools)
Next, we’ll put it to the test as we fetch and build a project directly from GitHub.
Step 3 — Installing an R Package from GitHub
In this step, we’re going to install the latest development build of Shiny, a web application framework for R, directly from GitHub. We’ll do this using the install_github function provided by devtools. A GitHub package is defined by its author (rstudio) and its name (shiny) which you can find from the GitHub URL of the main project page: https://github.com/rstudio/shiny.
Use the following command to install:
- devtools::install_github('rstudio/shiny')
Installation has successfully completed when we see the following lines near the end and are returned to the R prompt:
Output. . .
** testing if installed package can be loaded
* DONE (shiny)
>
We can see the specific version of Shiny we’ve installed with the following command:
- packageVersion("shiny")
Output[1] ‘0.14.0.9000’
In the next step, we’ll take a quick look at Shiny. We’ll need to do a couple of system-level tasks first, so we’ll exit the monitor with the following command or by using CTRL-D.:
- q()
Either of these will prompt you to save your workspace image, R’s working environment that includes user-defined objects. This isn’t necessary, so you can safely enter n.
Since we’ll be using a web browser to look at an example of what Shiny can do, we’re going to make sure that web traffic is allowed.
Check the Firewall
Shiny is a web application framework, so in order to view its examples in a browser, we’ll need to ensure that web traffic is allowed on our firewall. The built-in web server randomly chooses a port each time it is started unless it is started with a specific value. In order to make firewall management easier, we’ll specify port 4040 when we run our example.
Let’s check the status of the firewall:
- sudo ufw status
In this case, only SSH is allowed through:
OutputStatus: active

To                         Action      From
--                         ------      ----
OpenSSH                    ALLOW       Anywhere
OpenSSH (v6)               ALLOW       Anywhere (v6)
You may have other rules in place or no firewall rules at all. Since only SSH traffic is permitted in this case, we’ll add port 4040 and check the status when we’re done:
- sudo ufw allow 4040/tcp
- sudo ufw status
OutputStatus: active

To                         Action      From
--                         ------      ----
OpenSSH                    ALLOW       Anywhere
4040/tcp                   ALLOW       Anywhere
OpenSSH (v6)               ALLOW       Anywhere (v6)
4040/tcp (v6)              ALLOW       Anywhere (v6)
With the firewall configured, we’re ready to take a look at Shiny.
Run Shiny:
We’ll connect to R, this time as a regular user:
- R
Next, we’ll load shiny:
- library("shiny")
Shiny includes eleven built-in examples that demonstrate how it works. We’ll load the shiny library, then run the first example. Because we are working on a remote server, we’ll specify the host address in order to browse from our local machine. We’ll also set launch.browser to FALSE so it doesn’t try to launch a browser on the remote server:
- runExample("01_hello", host = "203.0.113.0", port = 4040, launch.browser= FALSE)
OutputListening on http://203.0.113.0:4040
Let’s visit this URL in a web browser:
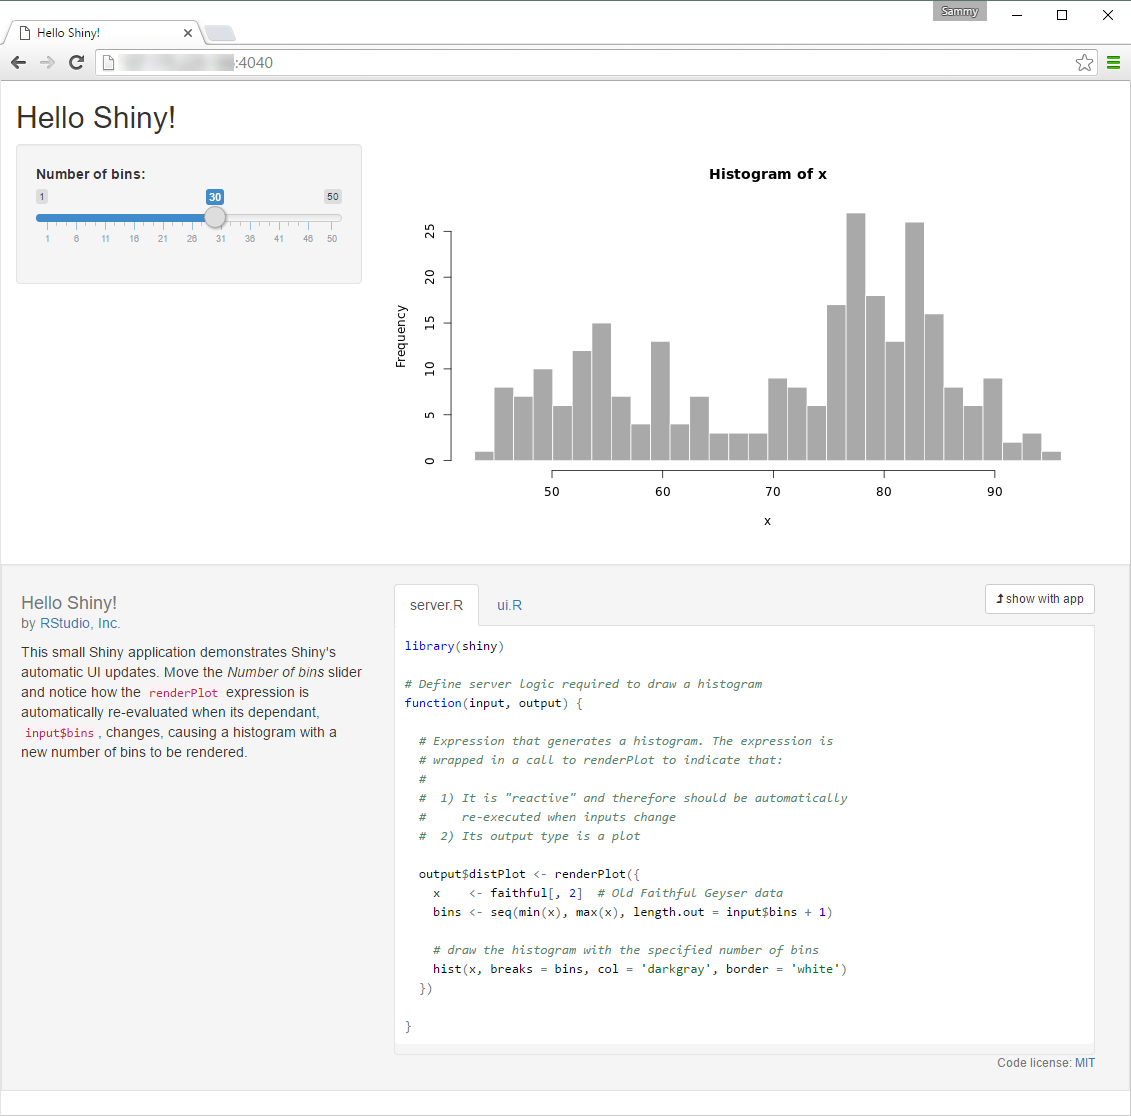
We installed Shiny to illustrate using devtools to install directly from a GitHub repository. Then we ran the example Shiny application without elevated privileges to verify that all users have access to the package.
Reinstalling the Stable Version of Shiny
For a production situation, we would install from CRAN unless we had a compelling reason to install from the repository.
Let’s take a moment to return to the stable package. First, we’ll interrupt the server with CTRL-C, then exit the R shell with CTRL-D and re-enter it as root:
- sudo -i R
Since we exited the shell, we’ll be prompted to choose a mirror, and we’ll select 1 again.
We can install the stable version with the following command, which will overwrite the installation from GitHub that we completed in the earlier step:
- install.packages("shiny")
Let’s verify the change in version:
- packageVersion("shiny")
Output[1] ‘0.14’
The output indicates that instead of 0.14.9000, the version we installed from GitHub, we’re now running the stable release.
Note: We can also find out more information about a package’s version from the system command-line from its DESCRIPTION file.
- cat /usr/local/lib/R/site-library/shiny/DESCRIPTION
Conclusion
In this tutorial, we’ve installed the latest Shiny package directly from GitHub and learned how to reinstall its stable release from CRAN. If you’re interested in learning more about Shiny itself, you might like to take a look at RStudio’s Shiny tutorial. You might also be interested in installing the open source RStudio Server, an interface to a version of R running on a remote Linux server, which brings an IDE to a server-based deployment.
Thanks for learning with the DigitalOcean Community. Check out our offerings for compute, storage, networking, and managed databases.
About the author
Still looking for an answer?
This textbox defaults to using Markdown to format your answer.
You can type !ref in this text area to quickly search our full set of tutorials, documentation & marketplace offerings and insert the link!
 This work is licensed under a Creative Commons Attribution-NonCommercial- ShareAlike 4.0 International License.
Become a contributor for community
Get paid to write technical tutorials and select a tech-focused charity to receive a matching donation.

DigitalOcean Documentation
Full documentation for every DigitalOcean product.

Resources for startups and AI-native businesses
The Wave has everything you need to know about building a business, from raising funding to marketing your product.
The developer cloud
Scale up as you grow — whether you're running one virtual machine or ten thousand.

Start building today
From GPU-powered inference and Kubernetes to managed databases and storage, get everything you need to build, scale, and deploy intelligent applications.
