By Andrew Andrade and Mark Drake

The author selected the Apache Software Foundation to receive a $100 donation as part of the Write for DOnations program.
Introduction
Jupyter Notebook is an open-source, interactive web application that allows you to write and run computer code in more than 40 programming languages, including Python, R, Julia, and Scala. A product from Project Jupyter, Jupyter Notebook is useful for iterative coding as it allows you to write a small snippet of code, run it, and return the result.
Jupyter Notebook provides the ability to create notebook documents, referred to simply as “notebooks”. Notebooks created from the Jupyter Notebook are shareable, reproducible research documents which include rich text elements, equations, code and their outputs (figures, tables, interactive plots). Notebooks can also be exported into raw code files, HTML or PDF documents, or used to create interactive slideshows or web pages.
This article will walk you through how to install and configure the Jupyter Notebook application on an Ubuntu 20.04 web server and how to connect to it from your local computer. Additionally, we will also go over how to use Jupyter Notebook to run some example Python code.
Prerequisites
To complete this tutorial, you will need:
- One Ubuntu 20.04 server instance. This server must have a non-root user with sudo privileges and a firewall configured. Set this up by following our initial server setup guide.
- Python 3, pip, and the Python
venvmodule installed on the server. Do this by following Steps 1 and 2 of our tutorial on How To Install Python 3 and Set Up a Local Programming Environment on Ubuntu 20.04. - A modern web browser running on your local computer which you will use to access Jupyter Notebook.
Step 1 — Installing Jupyter Notebook
Since notebooks are used to write, run and see the result of small snippets of code, you will first need to set up the programming language support. Jupyter Notebook uses a language-specific kernel, a computer program that runs and introspects code. Jupyter Notebook has many kernels in different languages, the default being IPython. In this tutorial, you will set up Jupyter Notebook to run Python code through the IPython kernel.
Assuming that you followed the tutorials linked in the Prerequisites section, you should have Python 3, pip and a virtual environment installed. The examples in this guide follow the convention used in the prerequisite tutorial on installing Python 3, which names the virtual environment “my_env”, but you should feel free to rename it.
Begin by activating the virtual environment:
- source my_env/bin/activate
Following this, your prompt will be prefixed with the name of your environment.
Now that you’re in your virtual environment, go ahead and install Jupyter Notebook:
- python3 -m pip install jupyter
If the installation was successful, you will see an output similar to the following:
Output. . .
Successfully installed MarkupSafe-1.0 Send2Trash-1.5.0 backcall-0.1.0 bleach-2.1.3 decorator-4.3.0 entrypoints-0.2.3 html5lib-1.0.1 ipykernel-4.8.2 ipython-6.4.0 ipython-genutils-0.2.0 ipywidgets-7.2.1 jedi-0.12.0 jinja2-2.10 jsonschema-2.6.0 jupyter-1.0.0 jupyter-client-5.2.3 jupyter-console-5.2.0 jupyter-core-4.4.0 mistune-0.8.3 nbconvert-5.3.1 nbformat-4.4.0 notebook-5.5.0 pandocfilters-1.4.2 parso-0.2.0 pexpect-4.5.0 pickleshare-0.7.4 prompt-toolkit-1.0.15 ptyprocess-0.5.2 pygments-2.2.0 python-dateutil-2.7.3 pyzmq-17.0.0 qtconsole-4.3.1 simplegeneric-0.8.1 six-1.11.0 terminado-0.8.1 testpath-0.3.1 tornado-5.0.2
With that, Jupyter Notebook has been installed onto your server. Next, we will go over how to run the application.
Step 2 — Running the Jupyter Notebook
Jupyter Notebook must be run from your VPS so that you can connect to it from your local machine using an SSH Tunnel and your favorite web browser.
To run the Jupyter Notebook server, enter the following command:
- jupyter notebook
After running this command, you will see output similar to the following:
Output[I 19:46:22.031 NotebookApp] Writing notebook server cookie secret to /home/sammy/.local/share/jupyter/runtime/notebook_cookie_secret
[I 19:46:22.365 NotebookApp] Serving notebooks from local directory: /home/sammy/environments
[I 19:46:22.365 NotebookApp] 0 active kernels
[I 19:46:22.366 NotebookApp] The Jupyter Notebook is running at:
[I 19:46:22.366 NotebookApp] http://localhost:8888/?token=Example_Jupyter_Token_3cadb8b8b7005d9a46ca4d6675
[I 19:46:22.366 NotebookApp] Use Control-C to stop this server and shut down all kernels (twice to skip confirmation).
[W 19:46:22.366 NotebookApp] No web browser found: could not locate runnable browser.
[C 19:46:22.367 NotebookApp]

    Copy/paste this URL into your browser when you connect for the first time,
    to login with a token:
        http://localhost:8888/?token=Example_Jupyter_Token_3cadb8b8b7005d9a46ca4d6675&tokenExample_Jupyter_Token_3cadb8b8b7005d9a46ca4d6675
You might notice in the output that there is a No web browser found warning. This is to be expected, since the application is running on a server and you likely haven’t installed a web browser onto it. This guide will go over how to connect to the Notebook on the server using SSH tunneling in the next section.
For now, exit the Jupyter Notebook by pressing CTRL+C followed by y, and then pressing ENTER to confirm:
OutputShutdown this notebook server (y/[n])? y
[C 20:05:47.654 NotebookApp] Shutdown confirmed
[I 20:05:47.654 NotebookApp] Shutting down 0 kernels
Then log out of the server by using the exit command:
- exit
You’ve just run Jupyter Notebook on your server. However, in order to access the application and start working with notebooks, you’ll need to connect to the application using SSH tunneling and a web browser on your local computer.
Step 3 — Connecting to the Jupyter Notebook Application with SSH Tunneling
If you installed Jupyter Notebook on a remote server, you will need to connect to the Jupyter Notebook web interface using SSH tunneling. Jupyter Notebook runs its browser interface on a specific port on your remote server (such as :8888, :8889 etc.), which is not exposed to the broader web by default. SSH tunneling enables you to securely connect to remote server ports, which you can then access using a local web browser.
Note that these instructions are designed to be run from a local terminal window, i.e., not the one with which you’ve connected to the server.
SSH Tunneling
If you are using Windows, you’ll need to install a version of OpenSSH in order to be able to ssh from a terminal. If you prefer to work in PowerShell, you can follow Microsoft’s documentation to add OpenSSH to PowerShell. If you would rather have a full Linux environment available, you can set up WSL, the Windows Subsystem for Linux, which will include ssh by default. Finally, as a lightweight third option, you can install Git for Windows, which provides a native Windows bash terminal environment that includes the ssh command. Each of these are well-supported and whichever you decide to use will come down to preference.
If you are using a Mac or Linux, you will already have the ssh command available in your terminal.
The steps for creating an SSH tunnel are similar to the How to Connect to Droplets with SSH guide except there are additional parameters added in the ssh command. This subsection will outline the additional parameters needed in the ssh command to tunnel successfully.
SSH tunneling can be done by running the following SSH command in a new local terminal window:
- ssh -L 8888:localhost:8888 your_server_username@your_server_ip
The ssh command opens an SSH connection, but -L specifies that the given port on the local (client) host is to be forwarded to the given host and port on the remote side (server). This means that whatever is running on the second port number (e.g. 8888) on the server will appear on the first port number (e.g. 8888) on your local computer.
If you receive a message that port 8888 is unavailable, you can change it to another arbitrary port number below 65535. Port 8888 has no significant meaning but is often used for demos like this.
server_username is your username (e.g. sammy) on the server which you created and your_server_ip is the IP address of your server.
For example, for the username sammy and the server address your_server_ip, the command would be:
- ssh -L 8888:localhost:8888 sammy@your_server_ip
If there are no errors from this command, it will log you into your remote server. From there, activate the virtual environment:
- source ~/environments/my_env/bin/activate
Then run the Jupyter Notebook application:
- jupyter notebook
To connect to Jupyter Notebook, use your favorite web browser to navigate to the local port on the local host: http://localhost:8000. Now that you’re connected to Jupyter Notebook, continue on to Step 4 to learn how to use it.
Step 4 — Using Jupyter Notebook
When accessed through a web browser, Jupyter Notebook provides a Notebook Dashboard which acts as a file browser and gives you an interface for creating, editing and exploring notebooks. Think of these notebooks as documents (saved with a .ipynb file extension) which you populate with any number of individual cells. Each cell holds an interactive text editor which can be used to run code or write rendered text. Additionally, notebooks allow you to write and run equations, include other rich media, such as images or interactive plots, and they can be exported and shared in various formats (.ipyb, .pdf, .py). To illustrate some of these functions, we’ll create a notebook file from the Notebook Dashboard, write a text board with an equation, and run some Python 3 code.
By this point you should have connected to the server using an SSH tunnel and started the Jupyter Notebook application from your server. After navigating to http://localhost:8000, you will be presented with a login page:
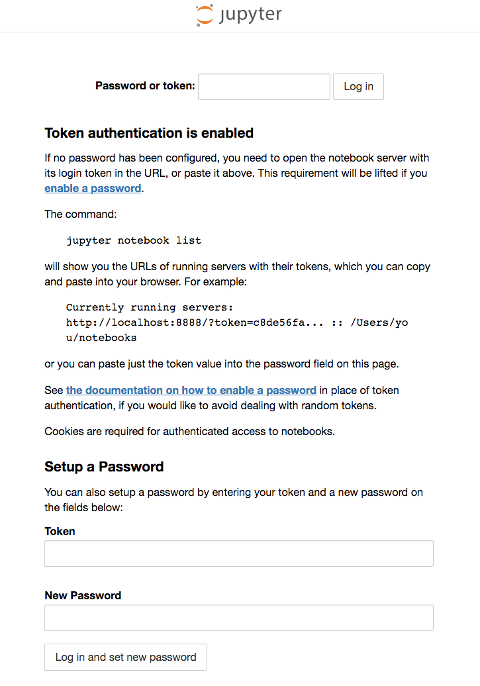
In the Password or token field at the top, enter the token shown in the output after you ran jupyter notebook from your server:
Output[I 20:35:17.004 NotebookApp] Writing notebook server cookie secret to /run/user/1000/jupyter/notebook_cookie_secret
[I 20:35:17.314 NotebookApp] Serving notebooks from local directory: /home/sammy
[I 20:35:17.314 NotebookApp] 0 active kernels
[I 20:35:17.315 NotebookApp] The Jupyter Notebook is running at:
[I 20:35:17.315 NotebookApp] http://localhost:8888/?token=Example_Jupyter_Token_3cadb8b8b7005d9a46ca4d6675
[I 20:35:17.315 NotebookApp] Use Control-C to stop this server and shut down all kernels (twice to skip confirmation).
[W 20:35:17.315 NotebookApp] No web browser found: could not locate runnable browser.
[C 20:35:17.316 NotebookApp]
. . .
Alternatively, you can copy that URL from your terminal output and paste it into your browser’s address bar.
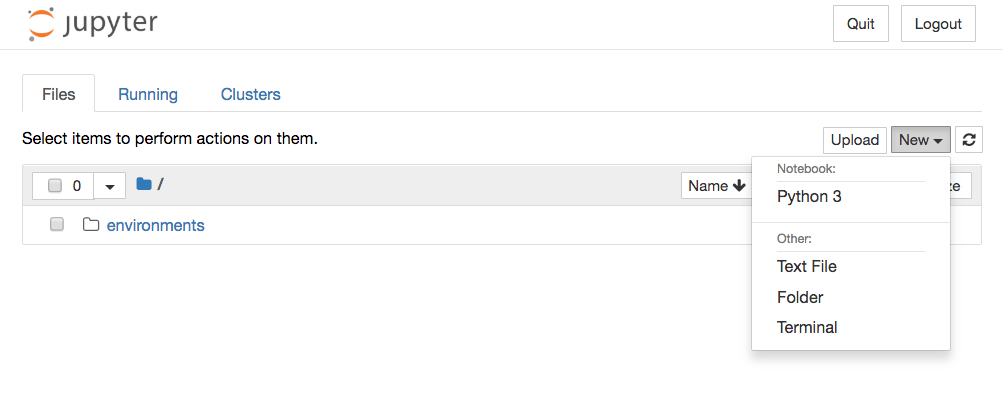
Automatically, Jupyter notebook will show all of the files and folders stored in the directory from which it’s run. Create a new notebook file by clicking New then Python 3 at the top-right of the Notebook Dashboard:
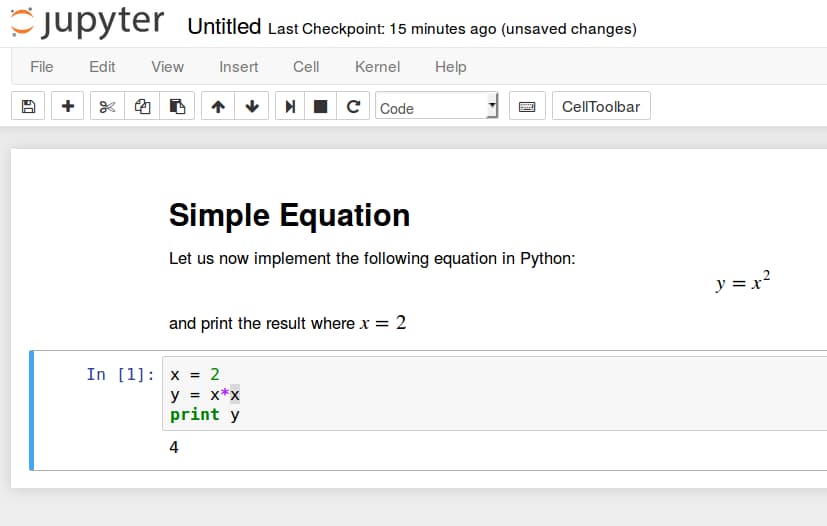
Within this new notebook, change the first cell to accept markdown syntax by clicking Cell > Cell Type > Markdown on the navigation bar at the top. In addition to markdown, this Cell Type also allows you to write equations in LaTeX. For example, type the following into the cell after changing it to markdown:
# Equation

Let us now implement the following equation in Python:
$$ y = x^2$$

where $x = 2$
To turn the markdown into rich text, press CTRL + ENTER and the following should be the result:

You can use the markdown cells to make notes and document your code.
Now, let’s implement an equation and print the result. Click Insert > Insert Cell Below to insert a cell. In this new cell, enter the following code:
x = 2
y = x*x
print(y)
To run the code, press CTRL + ENTER, and the following will be the result:
These are some relatively straightforward examples of what you can do with Jupyter Notebook. However, it is a very powerful application with many potential use cases. From here, you can add some Python libraries and use the notebook as you would with any other Python development environment.
Conclusion
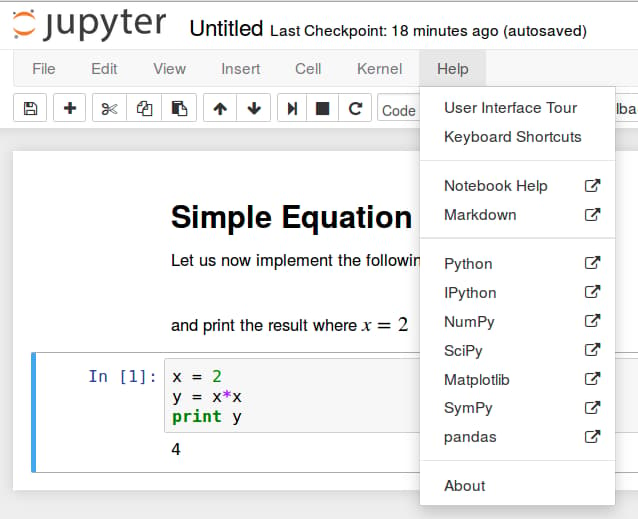
You should be now able to write reproducible Python code and text using the Jupyter Notebook running on a remote server. To get a quick tour of Jupyter Notebook, click Help in the top navigation bar and select User Interface Tour as shown here:
If you’re interested, we encourage you to learn more about Jupyter Notebook by going through the Project Jupyter documentation. Additionally, you can build on what you learned in this tutorial by learning how to code in Python 3.
Thanks for learning with the DigitalOcean Community. Check out our offerings for compute, storage, networking, and managed databases.
About the author(s)
Just someone learning how to lead projects and solve problems with data. Founder of @PetroPredict. Past intern at @Facebook, @Suncor (@PetroCanada)
Former Technical Writer at DigitalOcean. Focused on SysAdmin topics including Debian 11, Ubuntu 22.04, Ubuntu 20.04, Databases, SQL and PostgreSQL.
Still looking for an answer?
This textbox defaults to using Markdown to format your answer.
You can type !ref in this text area to quickly search our full set of tutorials, documentation & marketplace offerings and insert the link!
Thank you for the tutorial it was really helpful! Concerning step 3, it seems that it only works when using ssh -L 8888:localhost:8888 user@ip
Tested on a fresh droplet following every external guide.
Hi Andrew,
I have been using a Docker Droplet I created on this account for quite a while, where I mostly do data science computing stuff with Jupyter Notebook. Previously, in order to use Jupyter remotely, I followed this tutorial to connect to the Jupyter Notebook with SSH tunneling. It works flawlessly.
But this approach won’t work if I do not have access to a terminal, like on mobile devices. So instead, I need to access the Jupyter server via my droplet public ip address, not the SSH method. With a lot of googling, I managed to configure and setup a Jupyter server via ~/.jupyter/jupyter_notebook_config.py, and then successfully launched it on my Droplet by jupyter notebook as usual. But I can’t seem to access the Jupyter server via IP address like https://my-droplet-ip:8889/ (8889 is the port the notebook server will listen on).
I suspect the port 8889 is not open on my Droplet, or something related to firewall, or anything else I’m not aware of. Could you please help me with this issue?
Is there a way to do it by passing a double ssh tunnel. I want to run it on my workstation at work, but I cannot directly login to the workstation. Need to go to a cluster and then on a workstation. How can I do that?
 This work is licensed under a Creative Commons Attribution-NonCommercial- ShareAlike 4.0 International License.
Become a contributor for community
Get paid to write technical tutorials and select a tech-focused charity to receive a matching donation.

DigitalOcean Documentation
Full documentation for every DigitalOcean product.

Resources for startups and AI-native businesses
The Wave has everything you need to know about building a business, from raising funding to marketing your product.
The developer cloud
Scale up as you grow — whether you're running one virtual machine or ten thousand.

Start building today
From GPU-powered inference and Kubernetes to managed databases and storage, get everything you need to build, scale, and deploy intelligent applications.
