By Erin Glass
Senior Manager, DevEd
![How To Install the Apache Web Server on Ubuntu 20.04 [Quickstart]](https://www.digitalocean.com/api/static-content/v1/images?src=%2F_next%2Fstatic%2Fmedia%2Fintro-to-cloud.d49bc5f7.jpeg&width=1920 "How To Install the Apache Web Server on Ubuntu 20.04 [Quickstart]")
Introduction
The Apache HTTP server is the most widely-used web server in the world. It provides many powerful features, including dynamically loadable modules, robust media support, and extensive integration with other popular software.
In this guide, we’ll explain how to install an Apache web server on your Ubuntu 20.04 server. For a more detailed version of this tutorial, please refer to How To Install the Apache Web Server on Ubuntu 20.04.
Prerequisites
Before you begin this guide, you should have the following:
- An Ubuntu 20.04 server and a regular, non-root user with sudo privileges. Additionally, you will need to enable a basic firewall to block non-essential ports. You can learn how to configure a regular user account and set up a firewall for your server by following our Initial Server Setup for Ubuntu 20.04 guide.
When you have an account available, log in as your non-root user to begin.
Step 1 — Installing Apache
Apache is available within Ubuntu’s default software repositories, so you can install it using conventional package management tools.
Update your local package index:
- sudo apt update
Install the apache2 package:
- sudo apt install apache2
Step 2 — Adjusting the Firewall
Check the available ufw application profiles:
- sudo ufw app list
OutputAvailable applications:
  Apache
  Apache Full
  Apache Secure
  OpenSSH
Let’s enable the most restrictive profile that will still allow the traffic you’ve configured, permitting traffic on port 80 (normal, unencrypted web traffic):
- sudo ufw allow 'Apache'
Verify the change:
- sudo ufw status
OutputStatus: active

To                         Action      From
--                         ------      ----
OpenSSH                    ALLOW       Anywhere
Apache                     ALLOW       Anywhere
OpenSSH (v6)               ALLOW       Anywhere (v6)
Apache (v6)                ALLOW       Anywhere (v6)
Step 3 — Checking your Web Server
Check with the systemd init system to make sure the service is running by typing:
- sudo systemctl status apache2
Outputapache2.service - The Apache HTTP Server
     Loaded: loaded (/lib/systemd/system/apache2.service; enabled; vendor prese>
     Active: active (running) since Tue 2020-04-28 23:06:40 UTC; 56s ago
       Docs: https://httpd.apache.org/docs/2.4/
   Main PID: 13785 (apache2)
      Tasks: 55 (limit: 1137)
     Memory: 5.3M
     CGroup: /system.slice/apache2.service
             ├─13785 /usr/sbin/apache2 -k start
             ├─13787 /usr/sbin/apache2 -k start
             └─13788 /usr/sbin/apache2 -k start
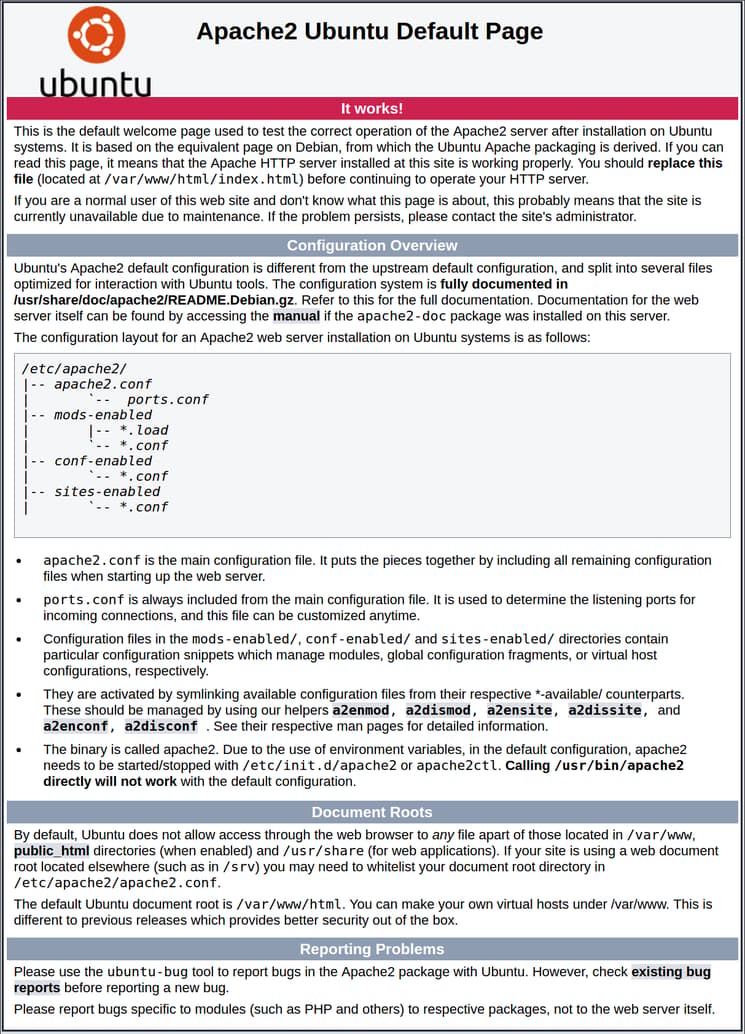
Access the default Apache landing page to confirm that the software is running properly through your IP address:
http://your_server_ip
You should receive the default Ubuntu 20.04 Apache web page:
Step 4 — Setting Up Virtual Hosts (Recommended)
When using the Apache web server, you can use virtual hosts (similar to server blocks in Nginx) to encapsulate configuration details and host more than one domain from a single server. We will set up a domain called your_domain, but you should replace this with your own domain name. To learn more about setting up a domain name with DigitalOcean, please refer to our our Introduction to DigitalOcean DNS.
Create the directory for your_domain:
sudo mkdir /var/www/your_domain
Assign ownership of the directory:
- sudo chown -R $USER:$USER /var/www/your_domain
The permissions of your web roots should be correct if you haven’t modified your unmask value, but you can make sure by typing:
- sudo chmod -R 755 /var/www/your_domain
Create a sample index.html page using nano or your favorite editor:
- nano /var/www/your_domain/index.html
Inside, add the following sample HTML:
<html>
    <head>
        <title>Welcome to Your_domain!</title>
    </head>
    <body>
        <h1>Success!  The your_domain virtual host is working!</h1>
    </body>
</html>
Save and close the file when you are finished.
Make a new virtual host file at /etc/apache2/sites-available/your_domain.conf:
- sudo nano /etc/apache2/sites-available/your_domain.conf
Paste in the following configuration block, updated for our new directory and domain name:
<VirtualHost *:80>
    ServerAdmin webmaster@localhost
    ServerName your_domain
    ServerAlias your_domain
    DocumentRoot /var/www/your_domain
    ErrorLog ${APACHE_LOG_DIR}/error.log
    CustomLog ${APACHE_LOG_DIR}/access.log combined
</VirtualHost>
Save and close the file when you are finished.
Enable the file with a2ensite:
- sudo a2ensite your_domain.conf
Disable the default site defined in 000-default.conf:
- sudo a2dissite 000-default.conf
Test for configuration errors:
- sudo apache2ctl configtest
You should receive the following output:
OutputSyntax OK
Restart Apache to implement your changes:
- sudo systemctl restart apache2
Apache should now be serving your domain name. You can test this by navigating to http://your_domain, where you should receive something like this:

Conclusion
Now that you have your web server installed, you have many options for the type of content to serve and the technologies you want to use to create a richer experience.
If you’d like to build out a more complete application stack, check out this article on How to configure a LAMP stack on Ubuntu 20.04.
Thanks for learning with the DigitalOcean Community. Check out our offerings for compute, storage, networking, and managed databases.
About the author
Open source advocate and lover of education, culture, and community.
Still looking for an answer?
This textbox defaults to using Markdown to format your answer.
You can type !ref in this text area to quickly search our full set of tutorials, documentation & marketplace offerings and insert the link!
Hi thanks for your tutorial, i can access my website by IP address but not by domain name. if you can help, thank you.
 This work is licensed under a Creative Commons Attribution-NonCommercial- ShareAlike 4.0 International License.
Become a contributor for community
Get paid to write technical tutorials and select a tech-focused charity to receive a matching donation.

DigitalOcean Documentation
Full documentation for every DigitalOcean product.

Resources for startups and AI-native businesses
The Wave has everything you need to know about building a business, from raising funding to marketing your product.
The developer cloud
Scale up as you grow — whether you're running one virtual machine or ten thousand.

Start building today
From GPU-powered inference and Kubernetes to managed databases and storage, get everything you need to build, scale, and deploy intelligent applications.
