Not using Ubuntu 22.04?
Choose a different version or distribution.
Introduction
The Apache HTTP server is the most widely used web server in the world. It provides many powerful features, including dynamically loadable modules, robust media support, and extensive integration with other popular software.
In this tutorial, you’ll learn how to install an Apache web server on your Ubuntu server.
Key Takeaways
- Install Apache quickly using
sudo apt install apache2– the standard and recommended method. - Allow HTTP traffic with UFW and verify access through your browser using the server’s IP address.
- Confirm that Apache is running with
systemctl status apache2. - Manage the service with
systemctlto start, stop, reload, or restart as needed. - Configure multiple websites easily using Apache Virtual Hosts.
- Always use least-privilege file permissions:
$USER:www-dataandu=rwX,go=rX.
This beginner-friendly Ubuntu Apache setup guide covers Apache web server basics and Apache web server configuration Ubuntu, including how to check if Apache is running in Ubuntu.
Deploy your applications from GitHub using DigitalOcean App Platform. Let DigitalOcean focus on scaling your app.
Note: Commands in this guide work unmodified on Ubuntu 22.04 LTS and Ubuntu 24.04 LTS. The package name (apache2), service name (apache2), configuration paths under /etc/apache2, and UFW application profiles are the same across these versions.
This tutorial has been verified on fresh images of Ubuntu 22.04 LTS and Ubuntu 24.04 LTS. To confirm your version, run the following command:
. /etc/os-release && echo "Ubuntu $VERSION_ID ($VERSION_CODENAME)"
No special changes are required for Ubuntu 24.04: installation via apt, service management via systemctl, and UFW rules behave the same as on 22.04.
Prerequisites
- Before you begin this guide, you will need an Ubuntu server set up with a non-root user with
sudoprivileges and a firewall enabled to block non-essential ports. You can learn how to do this by following our Initial server setup guide for Ubuntu.
Tip: If you receive a “permission denied” error while running commands, prepend sudo to the command.
- Once you’re done setting this up, log in as your non-root user and proceed to the first step.
Step 1 — How to Install Apache on Ubuntu
Apache is available within Ubuntu’s default software repositories, making it possible to install it using conventional package management tools.
Begin by updating the local package index to reflect the latest upstream changes:
sudo apt update
Then, install the apache2 package:
sudo apt install apache2
After confirming the installation, apt will install Apache and all required dependencies.
For more configuration details, refer to the official Apache 2.4 documentation.
Step 2 — How to Adjust the Firewall on Ubuntu
Before testing Apache, it’s necessary to modify the firewall settings to allow outside access to the default web ports. If you followed the instructions in the prerequisites, you should have a UFW firewall configured to restrict access to your server.
During installation, Apache registers itself with UFW to provide a few application profiles that can be used to enable or disable access to Apache through the firewall.
These profiles simplify apache ubuntu firewall settings, so beginners don’t need to manually open ports. On Ubuntu 22.04 LTS and Ubuntu 24.04 LTS, the same UFW application profiles are available (Apache, Apache Full, Apache Secure).
List the ufw application profiles by running the following:
sudo ufw app list
Your output will be a list of the application profiles:
OutputAvailable applications:
  Apache
  Apache Full
  Apache Secure
  OpenSSH
As indicated by the output, there are three profiles available for Apache:
Apache: This profile opens only port80(normal, unencrypted web traffic)Apache Full: This profile opens both port80(normal, unencrypted web traffic) and port443(TLS/SSL encrypted traffic)Apache Secure: This profile opens only port443(TLS/SSL encrypted traffic)
It is recommended that you enable the most restrictive profile that will still allow the traffic you’ve configured. Since you haven’t configured SSL for your server yet in this guide, you’ll only need to allow traffic on port 80:
sudo ufw allow 'Apache'
You can verify the change by checking the status:
sudo ufw status
The output will provide a list of allowed HTTP traffic:
OutputStatus: active

To                         Action      From
--                         ------      ----
OpenSSH                    ALLOW       Anywhere
Apache                     ALLOW       Anywhere
OpenSSH (v6)               ALLOW       Anywhere (v6)
Apache (v6)                ALLOW       Anywhere (v6)
As indicated by the output, the profile has been activated to allow access to the Apache web server.
Step 3 — How to Check your Web Server
At the end of the installation process, Ubuntu starts Apache. The web server will already be up and running.
Make sure the service is active by running the command for the systemd init system:
sudo systemctl status apache2
Output● apache2.service - The Apache HTTP Server
     Loaded: loaded (/lib/systemd/system/apache2.service; enabled; vendor prese>
     Active: active (running) since Tue 2022-04-26 15:33:21 UTC; 43s ago
       Docs: https://httpd.apache.org/docs/2.4/
   Main PID: 5089 (apache2)
      Tasks: 55 (limit: 1119)
     Memory: 4.8M
        CPU: 33ms
     CGroup: /system.slice/apache2.service
             ├─5089 /usr/sbin/apache2 -k start
             ├─5091 /usr/sbin/apache2 -k start
             └─5092 /usr/sbin/apache2 -k start
As confirmed by this output, the service has started successfully. However, the best way to test this is to request a page from Apache.
You can access the default Apache landing page to confirm that the software is running properly through your IP address. If you do not know your server’s IP address, you can get it a few different ways from the command line.
Try writing the following at your server’s command prompt:
hostname -I
You will receive a few addresses separated by spaces. You can try each in your web browser to determine if they work.
Another option is to use the free icanhazip.com tool. This is a website that, when accessed, returns your machine’s public IP address as read from another location on the internet:
curl -4 icanhazip.com
When you have your server’s IP address, enter it into your browser’s address bar:
http://your_server_ip
You will see the default Ubuntu Apache web page as in the following:
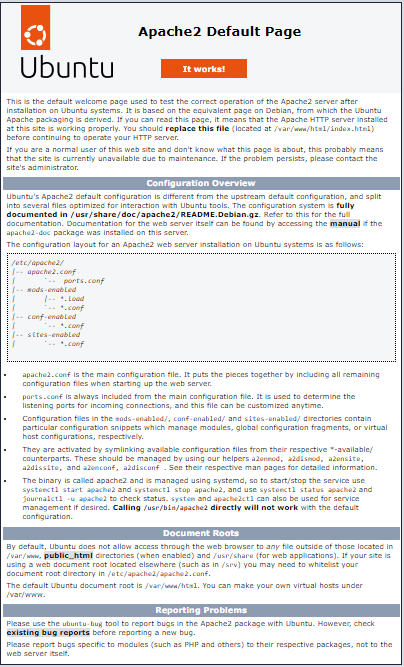
This page indicates that Apache is working correctly. It also includes some basic information about important Apache files and directory locations.
Step 4 — How to Manage the Apache Process
Now that you have your web server up and running, let’s review some basic management commands using systemctl.
To stop your web server, run:
sudo systemctl stop apache2
To start the web server when it is stopped, run:
sudo systemctl start apache2
To stop and then start the service again, run:
sudo systemctl restart apache2
If you are simply making configuration changes, Apache can often reload without dropping connections. To do this, use the following command:
sudo systemctl reload apache2
By default, Apache is configured to start automatically when the server boots. If this is not what you want, disable this behavior by running:
sudo systemctl disable apache2
To re-enable the service to start up at boot, run:
sudo systemctl enable apache2
Apache will now start automatically when the server boots again.
Use these commands during maintenance or configuration changes.
Curious how Apache compares to other web servers? See Apache vs Nginx: Practical Considerations for an in-depth comparison.
Step 5 — How to Set Up Virtual Hosts (Recommended)
When using the Apache web server, you can use virtual hosts (similar to server blocks in Nginx) to encapsulate configuration details and host more than one domain from a single server. We will set up a domain called your_domain, but you should replace this with your own domain name.
- DNS propagation: Changes may take minutes to hours to resolve. For instant local testing, temporarily add your domain and server IP to
/etc/hosts. - Port changes: If you modify
/etc/apache2/ports.confto listen on a custom port, also update every<VirtualHost *:PORT>directive to match. - Temporary 404s: If you disable
000-default.confbefore your vhost is ready or DNS points correctly, you may see 404 errors. This is expected until the configuration matches and Apache reloads.
This section walks you through how to configure Apache web server in Ubuntu step by step, from docroot creation to VirtualHost setup.
Learn more about configuring virtual hosts with the guide Apache Virtual Hosts on Ubuntu and Debian.
Info: If you are setting up a domain name with DigitalOcean, please refer to our Networking Documentation.
Apache on Ubuntu has one server block enabled by default that is configured to serve documents from the /var/www/html directory. While this works well for a single site, it can become unwieldy if you are hosting multiple sites. Instead of modifying /var/www/html, create a directory structure within /var/www for a your_domain site, leaving /var/www/html in place as the default directory to be served if a client request doesn’t match any other sites.
Create the directory for your_domain as follows:
sudo mkdir /var/www/your_domain
Next, assign ownership of the directory to your user and the www-data group (used by Apache):
sudo chown -R $USER:www-data /var/www/your_domain
Set secure permissions so that only your user can write, and everyone (including Apache) can read and access files:
sudo chmod -R u=rwX,go=rX /var/www/your_domain
Next, create a sample index.html page using nano or your favorite editor:
sudo nano /var/www/your_domain/index.html
Inside, add the following sample HTML:
<html>
    <head>
        <title>Welcome to Your_domain!</title>
    </head>
    <body>
        <h1>Success!  The your_domain virtual host is working!</h1>
    </body>
</html>
Save and close the file when you are finished. If you’re using nano, press CTRL+X, then Y, ENTER to save.
In order for Apache to serve this content, it’s necessary to create a virtual host file with the correct directives. Instead of modifying the default configuration file located at /etc/apache2/sites-available/000-default.conf directly, make a new one at /etc/apache2/sites-available/your_domain.conf:
sudo nano /etc/apache2/sites-available/your_domain.conf
Add in the following configuration block, which is similar to the default, but updated for your new directory and domain name:
<VirtualHost *:80>
    ServerAdmin webmaster@localhost
    ServerName your_domain
    ServerAlias www.your_domain
    DocumentRoot /var/www/your_domain
    ErrorLog ${APACHE_LOG_DIR}/error.log
    CustomLog ${APACHE_LOG_DIR}/access.log combined
</VirtualHost>
Notice that we’ve updated the DocumentRoot to our new directory and ServerAdmin to an email that the your_domain site administrator can access. We’ve also added two directives: ServerName, which establishes the base domain that will match this virtual host definition, and ServerAlias, which defines further names that will match as if they were the base name.
This is the standard pattern for how to configure Apache virtual hosts in Ubuntu, and it scales cleanly for multiple domains.
Save and close the file when you are finished. If you’re using nano, press CTRL+X, then Y, ENTER to save.
Now enable the file with the a2ensite tool:
sudo a2ensite your_domain.conf
Disable the default site defined in 000-default.conf:
sudo a2dissite 000-default.conf
Next, test for configuration errors:
sudo apache2ctl configtest
You should receive the following output:
Output. . .
Syntax OK
Restart Apache to implement your changes:
sudo systemctl restart apache2
Apache will now be serving your domain name. You can test this by navigating to http://your_domain, where you will see something like the following:

Deploy a Static Site Quickly
To quickly host a static website, copy your build files into the new directory and reload Apache:
scp -r ./build/* user@your_server_ip:/var/www/your_domain/
sudo systemctl reload apache2
Your static site will be live immediately.
Step 6 — How to Get Familiar with Important Apache Files and Directories
Now that you know how to manage the Apache service itself, you should take a few minutes to familiarize yourself with a few important directories and files.
Content
/var/www/html: The actual web content, which by default only consists of the default Apache page you saw earlier, is served out of the/var/www/htmldirectory. This can be changed by altering Apache configuration files.
Server Configuration
/etc/apache2: The Apache configuration directory. All of the Apache configuration files reside here./etc/apache2/apache2.conf: The main Apache configuration file. This can be modified to make changes to the Apache global configuration. This file is responsible for loading many of the other files in the configuration directory./etc/apache2/ports.conf: This file specifies the ports that Apache will listen on. By default, Apache listens on port80and additionally listens on port443when a module providing SSL capabilities is enabled./etc/apache2/sites-available/: The directory where per-site virtual hosts can be stored. Apache will not use the configuration files found in this directory unless they are linked to thesites-enableddirectory. Typically, all server block configuration is done in this directory and then enabled by linking to the other directory with thea2ensitecommand./etc/apache2/sites-enabled/: The directory where enabled per-site virtual hosts are stored. Typically, these are created by linking to configuration files found in thesites-availabledirectory with thea2ensite. Apache reads the configuration files and links found in this directory when it starts or reloads to compile a complete configuration./etc/apache2/conf-available/,/etc/apache2/conf-enabled/: These directories have the same relationship as thesites-availableandsites-enableddirectories but are used to store configuration fragments that do not belong in a virtual host. Files in theconf-availabledirectory can be enabled with thea2enconfcommand and disabled with thea2disconfcommand./etc/apache2/mods-available/,/etc/apache2/mods-enabled/: These directories contain the available and enabled modules, respectively. Files ending in.loadcontain fragments to load specific modules, while files ending in.confcontain the configuration for those modules. Modules can be enabled and disabled using thea2enmodanda2dismodcommands.
Server Logs
/var/log/apache2/access.log: By default, every request to your web server is recorded in this log file unless Apache is configured to do otherwise./var/log/apache2/error.log: By default, all errors are recorded in this file. TheLogLeveldirective in the Apache configuration specifies how much detail the error logs will contain.
Validation snapshot — Ubuntu 22.04 & 24.04 (2025-09-30)
sudo apt update && sudo apt install apache2→ installs Apache and starts theapache2service.sudo ufw app list→ showsApache,Apache Full,Apache Secure.sudo systemctl status apache2→ service is active (running) after install.sudo a2ensite your_domain.conf && sudo a2dissite 000-default.conf && sudo apache2ctl configtest→ returns Syntax OK;sudo systemctl restart apache2applies changes.
How to Troubleshoot Apache Issues on Ubuntu
If you encounter issues with your Apache installation or configuration, use these quick, least‑privilege, production‑safe fixes.
How to Troubleshoot Apache Service Not Starting Error
If Apache fails to start, check syntax and logs:
sudo apache2ctl configtest
sudo journalctl -xeu apache2.service
Look for misconfigured directives or missing modules and correct them.
Quick checks that fix common start failures:
# Show active vhosts and detect duplicate Listen/ServerName problems
apachectl -S

# If you see: Invalid command 'RewriteEngine' (or similar), enable the module
sudo a2enmod rewrite && sudo systemctl reload apache2

# "AH00558: Could not reliably determine the server's fully qualified domain name" (warning)
echo 'ServerName localhost' | sudo tee /etc/apache2/conf-available/servername.conf
sudo a2enconf servername && sudo systemctl reload apache2
How to Troubleshoot Port 80 Already in Use Error
If you see Address already in use, identify the process bound to port 80 quickly:
# Faster than lsof on some systems
sudo ss -ltnp | grep ':80'
# Alternative
sudo lsof -i :80
Stop or reconfigure the conflicting service (often Nginx or another Apache instance). If you change Apache’s listening port in /etc/apache2/ports.conf, be sure to also update each vhost from <VirtualHost *:80> to the new port (for example <VirtualHost *:8080>) or Apache will still fail to bind.
Permissions Errors in /var/www/
If you see Permission denied while serving files, set ownership and permissions with a least‑privilege model (folders 755, files 644) and make Apache’s group the reader:
sudo chown -R $USER:www-data /var/www/your_domain
sudo chmod -R u=rwX,go=rX /var/www/your_domain
# Equivalent explicit approach
sudo find /var/www/your_domain -type d -exec chmod 755 {} \;
sudo find /var/www/your_domain -type f -exec chmod 644 {} \;
If your app needs write access (for example an uploads or cache directory), grant write only where required:
sudo chgrp -R www-data /var/www/your_domain/uploads
sudo chmod -R 775 /var/www/your_domain/uploads
This improves security and avoids making regular files executable.
Advanced Diagnostics & Production Runbooks
Use these advanced steps when the quick fixes above do not resolve the issue or when performing production incident response. Note: You may need to install additional utilities for some commands:
sudo apt install net-tools bc mailutils iotop nmap dnsutils -y.
When managing Apache web servers in production environments, systematic troubleshooting becomes crucial for maintaining high availability and performance. This comprehensive guide provides expert-level solutions for common and complex Apache issues on Ubuntu 22.04.
Apache Service Startup Failures: Complete Diagnostic Framework
Apache service failures can stem from multiple root causes. Here’s a systematic approach to diagnose and resolve startup issues:
1. Configuration Syntax Validation
# Comprehensive syntax check with detailed output
sudo apache2ctl configtest -D DUMP_VHOSTS -D DUMP_MODULES

# Check for specific configuration file errors
sudo apache2ctl -t -D DUMP_INCLUDES

# Verify loaded modules and their configurations
sudo apache2ctl -M | grep -E "(ssl|rewrite|headers)" # Check critical modules
2. Advanced Log Analysis
# Real-time error monitoring during startup attempts
sudo journalctl -u apache2.service -f --no-pager

# Analyze systemd service logs with context
sudo journalctl -xeu apache2.service --since "10 minutes ago"

# Check Apache-specific error logs with timestamps
sudo tail -f /var/log/apache2/error.log | while read line; do
    echo "[$(date '+%Y-%m-%d %H:%M:%S')] $line"
done

# Search for specific error patterns
sudo grep -E "(segfault|failed to start|cannot bind|permission denied)" \
    /var/log/apache2/error.log | tail -20
3. Resource and Permission Diagnostics
# Check for file descriptor limits
sudo systemctl show apache2.service | grep -E "(LimitNOFILE|LimitNPROC)"

# Verify Apache user permissions
sudo -u www-data ls -la /var/www/html/ # Test www-data access
sudo -u www-data test -r /etc/apache2/apache2.conf && echo "Config readable"

# Check disk space and inode availability
df -h /var/log/apache2/
df -i /var/log/apache2/

# Verify critical file permissions
sudo find /etc/apache2/ -type f -not -perm -644 -ls
sudo find /var/www/ -type d -not -perm -755 -ls
4. Process and Port Conflict Resolution
# Comprehensive port usage analysis
sudo netstat -tulpn | grep -E ":(80|443|8080|8443)" | sort

# Identify processes using Apache ports with detailed info
sudo lsof -i :80 -P -n | awk 'NR==1 || /apache2|httpd|nginx/'

# Check for zombie or hung Apache processes
sudo ps aux | grep -E "[a]pache2|[h]ttpd" | grep -v grep

# Safe process cleanup if needed
sudo pkill -f apache2 # Only if service stop fails
sudo systemctl reset-failed apache2.service
SSL/TLS Configuration Issues: Production-Grade Solutions
SSL/TLS misconfigurations are common in production environments. Here’s how to diagnose and fix them:
SSL Certificate and Key Validation
# Verify SSL certificate validity and chain
sudo openssl x509 -in /etc/ssl/certs/your_domain.crt -text -noout | \
    grep -E "(Issuer|Subject|Not After)"

# Check certificate-key pair matching
cert_hash=$(sudo openssl x509 -noout -modulus -in /etc/ssl/certs/your_domain.crt | \
    openssl md5)
key_hash=$(sudo openssl rsa -noout -modulus -in /etc/ssl/private/your_domain.key | \
    openssl md5)
echo "Certificate hash: $cert_hash"
echo "Private key hash: $key_hash"
[[ "$cert_hash" == "$key_hash" ]] && echo "✓ Certificate and key match" || \
    echo "✗ Certificate and key mismatch"

# Test SSL configuration
sudo openssl s_client -connect your_domain:443 -servername your_domain \
    -verify_return_error < /dev/null
Advanced SSL Debugging
# Enable SSL error logging
sudo apache2ctl -D SSL -D DUMP_MODULES | grep ssl

# Test SSL handshake with detailed output
curl -vvv --connect-timeout 10 https://your_domain/ 2>&1 | \
    grep -E "(SSL|TLS|certificate|handshake)"

# Check for SSL protocol and cipher compatibility
nmap --script ssl-enum-ciphers -p 443 your_domain

# Validate SSL certificate chain
openssl s_client -connect your_domain:443 -showcerts < /dev/null 2>/dev/null | \
    openssl x509 -outform PEM > /tmp/cert.pem
openssl verify -CAfile /etc/ssl/certs/ca-certificates.crt /tmp/cert.pem
You can learn more about SSL/TLS misconfigurations and SSL Connect Error in our detailed tutorials.
Performance and Memory Issues: Expert Optimization
Apache performance problems often manifest as slow response times or high resource usage:
Memory Usage Analysis
# Analyze Apache memory consumption patterns
sudo ps -eo pid,ppid,cmd,%mem,%cpu --sort=-%mem | grep -E "[a]pache2|[h]ttpd" | head -20

# Monitor memory usage over time
while true; do
    echo "$(date): $(sudo ps -C apache2 -o pid=,rss= | \
        awk '{sum+=$2} END {print "Total RSS: " sum/1024 " MB"}')"
    sleep 30
done

# Check for memory leaks in Apache modules
sudo apache2ctl status | grep -E "(requests|cpu|load)"

# Analyze server-status if mod_status is enabled
curl -s http://localhost/server-status?auto | \
    grep -E "(Total accesses|CPU Usage|Uptime|ReqPerSec)"
Performance Tuning and Optimization
# Identify optimal MPM settings based on current load
current_connections=$(sudo netstat -an | grep :80 | grep ESTABLISHED | wc -l)
echo "Current HTTP connections: $current_connections"

# Calculate recommended MaxRequestWorkers
available_memory=$(free -m | awk 'NR==2{print $7}')
apache_avg_memory=$(sudo ps -C apache2 -o rss= | awk '{sum+=$1; count++} END {print sum/count/1024}')
recommended_workers=$((available_memory / apache_avg_memory * 80 / 100))
echo "Recommended MaxRequestWorkers: $recommended_workers"

# Monitor slow requests and bottlenecks
sudo tail -f /var/log/apache2/access.log | \
    awk '$NF > 5000 {print "Slow request:", $0, "Response time:", $NF "ms"}'

# Check for I/O bottlenecks
sudo iotop -a -o -d 5 | grep apache2
Virtual Host Configuration Errors: Advanced Debugging
Virtual host misconfigurations can cause sites to display incorrectly or not at all:
Virtual Host Validation Framework
# Comprehensive virtual host analysis
sudo apache2ctl -D DUMP_VHOSTS | sed '/^\s*$/d'

# Test virtual host resolution
for domain in your_domain.com www.your_domain.com; do
    echo "Testing $domain:"
    curl -H "Host: $domain" -I http://localhost/ 2>/dev/null | head -1
    echo "DocumentRoot: $(grep -A10 "<VirtualHost" /etc/apache2/sites-enabled/*.conf | \
        grep -A10 "ServerName $domain" | grep DocumentRoot | head -1)"
    echo "---"
done

# Validate DNS and virtual host interaction
dig +short your_domain.com A
curl -H "Host: your_domain.com" -v http://$(dig +short your_domain.com | head -1)/ 2>&1 | \
    grep -E "(HTTP|Server)"
Document Root and File Access Issues
# Comprehensive file permission audit
check_web_permissions() {
    local webroot="$1"
    echo "Auditing permissions for: $webroot"

    # Check directory permissions
    find "$webroot" -type d -exec ls -ld {} \; | \
        awk '$1 !~ /^d[rwx-]{3}r-xr-x/ {print "Directory permission issue:", $0}'

    # Check file permissions
    find "$webroot" -type f -exec ls -l {} \; | \
        awk '$1 !~ /^-[rwx-]{3}r--r--/ {print "File permission issue:", $0}'

    # Check for SELinux context (if applicable)
    if command -v getenforce &> /dev/null; then
        ls -Z "$webroot" | head -5
    fi
}

check_web_permissions "/var/www/your_domain"

# Test file accessibility as www-data user
sudo -u www-data test -r /var/www/your_domain/index.html && \
    echo "✓ Index file readable by www-data" || \
    echo "✗ Index file not readable by www-data"

# Check for file locks or corruption
sudo lsof +D /var/www/your_domain | grep -v "^COMMAND"
Load Balancer and Reverse Proxy Issues
When Apache acts as a reverse proxy or works behind load balancers:
Proxy Configuration Diagnostics
# Test proxy functionality
test_proxy_health() {
    local backend_url="$1"
    local proxy_url="$2"

    echo "Testing direct backend access..."
    curl -I "$backend_url" --connect-timeout 5 2>/dev/null | head -1

    echo "Testing through proxy..."
    curl -I "$proxy_url" --connect-timeout 5 2>/dev/null | head -1

    echo "Checking proxy headers..."
    curl -H "X-Forwarded-Proto: https" -I "$proxy_url" 2>/dev/null | \
        grep -E "(X-Forwarded|Via)"
}

# Monitor proxy backend health
sudo grep -E "(proxy_error|backend)" /var/log/apache2/error.log | tail -10

# Check mod_proxy_balancer status
curl -s http://localhost/balancer-manager | grep -E "(Status|Load)"
Security Issue Diagnostics
Security-related Apache issues require immediate attention:
Security Audit Framework
# Check for security headers
security_headers_test() {
    local url="$1"
    echo "Security headers audit for: $url"

    headers=$(curl -I "$url" 2>/dev/null)

    for header in "X-Frame-Options" "X-Content-Type-Options" "X-XSS-Protection" \
                  "Strict-Transport-Security" "Content-Security-Policy"; do
        if echo "$headers" | grep -qi "$header"; then
            echo "✓ $header present"
        else
            echo "✗ $header missing"
        fi
    done
}

# Check for exposed sensitive files
find /var/www/ -name "*.bak" -o -name "*.old" -o -name ".git" -o -name ".svn" \
    -o -name "config.php.save" | head -10

# Audit Apache modules for security
sudo apache2ctl -M | grep -E "(info|status|userdir)" | \
    while read module; do
        echo "Review security implications of: $module"
    done

# Check for directory traversal vulnerabilities
sudo grep -r "\.\./\.\." /var/log/apache2/ | tail -5
Access Control and Authentication Issues
# Test .htaccess processing
test_htaccess_processing() {
    local test_dir="/var/www/your_domain/test"
    sudo mkdir -p "$test_dir"

    # Create test .htaccess
    echo "deny from all" | sudo tee "$test_dir/.htaccess"

    # Test access
    response=$(curl -o /dev/null -s -w "%{http_code}" "http://your_domain/test/")

    if [[ "$response" == "403" ]]; then
        echo "✓ .htaccess processing working"
    else
        echo "✗ .htaccess not processed (response: $response)"
        echo "Check AllowOverride settings in virtual host configuration"
    fi

    # Cleanup
    sudo rm -rf "$test_dir"
}

# Check authentication configuration
sudo grep -r "AuthType\|AuthName\|AuthUserFile" /etc/apache2/sites-enabled/
Automated Health Monitoring Script
Create a comprehensive health check script for production environments:
# Create comprehensive Apache health monitoring
sudo tee /usr/local/bin/apache-health-check.sh > /dev/null << 'EOF'
#!/bin/bash
# Comprehensive Apache Health Check Script for Ubuntu 22.04

LOG_FILE="/var/log/apache-health-check.log"
EMAIL_ALERT="admin@your_domain.com"

log_message() {
    echo "[$(date '+%Y-%m-%d %H:%M:%S')] $1" | tee -a "$LOG_FILE"
}

check_service_status() {
    if systemctl is-active --quiet apache2; then
        log_message "✓ Apache service is running"
        return 0
    else
        log_message "✗ Apache service is not running"
        return 1
    fi
}

check_port_accessibility() {
    for port in 80 443; do
        if nc -z localhost $port 2>/dev/null; then
            log_message "✓ Port $port is accessible"
        else
            log_message "✗ Port $port is not accessible"
        fi
    done
}

check_configuration_syntax() {
    if sudo apache2ctl configtest 2>/dev/null | grep -q "Syntax OK"; then
        log_message "✓ Apache configuration syntax is valid"
    else
        log_message "✗ Apache configuration has syntax errors"
        sudo apache2ctl configtest 2>&1 | tail -5 >> "$LOG_FILE"
    fi
}

check_disk_space() {
    local usage=$(df /var/log/apache2/ | tail -1 | awk '{print $5}' | sed 's/%//')
    if [[ $usage -lt 90 ]]; then
        log_message "✓ Disk space OK ($usage% used)"
    else
        log_message "⚠ Disk space warning ($usage% used)"
    fi
}

check_memory_usage() {
    local apache_memory=$(ps -C apache2 -o rss= | awk '{sum+=$1} END {print sum/1024}')
    log_message "Apache memory usage: ${apache_memory}MB"

    if [[ $(echo "$apache_memory > 1000" | bc -l) -eq 1 ]]; then
        log_message "⚠ High memory usage detected"
    fi
}

check_error_rate() {
    local error_count=$(grep -c "error" /var/log/apache2/error.log 2>/dev/null || echo 0)
    local recent_errors=$(grep "$(date '+%Y-%m-%d %H')" /var/log/apache2/error.log 2>/dev/null | wc -l)

    log_message "Total errors in log: $error_count"
    log_message "Recent errors (last hour): $recent_errors"

    if [[ $recent_errors -gt 10 ]]; then
        log_message "⚠ High error rate detected"
        grep "$(date '+%Y-%m-%d %H')" /var/log/apache2/error.log | tail -5 >> "$LOG_FILE"
    fi
}

main() {
    log_message "Starting Apache health check"

    local issues=0

    check_service_status || ((issues++))
    check_port_accessibility
    check_configuration_syntax || ((issues++))
    check_disk_space
    check_memory_usage
    check_error_rate

    if [[ $issues -gt 0 ]]; then
        log_message "⚠ $issues critical issues detected"
        # Send alert email (requires mail command)
        if command -v mail &> /dev/null; then
            tail -20 "$LOG_FILE" | mail -s "Apache Health Alert - $(hostname)" "$EMAIL_ALERT"
        fi
    else
        log_message "✓ All health checks passed"
    fi

    log_message "Health check completed"
}

main "$@"
EOF

sudo chmod +x /usr/local/bin/apache-health-check.sh

# Set up automated health checks
echo "*/15 * * * * /usr/local/bin/apache-health-check.sh" | sudo crontab -u root -
Production Incident Response Checklist
When Apache issues occur in production, follow this systematic approach:
-
Immediate Assessment (0-2 minutes)
- Check service status:
sudo systemctl status apache2 - Verify site accessibility:
curl -I http://your_domain/ - Check recent error logs:
sudo tail -50 /var/log/apache2/error.log
- Check service status:
-
Quick Recovery Actions (2-5 minutes)
- Restart service if needed:
sudo systemctl restart apache2 - Check configuration:
sudo apache2ctl configtest - Monitor resource usage:
htoporps aux | grep apache2
- Restart service if needed:
-
Detailed Investigation (5-15 minutes)
- Analyze access patterns:
sudo tail -100 /var/log/apache2/access.log - Check system resources:
df -h,free -h,vmstat 1 5 - Review recent changes:
sudo find /etc/apache2/ -mtime -1 -type f
- Analyze access patterns:
-
Long-term Resolution (15+ minutes)
- Implement monitoring improvements
- Document incident and resolution
- Update runbooks and automation
This comprehensive troubleshooting guide provides expert-level solutions for maintaining robust Apache installations in production environments.
Frequently Asked Questions (FAQ)
1. How do I install Apache on Ubuntu?
To install Apache on Ubuntu (validated on Ubuntu 22.04 and 24.04), update your package index and install the apache2 package: sudo apt update && sudo apt install apache2 -y. This command installs Apache and its dependencies, starts the service automatically, and sets it to launch on boot. You can confirm it’s running with sudo systemctl status apache2. This is the most reliable, beginner-friendly way to get Apache running on Ubuntu and is widely recommended by industry professionals.
2. How do I check if Apache is running on my server?
The quickest way to check if Apache is running is by using sudo systemctl status apache2. If you see “active (running)” in green, Apache is up. You can also test it by visiting http://your_server_ip in a browser — the default Apache landing page confirms it is working. These checks ensure you can quickly verify uptime, which is critical in production environments.
3. What ports does Apache use on Ubuntu?
By default, Apache listens on port 80 for HTTP traffic and port 443 for HTTPS traffic once SSL/TLS is configured. You can verify this by checking /etc/apache2/ports.conf or running sudo ss -ltnp | grep apache2. Knowing which ports Apache uses is essential for configuring firewalls and ensuring your website is accessible to users.
4. How do I restart, stop, or start Apache?
You can manage Apache with systemctl: use sudo systemctl restart apache2 to restart, sudo systemctl stop apache2 to stop, and sudo systemctl start apache2 to start the service again. For configuration changes that don’t require a full restart, use sudo systemctl reload apache2 to apply them without dropping active connections.
5. How do I configure Apache Virtual Hosts on Ubuntu?
Create a new config file in /etc/apache2/sites-available/your_domain.conf, set the DocumentRoot and ServerName, enable it with sudo a2ensite your_domain.conf, then reload Apache. Virtual Hosts allow you to host multiple websites on one server, a best practice for developers managing staging and production environments.
6. How do I uninstall Apache from Ubuntu?
Uninstall Apache by running sudo apt remove apache2 to remove the software while preserving config files, or sudo apt purge apache2 to delete configuration files as well. Follow this with sudo apt autoremove to clean up dependencies. This is recommended when you want to free up system resources or switch to a different web server like Nginx.
On CentOS/RHEL, the package is httpd rather than apache2—see guides on how to install httpd in Linux if you’re on those platforms.
Conclusion
Now that you have your web server installed, you have many options for the type of content you can serve and the technologies you can use to create a richer experience.
If you’d like to build out a more complete application stack, you can read this article on how to set up a full LAMP stack on Ubuntu 22.04.
Further Learning
- Official Apache HTTP Server Documentation – Deep dive into all configuration directives and modules.
- How to Configure the Apache Web Server on an Ubuntu or Debian VPS – Learn more about virtual host configuration and advanced directives.
- How to Secure Apache with Let’s Encrypt on Ubuntu 22.04 – Add free SSL/TLS to your site for better security and SEO.
- Apache Performance Tuning – Official guide to optimizing Apache for production workloads.
Thanks for learning with the DigitalOcean Community. Check out our offerings for compute, storage, networking, and managed databases.
Tutorial Series: Getting Started With Cloud Computing
This curriculum introduces open-source cloud computing to a general audience along with the skills necessary to deploy applications and websites securely to the cloud.
Browse Series: 39 tutorials
About the author(s)
Open source advocate and lover of education, culture, and community.
Educator and writer committed to empowering our community by providing access to the knowledge and tools for making creative ideas into a reality
Building future-ready infrastructure with Linux, Cloud, and DevOps. Full Stack Developer & System Administrator. Technical Writer @ DigitalOcean | GitHub Contributor | Passionate about Docker, PostgreSQL, and Open Source | Exploring NLP & AI-TensorFlow | Nailed over 50+ deployments across production environments.
Still looking for an answer?
This textbox defaults to using Markdown to format your answer.
You can type !ref in this text area to quickly search our full set of tutorials, documentation & marketplace offerings and insert the link!
Hi,
I just followed your tutorial above about installing apache and added a virtual host to it, but I did not get it work. I wonder how it should work because I do not see the point where the name of my domain is resolved to an IP-Address. Does this tutorial just work for an official domain registered by the Denic (for a .de-Domain)? Do I have to install somewhere my own DNS-Server to get it work in my local network?
Thank you very much in advance and I look forward to your reply!
Kind regards, Andreas Grund
Please add the most important step to your tutorial: default AllowOverride in apache config should be changed to All to make .htaccess rules work. We have so many clients that follow your instructions and struggle to run websites with your tutorial. ANY regular hosting has this setting correct.
 This work is licensed under a Creative Commons Attribution-NonCommercial- ShareAlike 4.0 International License.
Become a contributor for community
Get paid to write technical tutorials and select a tech-focused charity to receive a matching donation.

DigitalOcean Documentation
Full documentation for every DigitalOcean product.

Resources for startups and AI-native businesses
The Wave has everything you need to know about building a business, from raising funding to marketing your product.
The developer cloud
Scale up as you grow — whether you're running one virtual machine or ten thousand.

Start building today
From GPU-powered inference and Kubernetes to managed databases and storage, get everything you need to build, scale, and deploy intelligent applications.
