Sr Technical Content Strategist and Team Lead
Introduction
SSL (Secure Sockets Layer) protocol errors are among the most common security-related issues encountered when establishing secure connections between clients and servers. These errors occur when there’s a mismatch or incompatibility in the SSL/TLS handshake process, preventing the establishment of a secure connection.
The SSL Protocol Error—often displayed as ERR_SSL_PROTOCOL_ERROR is a common issue encountered in web browsers like Chrome and Firefox. It prevents users from establishing a secure connection to a website, often halting access with vague or confusing messages.
In this tutorial, you’ll learn how to identify, diagnose, and resolve the most common SSL protocol errors on both the server and client side. By the end of this tutorial, you’ll have a systematic approach to troubleshooting SSL issues and the knowledge to implement lasting solutions.
Prerequisites
Before you begin this guide, you’ll need:
- A server running Ubuntu or any other Linux distribution.
- Root or
sudoprivileges on your server. - Basic familiarity with the command line.
- A domain name pointed to your server (for testing SSL configurations).
- Basic understanding of SSL/TLS concepts
Understanding Common SSL Protocol Errors
The SSL protocol error is a browser-side or server-side issue that prevents the successful establishment of a secure HTTPS connection. When this happens, users may see most common errors like:
ERR_SSL_PROTOCOL_VERSION_ALERT
This error occurs when the client and server cannot agree on a common SSL/TLS protocol version. Modern browsers require TLS 1.2 or higher, while older servers might only support deprecated versions. This is particularly common when:
- The server is configured to use older, insecure protocols like SSL 3.0 or TLS 1.0
- The client (browser) has disabled support for older protocols for security reasons
- There’s a proxy or firewall in between that’s interfering with the protocol negotiation
ERR_SSL_HANDSHAKE_FAILURE
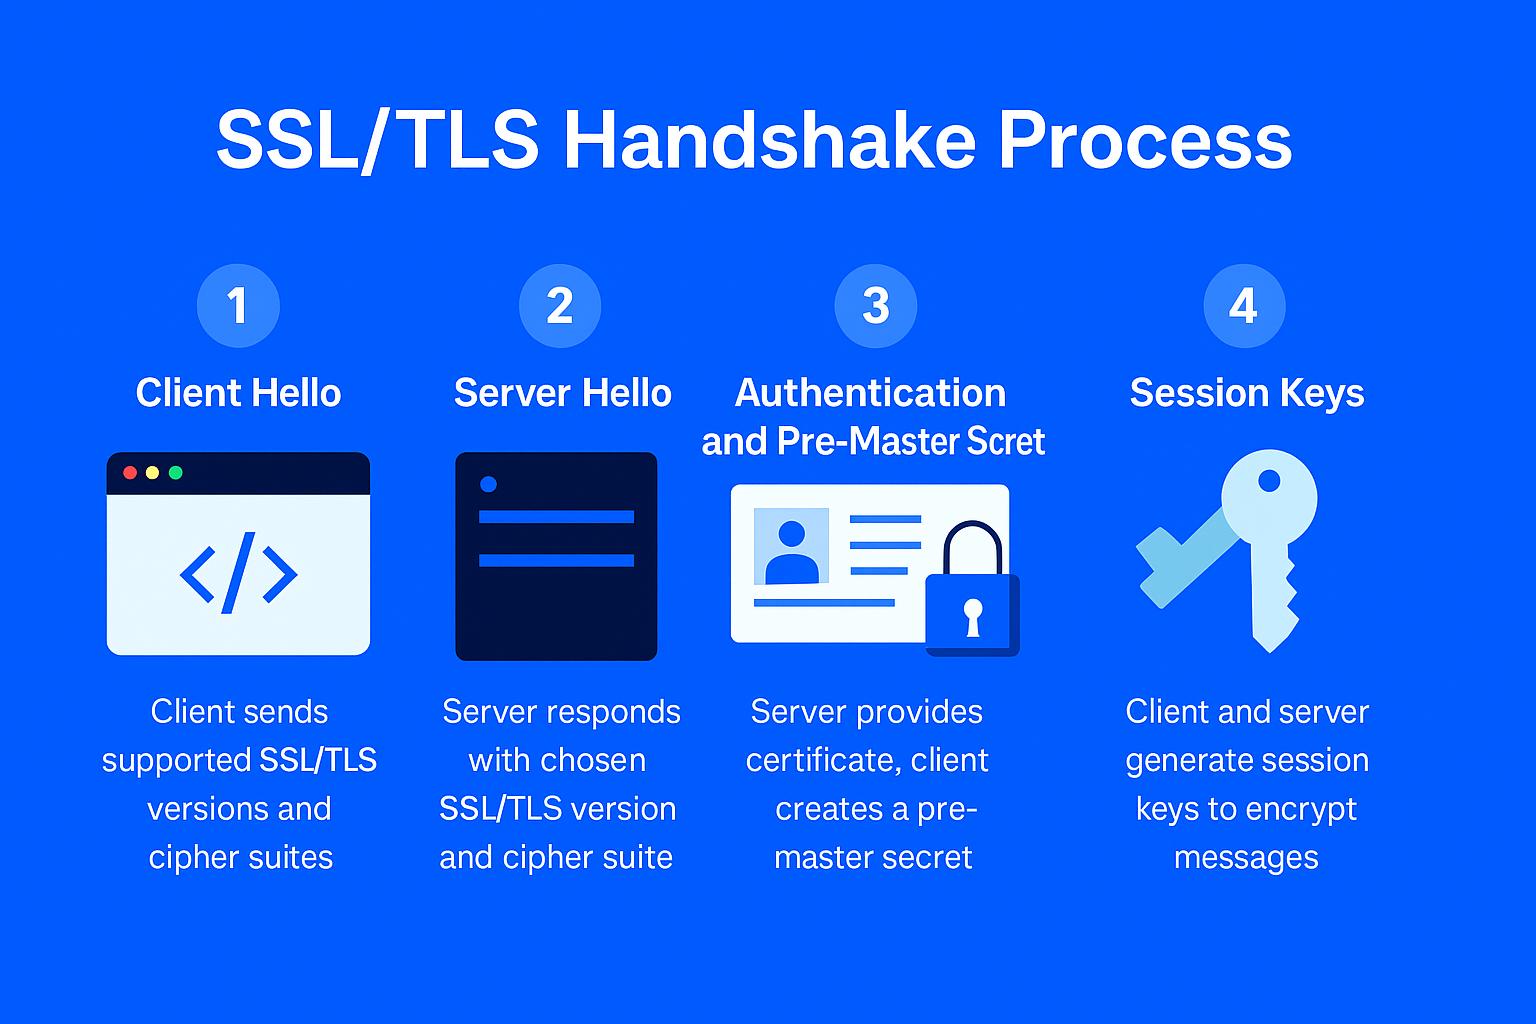
This error occurs when the SSL/TLS handshake process fails to establish a secure connection between the client and server. The handshake process involves several steps:
- Client Hello: The client initiates the connection by sending supported SSL/TLS versions and cipher suites
- Server Hello: The server responds with its chosen protocol version and cipher suite
- Certificate Exchange: The server sends its SSL certificate for validation
- Key Exchange: Both parties establish encryption keys for the session
- Finished: The handshake completes and secure communication begins
Common causes of handshake failures include:
- Incompatible cipher suites between client and server
- Certificate chain validation failures
- Client authentication issues
- Network interruptions during the handshake process
- Server configuration problems with SSL/TLS settings
- Protocol version mismatches
- Invalid or expired certificates
- Client-side security software interference
ERR_SSL_NO_CYPHER_OVERLAP
This error happens when the client and server don’t have any common cipher suites available for encryption. This typically occurs when:
- The server is configured with a very restricted set of cipher suites
- The client’s supported cipher suites are too modern for the server
- The server’s cipher configuration is misaligned with its SSL/TLS protocol version
- Security policies on either end are too restrictive
ERR_SSL_CERTIFICATE_INVALID
This occurs when there are issues with the SSL certificate, such as expiration, hostname mismatch, or invalid certificate chains. Specific causes include:
- The certificate has expired or is not yet valid
- The certificate’s Common Name (CN) or Subject Alternative Names (SANs) don’t match the domain
- The certificate chain is incomplete or broken
- The certificate was issued by an untrusted Certificate Authority (CA)
- The certificate has been revoked
- The certificate’s signature algorithm is considered insecure
A certificate mismatch occurs when the domain name in the SSL certificate doesn’t match the actual domain name being accessed. This can happen in several ways:
- Domain Name Mismatch: The certificate is issued for
example.combut being used onwww.example.comor a subdomain - IP Address Mismatch: The certificate is issued for a domain name but being used on an IP address
- Wildcard Certificate Issues: A wildcard certificate (*.example.com) might not cover all subdomains if not properly configured
- Multi-Domain Certificate Problems: A certificate with multiple Subject Alternative Names (SANs) might not include all required domains
To fix certificate mismatches:
- Ensure the certificate’s Common Name (CN) matches your primary domain
- Add all required domains to the Subject Alternative Names (SANs)
- Use a wildcard certificate if you need to cover multiple subdomains
- Verify the certificate is installed on the correct server and domain
Here is a table that summarizes the most common SSL protocol errors and their causes:
| Cause | Description | Solution |
|---|---|---|
| Invalid SSL Certificate | Expired, misconfigured, or self-signed certificates | Renew expired certificates, properly configure certificate chains, or obtain a valid certificate from a trusted CA |
| Mismatched SSL Protocols | Server and browser support incompatible versions (e.g., TLS 1.0 vs 1.3) | Update server configuration to support modern TLS versions (1.2+) and enable protocol negotiation |
| System Clock Issues | Incorrect system time/date causes certificate validation failures | Synchronize system time with NTP servers using ntpdate or configure automatic time synchronization |
| Antivirus or Firewall Blocking | Security tools interfering with SSL traffic | Configure security tools to allow SSL/TLS traffic or temporarily disable for testing. |
| Browser Cache or Cookies | Corrupted cache data can interrupt secure sessions | Clear browser cache and cookies, or try in incognito/private browsing mode |
| OS or Browser Outdated | Old versions may not support modern SSL/TLS protocols | Update OS and browser to latest versions supporting modern TLS protocols |
| DNS or Hosts File Conflict | Misconfigured DNS or custom host entries causing certificate mismatches | Verify DNS records, clear DNS cache, and check hosts file for conflicting entries |
| Server Misconfiguration | Incorrect HTTPS settings or expired certs on the server | Review and update server SSL configuration, ensure proper certificate installation |
| SSL Cache Issues | Corrupted SSL session cache causing handshake failures | Clear SSL session cache using openssl s_client -connect with -no_ticket flag or restart SSL services |
| System DNS Cache | Stale DNS records causing certificate validation issues | Flush system DNS cache using systemd-resolve --flush-caches or restart DNS services |
Installing Diagnostic Tools
Before troubleshooting SSL errors, you’ll need to install essential diagnostic tools. These tools will help you analyze SSL configurations and identify specific issues.
Update your package list:
sudo apt update
Install OpenSSL for certificate and connection testing:
sudo apt install openssl
The openssl command provides comprehensive SSL/TLS testing capabilities, including certificate validation, protocol testing, and cipher suite analysis.
Install curl for HTTP/HTTPS testing:
sudo apt install curl
Curl allows you to make HTTP/HTTPS requests with detailed SSL debugging information, which is essential for troubleshooting connection issues.
Install nmap for port and SSL service scanning:
sudo apt install nmap
Nmap can scan for open ports and test SSL services, helping you identify configuration issues at the network level.
How to Diagnose SSL Protocol Errors on the Server Side?
Now that you have the necessary tools, let’s start diagnosing SSL protocol errors systematically.
Testing SSL Connection with OpenSSL
Use OpenSSL to test the SSL connection to your server:
openssl s_client -connect your-domain.com:443 -servername your-domain.com
Replace your-domain.com with your actual domain name. The -servername flag enables Server Name Indication (SNI), which is required for servers hosting multiple SSL certificates.
This command will display detailed information about the SSL handshake process. Look for these key indicators:
- Protocol version: Should show TLS 1.2 or TLS 1.3
- Cipher suite: The encryption method being used
- Certificate chain: Verification of certificate validity
- Handshake status: Whether the connection was successful
Example of a Successful SSL Connection:
CONNECTED(00000003)
depth=2 C = US, O = Internet Security Research Group, CN = ISRG Root X1
verify return:1
depth=1 C = US, O = Let's Encrypt, CN = R3
verify return:1
depth=0 CN = your-domain.com
verify return:1
---
Certificate chain
 0 s:/CN=your-domain.com
   i:/C=US/O=Let's Encrypt/CN=R3
 1 s:/C=US/O=Let's Encrypt/CN=R3
   i:/C=US/O=Internet Security Research Group/CN=ISRG Root X1
---
Server certificate
-----BEGIN CERTIFICATE-----
... (Certificate details)
-----END CERTIFICATE-----
subject=/CN=your-domain.com
issuer=/C=US/O=Let's Encrypt/CN=R3
---
No client certificate CA names sent
Peer signing digest: SHA256
Peer signature type: RSA
Server Temp Key: ECDH, P-256, 256 bits
---
SSL handshake has read 3053 bytes and written 456 bytes
Verification: OK
---
New, TLSv1.3, Cipher is TLS_AES_256_GCM_SHA384
Server public key is 2048 bit
Secure Renegotiation IS supported
Compression: NONE
Expansion: NONE
No ALPN, server accepted to use h2
---
Example of a Failed SSL Connection:
CONNECTED(00000003)
depth=0 CN = your-domain.com
verify error:num=20:unable to get local issuer certificate
verify return:1
depth=0 CN = your-domain.com
verify error:num=21:unable to verify the first certificate
verify return:1
---
Certificate chain
 0 s:/CN=your-domain.com
   i:/C=US/O=Let's Encrypt/CN=R3
---
Server certificate
-----BEGIN CERTIFICATE-----
... (Certificate details)
-----END CERTIFICATE-----
subject=/CN=your-domain.com
issuer=/C=US/O=Let's Encrypt/CN=R3
---
No client certificate CA names sent
Peer signing digest: SHA256
Peer signature type: RSA
Server Temp Key: ECDH, P-256, 256 bits
---
SSL handshake has read 3053 bytes and written 456 bytes
Verification error: unable to verify the first certificate
---
New, TLSv1.3, Cipher is TLS_AES_256_GCM_SHA384
Server public key is 2048 bit
Secure Renegotiation IS supported
Compression: NONE
Expansion: NONE
No ALPN, server accepted to use h2
---
Explanation and Fix:
The SSL connection failed due to errors in verifying the certificate chain. Specifically, the errors are:
verify error:num=20:unable to get local issuer certificate: This indicates that the client (in this case,openssl s_client) was unable to find the issuer’s certificate in its trusted store. This is likely because the intermediate certificate is missing or not properly configured.verify error:num=21:unable to verify the first certificate: This error is a result of the previous error, as the client cannot verify the first certificate in the chain without the intermediate certificate.
To fix this issue, ensure that the intermediate certificate is installed and configured correctly on the server. This typically involves:
- Obtaining the intermediate certificate from the Certificate Authority (CA) or a trusted source.
- Installing the intermediate certificate on the server, usually in a specific directory or configuration file.
- Configuring the server to use the intermediate certificate in the SSL/TLS handshake. This may involve updating the server’s SSL/TLS configuration files or settings.
After resolving these issues, retry the SSL connection test to verify that the certificate chain is correctly configured and the SSL connection is successful.
Checking Supported SSL/TLS Versions
Test which SSL/TLS versions your server supports:
openssl s_client -connect your-domain.com:443 -tls1_2 -servername your-domain.com
Output:
CONNECTED(00000003)
depth=2 C = US, O = Internet Security Research Group, CN = ISRG Root X1
verify return:1
depth=1 C = US, O = Let's Encrypt, CN = R3
verify return:1
depth=0 CN = your-domain.com
verify return:1
---
Certificate chain
 0 s:/CN=your-domain.com
   i:/C=US/O=Let's Encrypt/CN=R3
---
Server certificate
-----BEGIN CERTIFICATE-----
... (Certificate details)
-----END CERTIFICATE-----
subject=/CN=your-domain.com
issuer=/C=US/O=Let's Encrypt/CN=R3
---
No client certificate CA names sent
Peer signing digest: SHA256
Peer signature type: RSA
Server Temp Key: ECDH, P-256, 256 bits
---
SSL handshake has read 3053 bytes and written 456 bytes
---
New, TLSv1.3, Cipher is TLS_AES_256_GCM_SHA384
Server public key is 2048 bit
Secure Renegotiation IS supported
Compression: NONE
Expansion: NONE
No ALPN, server accepted to use h2
---
Test TLS 1.3 support:
openssl s_client -connect your-domain.com:443 -tls1_3 -servername your-domain.com
Output:
CONNECTED(00000003)
depth=2 C = US, O = Internet Security Research Group, CN = ISRG Root X1
verify return:1
depth=1 C = US, O = Let's Encrypt, CN = R3
verify return:1
depth=0 CN = your-domain.com
verify return:1
---
Certificate chain
 0 s:/CN=your-domain.com
   i:/C=US/O=Let's Encrypt/CN=R3
---
Server certificate
-----BEGIN CERTIFICATE-----
... (Certificate details)
-----END CERTIFICATE-----
subject=/CN=your-domain.com
issuer=/C=US/O=Let's Encrypt/CN=R3
---
No client certificate CA names sent
Peer signing digest: SHA256
Peer signature type: RSA
Server Temp Key: ECDH, P-256, 256 bits
---
SSL handshake has read 3053 bytes and written 456 bytes
---
New, TLSv1.3, Cipher is TLS_AES_256_GCM_SHA384
Server public key is 2048 bit
Secure Renegotiation IS supported
Compression: NONE
Expansion: NONE
No ALPN, server accepted to use h2
---
If you receive a wrong version number error, the server doesn’t support that specific TLS version. For example:
openssl s_client -connect your-domain.com:443 -tls1_1 -servername your-domain.com
Output:
140255555555:error:14094410:SSL routines:ssl3_read_bytes:sslv3 alert handshake failure:s3_pkt.c:1492:SSL alert number 40
---
no peer certificate available
---
No client certificate CA names sent
---
SSL handshake has read 7 bytes and written 305 bytes
---
New, (NONE), Cipher is (NONE)
Secure Renegotiation IS NOT supported
Compression: NONE
Expansion: NONE
No ALPN, server accepted to use h2
---
To fix the wrong version number error, ensure that your server is configured to support the TLS version you are trying to use. This may involve updating your server’s SSL/TLS configuration files or settings to enable support for the desired TLS version.
Analyzing Certificate Issues
Check certificate details and validity:
openssl s_client -connect your-domain.com:443 -servername your-domain.com | openssl x509 -noout -dates
Example output:
notBefore=May  1 00:00:00 2023 GMT
notAfter=Oct 29 23:59:59 2023 GMT
This command displays the certificate’s validity period. The output will show:
notBefore: When the certificate becomes validnotAfter: When the certificate expires
Check certificate subject and issuer information:
openssl s_client -connect your-domain.com:443 -servername your-domain.com | openssl x509 -noout -subject -issuer
Example output:
subject=/CN=your-domain.com
issuer=/C=US/O=Let's Encrypt/CN=R3
This helps identify hostname mismatches and certificate authority issues. You can refer to this tutorial on How to Install an SSL Certificate from a Commercial Certificate Authority for more information.
How to Resolve SSL Protocol Version Errors on the Server Side?
If you’re encountering SSL protocol version errors, you need to configure your server to support modern TLS versions while disabling deprecated ones.
For Apache Web Server
Edit your Apache SSL configuration file:
sudo nano /etc/apache2/sites-available/your-site-ssl.conf
Add or modify the SSL protocol configuration within your <VirtualHost> block:
<VirtualHost *:443>
    ServerName your-domain.com
    DocumentRoot /var/www/your-site

    # SSL Configuration
    SSLEngine on
    SSLCertificateFile /path/to/your/certificate.crt
    SSLCertificateKeyFile /path/to/your/private.key
    SSLCertificateChainFile /path/to/your/ca-bundle.crt

    # Disable deprecated SSL versions and enable TLS 1.2+
    SSLProtocol all -SSLv2 -SSLv3 -TLSv1 -TLSv1.1 +TLSv1.2 +TLSv1.3

    # Configure secure cipher suites
    SSLCipherSuite ECDHE-ECDSA-AES128-GCM-SHA256:ECDHE-RSA-AES128-GCM-SHA256:ECDHE-ECDSA-AES256-GCM-SHA384:ECDHE-RSA-AES256-GCM-SHA384
    SSLHonorCipherOrder off

    # Enable HSTS (HTTP Strict Transport Security)
    Header always set Strict-Transport-Security "max-age=63072000; includeSubDomains; preload"
</VirtualHost>
The SSLProtocol directive explicitly disables vulnerable SSL/TLS versions (SSLv2, SSLv3, TLSv1, TLSv1.1) and enables secure versions (TLS 1.2 and 1.3).
Test the Apache configuration:
sudo apache2ctl configtest
Output:
Syntax OK
If the configuration is valid, you’ll see Syntax OK. Reload Apache to apply the changes:
sudo systemctl reload apache2
You can also refer to this tutorial on Steps to Configure SSL on Tomcat and Setup Auto Redirect from HTTP to HTTPS.
For Nginx Web Server
Edit your Nginx SSL configuration:
sudo nano /etc/nginx/sites-available/your-site
Add or modify the SSL configuration within your server block:
server {
    listen 443 ssl http2;
    server_name your-domain.com;
    root /var/www/your-site;

    # SSL Configuration
    ssl_certificate /path/to/your/certificate.crt;
    ssl_certificate_key /path/to/your/private.key;

    # Disable deprecated SSL versions and enable TLS 1.2+
    ssl_protocols TLSv1.2 TLSv1.3;

    # Configure secure cipher suites
    ssl_ciphers ECDHE-ECDSA-AES128-GCM-SHA256:ECDHE-RSA-AES128-GCM-SHA256:ECDHE-ECDSA-AES256-GCM-SHA384:ECDHE-RSA-AES256-GCM-SHA384;
    ssl_prefer_server_ciphers off;

    # Enable HSTS
    add_header Strict-Transport-Security "max-age=63072000; includeSubDomains; preload" always;

    # SSL session optimization
    ssl_session_cache shared:SSL:10m;
    ssl_session_timeout 1d;
    ssl_session_tickets off;
}
The ssl_protocols directive specifies which TLS versions to support, while ssl_ciphers defines the allowed encryption algorithms.
Test the Nginx configuration to ensure it’s valid and free of errors:
sudo nginx -t
The output should indicate if the configuration is valid or not. If the configuration is valid, you’ll see a message indicating that the syntax is correct and the test is successful. Here’s an example of a successful output:
nginx: the configuration file /etc/nginx/nginx.conf syntax is ok
nginx: configuration file /etc/nginx/nginx.conf test is successful
If the configuration is valid, reload Nginx to apply the changes:
sudo systemctl reload nginx
This command reloads Nginx without interrupting the service, ensuring that any changes to the configuration take effect without downtime.
You can also refer to this tutorial on How to Create a Self-Signed SSL Certificate for Nginx in Ubuntu.
How to Fix Certificate-Related Errors on the Server Side?
Certificate errors are common causes of SSL protocol failures. Here’s how to diagnose and fix them:
Checking Certificate Validity
Verify your certificate hasn’t expired:
openssl x509 -in /path/to/your/certificate.crt -text -noout | grep -A 2 "Validity"
This command shows the certificate’s validity period. If the certificate has expired, you need to renew it.
Verifying Certificate Chain
Check the complete certificate chain:
openssl s_client -connect your-domain.com:443 -servername your-domain.com -showcerts
This displays all certificates in the chain. Ensure you have the complete chain, including intermediate certificates.
Fixing Hostname Mismatch
If you’re getting hostname mismatch errors, verify the certificate’s Subject Alternative Names (SAN):
openssl x509 -in /path/to/your/certificate.crt -text -noout | grep -A 1 "Subject Alternative Name"
The output should include your domain name. If not, you need a new certificate that includes the correct hostname.
Renewing Certificates with Let’s Encrypt
If you’re using Let’s Encrypt certificates, renew them using Certbot:
sudo certbot renew --dry-run
The --dry-run flag tests the renewal process without actually renewing the certificate. Remove this flag to perform the actual renewal:
sudo certbot renew
After renewal, restart your web server:
sudo systemctl restart apache2
# or for Nginx
sudo systemctl restart nginx
You can also follow this tutorial on How To Secure Apache with Let’s Encrypt on Ubuntu for more information.
How to Resolve Cipher Suite Issues on the Server Side?
Cipher suite mismatches can cause SSL handshake failures. Here’s how to configure secure cipher suites:
Testing Current Cipher Suites
Check which cipher suites your server supports:
nmap --script ssl-enum-ciphers -p 443 your-domain.com
The output of this command should look similar to this:
Starting Nmap 7.92 ( https://nmap.org )
Nmap scan report for your-domain.com (192.168.1.1)
Host is up (0.00044s latency).
PORT    STATE SERVICE
443/tcp open  https
| ssl-enum-ciphers:
|   TLSv1.2:
|     ciphers:
|       TLS_ECDHE_ECDSA_WITH_AES_256_GCM_SHA384 (secp256r1) - A
|       TLS_ECDHE_RSA_WITH_AES_256_GCM_SHA384 (secp256r1) - A
|       TLS_DHE_RSA_WITH_AES_256_GCM_SHA384 (dh 2048) - A
|       TLS_ECDHE_ECDSA_WITH_AES_128_GCM_SHA256 (secp256r1) - A
|       TLS_ECDHE_RSA_WITH_AES_128_GCM_SHA256 (secp256r1) - A
|       TLS_DHE_RSA_WITH_AES_128_GCM_SHA256 (dh 2048) - A
|     compressors:
|       NULL
|     cipher preference: server
|_  least strength: A
This output lists all supported cipher suites and their security ratings.
Configuring Secure Cipher Suites
For Apache, add this to your SSL configuration:
# Modern cipher suite configuration
SSLCipherSuite ECDHE-ECDSA-AES128-GCM-SHA256:ECDHE-RSA-AES128-GCM-SHA256:ECDHE-ECDSA-AES256-GCM-SHA384:ECDHE-RSA-AES256-GCM-SHA384:ECDHE-ECDSA-CHACHA20-POLY1305:ECDHE-RSA-CHACHA20-POLY1305:DHE-RSA-AES128-GCM-SHA256:DHE-RSA-AES256-GCM-SHA384

# Disable weak ciphers
SSLCipherSuite !aNULL:!eNULL:!EXPORT:!DES:!RC4:!MD5:!PSK:!SRP:!CAMELLIA
For Nginx, use:
# Modern cipher suite configuration
ssl_ciphers ECDHE-ECDSA-AES128-GCM-SHA256:ECDHE-RSA-AES128-GCM-SHA256:ECDHE-ECDSA-AES256-GCM-SHA384:ECDHE-RSA-AES256-GCM-SHA384:ECDHE-ECDSA-CHACHA20-POLY1305:ECDHE-RSA-CHACHA20-POLY1305:DHE-RSA-AES128-GCM-SHA256:DHE-RSA-AES256-GCM-SHA384;
These configurations prioritize modern, secure cipher suites while maintaining compatibility with most clients.
Testing and Verification
After implementing fixes, thoroughly test your SSL configuration:
Verify SSL/TLS Configuration
Test the SSL connection again:
openssl s_client -connect your-domain.com:443 -servername your-domain.com
Look for successful handshake messages and verify the protocol version is TLS 1.2 or higher.
Test with Multiple Browsers
Test your site with different browsers to ensure compatibility:
- Chrome
- Firefox
- Safari
- Edge
Each browser may have different SSL/TLS requirements, so testing across multiple browsers ensures broad compatibility.
Use Online SSL Testing Tools
Use SSL Labs’ SSL Server Test to get a comprehensive analysis:
curl -s "https://api.ssllabs.com/api/v3/analyze?host=your-domain.com&publish=off&all=done" | jq .
This provides detailed information about your SSL configuration and identifies potential security issues.
Verify Certificate Chain
Ensure your certificate chain is complete:
openssl s_client -connect your-domain.com:443 -servername your-domain.com | openssl x509 -noout -text | grep -A 5 "Issuer"
The output should show the certificate authority that issued your certificate.
Monitoring and Maintenance
Implement ongoing monitoring to prevent future SSL protocol errors:
Set Up Certificate Expiration Monitoring
Create a script to check certificate expiration:
#!/bin/bash
# Certificate expiration check script

DOMAIN="your-domain.com"
DAYS_BEFORE_EXPIRY=30

# Get certificate expiration date
EXPIRY_DATE=$(openssl s_client -connect $DOMAIN:443 -servername $DOMAIN 2>/dev/null | openssl x509 -noout -enddate | cut -d= -f2)

# Convert to seconds since epoch
EXPIRY_SECONDS=$(date -d "$EXPIRY_DATE" +%s)
CURRENT_SECONDS=$(date +%s)

# Calculate days until expiry
DAYS_UNTIL_EXPIRY=$(( (EXPIRY_SECONDS - CURRENT_SECONDS) / 86400 ))

if [ $DAYS_UNTIL_EXPIRY -le $DAYS_BEFORE_EXPIRY ]; then
    echo "Certificate for $DOMAIN expires in $DAYS_UNTIL_EXPIRY days!"
    # Add notification logic here (email, Slack, etc.)
fi
Save this script as /usr/local/bin/check-ssl-expiry.sh and make it executable:
sudo chmod +x /usr/local/bin/check-ssl-expiry.sh
Schedule Regular SSL Checks
Add a cron job to run the certificate check daily:
sudo crontab -e
Add this line to check certificates daily at 9 AM:
0 9 * * * /usr/local/bin/check-ssl-expiry.sh
Enable Web Server SSL Logging
For Apache, enable SSL logging in your virtual host configuration:
LogLevel warn ssl:info
CustomLog /var/log/apache2/ssl_request.log "%t %h %{SSL_PROTOCOL}x %{SSL_CIPHER}x \"%r\" %b"
For Nginx, add SSL-specific logging:
access_log /var/log/nginx/ssl_access.log combined;
error_log /var/log/nginx/ssl_error.log warn;
These logs help you identify SSL-related issues and monitor connection patterns.
How to Fix SSL Protocol Error on the Client/Browser side?
Check the Website URL
When accessing a website, ensure that the URL starts with HTTPS (Hypertext Transfer Protocol Secure) instead of HTTP (Hypertext Transfer Protocol). This is crucial because HTTP is an insecure protocol that can expose your data to eavesdropping, tampering, and man-in-the-middle attacks. A simple typo or misconfiguration can redirect you to an insecure endpoint, leading to SSL protocol errors. Always verify the URL to ensure it’s using the secure protocol.
Clear Browser Cache and Cookies
Browser cache and cookies can sometimes become corrupted, causing issues with SSL handshakes. Clearing these can resolve problems related to SSL protocol errors. Here are the steps to clear browsing data in popular browsers:
- Google Chrome:
Settings > Privacy and Security > Clear browsing data - Mozilla Firefox:
Options > Privacy & Security > Cookies and Site Data > Clear Data - Safari:
Safari > Clear History and Website Data - Microsoft Edge:
Settings > Privacy > Clear browsing data
This will remove browsing history, cookies, and other site data that might be interfering with SSL connections.
Clear SSL State (Windows Only)
On Windows systems, you can clear the SSL state to resolve SSL protocol errors. To do this:
- Press
Windows + Rto open the Run dialog. - Type
inetcpl.cpland press Enter. - In the Internet Properties window, navigate to the
Contenttab. - Click
Clear SSL state.
This action will clear the SSL state and potentially resolve issues related to SSL protocol errors.
Check Your System Clock
An incorrect system clock can cause SSL certificate validation to fail, leading to SSL protocol errors. Ensure that your operating system’s date and time are set correctly. This is particularly important because SSL certificates are validated based on the current date and time. If your system clock is off, it can cause the browser to think the certificate is invalid or expired, resulting in SSL protocol errors.
Update Your Browser
Using an outdated browser can lead to SSL protocol errors due to compatibility issues with modern SSL protocols. Ensure you’re running the latest version of your browser to ensure compatibility with the latest SSL/TLS protocols. You can update your browser by visiting the following links:
Updating your browser will ensure you have the latest security patches and SSL/TLS protocol support.
Disable VPN, Antivirus, or Firewall Temporarily
Sometimes, security software like VPNs, antivirus programs, or firewalls can interfere with SSL/TLS communication, causing SSL protocol errors. Temporarily disabling these security tools can help you identify if they’re the root cause of the issue. If the error resolves after disabling these tools, you may need to configure them to allow SSL/TLS traffic or add exceptions for the website you’re trying to access.
Check Your Internet Connection or Network Settings
Network connectivity issues or misconfigured network settings can also cause SSL protocol errors. Try switching to a different network or resetting your router or DNS settings if necessary. This can help resolve issues related to network connectivity or DNS resolution that might be contributing to SSL protocol errors.
Try a Different Browser
If you’re experiencing SSL protocol errors on one browser but not another, it could indicate a browser-specific issue. This might be related to browser cache, extensions, or configuration. Try accessing the website on a different browser to isolate the issue. If the error is browser-specific, it may be resolved by clearing browser cache, disabling extensions, or adjusting browser settings.
FAQs
1. What does SSL Protocol Error mean?
An SSL Protocol Error occurs when there’s a problem with the SSL/TLS handshake process between your browser and the server. This can be due to various reasons such as outdated SSL/TLS versions, misconfigured certificates, or issues with the server’s SSL/TLS configuration. The error prevents the secure connection from being established, ensuring your data remains protected.
2. What causes ERR_SSL_PROTOCOL_ERROR in Chrome?
ERR_SSL_PROTOCOL_ERROR in Chrome is typically caused by a mismatch between the SSL/TLS protocol versions supported by the browser and the server. This error can also occur due to issues with the server’s SSL/TLS configuration, such as an invalid or expired SSL certificate, or if the server is not configured to support the latest SSL/TLS protocols. Additionally, antivirus software, firewalls, or VPNs can sometimes interfere with SSL/TLS connections, leading to this error.
3. How do I clear SSL state in Windows?
To clear the SSL state in Windows, follow these steps:
- Press
Windows + Rto open the Run dialog. - Type
inetcpl.cpland press Enter. - In the Internet Properties window, navigate to the
Contenttab. - Click
Clear SSL state.
This action will clear the SSL state and potentially resolve issues related to SSL protocol errors.
4. How to know if the SSL error is from my side or the server?
To determine if an SSL error is originating from your side or the server, follow these steps:
- Check your system clock: Ensure your system clock is set correctly, as an incorrect clock can cause SSL certificate validation to fail.
- Verify your browser and OS: Ensure your browser and operating system are up-to-date, as outdated versions may not support modern SSL/TLS protocols.
- Try a different browser: If the error occurs on one browser but not another, it could indicate a browser-specific issue.
- Check your antivirus and firewall: Temporarily disable antivirus software, firewalls, or VPNs to see if they’re interfering with SSL/TLS connections.
- Contact the website administrator: If none of the above steps resolve the issue, it’s likely a problem on the server side. Contact the website administrator or try accessing the website at a later time.
By following these steps, you can identify whether the SSL error is related to your local setup or the server configuration.
Conclusion
You’ve successfully learned how to troubleshoot and fix SSL protocol errors both on the server and client side. The systematic approach covered in this tutorial provides a framework for diagnosing and resolving the most common SSL issues:
- Diagnostic Phase: Using tools like OpenSSL, curl, and nmap to identify specific SSL problems
- Configuration Phase: Updating web server configurations to support modern SSL/TLS protocols and secure cipher suites
- Certificate Management: Ensuring certificates are valid, properly configured, and include the correct hostnames
- Testing and Verification: Confirming that fixes resolve the issues and maintain compatibility
- Ongoing Monitoring: Implementing systems to prevent future SSL problems
By following these practices, you’ll maintain secure SSL/TLS connections and provide a better experience for your users. Regular monitoring and proactive certificate management are key to preventing SSL protocol errors before they impact your services.
For additional security, consider implementing HTTP Strict Transport Security (HSTS), Certificate Transparency monitoring, and regular security audits of your SSL configuration.
What’s Next?
Now that you’ve mastered SSL protocol error troubleshooting, you might want to explore these related topics:
- Steps to Configure SSL on Tomcat and Setup Auto Redirect from HTTP to HTTPS - This tutorial guides you through the process of setting up SSL on Apache Tomcat and configuring automatic redirects from HTTP to HTTPS.
- OpenSSL Essentials: Working with SSL Certificates, Private Keys, and CSRs - This comprehensive guide covers the basics of working with SSL certificates, private keys, and Certificate Signing Requests (CSRs) using OpenSSL.
- How To Create a Self-Signed SSL Certificate for Nginx in Ubuntu - This tutorial explains the steps to create a self-signed SSL certificate for Nginx on an Ubuntu system, ensuring a secure connection for your web server.
Thanks for learning with the DigitalOcean Community. Check out our offerings for compute, storage, networking, and managed databases.
About the author
I help Businesses scale with AI x SEO x (authentic) Content that revives traffic and keeps leads flowing | 3,000,000+ Average monthly readers on Medium | Sr Technical Writer(Team Lead) @ DigitalOcean | Ex-Cloud Consultant @ AMEX | Ex-Site Reliability Engineer(DevOps)@Nutanix
Still looking for an answer?
This textbox defaults to using Markdown to format your answer.
You can type !ref in this text area to quickly search our full set of tutorials, documentation & marketplace offerings and insert the link!
 This work is licensed under a Creative Commons Attribution-NonCommercial- ShareAlike 4.0 International License.
Become a contributor for community
Get paid to write technical tutorials and select a tech-focused charity to receive a matching donation.

DigitalOcean Documentation
Full documentation for every DigitalOcean product.

Resources for startups and AI-native businesses
The Wave has everything you need to know about building a business, from raising funding to marketing your product.
The developer cloud
Scale up as you grow — whether you're running one virtual machine or ten thousand.

Start building today
From GPU-powered inference and Kubernetes to managed databases and storage, get everything you need to build, scale, and deploy intelligent applications.
