
Introduction
In this tutorial, we will go over how to use Tinc, an open source Virtual Private Network (VPN) daemon, to create a secure VPN that your servers can communicate on as if they were on a local network. We will also demonstrate how to use Tinc to set up a secure tunnel into a private network. We will be using Ubuntu 14.04 servers, but the configurations can be adapted for use with any other OS.
A few of the features that Tinc has that makes it useful include encryption, optional compression, automatic mesh routing (VPN traffic is routed directly between the communicating servers, if possible), and easy expansion. These features differentiate Tinc from other VPN solutions such as OpenVPN, and make it a good solution for creating a VPN out of many small networks that are geographically distributed. Tinc is supported on many operating systems, including Linux, Windows, and Mac OS X.
Note: If you want to set up a Tinc mesh VPN quickly and easily, check out this tutorial: How To Use Ansible and Tinc VPN to Secure Your Server Infrastructure.
Prerequisites
To complete this tutorial, you will require root access on at least three Ubuntu 14.04 servers. Instructions to set up root access can be found here (steps 3 and 4): Initial Server Setup with Ubuntu 14.04.
If you are planning on using this in your own environment, you will have to plan out how your servers need to access each other, and adapt the examples presented in this tutorial to your own needs. If you are adapting this to your own setup, be sure to substitute the highlighted values in the examples with your own values.
If you would like to follow this tutorial exactly, create two VPSs in the same datacenter, with private networking, and create another VPS in a separate datacenter. We will create two VPSs in the NYC2 datacenter and one in AMS2 datacenter with the following names:
- externalnyc: All of the VPN nodes will connect to this server, and the connection must be maintained for proper VPN functionality. Additional servers can be configured in a similarly to this one to provide redundancy, if desired.
- internalnyc: Connects to externalnyc VPN node using its private network interface
- ams1: Connects to externalnyc VPN node over the public Internet
Our Goal
Here is a diagram of the VPN that we want to set up (described in Prerequisites):
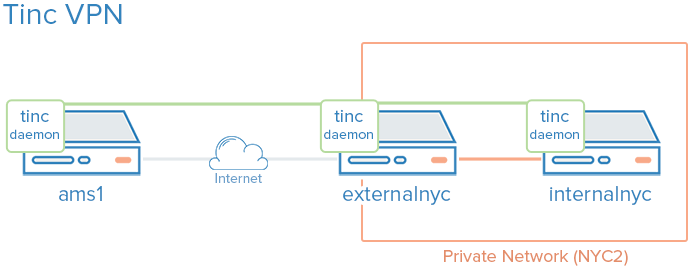
The green represents our VPN, the gray represents the public Internet, and the orange represents the private network. All three servers can communicate on the VPN, even though the private network is inaccessible to ams1.
Let’s get started by installing Tinc!
Install Tinc
On each VPS that you want to join the private network, install Tinc. Let’s start by updating apt:
sudo apt-get update
Then install Tinc via apt:
sudo apt-get install tinc
Now that Tinc is installed, let’s look at the Tinc configuration.
Tinc Configuration
Tinc uses a “netname” to distinguish one Tinc VPN from another (in case of multiple VPNs), and it is recommended to use a netname even if you are only planning on configuring one VPN. We will call our VPN “netname” for simplicity.
Every server that will be part of our VPN requires the following three configuration components:
- Configuration files: tinc.conf, tinc-up, and tinc-down, for example
- Public/private key pairs: For encryption and node authentication
- Host configuration files: Which contain public keys and other VPN configuration
Let’s start by configuring our externalnyc node.
Configure externalnyc
On externalnyc, create the configuration directory structure for our VPN called “netname”:
sudo mkdir -p /etc/tinc/netname/hosts
Now open tinc.conf for editing:
sudo vi /etc/tinc/netname/tinc.conf
Now add the following lines:
Name = externalnyc
AddressFamily = ipv4
Interface = tun0
This simply configures a node called externalnyc, with a network interface that will use IPv4 called “tun0”. Save and quit.
Next, let’s create an externalnyc hosts configuration file:
sudo vi /etc/tinc/netname/hosts/externalnyc
Add the following lines to it (substitute the public IP address of your VPS here):
Address = externalnyc_public_IP
Subnet = 10.0.0.1/32
Ultimately, this file will be used on other servers to communicate with this server. The address specifies how other nodes will connect to this server, and the subnet specifies which subnet this daemon will serve. Save and quit.
Now generate the public/private keypair for this host with the following command:
sudo tincd -n netname -K4096
This creates the private key (/etc/tinc/netname/rsa_key.priv) and appends the public key to the externalnyc hosts configuration file that we recently created (/etc/tinc/netname/hosts/externalnyc).
Now we must create tinc-up, the script that will run whenever our netname VPN is started. Open the file for editing now:
sudo vi /etc/tinc/netname/tinc-up
Add the following lines:
#!/bin/sh
ifconfig $INTERFACE 10.0.0.1 netmask 255.255.255.0
When we start our VPN, this script will run to create the network interface that our VPN will use. On the VPN, this server will have an IP address of 10.0.0.1.
Let’s also create a script to remove network interface when our VPN is stopped:
sudo vi /etc/tinc/netname/tinc-down
Add the following lines:
#!/bin/sh
ifconfig $INTERFACE down
Save and quit.
Lastly, make tinc network scripts executable:
sudo chmod 755 /etc/tinc/netname/tinc-*
Save and quit.
Let’s move on to our other nodes.
Configure internalnyc and ams1
These steps are required on both internalnyc and ams1, with slight variations that will be noted.
On internalnyc and ams1, create the configuration directory structure for our VPN called “netname” and edit the Tinc configuration file:
sudo mkdir -p /etc/tinc/netname/hosts
sudo vi /etc/tinc/netname/tinc.conf
Add the following lines (substitute the name with the node name):
Name = node_name
AddressFamily = ipv4
Interface = tun0
ConnectTo = externalnyc
These nodes are configured to attempt to connect to “externalnyc” (the node we created prior to this). Save and quit.
Next, let’s create the hosts configuration file:
sudo vi /etc/tinc/netname/hosts/node_name
For internalnyc, add this line:
Subnet = 10.0.0.2/32
For ams1, add this line:
Subnet = 10.0.0.3/32
Note that the numbers differ. Save and quit.
Next, generate the keypairs:
sudo tincd -n netname -K4096
And create the network interface start script:
sudo vi /etc/tinc/netname/tinc-up
For internalnyc, add this line:
ifconfig $INTERFACE 10.0.0.2 netmask 255.255.255.0
For ams1, add this line:
ifconfig $INTERFACE 10.0.0.3 netmask 255.255.255.0
These IP addresses are how these nodes will be accessed on the VPN. Save and quit.
Now create the network interface stop script:
sudo vi /etc/tinc/netname/tinc-down
And add this line:
ifconfig $INTERFACE down
Save and quit.
Lastly, make tinc network scripts executable:
sudo chmod 755 /etc/tinc/netname/tinc-*
Save and quit.
Now we must distribute the hosts configuration files to each node.
Distribute the Keys
If you happen to use a configuration management system, here is a good application. Minimally, each node that wants communicate directly with another node must have exchanged public keys, which are inside of the hosts configuration files. In our case, for example, only externalnyc needs to exchange public keys with the other nodes. It is easier to manage if you just copy each public key to all members of the node. Note that you will want to change the “Address” value in externalnyc’s hosts configuration file to its private IP address when it is copied to internalnyc, so that connection is established over the private network.
Because our VPN is called “netname”, here is the location of the hosts configuration files: /etc/tinc/netname/hosts
Exchange Keys Between externalnyc and internalnyc
On internalnyc, copy its hosts configuration file to externalnyc:
scp /etc/tinc/netname/hosts/internalnyc user@externalnyc_private_IP:/tmp
Then on externalnyc, copy the internalnyc’s file into the appropriate location:
cd /etc/tinc/netname/hosts; sudo cp /tmp/internalnyc .
Then on externalnyc again, copy its hosts configuration file to internalnyc:
scp /etc/tinc/netname/hosts/externalnyc user@internalnyc_private_IP:/tmp
On internalnyc, copy externalnyc’s file to the appropriate location:
cd /etc/tinc/netname/hosts; sudo cp /tmp/externalnyc .
On internalnyc, let’s edit externalnyc’s hosts configuration file so the “Address” field is set to externalnyc’s private IP address (so internalnyc will connect to the VPN via the private network). Edit externalnyc’s hosts configuration file:
sudo vi /etc/tinc/netname/hosts/externalnyc
Change the “Address” value to externalnyc’s private IP address:
Address = externalnyc_private_IP
Save and quit. Now let’s move on to our remaining node, ams1.
Exchange Keys Between externalnyc and ams1
On ams1, copy its hosts configuration file to externalnyc:
scp /etc/tinc/netname/hosts/ams1 user@externalnyc_public_IP:/tmp
Then on externalnyc, copy the ams1’s file into the appropriate location:
cd /etc/tinc/netname/hosts; sudo cp /tmp/ams1 .
Then on externalnyc again, copy its hosts configuration file to ams1:
scp /etc/tinc/netname/hosts/externalnyc user@ams1_public_IP:/tmp
On ams1, copy externalnyc’s file to the appropriate location:
cd /etc/tinc/netname/hosts; sudo cp /tmp/externalnyc .
Exchange Keys Between Additional Nodes
If you are creating a larger VPN, now is a good time to exchange the keys between those other nodes. Remember that if you want two nodes to directly communicate with each other (without a forwarding server between), they need to have exchanged their keys/hosts configuration files, and they need to be able to access each other’s real network interfaces. Also, it is fine to just copy each hosts configuration to every node in the VPN.
Test Our Configuration
On each node, starting with externalnyc, start Tinc in debug mode like so (netname is the name of our VPN):
sudo tincd -n netname -D -d3
After starting the daemon on each node, you should see output with the names of each node as they connect to externalnyc. Now let’s test the connection over the VPN.
In a separate window, on ams1, ping internalnyc’s VPN IP address (which we assigned to 10.0.0.2, earlier):
ping 10.0.0.2
The ping should work fine, and you should see some debug output in the other windows about the connection on the VPN. This indicates that ams1 is able to communicate over the VPN through externalnyc to internalnyc. Press CTRL-C to quit pinging.
You may also use the VPN interfaces to do any other network communication, like application connections, copying files, and SSH.
On each Tinc daemon debug window, quit the daemon by pressing CTRL-\.
Note: If the connections aren’t working, ensure that your firewall is not blocking the connections or forwarding.
Configure Tinc To Startup on Boot
Before the Tinc init script will function properly, we have to put our VPN’s name into the nets.boot configuration file.
On each node, edit nets.boot:
sudo vi /etc/tinc/nets.boot
Add the name of your VPN(s) into this file. Ours is “netname”:
# This file contains all names of the networks to be started on system startup.
netname
Save and quit. Tinc is now configured to start on boot, and it can be controlled via the service command. If you would like to start it now run the following command on each of your nodes:
sudo service tinc start
Congrats! Your Tinc VPN is set up.
Conclusion
Now that you have gone through this tutorial, you should have a good foundation to build out your VPN to meet your needs. Tinc is very flexible, and any node can be configured to connect to any other node (that it can access over the network) so it can act as a mesh VPN, not relying on a single node.
Good luck!
Thanks for learning with the DigitalOcean Community. Check out our offerings for compute, storage, networking, and managed databases.
About the author
Software Engineer @ DigitalOcean. Former Señor Technical Writer (I no longer update articles or respond to comments). Expertise in areas including Ubuntu, PostgreSQL, MySQL, and more.
Still looking for an answer?
 This work is licensed under a Creative Commons Attribution-NonCommercial- ShareAlike 4.0 International License.
Become a contributor for community
Get paid to write technical tutorials and select a tech-focused charity to receive a matching donation.

DigitalOcean Documentation
Full documentation for every DigitalOcean product.

Resources for startups and AI-native businesses
The Wave has everything you need to know about building a business, from raising funding to marketing your product.
The developer cloud
Scale up as you grow — whether you're running one virtual machine or ten thousand.

Start building today
From GPU-powered inference and Kubernetes to managed databases and storage, get everything you need to build, scale, and deploy intelligent applications.
