By Mark Drake and Mitchell Anicas

Introduction
Tinc is an open-source Virtual Private Network (VPN) daemon with useful features like encryption, optional compression, and automatic mesh routing that can opportunistically route VPN traffic directly between servers. These features differentiate tinc from other VPN solutions, and make it a good choice for creating a VPN out of many small, geographically distributed networks.
In this tutorial, we will go over how to use tinc to create a secure VPN on which your servers can communicate as if they were on a local network. We will also demonstrate how to use tinc to set up a secure tunnel into a private network. We will be using Ubuntu 18.04 servers, but the configurations can be adapted for use with any other OS.
Goals
In order to cover multiple use cases, this tutorial outlines how to connect one client node to the VPN over a private network interface and another over a public one. You can, however, adapt this setup to suit your own needs. You’ll just need to plan out how you want your servers to access each other and adapt the examples presented in this tutorial to your own needs. If you are adapting this to your own setup, be sure to substitute the highlighted values in the examples with your own values. It may be in your interest, though, to first follow the tutorial as it’s written to make sure you understand the components and processes involved before modifying these instructions.
To help keep things clear, this tutorial will refer to the servers like this:
- server-01: All of the VPN nodes will connect to this machine, and the connection must be maintained for proper VPN functionality. Additional servers can be configured in the same way as this one to provide redundancy, if desired
- client-01: Connects to the server-01 VPN node using its private network interface
- client-02: Connects to the server-01 VPN node over the public network interface
Note: Tinc itself doesn’t differentiate between servers (machines that host and deliver VPN services) and clients (the machines that connect to and use the secure private network), but it can be helpful to understand and visualize how tinc works by thinking of your servers like this.
Here is a diagram of the VPN that we want to set up:
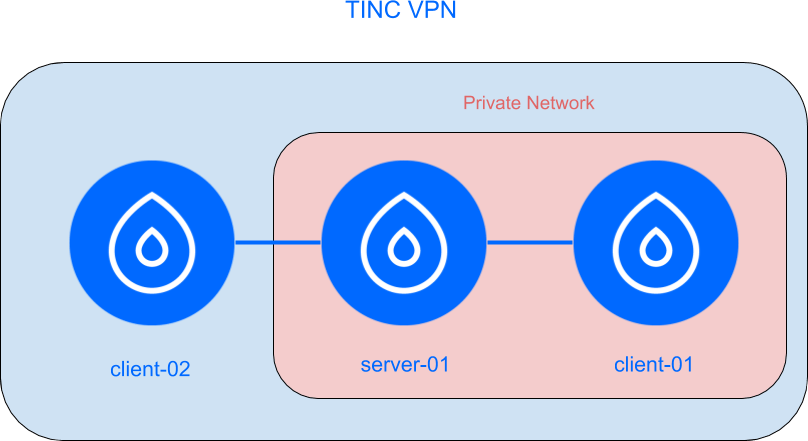
The blue box represents our VPN and the pink represents the underlying private network. All three servers can communicate on the VPN, even though the private network is otherwise inaccessible to client-02.
Prerequisites
If you would like to follow this tutorial exactly, provision two Ubuntu 18.04 servers (server-01 and client-01) in the same datacenter and enable private networking on each. Then, create another Ubuntu 18.04 server (client-02) in a separate datacenter. Each server should have an administrative user and a firewall configured with ufw. To set this up, follow our initial server setup guide for Ubuntu 18.04.
Additionally, later on in this tutorial we’ll need to transfer a few files between each machine using scp. Because of this, you’ll need to generate SSH keys on each of your servers, add both client-01 and client-02’s SSH keys to server-01’s authorized_keys file, and then add server-01’s SSH key to both client-01 and client-02’s authorized_keys files. For help setting this up, see our guide on How to Set Up SSH Keys on Ubuntu 18.04.
Step 1 — Installing Tinc
Tinc is available from the default Ubuntu APT repositories, which means we can install it with just a few commands.
If you’ve not done so recently, run the following command on each server to update their respective package indexes:
- sudo apt update
Then install tinc on each server by running the following command:
- sudo apt install tinc
With that, you’ve installed tinc on each of your servers. However, you’ll need to make some changes to tinc’s configuration on each machine in order to get your VPN up and running. Let’s begin with updating server-01.
Step 2 — Configuring the Tinc Server
Tinc requires that every machine that will be part of the VPN has the following three configuration components:
- Tinc configuration files: There are three distinct files that configure the tinc daemon:
tinc.conf, which defines the netname, the network device over which the VPN will run, and other VPN options;tinc-up, a script that activates the network device defined intinc.confafter tinc is started;tinc-down, which deactivates the network device whenever tinc stops.
- Public/private key pairs: Tinc uses public/private key pairs to ensure that only users with valid keys are able to access the VPN.
- Host configuration files: Each machine (or host) on the VPN has its own configuration file that holds the host’s actual IP address and the subnet where tinc will serve it
Tinc uses a netname to distinguish one tinc VPN from another. This is helpful in cases where you want to set up multiple VPNs, but it’s recommended that you use a netname even if you are only planning on configuring one VPN. You can give your VPN whatever netname you like, but for simplicity we will call our VPN netname.
On server-01, create the configuration directory structure for the VPN:
- sudo mkdir -p /etc/tinc/netname/hosts
Use your preferred text editor to create a tinc.conf file. Here, we’ll use nano:
- sudo nano /etc/tinc/netname/tinc.conf
Add the following lines to the empty file. These configure a tinc node named server_01 with a network interface called tun0 which will use IPv4:
Name = server_01
AddressFamily = ipv4
Interface = tun0
Warning: Note how the value after the Name directive includes an underscore (_) rather than a hyphen (-). This is important, since tinc requires that the Name value contain only alphanumeric or underscore characters. If you use a hyphen here, you’ll encounter an error when you try to start the VPN later in this guide.
Save and close the file after adding these lines. If you used nano, do so by pressing CTRL+X, Y, then ENTER.
Next, create a host configuration file named server_01 in the hosts subdirectory. Ultimately, the client nodes will use this file to communicate with server-01:
- sudo nano /etc/tinc/netname/hosts/server_01
Again, note that the name of this file contains an underscore rather than a hyphen. This way, it aligns with the Name directive in the tinc.conf file which will allow tinc to automatically append the server’s public RSA key to this file when we generate later on.
Add the following lines to the file, making sure to include server-01’s public IP address:
Address = server-01_public_IP_address
Subnet = 10.0.0.1/32
The Address field specifies how other nodes will connect to this server, and Subnet specifies which subnet this daemon will serve. Save and close the file.
Next, generate a pair of public and private RSA keys for this host with the following command:
- sudo tincd -n netname -K4096
After running this command, you’ll be prompted to enter filenames where tinc will save the public and private RSA keys:
Output. . .
Please enter a file to save private RSA key to [/etc/tinc/netname/rsa_key.priv]:
Please enter a file to save public RSA key to [/etc/tinc/netname/hosts/server_01]:
Press ENTER to accept the default locations at each prompt; doing so will tell tinc to store the private key in a file named rsa_key.priv and append the public key to the server_01 host configuration file.
Next, create tinc-up, the script that will run whenever the netname VPN is started:
- sudo nano /etc/tinc/netname/tinc-up
Add the following lines:
#!/bin/sh
ip link set $INTERFACE up
ip addr add 10.0.0.1/32 dev $INTERFACE
ip route add 10.0.0.0/24 dev $INTERFACE
Here’s what each of these lines do:
ip link …: sets the status of tinc’s virtual network interface asupip addr …: adds the IP address10.0.0.1with a netmask of32to tinc’s virtual network interface, which will cause the other machines on the VPN to see server-01’s IP address as10.0.0.1ip route …: adds a route (10.0.0.0/24) which can be reached on tinc’s virtual network interface
Save and close the file after adding these lines.
Next, create a script to remove the virtual network interface when your VPN is stopped:
- sudo nano /etc/tinc/netname/tinc-down
Add the following lines:
#!/bin/sh
ip route del 10.0.0.0/24 dev $INTERFACE
ip addr del 10.0.0.1/32 dev $INTERFACE
ip link set $INTERFACE down
These lines have the opposite effects as those in the tinc-up script:
ip route …: deletes the10.0.0.0/24routeip addr …: deletes the IP address10.0.0.1from tinc’s virtual network interfaceip link …: sets the status of tinc’s virtual network interface asdown
Save and close the file, then make both of these new network scripts executable:
- sudo chmod 755 /etc/tinc/netname/tinc-*
As a final step of configuring server-01, add a firewall rule that will allow traffic through port 655, tinc’s default port:
- sudo ufw allow 655
server-01 is now fully configured and you can move on to setting up your client nodes.
Step 3 — Configuring the Client Nodes
Both of your client machines will require a slightly different configuration than the server, although the process will generally be quite similar.
Because of the setup we’re aiming for in this guide, we will configure client-01 and client-02 almost identically with only a few slight differences between them. Hence, many of the commands given in this step must be run on both machines. Note, though, that if client-01 or client-02 require a specific command or special configuration, those instructions will be shown in a blue or red command block, respectively.
On both client-01 and client-02, replicate the directory structure you created on server-01:
- sudo mkdir -p /etc/tinc/netname/hosts
Then create a tinc.conf file:
- sudo nano /etc/tinc/netname/tinc.conf
Add the following lines to the file on both machines:
Name = node_name
AddressFamily = ipv4
Interface = tun0
ConnectTo = server_01
Be sure to substitute node_name with the respective client node’s name. Again, make sure this name uses an underscore (_) rather than a hyphen.
Note that this file contains a ConnectTo directive pointing to server_01, while server-01’s tinc.conf file didn’t include this directive. By not including a ConnectTo statement on server-01, it means that server-01 will only listen for incoming connections. This works for our setup since it won’t connect to any other machines.
Save and close the file.
Next, create a host configuration file on each client node. Again, make sure the file name is spelled with an underscore instead of a hyphen:
- sudo nano /etc/tinc/netname/hosts/node_name
For client-01, add this line:
Subnet = 10.0.0.2/32
For client-02, add this line:
Subnet = 10.0.0.3/32
Note that each client has a different subnet that tinc will serve. Save and close the file.
Next, generate the keypairs on each client machine:
- sudo tincd -n netname -K4096
Again as you did with server-01, when prompted to select files to store the RSA keys, press ENTER to accept the default choices.
Following that, create the network interface start script on each client:
- sudo nano /etc/tinc/netname/tinc-up
For client-01, add these lines:
#!/bin/sh
ip link set $INTERFACE up
ip addr add 10.0.0.2/32 dev $INTERFACE
ip route add 10.0.0.0/24 dev $INTERFACE
For client-02, add the following:
#!/bin/sh
ip link set $INTERFACE up
ip addr add 10.0.0.3/32 dev $INTERFACE
ip route add 10.0.0.0/24 dev $INTERFACE
Save and close each file.
Next, create the network interface stop script on each client:
- sudo nano /etc/tinc/netname/tinc-down
On client-01, add the following content to the empty file:
#!/bin/sh
ip route del 10.0.0.0/24 dev $INTERFACE
ip addr del 10.0.0.2/32 dev $INTERFACE
ip link set $INTERFACE down
On client-02, add the following::
#!/bin/sh
ip route del 10.0.0.0/24 dev $INTERFACE
ip addr del 10.0.0.3/32 dev $INTERFACE
ip link set $INTERFACE down
Save and close the files.
Make networking scripts executable by running the following command on each client machine:
- sudo chmod 755 /etc/tinc/netname/tinc-*
Lastly, open up port 655 on each client:
- sudo ufw allow 655
At this point, the client nodes are almost, although not quite, set up. They still need the public key that we created on server-01 in the previous step in order to authenticate the connection to the VPN.
Step 4 — Distributing the Keys
Each node that wants to communicate directly with another node must have exchanged public keys, which are inside of the host configuration files. In our case, server-01 needs to exchange public keys with the other nodes.
Exchange Keys Between server-01 and client-01
On client-01, copy its host configuration file to server-01. Because both client-01 and server-01 are in the same data center and both have private networking enabled, you can use server01’s private IP address here:
- scp /etc/tinc/netname/hosts/client_01 sammy@server-01_private_IP:/tmp
Then on server-01, copy the client-01 host configuration file into the /etc/tinc/netname/hosts/ directory:
- sudo cp /tmp/client_01 /etc/tinc/netname/hosts/
Then, while still on server-01, copy its host configuration file to client-01:
- scp /etc/tinc/netname/hosts/server_01 user@client-01_private_IP:/tmp
On client-01, copy server-01’s file to the appropriate location:
- sudo cp /tmp/server_01 /etc/tinc/netname/hosts/
On client-01, edit server-01’s host configuration file so the Address field is set to server-01’s private IP address. This way, client-01 will connect to the VPN via the private network:
- sudo nano /etc/tinc/netname/hosts/server_01
Change the Address directive to point to server-01’s private IP address:
Address = server-01_private_IP
Subnet = 10.0.0.1/32
Save and quit. Now let’s move on to our remaining node, client-02.
Exchange Keys Between server-01 and client-02
On client-02, copy its host configuration file to server-01:
- scp /etc/tinc/netname/hosts/client_02 sammy@server-01_public_IP:/tmp
Then on server-01, copy the client_02 host configuration file into the appropriate location:
- sudo cp /tmp/client_02 /etc/tinc/netname/hosts/
Then copy server-01’s host configuration file to client-02:
- scp /etc/tinc/netname/hosts/server_01 user@client-02_public_IP:/tmp
On client-02, copy server-01’s file to the appropriate location:
- sudo cp /tmp/server_01 /etc/tinc/netname/hosts/
Assuming you’re only setting up two client nodes, you’re finished distributing public keys. If, however, you’re creating a larger VPN, now is a good time to exchange the keys between those other nodes. Remember that if you want two nodes to directly communicate with each other (without a forwarding server between), they need to have exchanged their keys/hosts configuration files, and they need to be able to access each other’s real network interfaces. Also, it is fine to just copy each host’s configuration file to every node in the VPN.
Step 5 — Testing the Configuration
On each node, starting with server-01, start tinc with the following command:
- sudo tincd -n netname -D -d3
This command includes the -n flag, which points to the netname for our VPN, netname. This is useful if you have more than one VPN set up and you need to specify which one you want to start. It also includes the -D flag, which prevents tinc from forking and detaching, as well as disables tinc’s automatic restart mechanism. Lastly, it includes the -d flag, which tells tinc to run in debug mode, with a debug level of 3.
Note: When it comes to the tinc daemon, a debug level of 3 will show every request exchanged between any two of the servers, including authentication requests, key exchanges, and connection list updates. Higher debug levels show more information regarding network traffic, but for now we’re only concerned with whether the nodes can communicate with one another, so a level of 3 will suffice. In a production scenario, though, you would want to change to a lower debug level so as not to fill disks with log files.
You can learn more about tinc’s debug levels by reviewing the official documentation.
After starting the daemon on each node, you should see output with the names of each node as they connect to server-01. Now let’s test the connection over the VPN.
In a separate window, on client-02, ping client-01’s VPN IP address. We assigned this to be 10.0.0.2, earlier:
- ping 10.0.0.2
The ping should work correctly, and you should see some debug output in the other windows about the connection on the VPN. This indicates that client-02 is able to communicate over the VPN through server-01 to client-01. Press CTRL+C to quit pinging.
You may also use the VPN interfaces to do any other network communication, like application connections, copying files, and SSH.
On each tinc daemon debug window, quit the daemon by pressing CTRL+\.
Step 6 — Configuring Tinc To Start Up on Boot
Ubuntu servers use systemd as the default system manager to control starting and running processes. Because of this, we can enable the netname VPN to start up automatically at boot with a single systemctl command.
Run the following command on each node to set the tinc VPN to start up whenever the machines boot:
- sudo systemctl enable tinc@netname
Tinc is configured to start at boot on each of your machines and you can control it with the systemctl command. If you would like to start it now, run the following command on each of your nodes:
- sudo systemctl start tinc@netname
Note: If you have multiple VPNs you enable or start each of them at once, like this:
- sudo systemctl start tinc@natename_01 tinc@netname_02 … tinc@netname_n
With that, your tinc VPN fully configured and running on each of your nodes.
Conclusion
Now that you have gone through this tutorial, you should have a good foundation to build out your VPN to meet your needs. Tinc is very flexible, and any node can be configured to connect to any other node (that it can access over the network) so it can act as a mesh VPN without relying on one individual node.
Thanks for learning with the DigitalOcean Community. Check out our offerings for compute, storage, networking, and managed databases.
About the author(s)
Former Technical Writer at DigitalOcean. Focused on SysAdmin topics including Debian 11, Ubuntu 22.04, Ubuntu 20.04, Databases, SQL and PostgreSQL.
Software Engineer @ DigitalOcean. Former Señor Technical Writer (I no longer update articles or respond to comments). Expertise in areas including Ubuntu, PostgreSQL, MySQL, and more.
Still looking for an answer?
This textbox defaults to using Markdown to format your answer.
You can type !ref in this text area to quickly search our full set of tutorials, documentation & marketplace offerings and insert the link!
Why are your subnets in the hosts/client-01,client-02,server-01 having this?
Subnet = 10.0.0.1/32 Subnet = 10.0.0.2/32 Subnet = 10.0.0.3/32
TINC has advised not to use this.
Subnets can either be single MAC, IPv4 or IPv6 addresses, in which case a subnet consisting of only that single address is assumed, or they can be a IPv4 or IPv6 network address with a prefixlength. For example, IPv4 subnets must be in a form like 192.168.1.0/24, where 192.168.1.0 is the network address and 24 is the number of bits set in the netmask. Note that subnets like 192.168.1.1/24 are invalid! Read a networking HOWTO/FAQ/guide if you don’t understand this. IPv6 subnets are notated like fec0:0:0:1::/64. MAC addresses are notated like 0:1a:2b:3c:4d:5e.
https://www.tinc-vpn.org/documentation/Host-configuration-variables.html
 This work is licensed under a Creative Commons Attribution-NonCommercial- ShareAlike 4.0 International License.
Become a contributor for community
Get paid to write technical tutorials and select a tech-focused charity to receive a matching donation.

DigitalOcean Documentation
Full documentation for every DigitalOcean product.

Resources for startups and AI-native businesses
The Wave has everything you need to know about building a business, from raising funding to marketing your product.
The developer cloud
Scale up as you grow — whether you're running one virtual machine or ten thousand.

Start building today
From GPU-powered inference and Kubernetes to managed databases and storage, get everything you need to build, scale, and deploy intelligent applications.
