By Theo B and Brian Hogan
Not using Ubuntu 18.04?
Choose a different version or distribution.
The author selected the Tech Education Fund to receive a donation as part of the Write for DOnations program.
###Introduction
Webmin is a web-based control panel for any Linux machine which lets you manage your server through a modern web-based interface. With Webmin, you can change settings for common packages on the fly, including web servers and databases, as well as manage users, groups, and software packages.
In this tutorial, you’ll install and configure Webmin on your server and secure access to the interface with a valid certificate using Let’s Encrypt and Apache. You’ll then use Webmin to add new user accounts, and update all packages on your server from the dashboard.
Prerequisites
To complete this tutorial, you will need:
- One Ubuntu 18.04 server set up by following the Ubuntu 18.04 initial server setup guide, including a sudo non-root user and a firewall.
- Apache installed by following How To Install Linux, Apache, MySQL, PHP (LAMP) stack on Ubuntu 18.04. We’ll use Apache to perform Let’s Encrypt’s domain verification and act as a proxy for Webmin. Ensure you configure access to Apache through your firewall when following this tutorial.
- A Fully-Qualified Domain Name (FQDN), with a DNS A record pointing to the IP address of your server. To configure this, follow the tutorial How To Set Up a Host Name with DigitalOcean.
- Certbot installed by following Step 1 of How To Secure Apache with Let’s Encrypt on Ubuntu 18.04. You’ll use Certbot to generate the TLS/SSL certificate for Webmin.
Step 1 — Installing Webmin
First, we need to add the Webmin repository so that we can easily install and update Webmin using our package manager. We do this by adding the repository to the /etc/apt/sources.list file.
Open the file in your editor:
- sudo nano /etc/apt/sources.list
Then add this line to the bottom of the file to add the new repository:
. . .
deb http://download.webmin.com/download/repository sarge contrib
Save the file and exit the editor.
Next, add the Webmin PGP key so that your system will trust the new repository:
wget http://www.webmin.com/jcameron-key.asc
sudo apt-key add jcameron-key.asc
Next, update the list of packages to include the Webmin repository:
- sudo apt update
Then install Webmin:
- sudo apt install webmin
Once the installation finishes, you’ll be presented with the following output:
OutputWebmin install complete. You can now login to
https://your_server_ip:10000 as root with your
root password, or as any user who can use `sudo`.
Now, let’s secure access to Webmin by putting it behind the Apache web server and adding a valid TLS/SSL certificate.
Step 2 — Securing Webmin with Apache and Let’s Encrypt
To access Webmin, you have to specify port 10000 and ensure the port is open on your firewall. This is inconvenient, especially if you’re accessing Webmin using an FQDN like webmin.your_domain We are going to use an Apache virtual host to proxy requests to Webmin’s server running on port 10000. We’ll then secure the virtual host using a TLS/SSL certificate from Let’s Encrypt.
First, create a new Apache virtual host file in Apache’s configuration directory:
- sudo nano /etc/apache2/sites-available/your_domain.conf
Add the following to the file, replacing the email address and domain with your own:
<VirtualHost *:80>
        ServerAdmin your_email
        ServerName your_domain
        ProxyPass / http://localhost:10000/
        ProxyPassReverse / http://localhost:10000/
</VirtualHost>
This configuration tells Apache to pass requests to http://localhost:10000, the Webmin server. It also ensures that internal links generated from Webmin will also pass through Apache.
Save the file and exit the editor.
Next, we need to tell Webmin to stop using TLS/SSL, as Apache will provide that for us going forward.
Open the file /etc/webmin/miniserv.conf in your editor:
- sudo nano /etc/webmin/miniserv.conf
Find the following line:
...
ssl=1
...
Change the 1 to a 0 This will tell Webmin to stop using SSL.
Next we’ll add our domain to the list of allowed domains, so that Webmin understands that when we access the panel from our domain, it’s not something malicious, like a Cross-Site Scripting (XSS) attack.
Open the file /etc/webmin/config in your editor:
- sudo nano /etc/webmin/config
Add the following line to the bottom of the file, replacing your_domain with your fully-qualified domain name.
 . . .
referers=your_domain
Save the file and exit the editor.
Next, restart Webmin to apply the configuration changes:
- sudo systemctl restart webmin
Then enable Apache’s proxy_http module:
- sudo a2enmod proxy_http
You’ll see the following output:
OutputConsidering dependency proxy for proxy_http:
Enabling module proxy.
Enabling module proxy_http.
To activate the new configuration, you need to run:
  systemctl restart apache2
The output suggests you restart Apache, but first, activate the new Apache virtual host you created:
- sudo a2ensite your_domain
You’ll see the following output indicating your site is enabled:
OutputEnabling site your_domain.
To activate the new configuration, you need to run:
  systemctl reload apache2
Now restart Apache completely to activate the proxy_http module and the new virtual host:
- sudo systemctl restart apache2
Note: Ensure that you allow incoming traffic to your web server on port 80 and port 443 as shown in the prerequisite tutorial How To Install Linux, Apache, MySQL, PHP (LAMP) stack on Ubuntu 18.04. You can do this with the command sudo ufw allow in "Apache Full".
Navigate to http://your_domain in your browser, and you will see the Webmin login page appear.
Warning: Do NOT log in to Webmin yet, as we haven’t enabled SSL. If you log in now, your credentials will be sent to the server in clear text.
Now let’s configure a certificate so that your connection is encrypted while using Webmin. In order to do this, we’re going to use Let’s Encrypt.
Tell Certbot to generate a TLS/SSL certificate for your domain and configure Apache to redirect traffic to the secure site:
- sudo certbot --apache --email your_email -d your_domain --agree-tos --redirect --noninteractive
You’ll see the following output:
OutputSaving debug log to /var/log/letsencrypt/letsencrypt.log
Plugins selected: Authenticator apache, Installer apache
Obtaining a new certificate
Performing the following challenges:
http-01 challenge for your_domain
Enabled Apache rewrite module
Waiting for verification...
Cleaning up challenges
Created an SSL vhost at /etc/apache2/sites-available/your_domain-le-ssl.conf
Enabled Apache socache_shmcb module
Enabled Apache ssl module
Deploying Certificate to VirtualHost /etc/apache2/sites-available/your_domain-le-ssl.conf
Enabling available site: /etc/apache2/sites-available/your_domain-le-ssl.conf
Enabled Apache rewrite module
Redirecting vhost in /etc/apache2/sites-enabled/your_domain.conf to ssl vhost in /etc/apache2/sites-available/your_domain-le-ssl.conf

-------------------------------------------------------------------------------
Congratulations! You have successfully enabled https://your_domain

You should test your configuration at:
https://www.ssllabs.com/ssltest/analyze.html?d=your_domain
-------------------------------------------------------------------------------
The output indicates that the certificate was installed and Apache is configured to redirect requests from http://your_domain to https://your_domain.
You’ve now set up a secured, working instance of Webmin. Let’s look at how to use it.
Step 3 – Using Webmin
Webmin has modules that can control everything from the BIND DNS Server to something as simple as adding users to the system. Let’s look at how to create a new user, and then explore how to update software packages using Webmin.
In order to log in to Webmin, navigate to http://your_domain and sign in with either the root user or a user with sudo privileges.
Managing Users and Groups
Let’s manage the users and groups on the server.
First, click the System tab, and then click the Users and Groups button. From here you can either add a user, manage a user, or add or manage a group.
Let’s create a new user called deploy which could be used for hosting web applications. To add a user, click Create a new user, which is located at the top of the users table. This displays the Create User screen, where you can supply the username, password, groups and other options. Follow these instructions to create the user:
- Fill in Username with
deploy. - Select Automatic for User ID.
- Fill in Real Name with a descriptive name like
Deployment user. - For Home Directory, select Automatic.
- For Shell, select /bin/bash from the dropdown list.
- For Password, select Normal Password and type in a password of your choice.
- For Primary Group, select New group with same name as user.
- For Secondary Group, select sudo from the All groups list, and press the -> button to add the group to the in groups list.
- Press Create to create this new user.
When creating a user, you can set options for password expiry, the user’s shell, or whether they are allowed a home directory.
Next, let’s look at how to install updates to our system.
Updating Packages
Webmin lets you update all of your packages through its user interface. To update all of your packages, click the Dashboard link, and then locate the Package updates field. If there are updates available, you’ll see a link that states the number of available updates, as shown in the following figure:
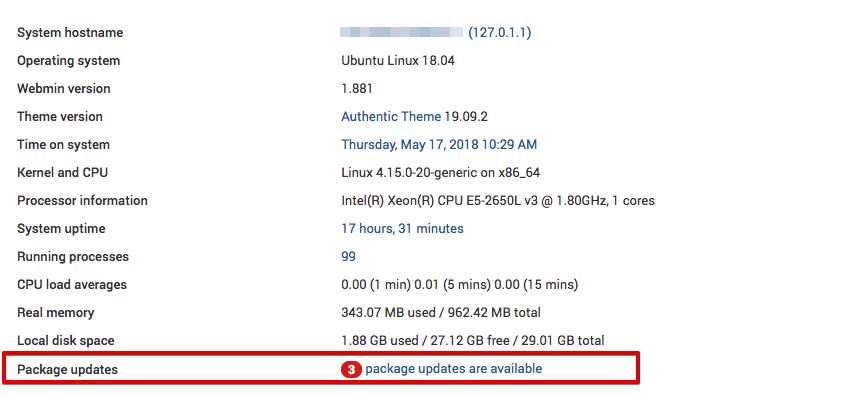
Click this link, and then press Update selected packages to start the update. You may be asked to reboot the server, which you can also do through the Webmin interface.
Conclusion
You now have a secured, working instance of Webmin and you’ve used the interface to create a user and update packages. Webmin gives you access to many things you’d normally need to access through the console, and it organizes them in an intuitive way. For example, if you have Apache installed, you would find the configuration tab for it under Servers, and then Apache.
Explore the interface further, or check out the Official Webmin wiki to learn more about managing your system with Webmin.
Thanks for learning with the DigitalOcean Community. Check out our offerings for compute, storage, networking, and managed databases.
About the author(s)
I like tech.
Managed the Write for DOnations program, wrote and edited community articles, and makes things on the Internet. Expertise in DevOps areas including Linux, Ubuntu, Debian, and more.
Still looking for an answer?
This textbox defaults to using Markdown to format your answer.
You can type !ref in this text area to quickly search our full set of tutorials, documentation & marketplace offerings and insert the link!
After adding the webmin repository and running update, all packages are up to date, then on sudo apt install webmin, I get unmet dependencies, libauthen-pam-perl, but it is not installable, and apt-show-versions, but it is not installable, unable to correct, you have held broken packages.
This comment has been deleted
Hi, you can try:
# sudo nano /etc/apt/sources.list

# Add links:
# See http://help.ubuntu.com/community/UpgradeNotes for how to upgrade to
# newer versions of the distribution.
deb http://us.archive.ubuntu.com/ubuntu/ bionic main restricted
# deb-src http://us.archive.ubuntu.com/ubuntu/ bionic main restricted

## Major bug fix updates produced after the final release of the
## distribution.
deb http://us.archive.ubuntu.com/ubuntu/ bionic-updates main restricted
# deb-src http://us.archive.ubuntu.com/ubuntu/ bionic-updates main restricted

## N.B. software from this repository is ENTIRELY UNSUPPORTED by the Ubuntu
## team. Also, please note that software in universe WILL NOT receive any
## review or updates from the Ubuntu security team.
deb http://us.archive.ubuntu.com/ubuntu/ bionic universe
# deb-src http://us.archive.ubuntu.com/ubuntu/ bionic universe
deb http://us.archive.ubuntu.com/ubuntu/ bionic-updates universe
# deb-src http://us.archive.ubuntu.com/ubuntu/ bionic-updates universe

## N.B. software from this repository is ENTIRELY UNSUPPORTED by the Ubuntu
## team, and may not be under a free licence. Please satisfy yourself as to
## your rights to use the software. Also, please note that software in
## multiverse WILL NOT receive any review or updates from the Ubuntu
## security team.
deb http://us.archive.ubuntu.com/ubuntu/ bionic multiverse
# deb-src http://us.archive.ubuntu.com/ubuntu/ bionic multiverse
deb http://us.archive.ubuntu.com/ubuntu/ bionic-updates multiverse
# deb-src http://us.archive.ubuntu.com/ubuntu/ bionic-updates multiverse

## N.B. software from this repository may not have been tested as
## extensively as that contained in the main release, although it includes
## newer versions of some applications which may provide useful features.
## Also, please note that software in backports WILL NOT receive any review
## or updates from the Ubuntu security team.
deb http://us.archive.ubuntu.com/ubuntu/ bionic-backports main restricted universe multiverse
# deb-src http://us.archive.ubuntu.com/ubuntu/ bionic-backports main restricted universe multiverse

## Uncomment the following two lines to add software from Canonical's
## 'partner' repository.
## This software is not part of Ubuntu, but is offered by Canonical and the
## respective vendors as a service to Ubuntu users.
# deb http://archive.canonical.com/ubuntu bionic partner
# deb-src http://archive.canonical.com/ubuntu bionic partner

deb http://security.ubuntu.com/ubuntu bionic-security main restricted
# deb-src http://security.ubuntu.com/ubuntu bionic-security main restricted
deb http://security.ubuntu.com/ubuntu bionic-security universe
# deb-src http://security.ubuntu.com/ubuntu bionic-security universe
deb http://security.ubuntu.com/ubuntu bionic-security multiverse
# deb-src http://security.ubuntu.com/ubuntu bionic-security multiverse
hi i have gone through the entire tutorial to the end and i cannot access webmin. it just loads in the browser and times out after several seconds
image of the terminal after installations are done: https://ibb.co/gj3df9
Any help will be much appreciated Thank you
So if you get the error unmet dependencies, libauthen-pam-perl, but it is not installable, and apt-show-versions, but it is not installable, unable to correct, you have held broken packages , if you run sudo add-apt-repository universe then re-run the webmin installer it should work. (reference to issue 955 https://github.com/webmin/webmin/issues/955)
Follow The Below Steps To Install Latest Webmin Control Panel in Ubuntu 18.04: We will first install the dependency packages by running the following command.
sudo apt install python apt-show-versions libapt-pkg-perl libauthen-pam-perl libio-pty-perl libnet-ssleay-perl
Read More - https://www.itsmarttricks.com/how-to-install-latest-webmin-control-panel-in-ubuntu/
Solution for webmin installl error On ubuntu 18.04.1 the universe and multiverse repositories are disabled by default to enable do: sudo add-apt-repository universe sudo add-apt-repository multiverse
Now you can resolve the webmin dependencies and install it.
All credits to Ribalinux on this page: https://sourceforge.net/p/webadmin/discussion/600155/thread/7fdd077d/
“`Navigate to http://your_domain in your browser, and you will see the Webmin login page appear.”
I can’t get past this step. The browser just times out and I don’t see any errors in my apache log. Any ideas? I’ve been over the steps several times and I can’t see what I’m missing.
I’m using webmin with virtualmin and whenever I add a new domain with SSL, it messes up my webmin address and points it to the new domain directory I just created. Anyone know how to fix this?
 This work is licensed under a Creative Commons Attribution-NonCommercial- ShareAlike 4.0 International License.
Become a contributor for community
Get paid to write technical tutorials and select a tech-focused charity to receive a matching donation.

DigitalOcean Documentation
Full documentation for every DigitalOcean product.

Resources for startups and AI-native businesses
The Wave has everything you need to know about building a business, from raising funding to marketing your product.
The developer cloud
Scale up as you grow — whether you're running one virtual machine or ten thousand.

Start building today
From GPU-powered inference and Kubernetes to managed databases and storage, get everything you need to build, scale, and deploy intelligent applications.
