- Log in to:
- Community
- DigitalOcean
- Sign up for:
- Community
- DigitalOcean
Not using Debian 10?
Choose a different version or distribution.
Introduction
WordPress is the most popular CMS (content management system) on the internet. It allows you to easily set up flexible blogs and websites on top of a MySQL-based backend with PHP processing. WordPress has seen incredible adoption and is a great choice for getting a website up and running quickly. After setup, almost all administration can be done through the web frontend.
In this guide, we’ll focus on getting a WordPress instance set up on a LEMP stack (Linux, Nginx, MariaDB, and PHP) on a Debian 10 server.
Prerequisites
In order to complete this tutorial, you will need access to a Debian 10 server.
You will need to perform the following tasks before you can start this guide:
- Create a
sudouser on your server: We will be completing the steps in this guide using a non-root user withsudoprivileges. You can create a user withsudoprivileges by following our Debian 10 initial server setup guide. - Install a LEMP stack: WordPress will need a web server, a database, and PHP in order to correctly function. Setting up a LEMP stack (Linux, Nginx, MariaDB, and PHP) fulfills all of these requirements. Follow this guide to install and configure this software.
- Secure your site with SSL: WordPress serves dynamic content and handles user authentication and authorization. TLS/SSL is the technology that allows you to encrypt the traffic from your site so that your connection is secure. This tutorial will assume that you have a domain name for your blog. You can use Let’s Encrypt to get a free SSL certificate for your domain. Follow our Let’s Encrypt guide for Nginx to set this up.
When you are finished with the setup steps, log into your server as your sudo user and continue below.
Step 1 — Creating a Database and User for WordPress
WordPress needs a MySQL-based database to store and manage site and user information. Our setup uses MariaDB, a community fork of the original MySQL project by Oracle. MariaDB is currently the default MySQL-compatible database server available on debian-based package manager repossudo systemctl status php* | grep fpmitories.
To get started, log into the MariaDB root (administrative) account. If MariaDB is configured to use the auth_socket authentication plugin, which is the default, you can log into the MariaDB administrative account using sudo:
- sudo mariadb
If you changed the authentication method to use a password for the MariaDB root account, use the following format instead:
- mariadb -u root -p
You will be prompted for the password you set for the MariaDB root account.
First, we can create a separate database that WordPress can control. You can name this whatever you would like, but we will be using wordpress in this guide to keep it simple. You can create the database for WordPress by typing:
- CREATE DATABASE wordpress DEFAULT CHARACTER SET utf8 COLLATE utf8_unicode_ci;
Next, we are going to create a separate MariaDB user account that we will use exclusively to operate on our new database. Creating one-function databases and accounts is a good idea from a management and security standpoint. We will use the name wordpress_user in this guide. Feel free to change this if you’d like.
The following command will create this account, set a password, and grant access to the database we created. Remember to choose a strong password for your database user:
- GRANT ALL ON wordpress.* TO 'wordpress_user'@'localhost' IDENTIFIED BY 'password';
You now have a database and a user account, each made specifically for WordPress. We need to flush the privileges so that the current instance of the database server knows about the recent changes we’ve made:
- FLUSH PRIVILEGES;
Exit out of MariaDB by typing:
- EXIT;
The MariaDB session will exit, returning you to the regular Linux shell.
Step 2 — Installing Additional PHP Extensions
When setting up our LEMP stack, we only required a very minimal set of extensions in order to get PHP to communicate with MariaDB. WordPress and many of its plugins leverage additional PHP extensions.
We can download and install some of the most popular PHP extensions for use with WordPress by typing:
- sudo apt update
- sudo apt install php-curl php-gd php-intl php-mbstring php-soap php-xml php-xmlrpc php-zip
Note: Each WordPress plugin has its own set of requirements. Some may require additional PHP packages to be installed. Check your plugin documentation to discover its PHP requirements.
When you are finished installing the new extensions, you’ll need to restart the PHP-FPM process so that the running PHP processor can leverage the newly installed features:
- sudo systemctl restart php7.3-fpm.service
You may need to adjust the highlighted portion of the command with your specific version of PHP-FPM, since that can vary. To verify the exact service name you need to use within systemctl commands, you can use:
- sudo systemctl status php* | grep fpm.service
You’ll see output like this:
Output● php7.3-fpm.service - The PHP 7.3 FastCGI Process Manager
   Loaded: loaded (/lib/systemd/system/php7.3-fpm.service; enabled; vendor preset: enabled)
   CGroup: /system.slice/php7.3-fpm.service
The highlighted string is the name that you’ll need to use when managing the PHP-FPM service with systemctl commands.
Our PHP extensions are now installed. In the next section, we’ll configure Nginx to use PHP-FPM for handling PHP pages.
Step 3 — Configuring Nginx
We’ll now make a few minor adjustments to our Nginx server block files. Based on the prerequisite tutorials, you should have a configuration file for your site in the /etc/nginx/sites-available/ directory configured to respond to your server’s domain name and protected by a TLS/SSL certificate. We’ll use /etc/nginx/sites-available/your_domain as an example here, but you should substitute the path to your configuration file where appropriate.
Additionally, we will use /var/www/your_domain as the root directory of our WordPress install. You should use the web root specified in your own configuration.
Note: It’s possible you are using the /etc/nginx/sites-available/default default configuration (with /var/www/html as your web root). This is fine to use if you’re only going to host one website on this server. If not, it’s best to split the necessary configuration into logical chunks, one file per site.
Open your site’s Nginx configuration file with sudo privileges to begin:
- sudo nano /etc/nginx/sites-available/your_domain
We need to add a few location directives within our main server block. After adding SSL certificates your config may have two server blocks. If so, find the one that contains root /var/www/your_domain and your other location directives and implement your changes there.
Start by creating exact-matching location blocks for requests to /favicon.ico and /robots.txt, both of which we do not want to log requests for.
We will use a regular expression location to match any requests for static files. We will again turn off the logging for these requests and will mark them as highly cacheable since these are typically expensive resources to serve. You can adjust this static files list to contain any other file extensions your site may use:
server {
    . . .

    location = /favicon.ico { log_not_found off; access_log off; }
    location = /robots.txt { log_not_found off; access_log off; allow all; }
    location ~* \.(css|gif|ico|jpeg|jpg|js|png)$ {
        expires max;
        log_not_found off;
    }
    . . .
}
Inside of the existing location / block, we need to adjust the try_files list so that instead of returning a 404 error as the default option, control is passed to the index.php file with the request arguments.
This should look something like this:
server {
    . . .
    location / {
        #try_files $uri $uri/ =404;
        try_files $uri $uri/ /index.php$is_args$args;
    }
    . . .
}
When you are finished, save and close the file.
Now, we can check our configuration for syntax errors by typing:
- sudo nginx -t
If no errors were reported, reload Nginx by typing:
- sudo systemctl reload nginx
Next, we will download and set up WordPress itself.
Step 4 — Downloading WordPress
Now that our server software is configured, we can download and set up WordPress. For security reasons in particular, it is always recommended to get the latest version of WordPress from their site.
Change into a writable directory and then download the compressed release by typing:
- cd /tmp
- curl -LO https://wordpress.org/latest.tar.gz
Extract the compressed file to create the WordPress directory structure:
- tar xzvf latest.tar.gz
We will be moving these files into our document root momentarily. Before we do that, we can copy over the sample configuration file to the filename that WordPress actually reads:
- cp /tmp/wordpress/wp-config-sample.php /tmp/wordpress/wp-config.php
Now, we can copy the entire contents of the directory into our document root. We are using the -a flag to make sure our permissions are maintained. We are using a dot at the end of our source directory to indicate that everything within the directory should be copied, including any hidden files:
- sudo cp -a /tmp/wordpress/. /var/www/your_domain
Now that our files are in place, we’ll assign ownership them to the www-data user and group. This is the user and group that Nginx runs as, and Nginx will need to be able to read and write WordPress files in order to serve the website and perform automatic updates.
- sudo chown -R www-data:www-data /var/www/your_domain
Our files are now in our server’s document root and have the correct ownership, but we still need to complete some more configuration.
Step 5 — Setting up the WordPress Configuration File
Next, we need to make a few changes to the main WordPress configuration file.
When we open the file, our first order of business will be to adjust the secret keys to provide some security for our installation. WordPress provides a secure generator for these values so that you do not have to try to come up with good values on your own. These are only used internally, so it won’t hurt usability to have complex, secure values here.
To grab secure values from the WordPress secret key generator, type:
- curl -s https://api.wordpress.org/secret-key/1.1/salt/
You will get back unique values that look something like this:
Warning: It is important that you request unique values each time. Do NOT copy the values shown below!
Outputdefine('AUTH_KEY',         '1jl/vqfs<XhdXoAPz9 DO NOT COPY THESE VALUES c_j{iwqD^<+c9.k<J@4H');
define('SECURE_AUTH_KEY',  'E2N-h2]Dcvp+aS/p7X DO NOT COPY THESE VALUES {Ka(f;rv?Pxf})CgLi-3');
define('LOGGED_IN_KEY',    'W(50,{W^,OPB%PB<JF DO NOT COPY THESE VALUES 2;y&,2m%3]R6DUth[;88');
define('NONCE_KEY',        'll,4UC)7ua+8<!4VM+ DO NOT COPY THESE VALUES #`DXF+[$atzM7 o^-C7g');
define('AUTH_SALT',        'koMrurzOA+|L_lG}kf DO NOT COPY THESE VALUES  07VC*Lj*lD&?3w!BT#-');
define('SECURE_AUTH_SALT', 'p32*p,]z%LZ+pAu:VY DO NOT COPY THESE VALUES C-?y+K0DK_+F|0h{!_xY');
define('LOGGED_IN_SALT',   'i^/G2W7!-1H2OQ+t$3 DO NOT COPY THESE VALUES t6**bRVFSD[Hi])-qS`|');
define('NONCE_SALT',       'Q6]U:K?j4L%Z]}h^q7 DO NOT COPY THESE VALUES 1% ^qUswWgn+6&xqHN&%');
These are configuration lines that we can paste directly in our configuration file to set secure keys. Copy the output you received now.
Now, open the WordPress configuration file:
- nano /var/www/your_domain/wp-config.php
Find the section that contains the dummy values for those settings. It will look something like this:
. . .

define('AUTH_KEY',         'put your unique phrase here');
define('SECURE_AUTH_KEY',  'put your unique phrase here');
define('LOGGED_IN_KEY',    'put your unique phrase here');
define('NONCE_KEY',        'put your unique phrase here');
define('AUTH_SALT',        'put your unique phrase here');
define('SECURE_AUTH_SALT', 'put your unique phrase here');
define('LOGGED_IN_SALT',   'put your unique phrase here');
define('NONCE_SALT',       'put your unique phrase here');

. . .
Delete those lines and paste in the values you copied from the command line:
. . .

define('AUTH_KEY',         'VALUES COPIED FROM THE COMMAND LINE');
define('SECURE_AUTH_KEY',  'VALUES COPIED FROM THE COMMAND LINE');
define('LOGGED_IN_KEY',    'VALUES COPIED FROM THE COMMAND LINE');
define('NONCE_KEY',        'VALUES COPIED FROM THE COMMAND LINE');
define('AUTH_SALT',        'VALUES COPIED FROM THE COMMAND LINE');
define('SECURE_AUTH_SALT', 'VALUES COPIED FROM THE COMMAND LINE');
define('LOGGED_IN_SALT',   'VALUES COPIED FROM THE COMMAND LINE');
define('NONCE_SALT',       'VALUES COPIED FROM THE COMMAND LINE');

. . .
Next, we need to modify some of the database connection settings at the beginning of the file. You need to adjust the database name, the database user, and the associated password that we configured within MariaDB.
The other change we need to make is to set the method that WordPress should use to write to the filesystem. Since we’ve given the web server permission to write where it needs to, we can explicitly set the filesystem method to “direct”. Failure to set this with our current settings would result in WordPress prompting for FTP credentials when we perform some actions. This setting can be added below the database connection settings, or anywhere else in the file:
. . .

define('DB_NAME', 'wordpress');

/** MySQL database username */
define('DB_USER', 'wordpress_user');

/** MySQL database password */
define('DB_PASSWORD', 'password');

. . .

define('FS_METHOD', 'direct');
Save and close the file when you are finished.
Step 6 — Completing the Installation Through the Web Interface
Now that the server configuration is complete, we can finish up the installation through the web interface.
In your web browser, navigate to your server’s domain name or public IP address:
http://server_domain_or_IP
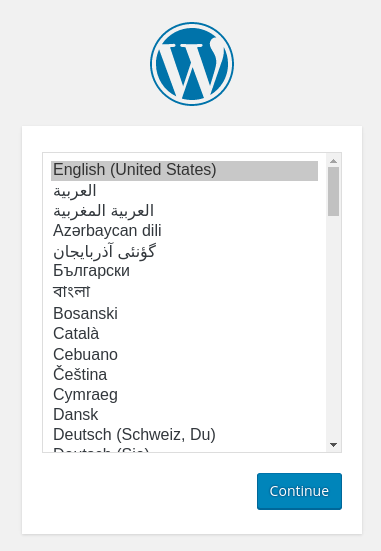
Select the language you would like to use:

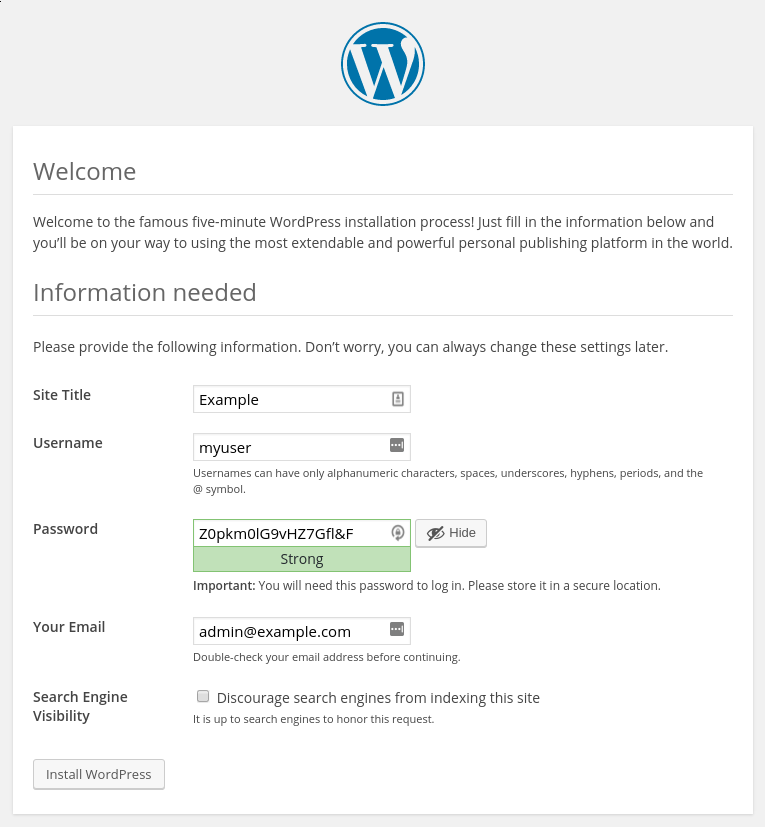
Next, you will come to the main setup page.
Select a name for your WordPress site and choose a username (it is recommended not to choose something like “admin” for security purposes). A strong password is generated automatically. Save this password or select an alternative strong password.
Enter your email address and select whether you want to discourage search engines from indexing your site:

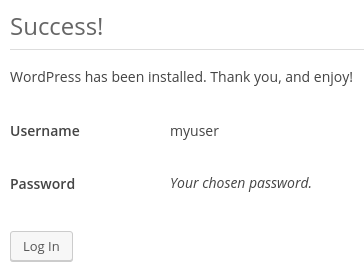
When you click ahead, you will be taken to a page that prompts you to log in:

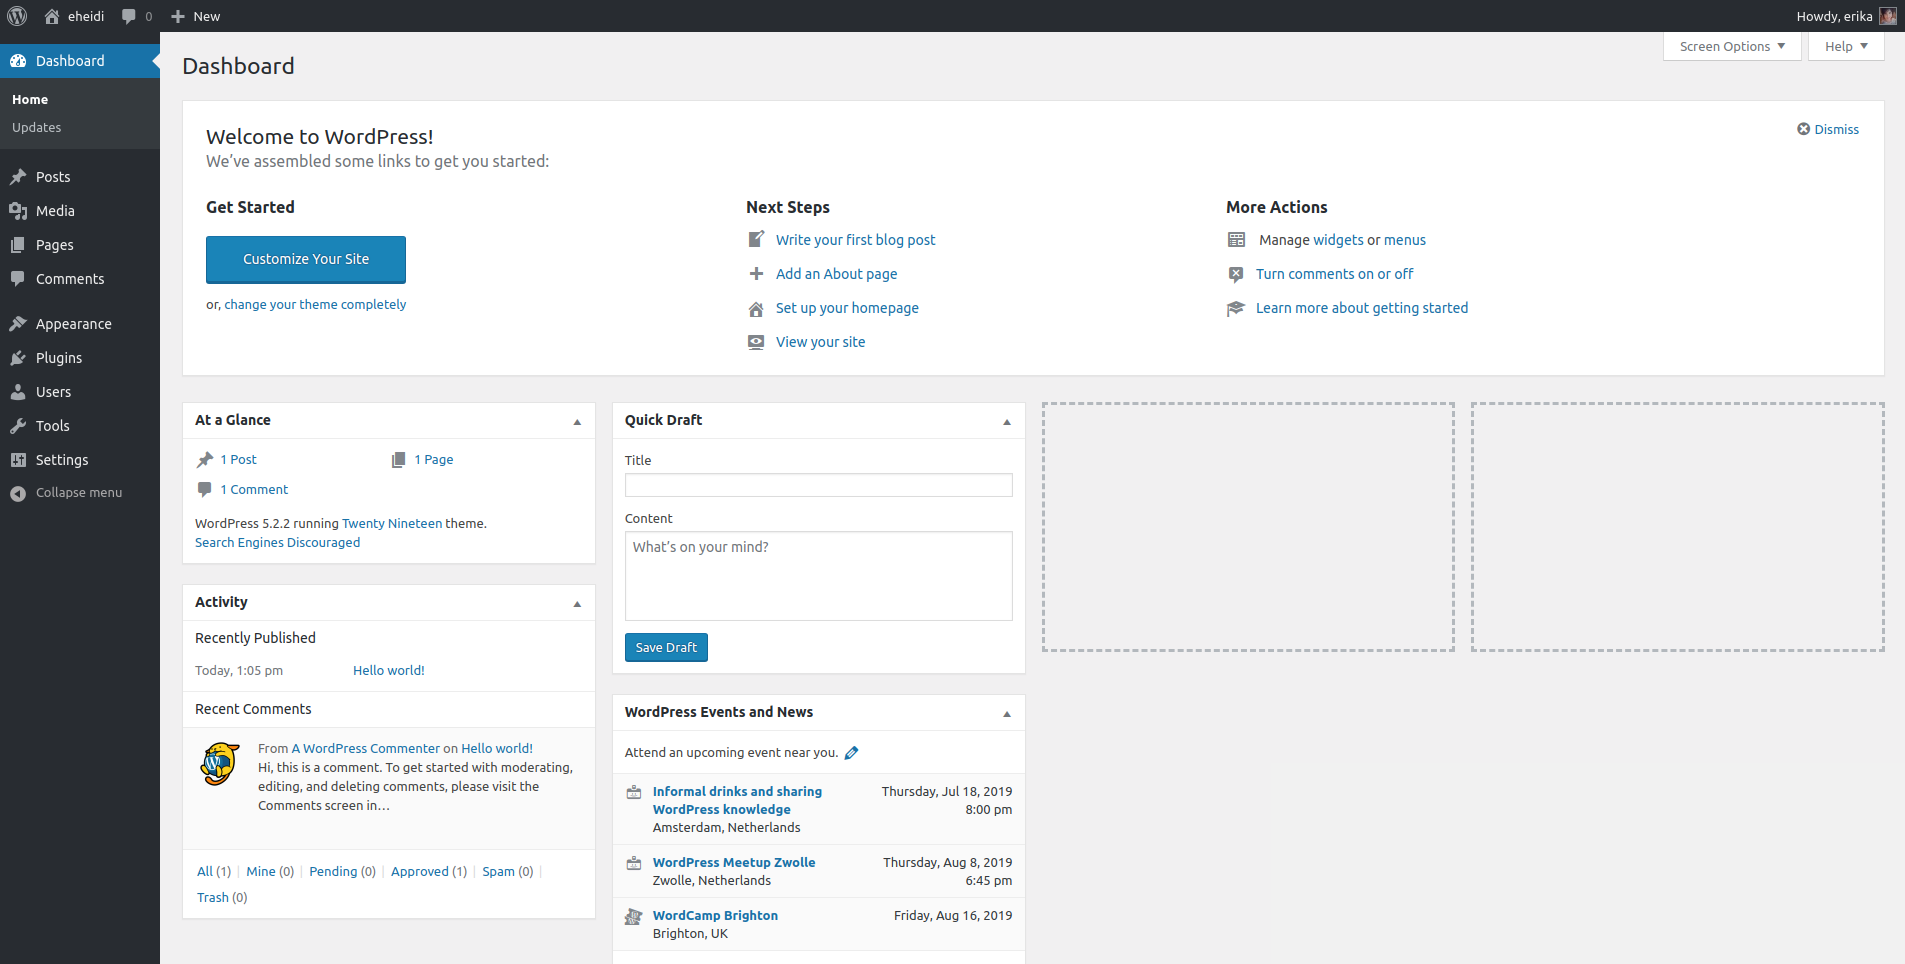
Once you log in, you will be taken to the WordPress administration dashboard:

From the dashboard, you can begin making changes to your site’s theme and publishing content.
Conclusion
WordPress should be installed and ready to use! Some common next steps are to choose the permalinks setting for your posts (can be found in Settings > Permalinks) or to select a new theme (in Appearance > Themes). If this is your first time using WordPress, explore the interface a bit to get acquainted with your new CMS, or check the First Steps with WordPress guide on their official documentation.
Thanks for learning with the DigitalOcean Community. Check out our offerings for compute, storage, networking, and managed databases.
About the author(s)
Dev/Ops passionate about open source, PHP, and Linux. Former Senior Technical Writer at DigitalOcean. Areas of expertise include LAMP Stack, Ubuntu, Debian 11, Linux, Ansible, and more.
Former Senior Technical Writer at DigitalOcean, specializing in DevOps topics across multiple Linux distributions, including Ubuntu 18.04, 20.04, 22.04, as well as Debian 10 and 11.
Senior Technical Writer at DigitalOcean
Still looking for an answer?
This textbox defaults to using Markdown to format your answer.
You can type !ref in this text area to quickly search our full set of tutorials, documentation & marketplace offerings and insert the link!
If we want to install another site with a different domain name on the same droplet, how do we go about it? We repeat the steps from top to bottom?
Hello, everywhere.
I do not know what I did wrong, but when in the step 6, I enter my_domain or server ip either. I don’t see WordPress, I see Nginx start page.
- Table of contents
- Prerequisites
- Step 1 — Creating a Database and User for WordPress
- Step 2 — Installing Additional PHP Extensions
- Step 3 — Configuring Nginx
- Step 4 — Downloading WordPress
- Step 5 — Setting up the WordPress Configuration File
- Step 6 — Completing the Installation Through the Web Interface
- Conclusion
Deploy on DigitalOcean
Click below to sign up for DigitalOcean's virtual machines, Databases, and AIML products.
Become a contributor for community
Get paid to write technical tutorials and select a tech-focused charity to receive a matching donation.
DigitalOcean Documentation
Full documentation for every DigitalOcean product.
Resources for startups and SMBs
The Wave has everything you need to know about building a business, from raising funding to marketing your product.
Get our newsletter
Stay up to date by signing up for DigitalOcean’s Infrastructure as a Newsletter.
New accounts only. By submitting your email you agree to our Privacy Policy
The developer cloud
Scale up as you grow — whether you're running one virtual machine or ten thousand.
Get started for free
Sign up and get $200 in credit for your first 60 days with DigitalOcean.*
*This promotional offer applies to new accounts only.
