
Status: Deprecated
This article covers a version of Ubuntu that is no longer supported. If you are currently operate a server running Ubuntu 12.04, we highly recommend upgrading or migrating to a supported version of Ubuntu:
- Upgrade to Ubuntu 14.04.
- Upgrade from Ubuntu 14.04 to Ubuntu 16.04
- Migrate the server data to a supported version
Reason: Ubuntu 12.04 reached end of life (EOL) on April 28, 2017 and no longer receives security patches or updates. This guide is no longer maintained.
See Instead:
This guide might still be useful as a reference, but may not work on other Ubuntu releases. If available, we strongly recommend using a guide written for the version of Ubuntu you are using. You can use the search functionality at the top of the page to find a more recent version.
Introduction
Zabbix is a networked server and software monitor. It can be used to keep track of multiple physical or virtual private server instances.
The client-server model that Zabbix employs allows the cloud server to collect rich sets of data that be used to graph historical trends. This can be very useful for monitoring the performance of the websites and applications hosted on your VPS.
For this guide, we will configure two machines. One will be configured as the server, and the other as a client. They both will run Ubuntu 12.04 LTS on 20GB Droplets.
Installing the Zabbix Server
We will begin by installing the Zabbix server on the VPS that we will use as the monitoring station.
Ubuntu has Zabbix in its repositories, but it is outdated. We will use a PPA with more up-to-date packages instead.
Edit apt source list to add the PPA:
sudo nano /etc/apt/sources.list
Add the following items at the end of the file:
# Zabbix Application PPA
deb http://ppa.launchpad.net/tbfr/zabbix/ubuntu precise main
deb-src http://ppa.launchpad.net/tbfr/zabbix/ubuntu precise main
Save and close the file.
Next, we need to add the PPA's key so that apt-get trusts the source:
sudo apt-key adv --keyserver keyserver.ubuntu.com --recv-keys C407E17D5F76A32B
We can now install Zabbix. It will pull in the necessary LAMP dependencies as well:
sudo apt-get update
sudo apt-get install zabbix-server-mysql php5-mysql zabbix-frontend-php
During the installation, you will be asked to choose a password for the MySQL root account. Make a selection and confirm your choice.
Configuring the Zabbix Server
Next, we will need to configure the packages we just installed.
First, we will edit the main Zabbix server configuration file. Open the file with root privileges:
sudo nano /etc/zabbix/zabbix_server.conf
Search for the following properties and set them accordingly. Some may already be set correctly, and some you may have to add. Choose a password as well:
DBName=zabbix
DBUser=zabbix
DBPassword=Your.Password.Here
Save and close the file.
MySQL Configuration
Next, we will go into the package directory and unzip the SQL files that will define our database environment:
cd /usr/share/zabbix-server-mysql/
sudo gunzip *.gz
We will import the SQL files into our database. However, we first must create the database and do some initial configuration.
Log into MySQL as the root user using the password that you set up during installation:
mysql -u root -p
First, create a user for Zabbix that matches the information we entered in the "/etc/zabbix/zabbix_server.conf" file. Make sure to use the same information:
create user 'zabbix'@'localhost' identified by 'Your.Password.Here';
Next, we will create the Zabbix database:
create database zabbix;
Give control over the new database to the new user we created:
grant all privileges on zabbix.* to 'zabbix'@'localhost';
The following line will implement our new permissions:
flush privileges;
We are now done with the initial MySQL configuration. Exit back to the shell:
exit;
Now that we have our database set up, we can import the files that Zabbix needs to function. Enter the password for the user "zabbix" that you configured when prompted:
mysql -u zabbix -p zabbix < schema.sql
Do the same with the images file:
mysql -u zabbix -p zabbix < images.sql
And finally, import the data file:
mysql -u zabbix -p zabbix < data.sql
PHP Configuration
We need to adjust some values for the php processing of our monitoring data. Open the php configuration file:
sudo nano /etc/php5/apache2/php.ini
Search for and adjust the following entries. If they do not exist, add them:
post_max_size = 16M
max_execution_time = 300
max_input_time = 300
date.timezone = UTC
Save and close the file.
Next, we will copy the Zabbix-specific php file into the configuration directory:
sudo cp /usr/share/doc/zabbix-frontend-php/examples/zabbix.conf.php.example /etc/zabbix/zabbix.conf.php
Open the file:
sudo nano /etc/zabbix/zabbix.conf.php
Edit the following values. Use the same info as when you set up the database earlier:
$DB['DATABASE'] = 'zabbix';
$DB['USER'] = 'zabbix';
$DB['PASSWORD'] = 'Your.Password.Here'
Save and close the file.
Configuring Additional Files
There are a few more files that we need to configure.
First, we'll move the Zabbix apache file from the package directory:
sudo cp /usr/share/doc/zabbix-frontend-php/examples/apache.conf /etc/apache2/conf.d/zabbix.conf
Ensure that the "alias" mod is enabled within Apache:
sudo a2enmod alias
Restart Apache to use the copied configuration file:
sudo service apache2 restart
Edit the Zabbix init file to ensure that it performs the correct action:
sudo nano /etc/default/zabbix-server
Go to the bottom and adjust the "START" property to read "yes":
START=yes
Save and close the file. We can now start Zabbix:
sudo service zabbix-server start
Installing and Configuring Zabbix Agent
Next, we need to configure the agent software that reports to the Zabbix server. We will install the agent software on our server machine and an additional client machine.
Follow these steps on both machines. Adjust the commands to reflect the correct information.
First, install the agent software:
sudo apt-get update
sudo apt-get install zabbix-agent
Next, we need to update the configuration files:
sudo nano /etc/zabbix/zabbix_agentd.conf
Edit the "Server" property to reflect the IP Address of the Zabbix server. For the agent configuration on the Zabbix server, you can use "127.0.0.1":
Server=Zabbix.Server.IP.Address
Adjust the "Hostname" property to reflect the hostname of the machine being monitored.
Hostname=Hostname_Of_Current_Machine
<p>Save and close the file.</p>

<p>Restart the agent software:</p>
sudo service zabbix-agent restart
Logging In for the First Time
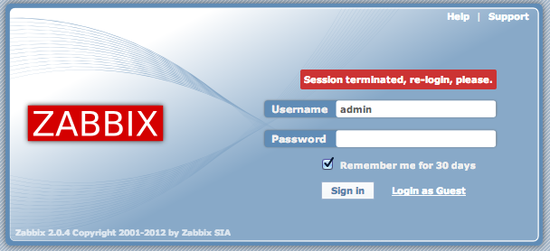
In your web browser, navigate to your Zabbix server's IP address followed by "/zabbix":
Your.Zabbix.IP.Address/zabbix
You will be presented with a login screen. The default credentials are as follows:
Username = admin
Password = zabbix
When you have logged in, click on the "Configuration" button, and then "Hosts" in the top navigation bar.
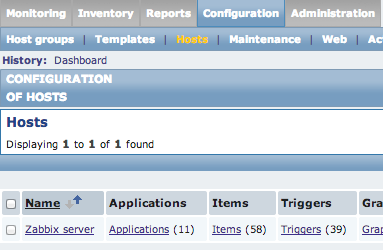
Click on the name of the server (by default, this should be "Zabbix server"). This will open the host configuration page.
Adjust the Hostname to reflect the hostname of your Zabbix server (this should be the same hostname you entered in the agent configuration for the server machine).
At the bottom, change the "Status" property to "Monitored". Click save.
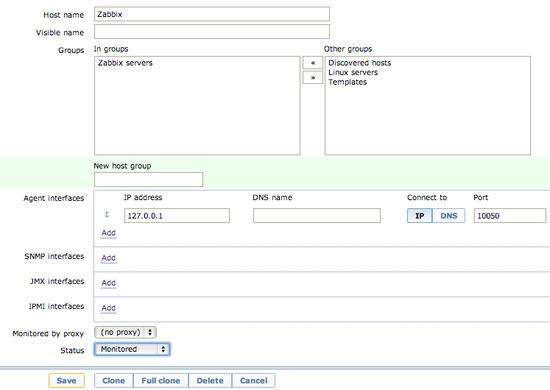
You will be dopped back to the Hosts configuration page. Re-click on the hostname again.
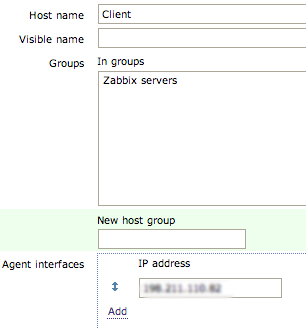
This time, click on the "Clone" button at the bottom of the page.
We will configure this to reflect the settings of the client machine. Change the hostname and the IP address to reflect the correct information from the client agent file.
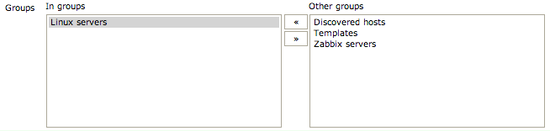
In the "groups" section, select "Zabbix servers" and click the right arrow icon to remove that group. Select the "Linux servers" and click the left arrow icon to add that group setting.
Click "Save" at the bottom.
After a few minutes, you should be able to see both computers by going to "Monitoring" and then clicking on "Latest data".
There should be information for both the server and client machines populating.
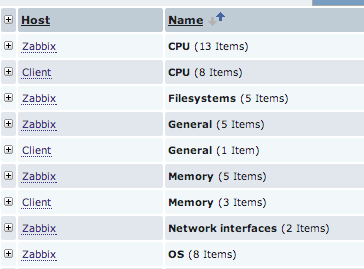
If you click on the arrows next to an item, you can see the collected information.

If you click "Graph" you will see a graphical representation of the data points that have been collected:
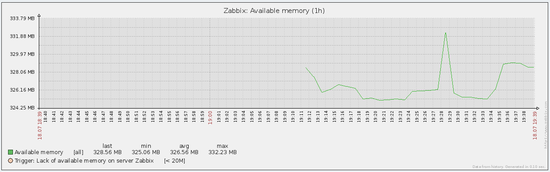
As with all monitoring software, these graphs will become more interesting the longer the server runs.
There are many other options that you can utilize to keep an eye on your VPS. Explore the interface to get comfortable with the powerful monitoring tools.
Thanks for learning with the DigitalOcean Community. Check out our offerings for compute, storage, networking, and managed databases.
About the author
Former Senior Technical Writer at DigitalOcean, specializing in DevOps topics across multiple Linux distributions, including Ubuntu 18.04, 20.04, 22.04, as well as Debian 10 and 11.
Still looking for an answer?
This textbox defaults to using Markdown to format your answer.
You can type !ref in this text area to quickly search our full set of tutorials, documentation & marketplace offerings and insert the link!
Best blog I always follow this blog and always I got good knowledge :)
Hi. I am getting a 404 Not Found on the sources added when I run sudo apt-get update. Has there been an update to the location of the sources?
Please ignore the previous question/comment. I did mis type. If all else fail read it out loud backwards!
If you ever Come to Dominican Rep. Dinner at Best Restaurant is on Me !! best tutorial Ever !
I keep getting this error “mysql_connect(): The mysql extension is deprecated and will be removed in the future: use mysqli or PDO instead [include/db.inc.php:77]” when I log in to the Zabbix Server. What is the solution for this?
on fresh installations, you might also need to run “apt-get install php5-mysql”
 This work is licensed under a Creative Commons Attribution-NonCommercial- ShareAlike 4.0 International License.
Become a contributor for community
Get paid to write technical tutorials and select a tech-focused charity to receive a matching donation.

DigitalOcean Documentation
Full documentation for every DigitalOcean product.

Resources for startups and AI-native businesses
The Wave has everything you need to know about building a business, from raising funding to marketing your product.
The developer cloud
Scale up as you grow — whether you're running one virtual machine or ten thousand.

Start building today
From GPU-powered inference and Kubernetes to managed databases and storage, get everything you need to build, scale, and deploy intelligent applications.
