
Introduction
DigitalOcean Spaces is an object storage service designed to make it easy and cost effective to store and serve large amounts of data. If you have previously relied on other object storage services, migrating data to Spaces may be one of your first tasks.
In this guide, we will cover how to migrate data to DigitalOcean Spaces from Amazon’s S3 block storage service using the rclone utility. We will demonstrate how to install rclone, the configuration settings to use to access both storage services, and the commands that you can use to synchronize your files and verify their integrity within Spaces.
Creating API Keys and Finding Bucket Properties
Before we begin installing and configuring rclone to copy our objects to Spaces, we will need some information about our Amazon S3 and DigitalOcean Spaces accounts. We will need a set of API keys for both services that the tool can use and we will need to know the region and location constraint values for our buckets.
Generating a DigitalOcean Spaces API Key and Finding the API Endpoint
To create a DigitalOcean Spaces API key, follow the “Creating an Access Key” section of our How To Create a DigitalOcean Space and API Key tutorial.
Save the access key ID and the secret key so that we can configure rclone to access our account.
Next, we need to find the appropriate API endpoint. If you’ve already created a DigitalOcean Space you wish to transfer your objects to, you can view the Space’s endpoint within the DigitalOcean Control Panel by selecting the Space and viewing the Settings tab:
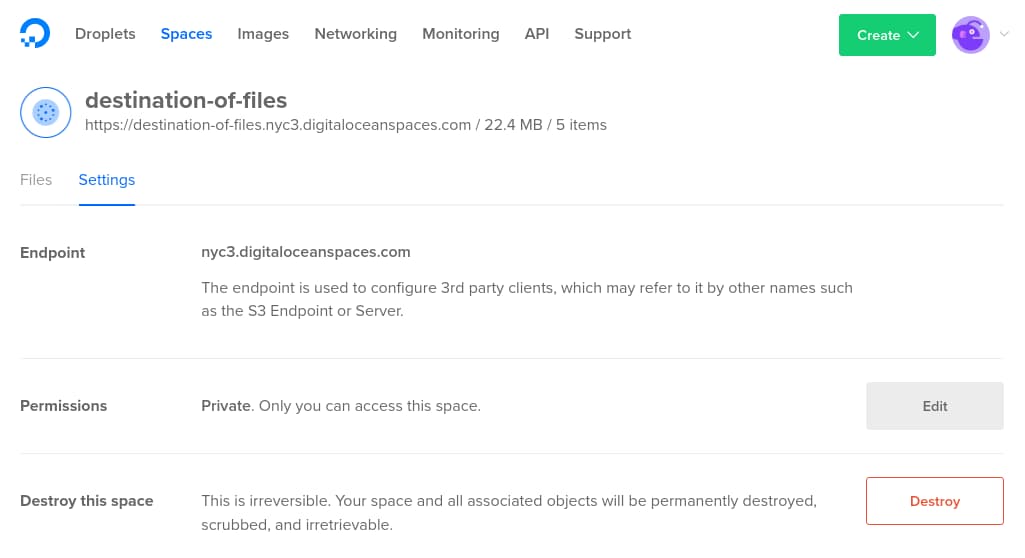
If you have not created a Space yet, rclone can automatically create the space you select as part of the copying process. The endpoint in that case would be the Spaces region you wish to use followed by .digitaloceanspaces.com. You can find the available regions for Spaces in the DigitalOcean Control Panel by viewing the selection options on the Spaces creation page. At the time of this writing only the “nyc3” region is available (with endpoint of nyc3.digitaloceanspaces.com).
Generating an Amazon S3 API Key
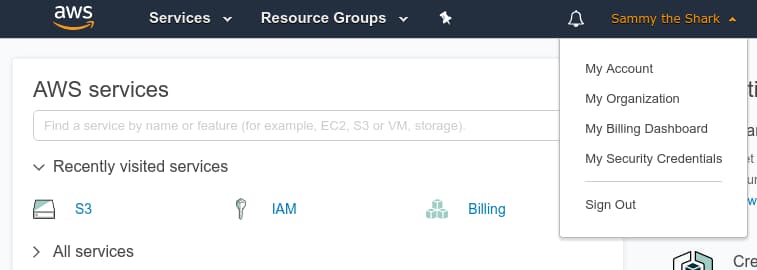
If you do not already have an Amazon API key with permission to manage S3 assets, you will need to generate those now. In your AWS Management Console, click on your account name and select My Security Credentials from the drop down menu:
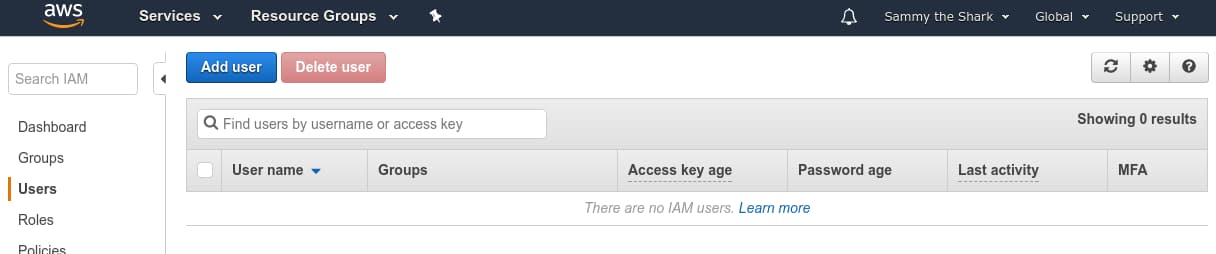
Next, select Users in the left-hand menu and then click the Add user button:
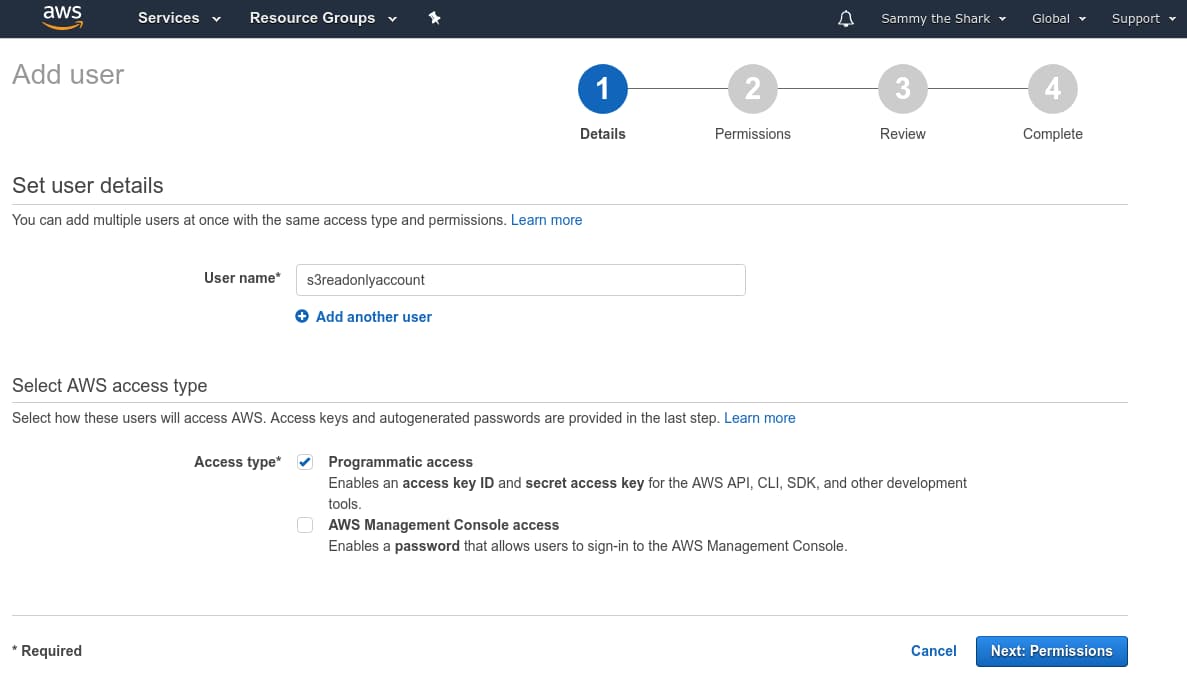
Type in a User name and select Programmatic access in the Access type section. Click the Next: Permissions button to continue:
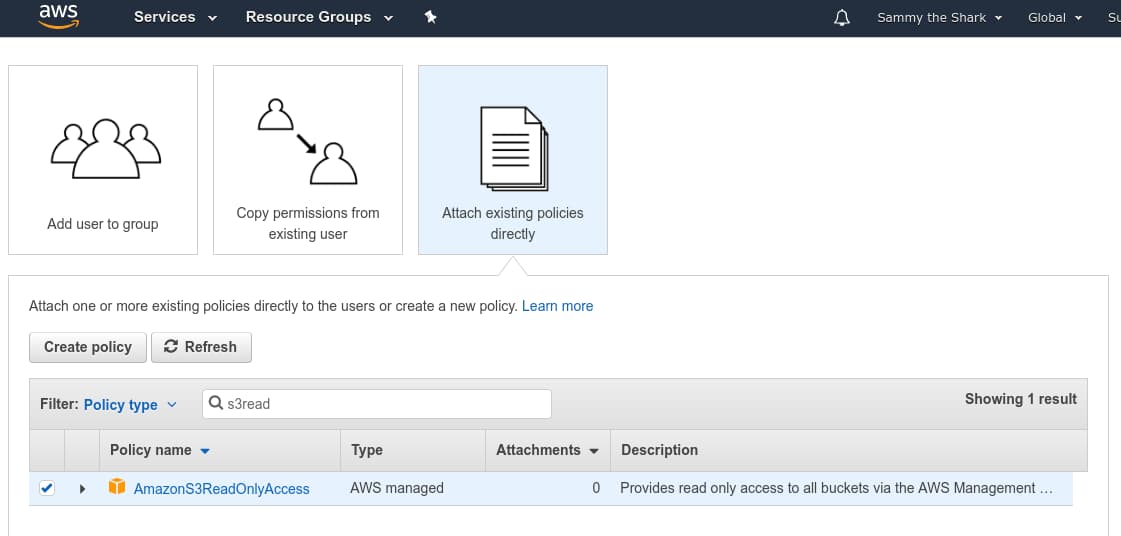
On the page that follows, select the Attach existing policies directly option at the top and then type s3read in the Policy type filter. Check the AmazonS3ReadOnlyAccess policy box and then click the Next: Review button to continue:
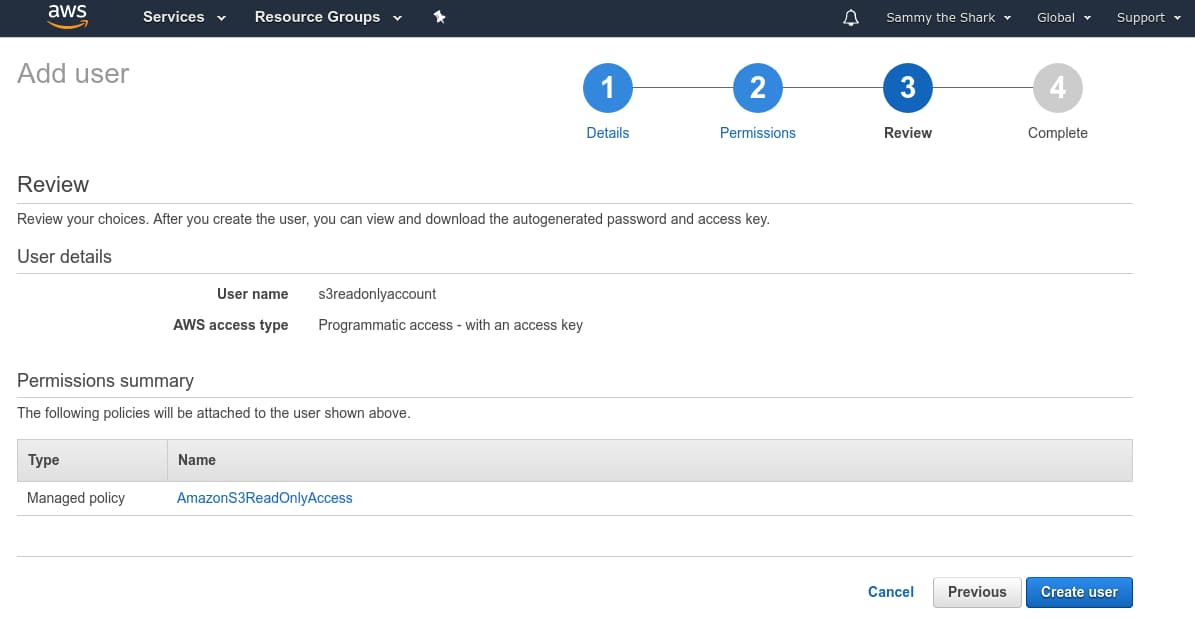
Review the user details on the next page and then click the Create user button when ready:
On the final page, you will see the credentials for your new user. Click the Show link under the Secret access key column to view the credentials:
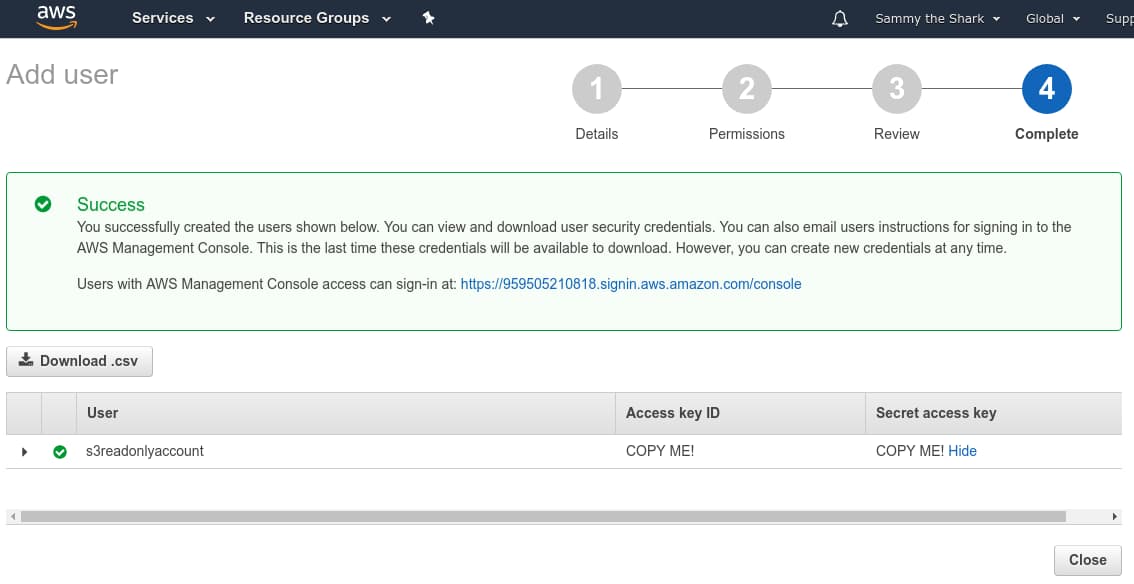
Copy the Access key ID and the Secret access key somewhere secure so that you can configure rclone to use those credentials. You can also click the Download .csv button to save the credentials to your computer.
Finding the Amazon S3 Bucket Region and Location Constraints
Now, we need to find the region and location constraint values for our S3 bucket.
Click Services in the top menu and type S3 in the search bar that appears. Select the S3 service to go to the S3 management console.
We need to look for the region name of the bucket we wish to transfer. The region will be displayed next to the bucket name:
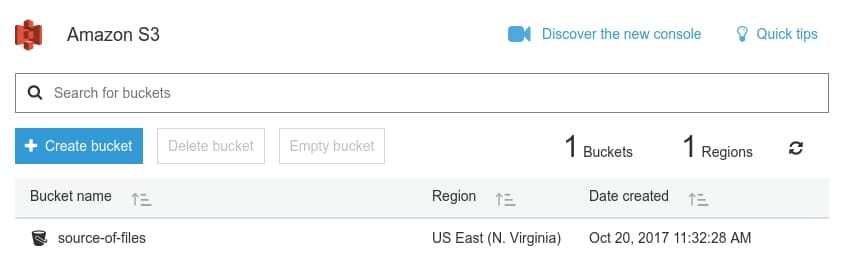
We need to find the region string and the matching location restraint associated with our bucket’s region. Look for your bucket’s region name in this S3 region chart from Amazon to find the appropriate region and location constraint strings. In our example, our region name is “US East (N. Virginia)”, so we would use us-east-1 as the region string and our location constraint would be blank.
Now that we have the appropriate information from our Amazon account, we can install and configure rclone using this information.
Install rclone on Your Local Computer
You’re now ready to install rclone on your local computer.
Visit the Downloads section of the project’s website to find binaries of the utility compiled for different platforms. Download the zipped binary that matches your computer’s operating system to your Downloads directory to get started.
Once you have the rclone zip file downloaded to your computer, follow the section below that matches your platform.
Linux
Before we can extract the archive, we will need to ensure that the unzip utility is available.
If you are running Ubuntu or Debian, you can update the local package index and install unzip by typing:
- sudo apt-get update
- sudo apt-get install unzip
If you are running CentOS or Fedora, you can install unzip by typing:
- sudo yum install unzip
With unzip installed, navigate to the directory where you downloaded the rclone zip file:
- cd ~/Downloads
Next, unzip the archive and move into the new directory:
- unzip rclone*
- cd rclone-v*
From here, we can copy the binary to the /usr/local/bin directory so that it is available system-wide:
- sudo cp rclone /usr/local/bin
Next, we can add the manual page to the system so that we can easily get help on the command syntax and available options. Make sure that the local manual directory we require is available and then copy the rclone.1 file:
- sudo mkdir -p /usr/local/share/man/man1
- sudo cp rclone.1 /usr/local/share/man/man1
Update the man database to add the new manual page to the system:
- sudo mandb
Finally, we can create the configuration directory and open up a configuration file to define our S3 and Spaces credentials:
- mkdir -p ~/.config/rclone
- nano ~/.config/rclone/rclone.conf
This will open up your text editor with a new blank file. Skip ahead to the section on defining your object storage accounts to continue.
macOS
If you are running macOS, begin by navigating in the terminal to the directory where you downloaded the rclone zip file:
- cd ~/Downloads
Next, unzip the file and move into the new directory level:
- unzip -a rclone*
- cd rclone-v*
Next, make sure the /usr/local/bin directory is available and then move the rclone binary inside:
- sudo mkdir -p /usr/local/bin
- sudo cp rclone /usr/local/bin
Finally, we can create the configuration directory and open up a configuration file to define our S3 and Spaces credentials:
- mkdir -p ~/.config/rclone
- nano ~/.config/rclone/rclone.conf
This will open up your text editor with a new blank file. Skip ahead to the section on defining your object storage accounts to continue.
Windows
If you are running Windows, begin by navigating to the Downloads directory in the Windows File Explorer. Select the rclone zip file and right-click. In the context menu that appears, click Extract All…:
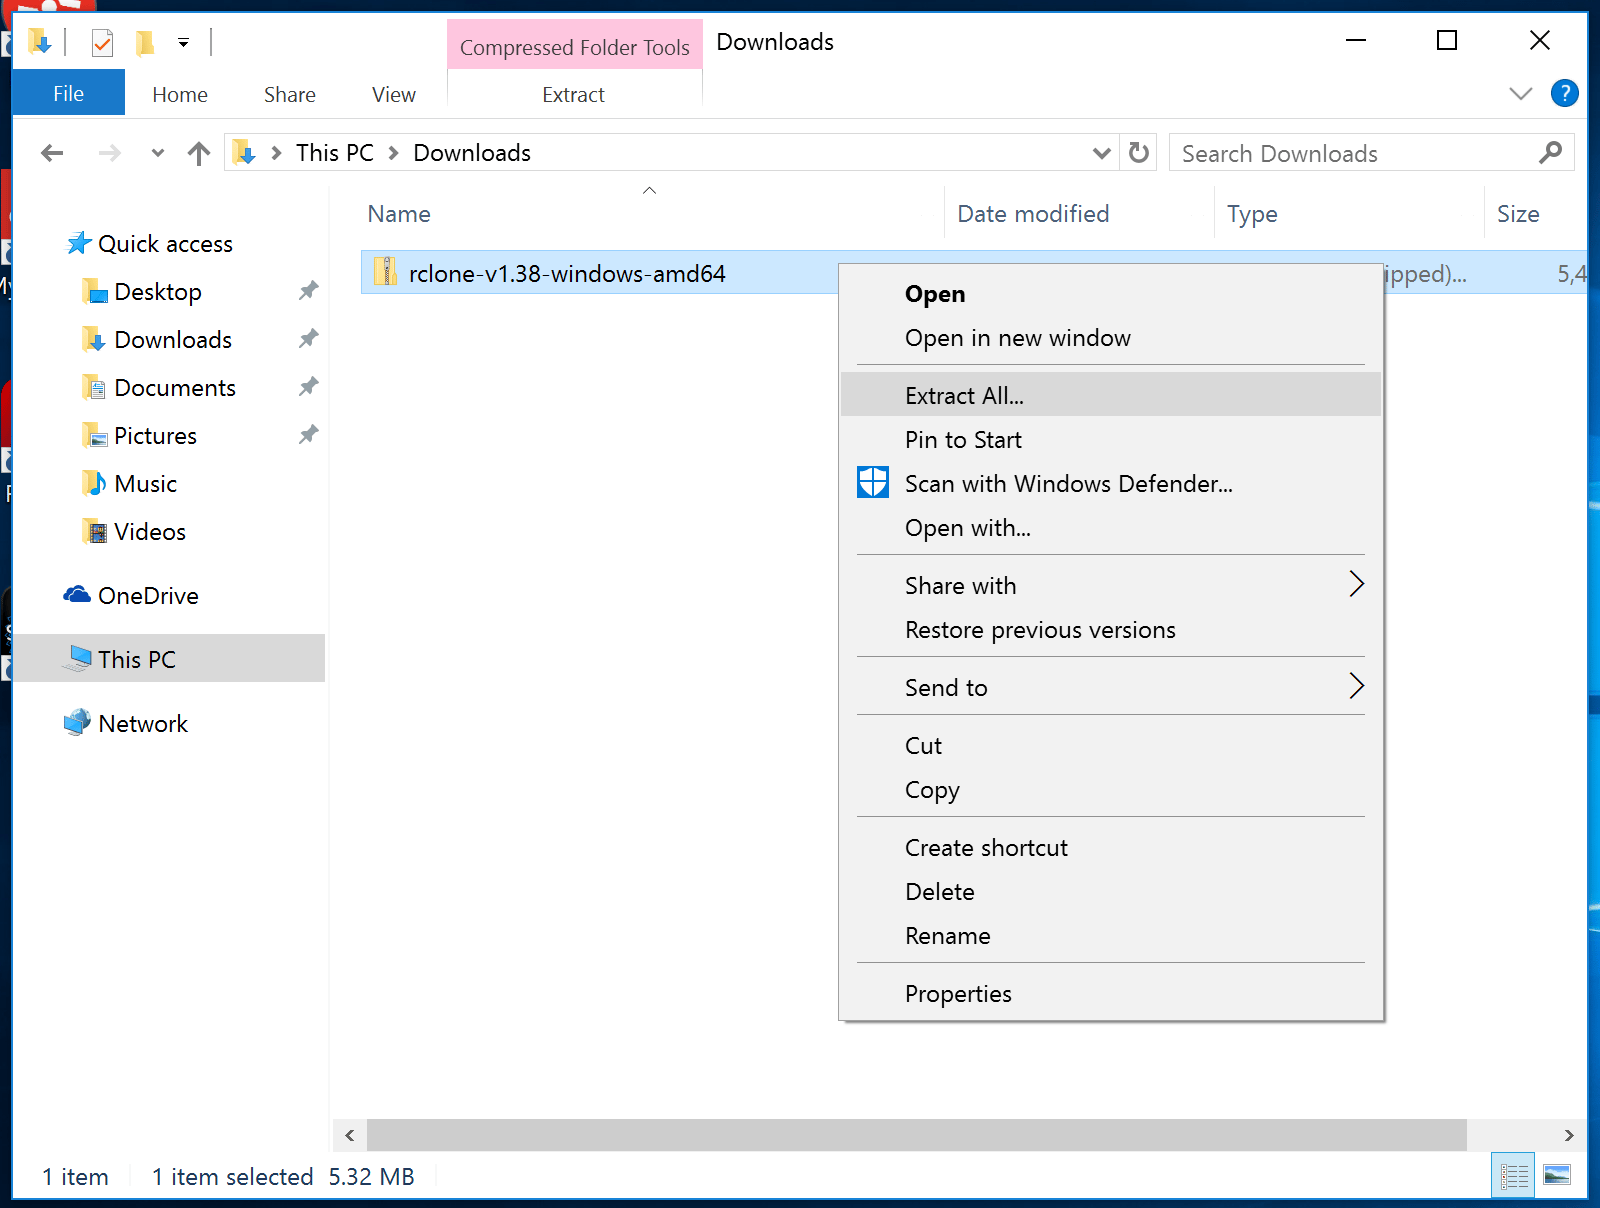
Follow the prompts to extract the files from the zip archive.
The rclone.exe utility must be run from the command line. Open a new Command Prompt (the cmd.exe program) window by clicking the Windows button in the lower-left corner, typing cmd, and selecting Command Prompt.
Inside, navigate to the rclone path you extracted by typing:
- cd "%HOMEPATH%\Downloads\rclone*\rclone*"
List the directory contents to verify that you are in the correct location:
- dir
Output10/23/2017  01:02 PM    <DIR>          .
10/23/2017  01:02 PM    <DIR>          ..
10/23/2017  01:02 PM                17 git-log.txt
10/23/2017  01:02 PM           296,086 rclone.1
10/23/2017  01:02 PM        16,840,192 rclone.exe
10/23/2017  01:02 PM           315,539 README.html
10/23/2017  01:02 PM           261,497 README.txt
               5 File(s)     17,713,331 bytes
               2 Dir(s)  183,296,266,240 bytes free
You will need to be in this directory whenever you want to use the rclone.exe command.
Note: On macOS and Linux, we run the tool by typing rclone, but on Windows, the command is called rclone.exe. Throughout the rest of this guide, we will be providing commands as rclone, so be sure to substitute rclone.exe each time when running on Windows.
Next, we can create the configuration directory and open up a configuration file to define our S3 and Spaces credentials:
- mkdir "%HOMEPATH%\.config\rclone"
- notepad "%HOMEPATH%\.config\rclone\rclone.conf"
This will open up your text editor with a new blank file. Continue ahead to learn how to define your object storage accounts in the configuration file.
Configure the S3 and Spaces Accounts
We can define our Amazon S3 and DigitalOcean Spaces configuration in the new file so that rclone can manage content between our two accounts.
Let’s start by defining our S3 account. Paste the following section in the configuration file:
[s3]
type = s3
env_auth = false
access_key_id = aws_access_key
secret_access_key = aws_secret_key
region = aws_region
location_constraint = aws_location_constraint
acl = private
Here, we define a new rclone “remote” called s3. We set the type to s3 so that rclone knows the appropriate way to interact with and manage the remote storage resource. We will define the S3 credentials in the configuration file itself, so we set env_auth to false.
Next, we set the access_key_id and secret_access_key variables to our S3 access key and secret key, respectively. Be sure to change the values to the S3 credentials associated with your account.
We set the region and location constraint according to the properties of our S3 bucket that we found in the Amazon region chart. Finally, we set the access control policy to “private” so that assets are not public by default.
Now, we can define a similar section for our DigitalOcean Spaces configuration. Paste the following section in the configuration file:
. . .

[spaces]
type = s3
env_auth = false
access_key_id = spaces_access_key
secret_access_key = spaces_secret_key
endpoint = nyc3.digitaloceanspaces.com
acl = private
In this section, we are defining a new remote called “spaces”. Again, we are setting type to s3 since Spaces offers an S3-compatible API. We turn off env_auth so that we can define the Spaces credentials within the configuration file.
Next, we set the access_key_id and secret_access_key variables to the values generated for our DigitalOcean account. We set the endpoint to the appropriate Spaces endpoint we determined earlier. Finally, we set the acl to private again to protect our assets until we want to share them.
Save and close the file when you are finished.
On macOS and Linux, be sure to lock down the permissions of the configuration file since our credentials are inside:
- chmod 600 ~/.config/rclone/rclone.conf
On Windows, permissions are denied to non-administrative users unless explicitly granted, so we shouldn’t need to adjust access manually.
Copying Objects from S3 to Spaces
Now that our configuration is complete, we are ready to transfer our files.
Begin by checking the rclone configured remotes:
- rclone listremotes
Outputs3:
spaces:
Both of the sections we defined are displayed.
We can view the available S3 buckets by asking rclone to list the “directories” associated with the s3 remote (make sure to add the colon to the end of the remote name):
- rclone lsd s3:
Output -1 2017-10-20 15:32:28 -1 source-of-files
The above output indicates that one bucket, called source-of-files was found in our S3 account.
If you have already created a DigitalOcean Space, you can repeat the procedure to view your Spaces:
- rclone lsd spaces:
Output -1 2017-10-25 19:00:35 -1 existing-space
To view the contents of an S3 bucket or DigitalOcean Space, you can use the tree command. Pass in the remote name, followed by a colon and the name of the “directory” you wish to list (the bucket or Space name):
- rclone tree s3:source-of-files
Output/
├── README.txt
├── demo_dir
│   ├── demo1
│   └── demo2
└── media
    ├── Social Rebrand Presentation 032815.ppt
    ├── TechnicLauncher.jar
    ├── nda_template.docx
    ├── textfile.txt
    └── the_mother_of_all_demos.mp4

2 directories, 8 files
When you are ready, you can copy the files from your S3 bucket to a DigitalOcean Space by typing:
- rclone sync s3:source-of-files spaces:dest-of-files
If you hadn’t previously created the Space you selected, rclone will attempt to create one for you with the given name. This will fail if the name provided is already being used by another account or if the name doesn’t meet the naming requirements for DigitalOcean Spaces (lowercase letters, numbers, and dashes only).
Assuming everything went well, rclone will begin copying objects from S3 to Spaces.
When the transfer is complete, you can visually check that the objects have transferred by viewing them with the tree subcommand:
- rclone tree spaces:dest-of-files
Output/
├── README.txt
├── demo_dir
│   ├── demo1
│   └── demo2
└── media
    ├── Social Rebrand Presentation 032815.ppt
    ├── TechnicLauncher.jar
    ├── nda_template.docx
    ├── textfile.txt
    └── the_mother_of_all_demos.mp4

2 directories, 8 files
For more robust verification, use the check subcommand to compare the objects in both remotes:
- rclone check s3:source-of-files spaces:dest-of-files
Output2017/10/25 19:51:36 NOTICE: S3 bucket dest-of-files: 0 differences found
2017/10/25 19:51:36 NOTICE: S3 bucket dest-of-files: 2 hashes could not be checked
This will compare the hash values of each object in both remotes. You may receive a message indicating that some hashes could not be compared. In that case, you can rerun the command with the --size-only flag (which just compares based on file size) or the --download flag (which downloads each object from both remotes to compare locally) to verify the transfer integrity.
Conclusion
In this guide, we’ve covered how to transfer objects from Amazon S3 to DigitalOcean Spaces. We created API credentials for both services, installed and configured the rclone utility on our local computer, and then copied all objects from an S3 bucket to a DigitalOcean Space.
The rclone client can be used for many other object storage management tasks including uploading or downloading files, mounting buckets on the local filesystem, and creating or deleting additional buckets. Check out the man page to learn more about the functionality the tool provides.
Thanks for learning with the DigitalOcean Community. Check out our offerings for compute, storage, networking, and managed databases.
About the author
Former Senior Technical Writer at DigitalOcean, specializing in DevOps topics across multiple Linux distributions, including Ubuntu 18.04, 20.04, 22.04, as well as Debian 10 and 11.
Still looking for an answer?
This textbox defaults to using Markdown to format your answer.
You can type !ref in this text area to quickly search our full set of tutorials, documentation & marketplace offerings and insert the link!
Hello!
Thanks for the tutorial!
How this performs?
I mean i need to copy 294.818 GB of small images… can I run it in a VPS better than my local machine I suppose…
Hello!
I’m getting an error:
2017/11/07 19:38:32 ERROR : uploads/figure_skyline/data/1662323/telaeliana-iii.png: Failed to copy: InvalidArgument: status code: 400, request id: tx00000000000000672de8d-005a020bb8-3f966-nyc3a, host id
What whould it be?
I don’t know why! But, It just works with the version v1.32 of rclone; AND, running from unziped folder, without install; Any news, please post here!
I am running on the windows machine and i am getting Failed to copy: InvalidArgument: error when I tried to sync. all other operations are working for me any idea what is this error.
Setting acl = public is not working. when i did a copy then i am getting file as private
i want to set mine in amazone s3 but it could not dis play i want some one to tell how to set it i will apreciate who ever do
According to Digital Ocean space spec, they can only support 150 request/second per bucket. What are the solutions to move million objects over from S3 within hours if possible?
Very cool guide! Though I was getting the error:
notice: s3: s3 provider "" not known - please set correctly
and I had to add the provider to the config like:
[s3]
type = s3
provider = AWS
env_auth = false
access_key_id = <obfuscated>
secret_access_key = <obfuscated>
region = us-east-2
acl = private

[spaces]
provider = DigitalOcean
type = s3
env_auth = false
access_key_id = <obfuscated>
secret_access_key = <obfuscated>
endpoint = nyc3.digitaloceanspaces.com
acl = private
 This work is licensed under a Creative Commons Attribution-NonCommercial- ShareAlike 4.0 International License.
Become a contributor for community
Get paid to write technical tutorials and select a tech-focused charity to receive a matching donation.

DigitalOcean Documentation
Full documentation for every DigitalOcean product.

Resources for startups and AI-native businesses
The Wave has everything you need to know about building a business, from raising funding to marketing your product.
The developer cloud
Scale up as you grow — whether you're running one virtual machine or ten thousand.

Start building today
From GPU-powered inference and Kubernetes to managed databases and storage, get everything you need to build, scale, and deploy intelligent applications.
