By Vadym Kalsin and Brian Hogan

Introduction
Alerta is a web application used to consolidate and de-duplicate alerts from multiple monitoring systems and visualize them on a single screen. Alerta can integrate with many well-known monitoring tools like Nagios, Zabbix, Sensu, InfluxData Kapacitor, and many others.
In this tutorial you’ll set up Alerta and configure it to display notifications from Nagios, the popular open-source monitoring system.
Prerequisites
To follow this tutorial, you will need:
- Two Ubuntu 16.04 servers set up by following the Ubuntu 16.04 initial server setup guide, including a sudo non-root user and a firewall.
- On the first Ubuntu server, which is where you’ll run Nagios, install the following components:
- Apache, MySQL, and PHP, by following the tutorial How To Install Linux, Apache, MySQL, PHP (LAMP) stack on Ubuntu 16.04.
- Nagios 4, installed by following the tutorial How To Install Nagios 4 and Monitor Your Servers on Ubuntu and its prerequisites to configure it.
- On the second Ubuntu server, which is where we’ll install Alerta in this tutorial, install the following components:
- Nginx, installed by following the tutorial How To Install Nginx on Ubuntu 16.04.
- MongoDB, installed by following the tutorial How to Install MongoDB on Ubuntu 16.04.
- Alerta, installed by following steps 1 through 6 in the tutorial How To Monitor Zabbix Alerts with Alerta on Ubuntu 16.04.
Step 1 — Installing the Nagios-to-Alerta Gateway
You can extend Nagios’ functionality with Nagios Event Broker (NEB) modules. NEB is Nagios’ event integration mechanism, and NEB modules are shared libraries that let you integrate other services with Nagios. In this step, we’ll install the Nagios to Alerta Gateway, the NEB module that will send notifications to Alerta.
Log into your Nagios server as your non-root user:
- ssh sammy@your_nagios_server_ip
The Nagios to Alerta Gateway does not have preconfigured system packages, so you’ll have to build it from source. To do that, you’ll need to install some development tools and files. You’ll also need Git installed so you can fetch the source code from GitHub.
- sudo apt-get install -y git curl gcc make libcurl4-openssl-dev
With the prerequisites installed, use Git to clone the source code from the project’s GitHub repository:
- git clone https://github.com/alerta/nagios-alerta.git
Then change to the new nagios-alerta directory:
- cd nagios-alerta
Then compile the nagios-alerta module using make:
- make nagios4
You’ll see the following output:
Outputcd ./src && make nagios4
make[1]: Entering directory '/home/sammy/nagios-alerta/src'
gcc -fPIC -g -O2 -DHAVE_CONFIG_H -I../include -I../include/nagios4 -lcurl -o alerta-neb.o alerta-neb.c -shared  -lcurl
make[1]: Leaving directory '/home/sammy/nagios-alerta/src'
If you see something different, ensure you have all of the prerequisites installed.
Now run the installation task:
- sudo make install
You’ll see this output, indicating the module was installed in /usr/lib/nagios:
Outputcd ./src && make install
make[1]: Entering directory '/home/sammy/nagios-alerta/src'
[ -d /usr/lib/nagios ] || mkdir /usr/lib/nagios
install -m 0644 alerta-neb.o /usr/lib/nagios
make[1]: Leaving directory '/home/sammy/nagios-alerta/src'
With the module installed, we can configure Nagios to use this new module.
Step 2 — Configure Nagios-to-Alerta Gateway
Let’s configure Nagios to send notification messages to Alerta.
First, enable the newly installed Alerta broker module in the Nagios main configuration file. Open the Nagios configuration file in your editor:
- sudo vi /usr/local/nagios/etc/nagios.cfg
Find the section which contains the broker_module directives:
...
# EVENT BROKER MODULE(S)
# This directive is used to specify an event broker module that should
# by loaded by Nagios at startup.  Use multiple directives if you want
# to load more than one module.  Arguments that should be passed to
# the module at startup are separated from the module path by a space.
#
[...]
#broker_module=/somewhere/module1.o
#broker_module=/somewhere/module2.o arg1 arg2=3 debug=0
...
To configure the Alerta module, you need to provide two mandatory arguments:
- URL: The address which is used to communicate with the Alerta API. You configured this in Step 3 of the tutorial How To Monitor Zabbix Alerts with Alerta on Ubuntu 16.04.
- key: The API key you created in step 4 of the tutorial How To Monitor Zabbix Alerts with Alerta on Ubuntu 16.04. You need this to authenticate with Alerta and post events.
Add this line to the file to configure the Alerta integration:
...
broker_module=/usr/lib/nagios/alerta-neb.o http://your_alerta_server_ip/api key=ALERTA_API_KEY
...
There are some additional optional arguments you can specify as well:
- env: This specifies the environment name. The default environment name is
Production. - hard_only: Forwards results in Hard state only. You can find more info about Nagios State Types in the Nagios documentation. Set this to
1to enable this mode. - debug: - enable debug mode for the module. Set this to
1to enable this mode.
To specify all of these options, use this line instead:
...
broker_module=/usr/lib/nagios/alerta-neb.o http://your_alerta_server_ip/api key=ALERTA_API_KEY env=Production hard_only=1 debug=1
...
Save the file and exit the editor.
In order to identify alerts by environment and service name, you’ll need to set up environment and service names using Nagios Custom Object Variables. To do this, use the _Environment and _Service variables in your configuration. Let’s configure those now.
Open the default Nagios host object configuration file, which you’ll find in the /usr/local/nagios/etc/objects/ directory:
- sudo vi /usr/local/nagios/etc/objects/localhost.cfg
We’ll mark all alerts with this host as Production alerts, and we’ll call the default service Nagios. Find the following host definition:
...
define host{
        use                     linux-server            ; Name of host template to use
                                                        ; This host definition will inherit all variables that are defined
                                                        ; in (or inherited by) the linux-server host template definition.
        host_name               localhost
        alias                   localhost
        address                 127.0.0.1
        }

...
Add the _Environment and _Service values to the configuration:
...
        host_name               localhost
        alias                   localhost
        address                 127.0.0.1
        _Environment            Production
        _Service                Nagios
        }
...
Now mark all the events associated with a lack of space on the system partitio as System alerts. Locate this section of the file which defines how to check for free space:
...
define service{
        use                             local-service         ; Name of service template to use
        host_name                       localhost
        service_description             Root Partition
        check_command                   check_local_disk!20%!10%!/
        }
...
Modify it to associate it with the System service:
...
define service{
        use                             local-service         ; Name of service template to use
        host_name                       localhost
        service_description             Root Partition
        check_command                   check_local_disk!20%!10%!/
        _Service                        System
        }
...
Save the file and exit the editor. Restart Nagios to apply these new settings:
- sudo systemctl restart nagios.service
Check the Nagios log file to ensure that the service is running properly:
- tail /usr/local/nagios/var/nagios.log
You’ll see the following output:
Output...
[1505804481] [alerta] Initialising Nagios-Alerta Gateway module, v3.5.0
[1505804481] [alerta] debug is on
[1505804481] [alerta] states=Hard (only)
[1505804481] [alerta] Forward service checks, host checks and downtime to http://your_alerta_server_ip/api
[1505804481] Event broker module '/usr/lib/nagios/alerta-neb.o' initialized successfully.
[1505804481] Successfully launched command file worker with pid 25416
Now Nagios will send a notification as soon as any system or service goes off. Let’s generate a test event.
Step 3 — Generating a Test Alert to Verify Nagios-Alerta Integration
Let’s generate a test alert to ensure everything is connected. By default, Nagios keeps track of the amount of free disk space on your server. We’ll create a temporary file that’s large enough to trigger Nagios’ file system usage alert.
First, determine how much free space you have on the Nagios server. You can use the df command to find out:
- df -h
You’ll see output like the following:
Output    Filesystem      Size  Used Avail Use% Mounted on
    /dev/vda1        20G  3.1G   16G   17% /
Look at the amount of free space available. In this case, the free space is 16GB. Your free space may differ.
Use the fallocate command to create a file that takes up more than 80% of the available disk space, which should be enough to trigger the alert:
- fallocate -l 14G /tmp/temp.img
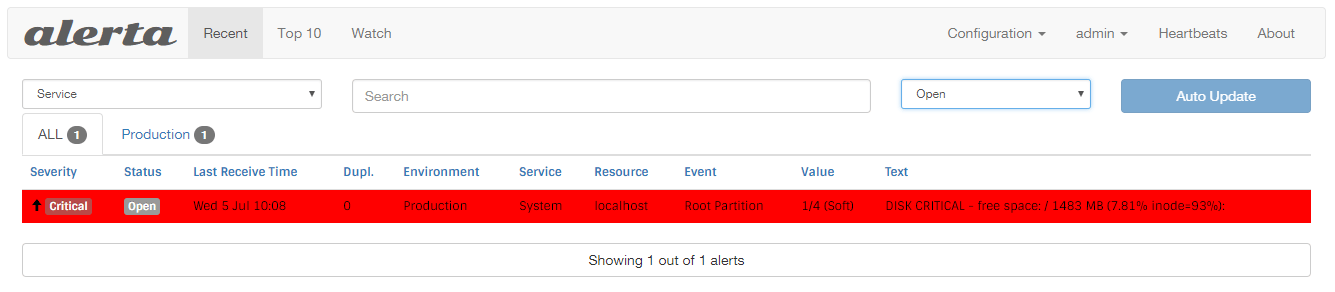
Within a few minutes, Nagios will trigger an alert about the amount of free disk space and will send the notification message to Alerta. You will see this new notification in the Alerta dashboard:
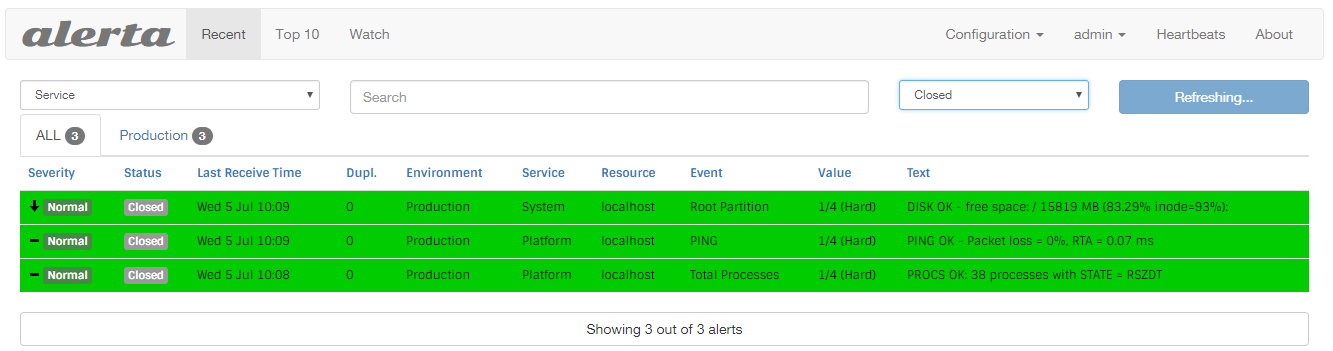
Now that you know the alerts are working, delete the temporary file you created so you can reclaim your disk space:
- rm -f /tmp/temp.img
After a minute Nagios will send the recovery message. The alert will then disappear from the main Alerta dashboard, but you can view all closed events by selecting Closed.
You can click on the event row to view more details.
Conclusion
In this tutorial, you configured Nagios to send notifications to another server running Alerta.
Alerta gives you a convenient place to track alerts from many systems. For example, if some parts of your infrastructure use Nagios and others use Zabbix, you can merge notifications from both systems into one panel.
Thanks for learning with the DigitalOcean Community. Check out our offerings for compute, storage, networking, and managed databases.
About the author(s)
Monitoring engineer
Managed the Write for DOnations program, wrote and edited community articles, and makes things on the Internet. Expertise in DevOps areas including Linux, Ubuntu, Debian, and more.
Still looking for an answer?
This textbox defaults to using Markdown to format your answer.
You can type !ref in this text area to quickly search our full set of tutorials, documentation & marketplace offerings and insert the link!
 This work is licensed under a Creative Commons Attribution-NonCommercial- ShareAlike 4.0 International License.
Become a contributor for community
Get paid to write technical tutorials and select a tech-focused charity to receive a matching donation.

DigitalOcean Documentation
Full documentation for every DigitalOcean product.

Resources for startups and AI-native businesses
The Wave has everything you need to know about building a business, from raising funding to marketing your product.
The developer cloud
Scale up as you grow — whether you're running one virtual machine or ten thousand.

Start building today
From GPU-powered inference and Kubernetes to managed databases and storage, get everything you need to build, scale, and deploy intelligent applications.
