By Alex Garnett
Senior DevOps Technical Writer

Introduction
Optical Character Recognition, or OCR, is primarily used to turn the text from scanned images into selectable, copyable, encoded, embedded text. Many modern desktop and mobile applications and scanner software stacks have some OCR functionality built in, and most circulating PDFs have text embedded. However, you may still encounter documents or images that contain significant amounts of non-embedded text which cannot be automatically extracted.
In this case, you can use a pipeline of open source tools to automatically perform OCR. This is especially useful if you are ingesting documents or images to a web application that needs to extract text, or if you are working with a large corpus of documents that need to have their full text indexed.
This tutorial will cover setting up an OCR pipeline using Ghostscript, Tesseract, and PDFtk. You will also review other tools that can be used instead of or in addition to this baseline functionality.
Prerequisites
These tools are available on most platforms. This tutorial will provide installation instructions for a Ubuntu 22.04 server, following our guide to Initial Server Setup with Ubuntu 22.04.
Step 1 – Installing Ghostscript, Tesseract, and PDFtk
OCR can be performed on both PDFs (which contain, and are sometimes rendered as, images) and standalone images. Working with PDFs adds some extra steps, which you can skip if you are working with images by themselves.
You will need three tools for the end-to-end pipeline: Ghostscript, which handles all kinds of PDF-to-image conversion and vice-versa (it was originally created as an interpreter for Postscript, the predecessor technology to PDF), Tesseract, an open source OCR engine which, like Ghostscript, has been developed continuously since the 1980s, and PDFtk, a smaller utility for slicing or reconstructing PDFs from individual pages.
All three applications are available in Ubuntu’s default repositories, and can be installed with the apt package manager. Update your package sources with apt update and then use apt install to install them:
- sudo apt update
- sudo apt install pdftk ghostscript tesseract-ocr x11-utils
You should now have three new commands present, one for each application, which you can verify by using which:
- which pdftk
Output/usr/bin/pdftk
- which gs
Output/usr/bin/gs
- which tesseract
Output/usr/bin/tesseract
You’ll use these commands to perform OCR in the next step.
Step 2 – Converting PDFs to Images and Running Tesseract
If you don’t already have a PDF that you want to perform OCR on, you can follow along with this tutorial by downloading this sample PDF, which was scanned without any embedded text. To download the PDF onto your server, you can use curl with the -O flag to save it to your current directory under the same file name:
- curl -O https://deved-images.nyc3.cdn.digitaloceanspaces.com/server-ocr/OCR-sample-paper.pdf
If you’re working with one or more PDFs, you’ll need to convert them to individual images before they can be used as OCR sources. This can be done using a Ghostscript command. You’ll need to include additional parameters to maintain consistency around DPI, color space, and dimensions. First, create a working output directory for the files created this process, then run gs:
- mkdir output
- gs -o output/%05d.png -sDEVICE=png16m -r300 -dPDFFitPage=true OCR-sample-paper.pdf
This gs command specifies the output path before the rest of the command, using the -o flag. %05d is obscure shell syntax that Ghostscript understands natively — in this case, it means to name the output PNG files from the input PDF using automatically incremented, 5-digit numbers. You may see this used in other, older, command line applications. After adding some PNG formatting syntax and a DPI of -r300, provide the path to OCR-sample-paper.pdf or your chosen input file.
Ghostscript will output every page in the PDF individually:
OutputProcessing pages 1 through 14.
Page 1
Page 2
Page 3
Page 4
Page 5
…
After it finishes, you can verify the contents of the output directory.
- ls output
Output00001.png  00003.png  00005.png  00007.png  00009.png  00011.png  00013.png
00002.png  00004.png  00006.png  00008.png  00010.png  00012.png  00014.png
Next, you’ll use a shell for loop around a tesseract command to turn the images you created back into individual PDF pages, this time with embedded text. Shell loops behave similarly to loops in other programming languages, and you can format them all into a single command by separating each part with semicolons, ending with done:
- for png in $(ls output); do tesseract -l eng output/$png output/$(echo $png | sed -e "s/\.png//g") pdf; done
Some text will be output to your shell while the command is looping:
OutputTesseract Open Source OCR Engine v4.1.1 with Leptonica
Tesseract Open Source OCR Engine v4.1.1 with Leptonica
Tesseract Open Source OCR Engine v4.1.1 with Leptonica
Tesseract Open Source OCR Engine v4.1.1 with Leptonica
...
The Tesseract syntax itself is this component: tesseract -l language input_filename output_base_filename [pdf]. If the -l language component is omitted, Tesseract defaults to the English language model, and if pdf is omitted, Tesseract will output identified text separately from the input image, rather than as a PDF. The additional sed syntax added to this command ensures that the correct paths are provided to Tesseract, and the .png file extensions are removed when renaming the output files to .pdf.
Note: On Ubuntu, Tesseract does not install every language model by default. If you need to perform non-English OCR, you should install the tesseract-ocr-all package with sudo apt install tesseract-ocr-all.
You can find more Tesseract command line examples in the official documentation.
Check the output directory again after running Tesseract:
- ls output
You’ll see all your newly created PDF pages.
Output00001.pdf  00003.pdf  00005.pdf  00007.pdf  00009.pdf  00011.pdf  00013.pdf
00001.png  00003.png  00005.png  00007.png  00009.png  00011.png  00013.png
00002.pdf  00004.pdf  00006.pdf  00008.pdf  00010.pdf  00012.pdf  00014.pdf
00002.png  00004.png  00006.png  00008.png  00010.png  00012.png  00014.png
If you only need an output image, you can skip ahead to the final steps of this tutorial to learn more about bulk text extraction options. If you’re using a PDF, you’ll reconstruct and finalize it in the next step.
Step 3 (Optional) – Rebuilding PDFs from Image Output
If you used a PDF as input in the last step, you’ll now need to use PDFtk and Ghostscript again to put it back together from the individual pages produced by Tesseract. Because they are numbered sequentially, you can use shell syntax to pass an ordered list of files to the pdftk cat command, to concatenate them:
- pdftk output/*.pdf cat output joined.pdf
You now have a single PDF reconstructed from your Tesseract output named joined.pdf. The only remaining step is to reformat the PDF using Ghostscript. This is important because Tesseract isn’t always faithful to precise PDF dimensions. Your new PDF is currently much larger than your input because it hasn’t been optimized, and Ghostscript is a much more powerful tool for re-rendering PDFs to exact specifications. Run one last gs command on your joined.pdf:
- gs -sDEVICE=pdfwrite -sPAPERSIZE=letter -dFIXEDMEDIA -dPDFFitPage -o final.pdf joined.pdf
You may receive some warning output from this command about PDF spec compliance, which is normal. Ghostscript is much more exacting about PDF standards than other tools, and most PDFs will render in most viewers.
The parameters -sDEVICE=pdfwrite -sPAPERSIZE=letter -dFIXEDMEDIA -dPDFFitPage are all used to enforce PDF dimensions. You may need to change sPAPERSIZE=letter if you are working with a different page format. The -o final.pdf filename provided to the gs command will be the name of your finished output.
To test that your OCR was successful, you can open the PDF locally in a desktop application, or you can use a command line application like pdftotext to dump out the now-embedded text from the document.
You can install pdftotext on Ubuntu via a package called poppler-utils, which contains several tools for working with PDFs on the command line:
- sudo apt install poppler-utils
Next, run pdftotext on your new PDF:
- pdftotext final.pdf
A new file, final.txt, will be created. Preview this file’s contents with a tool like head:
- head final.txt
OutputPakistan Journal of Applied Economics (1983) vol. II, no. 2 (167—180)

THE MEASUREMENT OF FARM-SPECIFIC
TECHNICAL EFFICIENCY
K. P. KALIRAJAN and J. C, FLINN*

Measures of technical efficiency were estimated using a stochastic translog
production frontier for a sample of rainfed rice farmers in Bicol, Philippines.
These estimates were farm specific as opposed to being based on deviations
from an average sample efficiency. A wide variation in the level of technical
You should receive a stream of text from your input file. It may be out of order or include some odd formatting characters, but that’s natural when dumping out the text all at once – the important thing is that the document now contains embedded text. At this point, you can remove the output directory you created that contains the work-in-progress images and PDF pages. Those images are no longer needed.
You now have an end-to-end PDF OCR pipeline using three tools and four commands. These can be combined into a standalone script, integrated into another application, or run interactively as needed. This is a complete solution for individual PDF documents. In the next steps, you’ll review some additional options for formatting data tables and for bulk text extraction.
Step 4 (Optional) – Extracting CSV Tables from Documents After OCR
After performing OCR on images or PDFs, you can optionally also extract any tabular or spreadsheet-formatted data into a CSV file. This can be especially useful when working with older data sources or scientific papers.
There are two tools which provide this functionality, and they both perform similarly: Tabula, written in Java, and Camelot, written in Python.
Tabula
Tabula can be installed as a snap package on Ubuntu by using snap install:
- sudo snap install tabula
If you visually inspect the sample PDF used in this tutorial, you will find a table in the middle of page 6:
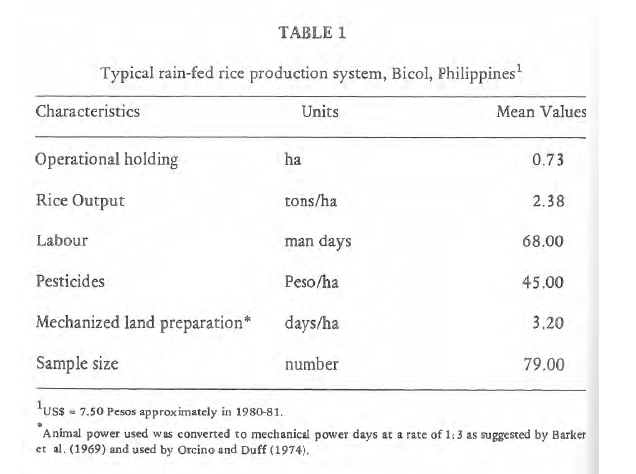
Therefore, you’ll run tabula on your PDF by specifying that you want to extract a table from -p 6 in your final.pdf, and redirect the output to a new file called test.csv:
- tabula -p 6 final.pdf > test.csv
Check the quality of the table detection in test.csv. You should now be able to use it as input to a spreadsheet program like Excel, or to another data analysis script.
Camelot
Camelot is a Python library, and requires you to have installed Python and pip, the Python package manager. If you haven’t already installed Python, you can refer to the first step of How To Install Python 3 and Set Up a Programming Environment on an Ubuntu 22.04 Server.
Next, install Camelot with pip install, along with its opencv dependency:
- sudo pip install camelot-py opencv-python-headless ghostscript
After that, you can run camelot on your PDF, again specifying -p 6, the output path and file type, and the input final.pdf:
- camelot -p 6 -f csv -o test.csv stream final.pdf
You can refer to the Camelot documentation to fine-tune the extraction if needed.
In the final, optional step of this tutorial, you’ll review some other OCR solutions.
Step 5 (Optional) – Using Other OCR Solutions for Bulk Extraction
While Tesseract is the longest-developed open source OCR tool and provides support for the broadest set of output formats, a few other options also exist for performing server-side OCR. EasyOCR is a newer open source OCR engine that is more actively developed and can provide faster or more accurate results by running on a GPU. However, EasyOCR does not support PDF output, making it challenging to reconstruct input documents, and is primarily useful for outputting large amounts of raw text.
EasyOCR is a Python library, and requires you to have installed Python and pip, the Python package manager. If you haven’t already installed Python, you can refer to the first step of How To Install Python 3 and Set Up a Programming Environment on an Ubuntu 22.04 Server.
Next, install EasyOCR with pip install:
- sudo pip install easyocr
After installing EasyOCR, you can use it as a library within a Python script, or you can call it directly from the command line using the easyocr command. A sample EasyOCR command looks like this:
- easyocr -l ch_sim en -f image.jpg --detail=1 --gpu=True
EasyOCR supports loading multiple language models at once for performing multilingual OCR. You can specify multiple languages following the -l flag, in this case ch_sim for simplified Chinese and en for English. -f image.jpg is the path to your input file. --detail=1 will provide bounding box coordinates along with your output if you need to reference the location of the extracted text in your file. You can also omit this information by running with --detail=0.
The -gpu=True flag is optional, and will try to use a CUDA code path for more efficient extraction if a GPU environment has been configured.
Conclusion
In this tutorial, you created an OCR pipeline using several mature open-source tools that can be implemented into other application stacks or exposed via a web service. You also reviewed some of the syntax and options available to these tools for fine-tuning, and considered some other OCR options, for extracting CSV tables and for running large-scale bulk extraction of text.
OCR is a well-understood and widely used technology: you know when you need it. Despite this, turnkey OCR implementations are often limited to paid desktop software. Being able to deploy OCR tools wherever you need them can be very useful. Next, you may want to read An Introduction to Machine Learning to review some related topic areas.
Thanks for learning with the DigitalOcean Community. Check out our offerings for compute, storage, networking, and managed databases.
About the author
Former Senior DevOps Technical Writer at DigitalOcean. Expertise in topics including Ubuntu 22.04, Linux, Rocky Linux, Debian 11, and more.
Still looking for an answer?
This textbox defaults to using Markdown to format your answer.
You can type !ref in this text area to quickly search our full set of tutorials, documentation & marketplace offerings and insert the link!
 This work is licensed under a Creative Commons Attribution-NonCommercial- ShareAlike 4.0 International License.
Become a contributor for community
Get paid to write technical tutorials and select a tech-focused charity to receive a matching donation.

DigitalOcean Documentation
Full documentation for every DigitalOcean product.

Resources for startups and AI-native businesses
The Wave has everything you need to know about building a business, from raising funding to marketing your product.
The developer cloud
Scale up as you grow — whether you're running one virtual machine or ten thousand.

Start building today
From GPU-powered inference and Kubernetes to managed databases and storage, get everything you need to build, scale, and deploy intelligent applications.
