By Amir Ghorbanian and Caitlin Postal

The author selected the Free and Open Source Fund to receive a donation as part of the Write for DOnations program.
Introduction
Token-based authentication can secure web applications that have a mix of public and private assets. Access to private assets requires a user to successfully authenticate themselves, usually by providing a username and secret password only the user knows. Successful authentication returns a token for the duration the user decides to stay authenticated, so the user can provide the token instead of needing to re-authenticate themselves upon every access to privileged assets. Token usage raises an essential question of where to store tokens to keep them safe. Tokens may be stored in browser storage by using the Window.localStorage or Window.sessionStorage properties, but this method is vulnerable to cross-site scripting (XSS) attacks because the contents of local and session storage are accessible to any JavaScript running on the same document that stores the data.
In this tutorial, you will create a React application and mock API that implements a token-based authentication system set up in a local Docker container for consistent testing across platforms. You will begin by implementing token-based authentication using browser storage with the Window.localStorage property. Then you will exploit this setup with a reflected cross-site scripting attack to understand the security vulnerabilities present when using browser storage to persist secret information. You will then improve this application by changing it to HTTP-only cookies storing the authentication token, which will no longer be accessible to potentially malicious JavaScript code that may be present on the document.
By the end of this tutorial, you’ll understand the security considerations needed to implement a functioning token-based authentication system alongside a React and Node web application. The code for this tutorial is available in the DigitalOcean Community GitHub.
Prerequisites
To complete this tutorial, you will need the following:
- A local development environment inside of a Docker container, which you will prepare in Step 1. You can install Docker directly or follow the tutorial on How to Install and Use Docker on Ubuntu 22.04.
- The application in this tutorial was built on an image running
node:18.7.0-bullseye. You can also install Node.js with the How to Install Node.js and Create a Local Development Environment series.
- The application in this tutorial was built on an image running
- A browser to test and develop the application. This tutorial uses the Firefox browser. Using a different browser can have unexpected results.
- Familiarity working with React is helpful. You can reference How To Call Web APIs with the
useEffectHook in React as needed for fetching data from APIs. You can also refer to How To Add Login Authentication to React Applications for help with rudimentary authentication systems. - You will be creating and manipulating HTTP-only cookies. For more on cookies, refer to What Are Cookies & How to Work With Them Using JavaScript and How To Use JSON Web Tokens (JWTs) in Express.js.
- Knowledge of JavaScript, HTML, and CSS. Refer to How To Build a Website With HTML series, How To Style HTML with CSS, and in How To Code in JavaScript.
Step 1 — Preparing a Docker Container for Development
In this step, you’ll set up a Docker container for development purposes. You’ll start by creating a Dockerfile with instructions for building an image to create your container.
Create and open a file called Dockerfile inside of your home directory using nano or your preferred editor:
- nano Dockerfile
Place the following lines of code inside of it:
FROM node:18.7.0-bullseye

RUN apt update -y \
    && apt upgrade -y \
    && apt install -y vim nano \
    && mkdir /app

WORKDIR /app

CMD [ "tail", "-f", "/dev/null" ]
The FROM line creates the base of your image using the prebuilt node:18.7.0-bullseye from Dockerhub. This image comes built with the necessary NodeJS dependencies installed, which will streamline your setup process.
The RUN line updates and upgrades packages and this line also installs other packages you may need. The WORKDIR line sets the working directory.
The CMD line defines the primary process to be run inside the container, ensuring that the container will stay running so that you can connect to and use it for development.
Save and close the file.
Create the Docker image with the docker build command, replacing path_to_your_dockerfile with the path to your Dockerfile:
- docker build -f /path_to_your_dockerfile --tag jwt-tutorial-image .
The path to your Dockerfile will be passed to the -f option to indicate the file path from which you will build an image. You tag this build using the --tag option, which enables you to later refer to it with a reader-friendly name (in this case, jwt-tutorial-image).
After running the build command, you will see an output similar to this:
Output...
 => => writing image sha256:1cf8f3253e430cba962a1d205d5c919eb61ad106e2933e33644e0bc4e2cdc433                                    0.0s
 => => naming to docker.io/library/jwt-tutorial-image
Run the image as a container with the following command:
- docker run -d -p 3000:3000 -p 8080:8080 --name jwt-tutorial-container jwt-tutorial-image
The -d flag runs the container in detached mode so you can connect to it with a separate terminal session.
Note: If you would rather develop using the same terminal you are using to run the Docker container, replace the -d flag with -it, which will immediately provide you with an interactive terminal running within the container.
The -p flag will forward ports 3000 and 8080 of your container. These ports serve the front-end and back-end applications, respectively, to your host machine’s localhost network so that you can test your application using your local browser.
Note: If your host machine is currently using ports 3000 and 8080, you will need to stop the applications using those ports, or Docker will throw an error when attempting to forward the ports.
You can also use the -P flag to forward your containers’ ports to unused ports on your machine’s localhost network. If you use the -P flag instead of mapping specific ports, you will need to run docker network inspect your_container_name to know which development container ports are mapped to which local ports.
You can also connect with VSCode using the Remote Containers plug-in.
In a separate terminal session, run this command to connect to the container:
- docker exec -it jwt-tutorial-container /bin/bash
You will see a connection like this with your container label to indicate you have connected:
Outputroot@d7e051c96368:/app#
In this step, you set up a prebuilt Docker image and connected to the container you will use for development. Next, you will set up the skeleton of your application in the container using create-react-app.
Step 2 — Setting Up the Foundations of Your Front-End Application
In this step, you will initialize your React application and configure app management with an ecosystem.config.js file.
After connecting to the container, create a directory for your application with the mkdir command, and then move into the newly created directory using the cd command:
- mkdir /app/jwt-storage-tutorial
- cd /app/jwt-storage-tutorial
Then run the create-react-app binary using the npx command to initialize a new React project that will serve as the frontend of your web application:
- npx create-react-app front-end
The create-react-app binary initializes a bare-bones React application with a README file for developing and testing the application, as well as several widely-used dependencies, including react-scripts, react-dom, and jest.
Type y when prompted to proceed with the installation.
You will see this output of the call to create-react-app:
Output...

Success! Created front-end at /home/nodejs/jwt-storage-tutorial/front-end
Inside that directory, you can run several commands:

  yarn start
    Starts the development server.

  yarn build
    Bundles the app into static files for production.

  yarn test
    Starts the test runner.

  yarn eject
    Removes this tool and copies build dependencies, configuration files
    and scripts into the app directory. If you do this, you can’t go back!

We suggest that you begin by typing:

  cd front-end
  yarn start

Happy hacking!
Your output may vary slightly with different versions of create-react-app.
You are ready to launch a development instance and begin working on your new React application.
To run the application, you will use the PM2 process manager. Install pm2 with this command:
- npm install pm2 -g
The -g flag installs the package globally. Depending on the permissions of the user you are logged in as, you may need to use the sudo command to install packages globally.
PM2 offers several advantages during the development and production stages of an application. For example, PM2 helps you keep the different components of your application running in the background during development. You can also use PM2 for operational needs in production, such as implementing deployment models to patch your production application with minimal downtime. To learn more, you can read PM2: Production-Ready Nodejs Applications in Minutes.
The output of the installation will be similar to the following:
Outputadded 183 packages, and audited 184 packages in 2m
12 packages are looking for funding
  run `npm fund` for details
found 0 vulnerabilities -->
To run your application using the PM2 process manager, move into your React project directory and create a file named ecosystem.config.js using nano or your preferred editor:
- cd front-end
- nano ecosystem.config.js
The ecosystem.config.js file will hold configurations for the PM2 process manager on how to run your application.
Add the following code into the newly created ecosystem.config.js file:
module.exports = {
  apps: [
    {
      name: 'front-end',
      cwd: '/app/jwt-storage-tutorial/front-end',
      script: 'npm',
      args: 'run start',
      env: {
        PORT: 3000
      },
    },
  ],
};
Here, you define a new app configuration with the PM2 process manager. The name config parameter allows you to choose a name for your process in the PM2 process table for easy identification. The cwd parameter sets the root directory of the project you will run. The script and args parameters allow you to select the command line tool for running your program. Finally, the env parameter allows you to pass in a JSON object to set the necessary environment variables for your application. You only define a single environment variable, PORT, which sets the port that the front-end application will run on.
Save and exit the file.
Use this command to check what processes the PM2 manager is currently running:
- pm2 list
In this case, you are not currently running any processes on PM2, so you get this output:
Output┌────┬────────────────────┬──────────┬──────┬───────────┬──────────┬──────────┐
│ id │ name               │ mode     │ ↺    │ status    │ cpu      │ memory   │
└────┴────────────────────┴──────────┴──────┴───────────┴──────────┴──────────┘
If you are running commands and need to reset the process manager for a fresh slate, run this command:
- pm2 delete all
Now, start your application using the PM2 process manager with the configurations specified in your ecosystem.config.js file:
- pm2 start ecosystem.config.js
You will see output similar to this on the terminal:
Output┌────┬────────────────────┬──────────┬──────┬───────────┬──────────┬──────────┐
│ id │ name               │ mode     │ ↺    │ status    │ cpu      │ memory   │
├────┼────────────────────┼──────────┼──────┼───────────┼──────────┼──────────┤
│ 0  │ front-end          │ fork     │ 0    │ online    │ 0%       │ 33.6mb   │
└────┴────────────────────┴──────────┴──────┴───────────┴──────────┴──────────┘
You can control the activity of PM2 processes using the stop and start commands and the restart and startOrRestart commands.
You can view the application by navigating to http://localhost:3000 in your preferred browser. The default React welcome page will be displayed:
Finally, install version 5.2.0 of react-router for client-side routing:
- npm install react-router-dom@5.2.0
When the installation is complete, you will receive a variation of the following message:
Output...

added 13 packages, and audited 1460 packages in 7s

205 packages are looking for funding
  run `npm fund` for details

6 high severity vulnerabilities

To address all issues (including breaking changes), run:
  npm audit fix --force

Run `npm audit` for details.
In this step, you set up the skeleton of your React application in your Docker container. Next, you will build the pages for your application that you will later use to test against XSS attacks.
Step 3 — Building a Login Page
In this step, you’ll create a login page for your application. You will use components to represent an application with both private and public assets. Then, you will implement a login page where a user will verify themself to get permission to access private assets on the website. By the end of this step, you’ll have the skeleton of a standard application with a mix of private and public assets and a login page.
First, you will create the Home and Login pages. You will next create a SubscriberFeed component to represent a private page that only users who have logged in will be able to view.
To begin, create a components directory to hold all of your application’s components:
- mkdir src/components
Then, create and open a new file inside of the components directory called SubscriberFeed.js:
- nano src/components/SubscriberFeed.js
Inside the SubscriberFeed.js file, add these lines with an <h2> tag with the title of the component inside:
import React from 'react';

export default () => {
  return(
    <h2>Subscriber Feed</h2>
  );
}
Save and close the file.
Next, you will import the SubscriberFeed component inside the App.js file, creating routes to make the component accessible to users. Open the App.js file found in the src directory of your project:
- nano src/App.js
Add the following highlighted line to import the BrowserRouter, Switch, and Route components from the react-router-dom package:
import logo from './logo.svg';
import './App.css';

import { BrowserRouter, Route, Switch } from 'react-router-dom';

function App() {
  return (
    <div className="App">
      <header className="App-header">
        <img src={logo} className="App-logo" alt="logo" />
        <p>
          Edit <code>src/App.js</code> and save to reload.
        </p>
        <a
          className="App-link"
          href="https://reactjs.org"
          target="_blank"
          rel="noopener noreferrer"
        >
          Learn React
        </a>
      </header>
    </div>
  );
}

export default App;
You will use these to set up routing in your web application.
Next, add the highlighted line to import the SubscriberFeed component that you just made:
import logo from './logo.svg';
import './App.css';

import { BrowserRouter, Route, Switch } from 'react-router-dom';
import SubscriberFeed from "./components/SubscriberFeed";

function App() {
  return (
    <div className="App">
      <header className="App-header">
        <img src={logo} className="App-logo" alt="logo" />
        <p>
          Edit <code>src/App.js</code> and save to reload.
        </p>
        <a
          className="App-link"
          href="https://reactjs.org"
          target="_blank"
          rel="noopener noreferrer"
        >
          Learn React
        </a>
      </header>
    </div>
  );
}

export default App;
You are now ready to create your main application and the routes for your web pages.
Still in src/App.js, remove the returned JSX lines (everything contained inside of the parentheses after the return keyword) and replace them with the highlighted lines:
import logo from './logo.svg';
import './App.css';

import { BrowserRouter, Route, Switch } from 'react-router-dom';
import SubscriberFeed from "./components/SubscriberFeed";

function App() {
  return(
    <div className="App">
      <h1 className="App-header">
        JWT-Storage-Tutorial Application
      </h1>
    </div>
  );
}

export default App;
The div tag has a className attribute of App that contains an <h1> tag with the name of your application.
Below the <h1> tag, add a BrowserRouter component that uses a Switch component to wrap a Route component that contains the SubscriberFeed component:
import logo from './logo.svg';
import './App.css';

import { BrowserRouter, Route, Switch } from 'react-router-dom';
import SubscriberFeed from "./components/SubscriberFeed";

function App() {
  return(
    <div className="App">
      <h1 className="App-header">
        JWT-Storage-Tutorial Application
      </h1>
      <BrowserRouter>
        <Switch>
          <Route path="/subscriber-feed">
            <SubscriberFeed />
          </Route>
        </Switch>
      </BrowserRouter>
    </div>
  );
}

export default App;
These new lines allow you to define your application’s routes. The BrowserRouter component encloses your defined paths. The Switch component ensures that the path returned is the first route that matches the path the user navigates to, and the Route components define specific route names.
Finally, you will add padding to your application using CSS so that the titles and components are centered and presentable. Add a wrapper to the className attribute of the outermost <div> tag:
import logo from './logo.svg';
import './App.css';

import { BrowserRouter, Route, Switch } from 'react-router-dom';
import SubscriberFeed from "./components/SubscriberFeed";

function App() {
  return(
    <div className="App wrapper">
      <h1 className="App-header">
        JWT-Storage-Tutorial Application
      </h1>
      <BrowserRouter>
        <Switch>
          <Route path="/subscriber-feed">
            <SubscriberFeed />
          </Route>
        </Switch>
      </BrowserRouter>
    </div>
  );
}

export default App;
Save and close the App.js file.
Open the App.css file:
- nano src/App.css
You will see existing CSS in this file. Delete everything in the file.
Then, add the following lines to define the wrapper styling:
.wrapper {
    padding: 20px;
    text-align: center;
}
You set the text-align property of the wrapper class to center to center the text in the application. You also added 20 pixels of padding to the wrapper class by setting the padding property to 20px.
Save and close the App.css file.
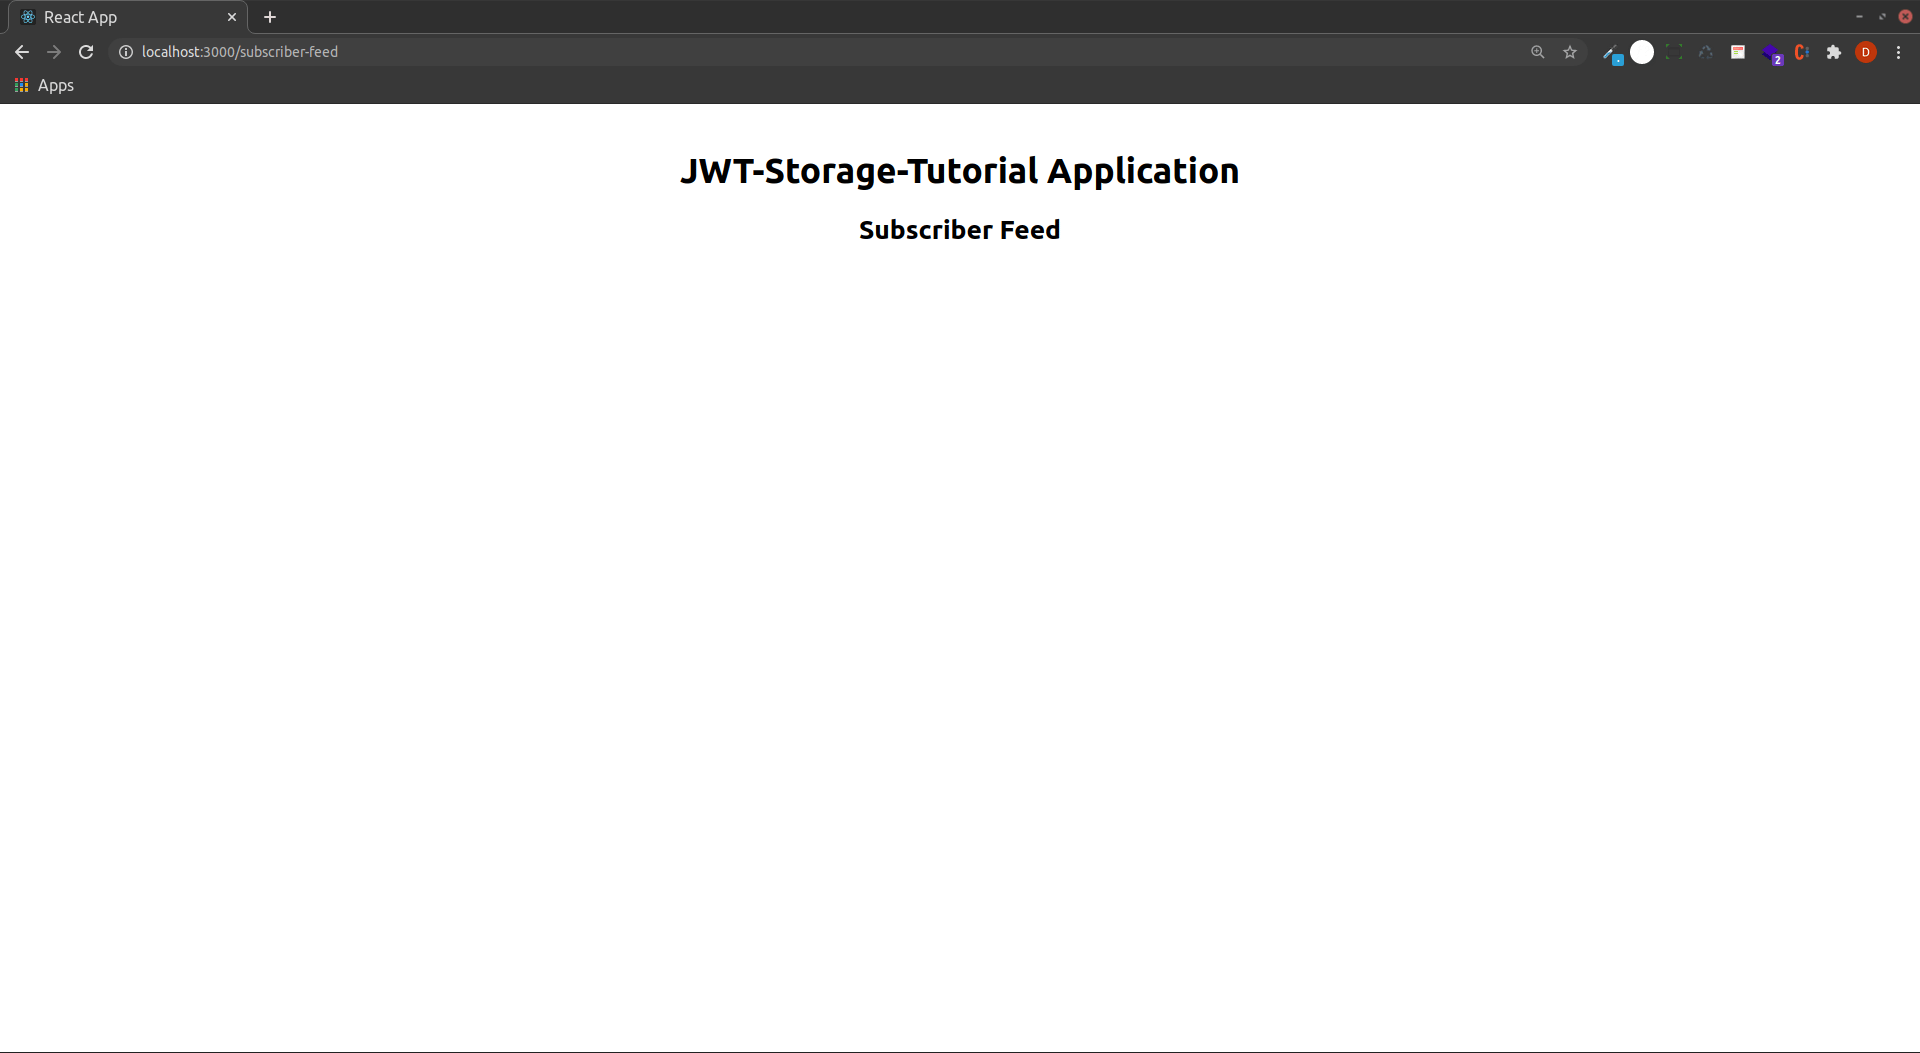
You may see your React homepage update with the new styling. Navigate to http://localhost:3000/subscriber-feed to view the Subscriber Feed, which is now visible.
The routes work as expected, but all visitors can access the Subscriber Feed. To ensure that the Subscriber Feed is only visible to authenticated users, you need to create a login page for users to verify themselves with their username and password.
Open a new Login.js file in your components directory:
- nano src/components/Login.js
Add the following lines to the new file:
import React from 'react';

export default () => {
  return(
    <div className='login-wrapper'>
      <h1>Login</h1>
      <form>
        <label>
          <p>Username</p>
          <input type="text" />
        </label>
        <label>
          <p>Password</p>
          <input type="password" />
        </label>
        <div>
          <button type="submit">Submit</button>
        </div>
      </form>
    </div>
  );
}
You create a form with an <h1> tag header, two inputs (username and password), and a submit button. You wrap the form in a <div> tag with a className of login-wrapper so you can style it in your App.css file.
Save and close the file.
Open the App.css file in the root directory of the project to style your Login component:
- nano src/App.css
Add the following CSS lines to style the login-wrapper class:
...

.login-wrapper {
    display: flex;
    flex-direction: column;
    align-items: center;
}
You center the components on the page with a display property of flex and an align-items property of center. Then you set the flex-direction to column, which will align the elements vertically in a column.
Save and close the file.
Finally, you will render the Login component inside App.js using the useState Hook to store the token in memory. Open the App.js file:
- nano src/App.js
Add the highlighted lines to the file:
import logo from './logo.svg';
import './App.css';

import { useState } from 'react'

import { BrowserRouter, Route, Switch } from 'react-router-dom';
import SubscriberFeed from "./components/SubscriberFeed";
import Login from './components/Login';

function App() {
  const [token, setToken] = useState();

  if (!token) {
    return <Login setToken={setToken} />
  }

  return(
    <div className="App wrapper">
      <h1 className="App-header">
        JWT-Storage-Tutorial Application
      </h1>
      <BrowserRouter>
        <Switch>
          <Route path="/subscriber-feed">
            <SubscriberFeed />
          </Route>
        </Switch>
      </BrowserRouter>
    </div>
  );
}

export default App;
First, you import the useState hook from the react package.
You also create a new token state variable to store the token information that will be fetched during the login process. In Step 5, you will improve this setup by using browser storage to persist the authentication status. In Step 7, you will further strengthen your persistence method by using HTTP-only cookies to store the authentication status securely.
You also import the Login component, which will display the Login page if the value for token is falsy. The if statement declares that if the token is falsy, the user will be required to log in if they are not authenticated. You pass the setToken function to the Login component as a prop.
Save and close the file.
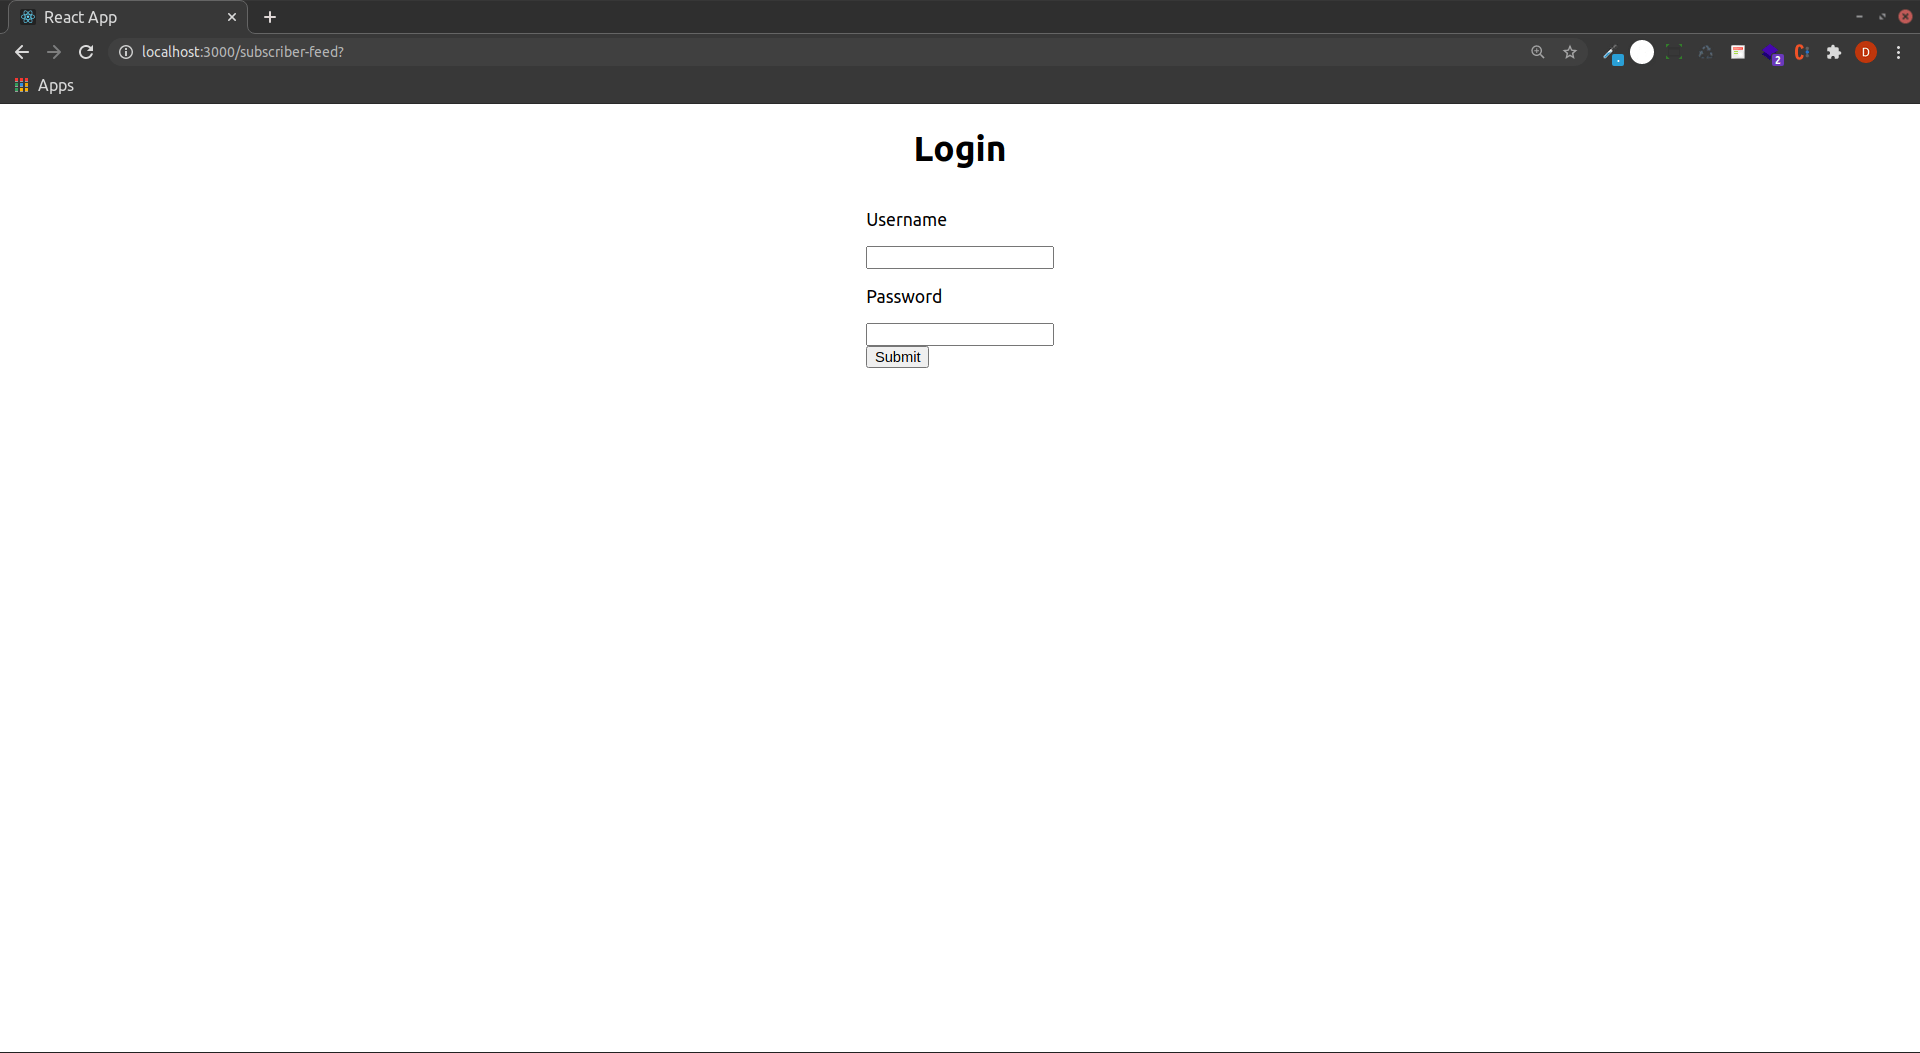
Then, refresh the page of your application to load the newly built login page. Because there is no functionality implemented for setting the token currently, the application will only display the login page:
In this step, you updated your application with a login page and a private component that will be protected from unauthorized users until they log in.
In the next step, you will create a new back-end application using NodeJS and a new login route to call for an authentication token on your front-end application.
Step 4 — Creating a Token API
In this step, you will create a Node server as the backend to the front-end React application you set up in the previous step. You will use the Node server to create and make available an API that returns an authentication token upon successful front-end user authentication. By the end of this step, your application will have a working login page, private resources that are only available after successful authentication, and a back-end server application allowing authentication through API calls.
You will build the server using the Express framework. You will use the cors package to enable cross-origin resource sharing for all routes. You can then test and develop your application without CORS errors.
Warning: CORS is enabled in the development environment for instructional purposes. However, enabling CORS for all routes in a production application will lead to security vulnerabilities.
Create and move to a new directory called back-end that will house your Node project:
- mkdir /app/jwt-storage-tutorial/back-end
- cd /app/jwt-storage-tutorial/back-end
In the new directory, initialize the Node project:
- npm init -y
The init command tells the npm command line utility to create a new Node project in the directory in which the command is run. The -y flag uses the default values for all initialization questions that the interactive command line tool asks when creating a new project. The following is the output of the init command run with the -y flag:
OutputWrote to /home/nodejs/jwt-storage-tutorial/back-end/package.json:

{
  "name": "back-end",
  "version": "1.0.0",
  "description": "",
  "main": "index.js",
  "scripts": {
    "test": "echo \"Error: no test specified\" && exit 1"
  },
  "keywords": [],
  "author": "",
  "license": "ISC"
}
Next, install the express and cors modules in the back-end project directory:
- npm install express cors
Some variation of the following output will appear in the terminal:
Outputadded 59 packages, and audited 60 packages in 3s

7 packages are looking for funding
  run `npm fund` for details

found 0 vulnerabilities
Create a new index.js file:
- nano index.js
Add the following lines to import the express module and initialize a new Express application by calling express() and storing the result in a variable by the name of app:
const express = require('express');
const app = express();
Next, add cors to the app as middleware with the highlighted lines:
const express = require('express');
const cors = require('cors');

const app = express();

app.use(cors());
You import the cors module and then add it to the app object with the use method.
Then add the highlighted lines to define a handler for the /login path that returns a token to the user attempting to log in:
const express = require('express');
const cors = require('cors');

const app = express();

app.use(cors());

app.use('/login', (req, res) => {
    res.send({
      token: "This is a secret token"
    });
});
You define a request handler for a route with the app.use() method. This route will allow you to send the username and password of the user being authenticated from the front-end application you just built. In return, you will provide the authentication token for the user to make authenticated calls to the back-end application.
The first argument to the app.use method is the route that the application will accept requests on. The second argument is a callback detailing how to handle the request that the application has received. The callback takes two arguments: a req argument containing the request data and a res argument containing the response data.
Note: You do not check the accuracy of the credentials passed when the user requests to log in using the back-end API. This step is not included for brevity, but a production application normally queries a database for the user’s information to check if they have provided the correct username and password before issuing an authentication token.
Finally, add the highlighted lines to run the server on port 8080 using the app.listen function:
const express = require('express');
const cors = require('cors');

const app = express();

app.use(cors());

app.use('/login', (req, res) => {
    res.send({
      token: "This is a secret token"
    });
});

app.listen(8080, () => console.log(`API is active on http://localhost:8080`));
Save and close the file.
To run your back-end app with PM2, create a new backend/ecosystem.config.js file:
- nano ecosystem.config.js
Add the following configuration code to the newly created back-end/ecosystem.config.js file:
module.exports = {
  apps: [
    {
      name: 'back-end',
      cwd: '/app/jwt-storage-tutorial/back-end',
      script: 'node',
      args: 'index.js',
      watch: ['index.js']
    },
  ],
};
PM2 will manage the back-end application with configuration parameters similar to the front-end application.
You set the watch parameter in the config file to enable an automatic reload of the application every time a change is made to a file. The watch parameter is a helpful development feature as it updates the results in the browser as changes are made to the code. You did not need a watch parameter for the front-end application because you ran it with react-scripts, which has an automatic reload feature by default. However, your back-end application will be run using the node runtime, which does not have that default capability.
Save and close the file.
You can now run the back-end application with pm2:
- pm2 start ecosystem.config.js
Your output will be some variation of the following:
Output[PM2][WARN] Applications back-end not running, starting...
[PM2] App [back-end] launched (1 instances)
┌────┬────────────────────┬──────────┬──────┬───────────┬──────────┬──────────┐
│ id │ name               │ mode     │ ↺    │ status    │ cpu      │ memory   │
├────┼────────────────────┼──────────┼──────┼───────────┼──────────┼──────────┤
│ 2  │ back-end           │ fork     │ 0    │ online    │ 0%       │ 24.0mb   │
│ 0  │ front-end          │ fork     │ 9    │ online    │ 0%       │ 47.2mb   │
└────┴────────────────────┴──────────┴──────┴───────────┴──────────┴──────────┘
You will use curl to assess if your newly created API endpoint is properly returning an authentication token:
- curl localhost:8080/login
You should see the following output:
Output{"token":"This is a secret token"}
You now know that your server login route returns the token as expected.
Next, you will modify your front-end Login component to use the API. Navigate to the appropriate front-end folder:
- cd ..
- cd front-end/src/components/
Open the front-end Login.js file:
- nano Login.js
Add the highlighted lines:
import React, { useRef } from 'react';

export default () => {
  const emailRef = useRef();
  const passwordRef = useRef();

  return(
    <div className='login-wrapper'>
      <h1>Login</h1>
      <form>
        <label>
          <p>Username</p>
          <input type="text" ref={emailRef} />
        </label>
        <label>
          <p>Password</p>
          <input type="password" ref={passwordRef} />
        </label>
        <div>
          <button type="submit">Submit</button>
        </div>
      </form>
    </div>
  );
}
You add the useRef hook to keep track of the values of the email and password input fields. When typing in the input fields bound to the useRef hook, the values put in will be updated in the references, which will then be sent to the backend upon pressing the submit button.
Next, add the highlighted lines to create a handleSubmit callback to handle when the submit button is pressed on the form:
import React, { useRef } from 'react';

async function loginUser(credentials) {
  return fetch('http://localhost:8080/login', {
    method: 'POST',
    headers: {
      'Content-Type': 'application/json'
    },
    body: JSON.stringify(credentials)
  }).then(data => data.json())
}

export default ({ setToken }) => {
  const emailRef = useRef();
  const passwordRef = useRef();

  const handleSubmit = async (e) => {
    e.preventDefault();
    const token = await loginUser({
        username: emailRef.current.value,
        password: passwordRef.current.value
    })
    setToken(token)
  }

  return(
    <div className='login-wrapper'>
      <h1>Login</h1>
      <form onSubmit={handleSubmit}>
        <label>
          <p>Username</p>
          <input type="text" ref={emailRef} />
        </label>
        <label>
          <p>Password</p>
          <input type="password" ref={passwordRef} />
        </label>
        <div>
          <button type="submit">Submit</button>
        </div>
      </form>
    </div>
  );
}
Inside the handleSubmit handler function, you call the loginUser helper function to make a fetch request to the login route of the API created earlier. Calling the preventDefault function on the event passed into the handleSubmit function means the default refresh functionality of the submit button is not executed, so your app can instead call the login endpoint and handle the steps necessary for user login. It will also set the value of the token state variable using the setter passed into the Login component as a prop.
Save and close the file when finished.
When you check the web application in your browser, you can now log in with an arbitrary username and password. Press the Submit button to be redirected to a page where you are logged in. If you refresh the page, your React app will lose the token, and you will be logged out.
In the next step, you will use browser storage to persist the token received in the front-end application.
Step 5 — Storing Tokens with Browser Storage
It benefits the user experience if users can stay logged in across browser sessions and page refreshes. In this step, you will use the Window.localStorage property to store authentication tokens for persistent user sessions that are not lost when the user closes the browser or refreshes the web page. Ongoing user sessions for modern web apps reduce network traffic handled by your app because users do not constantly need to use their login credentials for the same website.
Browser storage includes two different yet similar types of storage: local storage and session storage. In short, session storage persists data across tab sessions while local storage persists data across tab and browser sessions. To store your token with browser storage, you will use local storage.
Open the App.js file for your front-end application:
- nano /app/jwt-storage-tutorial/front-end/src/App.js
To begin your integration of browser storage, add the highlighted lines, which define two helper functions (setToken and getToken), and change the token variable to get the token using the newly implemented functions:
import logo from './logo.svg';
import './App.css';

import { useState } from 'react'

import { BrowserRouter, Route, Switch } from 'react-router-dom';
import SubscriberFeed from "./components/SubscriberFeed";
import Login from './components/Login';

function setToken(userToken) {
  localStorage.setItem('token', JSON.stringify(userToken));
  window.location.reload(false)
}

function getToken() {
  const tokenString = localStorage.getItem('token');
  const userToken = JSON.parse(tokenString);
  return userToken?.token
}

function App() {
  let token = getToken()

  if (!token) {
    return <Login setToken={setToken} />
  }

  return(
    <div className="App wrapper">
      <h1 className="App-header">
        JWT-Storage-Tutorial Application
      </h1>
      <BrowserRouter>
        <Switch>
          <Route path="/subscriber-feed">
            <SubscriberFeed />
          </Route>
        </Switch>
      </BrowserRouter>
    </div>
  );
}

export default App;
You create two helper functions: setToken and getToken. Inside of setToken, you use the setItem function of localStorage to map from the userToken input parameter of the helper function to a key called token. You will also use the reload function of the window.location property to refresh the page so your application can find the newly set token in browser storage and rerender the application.
Inside of getToken, you will use the getItem function of localStorage to check if any value exists for the token key, which you will return. You replace the defined variable within the App() function to use the getToken function.
Every time the user visits your website, the frontend will check if there is an authentication token in browser storage and attempt to validate the user using the already present token rather than asking them to log in.
Save and close the file, then refresh the application. You should be able to now log in to the application, refresh the web page, and not need to log in again.
In this step, you implemented token persistence using browser storage. You will exploit the token-based authentication system using browser storage in the next section.
Step 6 — Exploiting Browser Storage with an XSS Attack
In this step, you will perform a staged cross-site scripting attack (also known as an XSS attack) on your current application, which will demonstrate the security vulnerabilities present when using browser storage to persist secret information. The attack will be in the form of a URL link that, when clicked, directs the victim to your web application and injects the application with crafted code. The injection may trick the user into interacting with it, allowing a malicious agent to steal the contents of local storage on the victim’s browser.
XSS attacks are among the most common modern-day cyberattacks. Attackers usually inject malicious scripts into browsers to achieve code execution in a trusted environment. Attackers often use phishing techniques to trick users into compromising the contents of their browser storage by interacting with maliciously crafted links, such as those delivered by spam emails.
XSS attacks are of particular interest for attackers aiming to steal the contents of an unsuspecting victim’s browser storage because the browser storage of a domain is fully accessible to JavaScript code that runs on any documents associated with the domain. If an attacker can execute JavaScript code on a user’s browser for a specific web document, they can steal the contents of the user’s browser storage (both local and session) for the web domain associated with that document the user’s browser.
For instructional purposes, you will intentionally leave your application vulnerable to XSS attacks by creating a component called XSSHelper that can have code injected into it via URL query parameters. You will then exploit this vulnerability by crafting a malicious URL. The malicious URL will access and expose the contents of the logged-in user’s local storage when the user navigates to the URL in their browser and clicks a suspicious link injected into the web page.
Open a new component called XSSHelper.js in the components directory of the front-end application:
- nano /app/jwt-storage-tutorial/front-end/src/components/XSSHelper.js
Add the following code to the new file:
import React from 'react';
import { useLocation } from 'react-router-dom';

export default (props) => {
  const search = useLocation().search;
  const code = new URLSearchParams(search).get('code');


  return(
    <h2>XSS Helper Active</h2>
  );
}
You create a new functional component that imports the useLocation hook and accesses the code query parameter through the search property of the useLocation hook. You return an <h2> tag with a message to state that the XSSHelper component is active.
The URLSearchParams JavaScript function provides helper methods such as getters for interacting with search strings.
Now add the highlighted lines to import and use the useEffect hook to log the value of the query parameter:
import React, { useEffect } from 'react';
import { useLocation } from 'react-router-dom';

export default (props) => {
  const search = useLocation().search;
  const code = new URLSearchParams(search).get('code');

  useEffect(() => {
    console.log(code)
  })

  return(
    <h2>XSS Helper Active</h2>
  );
}
Save and close the file.
Next, you will modify your App.js file to return the component when the user navigates to your application’s xss-helper route.
Open the App.js file:
- nano /app/jwt-storage-tutorial/front-end/src/App.js
Add the highlighted lines to import and add the XSSHelper component as a route:
import logo from './logo.svg';
import './App.css';

import { useState } from 'react'

import { BrowserRouter, Route, Switch } from 'react-router-dom';
import SubscriberFeed from "./components/SubscriberFeed";
import Login from './components/Login';
import XSSHelper from './components/XSSHelper'

function setToken(userToken) {
  localStorage.setItem('token', JSON.stringify(userToken));
  window.location.reload(false)
}

function getToken() {
  const tokenString = localStorage.getItem('token');
  const userToken = JSON.parse(tokenString);
  return userToken?.token
}

function App() {
  let token = getToken()

  if (!token) {
    return <Login setToken={setToken} />
  }

  return(
    <div className="App wrapper">
      <h1 className="App-header">
        JWT-Storage-Tutorial Application
      </h1>
      <BrowserRouter>
        <Switch>
          <Route path="/subscriber-feed">
            <SubscriberFeed />
          </Route>
          <Route path="/xss-helper">
            <XSSHelper />
          </Route>
        </Switch>
      </BrowserRouter>
    </div>
  );
}

export default App;
Save and close the file.
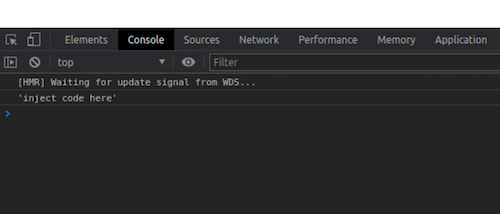
Navigate to localhost:3000/xss-helper?code='inject code here' in your browser. Make sure that you are logged in to the application, or you will not be able to access the XSSHelper component.
Left click and press Inspect. Then navigate to the Console section. You will see 'inject code here' in the console log.
You now know that you can pass in URL query parameters to your component.
Next, you will set the value of the query parameters that are passed into your component on the document of the web page using the dangerouslySetInnerHTML attribute. The component takes the value of the code URL query parameter and injects it into a div component on the web page.
Warning: Using the dangerouslySetInnerHTML attribute in production environments can make your application vulnerable to XSS attacks.
Open the XSSHelper file again:
- nano XSSHelper.js
Add the highlighted lines:
import React, {useEffect} from 'react';
import { useLocation } from 'react-router-dom';

export default (props) => {
  const search = useLocation().search;
  const code = new URLSearchParams(search).get('code');

  useEffect(() => {
    console.log(code)
  })

  return(
    <>
      <h2>XSS Helper Active</h2>
      <div dangerouslySetInnerHTML={{__html: code}} />
    </>
  );
}
You wrap the elements being returned in an empty JSX tag (<> ... </>) to avoid multi-fragment JSX returns, which are syntactically illegal when working with React fragments.
Save and close the file.
You can now inject maliciously crafted code into your component to achieve code execution on the web page.
You know that the value of the code query parameter sent to the xss-helper route will be directly embedded into the document of your application. You can set the value of the code query parameter to a link with an <a> tag that uses the href attribute to pass custom JavaScript code directly to the browser.
Navigate to the following URL in your browser:
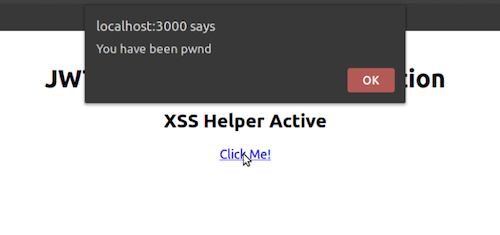
localhost:3000/xss-helper?code=<a href="javascript:alert(`You have been pwned`);">Click Me!</a>
In the above URL, you craft a query parameter XSS payload to show up as a link that reads Click Me! on the web page. When the user clicks on the link, the link tells the browser to execute your crafted JavaScript code. That code uses the alert function to create a pop-up with the message You have been pwned.
Next, navigate to the following URL in your browser:
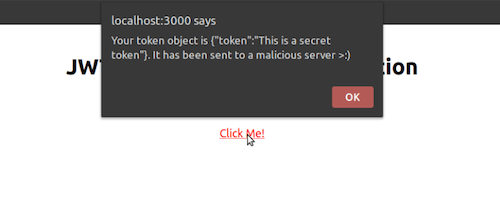
localhost:3000/xss-helper?code=<a href="javascript:alert(`Your token object is ${localStorage.getItem('token')}. It has been sent to a malicious server >:)`);">Click Me!</a>
For this page, the browser storage contents are accessible to an attacker via URL query parameter script injection that reads the value of the token stored in localStorage with JavaScript code.
You have to be logged into the application for the token to exist, allowing your maliciously crafted URL to show the token stored in local storage. When you press the Click Me! link on the web page, you will receive a pop-up message that your token has been stolen.
In this step, you used one of many sample attack vectors to achieve code execution. With the authentication token of an unsuspecting user, malicious attackers can impersonate users on your web application to access privileged site assets. From these tests, you now know that storing secret information, such as authentication tokens, in browser storage is an unsafe practice.
Next, you will use an alternative method to store secret information, which will be inaccessible to scripts running on the document and immune to this type of XSS attack.
Step 7 — Using HTTP-Only Cookies to Mitigate Browser Storage XSS Vulnerability
In this step, you will use HTTP-only cookies to mitigate the XSS vulnerability discovered and exploited in the previous step.
HTTP cookies are snippets of information stored in key-value pairs within the browser. They are often used for tracking, personalization, or session management.
JavaScript cannot access an HTTP-only cookie via the Document.cookie property, which helps to prevent XSS attacks aiming to steal user information through malicious code injection. You can use the Set-Cookie header to set cookies server-side for authenticated clients, which will be available in every request the client makes to the server and can then be used by the server to check the authentication status of the user. You will use the cookie-parser middleware with Express to handle this rather than setting the header.
To implement secure HTTP-only cookie-based token storage, you will update the following files:
- The back-end
index.jsfile will be modified to implement theloginroute so that it sets a cookie upon successful authentication. The back-end will also need two new routes: one for checking the authentication status of a user and one for logging out a user. - The front-end
Login.jsandApp.jsfiles will be modified to use the new routes from the back-end.
These modifications will implement login, logout, and authentication status functionalities to your client and server code.
Move to the back-end directory and install the cookie-parser package, which will allow you to set and read cookies in your Express app:
- cd /app/jwt-storage-tutorial/back-end
- npm install cookie-parser
You will see a variation of the following output:
Output...
added 2 packages, and audited 62 packages in 1s

7 packages are looking for funding
  run `npm fund` for details

found 0 vulnerabilities...
Next, open index.js in your back-end application:
- nano /app/jwt-storage-tutorial/back-end/index.js
Add the highlighted code to import the newly installed cookie-parser package with the require method and use it as middleware in the app:
const express = require('express');
const cors = require('cors');

const cookieParser = require('cookie-parser')

const app = express();

app.use(cors());
app.use(cookieParser())

app.post('/login', (req, res) => {
    res.send({
      token: "This is a secret token"
    });
});

app.listen(8080, () => console.log('API active on http://localhost:8080'));
You will also configure the cors middleware to bypass CORS restrictions for development purposes. In the same file, add the highlighted lines:
const express = require('express');
const cors = require('cors');

const cookieParser = require('cookie-parser')

const app = express();

let corsOptions = {
  origin: 'http://localhost:3000',
  credentials: true,
}

app.use(cors(corsOptions));
app.use(cookieParser())

app.post('/login', (req, res) => {
    res.send({
      token: "This is a secret token"
    });
});

app.listen(8080, () => console.log('API active on http://localhost:8080'));
You set the Access-Control-Allow-Origin CORS header using the origin option under the corsOptions object to the domain from which your front-end sends API requests. You also set the credentials parameter to true, which tells the front-end that it is expected to send the authorization token in a cookie for every API request. The value of the origin option specifies from which domains to accept access-control data, such as cookies, for back-end processing.
Finally, you pass in the corsOptions configuration object into the cors middleware object.
Next, you will set the user’s cookie token using the cookie() method made available on the response object of your route handler by the cookie-parser middleware. Replace the lines in the app.use('/login', (req, res) section with the highlighted lines:
const express = require('express');
const cors = require('cors');

const cookieParser = require('cookie-parser')

const app = express();

let corsOptions = {
  origin: 'http://localhost:3000',
  credentials: true,
}

app.use(cors(corsOptions));
app.use(cookieParser())

app.use('/login', (req, res) => {
    res.cookie("token", "this is a secret token", {
      httpOnly: true,
      maxAge: 1000 * 60 * 60 * 24 * 14, // 14 Day Age,
      domain: "localhost",
      sameSite: 'Lax',
    }).send({
      authenticated: true,
      message: "Authentication Successful."});
});

app.listen(8080, () => console.log('API active on http://localhost:8080'));
In the above code block, you set a cookie with a key of token and a value of this is a secret token. The httpOnly config option sets the httpOnly attribute so that the cookie will not be accessible to JavaScript running on the document.
You set the maxAge attribute so that the cookie expires in 14 days. After 14 days, the cookie will expire, and the browser will need a new authentication cookie. So the user will need to log in again with their username and password.
The sameSite and domain attributes are set to ensure that the client browser does not reject your cookies due to CORS or other security protocol issues.
Now that you have a route to log in, you need a route to log out. Add the highlighted lines to set the log-out method:
const express = require('express');
const cors = require('cors');

const cookieParser = require('cookie-parser')

const app = express();

let corsOptions = {
  origin: 'http://localhost:3000',
  credentials: true,
}

app.use(cors(corsOptions));
app.use(cookieParser())

app.use('/login', (req, res) => {
    res.cookie("token", "this is a secret token", {
      httpOnly: true,
      maxAge: 1000 * 60 * 60 * 24 * 14, // 14 Day Age,
      domain: "localhost",
      sameSite: 'Lax',
    }).send({
      authenticated: true,
      message: "Authentication Successful."});
});

app.use('/logout', (req, res) => {
  res.cookie("token", null, {
    httpOnly: true,
    maxAge: 1000 * 60 * 60 * 24 * 14, // 14 Day Age,
    domain: "localhost",
    sameSite: 'Lax',
  }).send({
    authenticated: false,
    message: "Logout Successful."
  });
});

app.listen(8080, () => console.log('API active on http://localhost:8080'));
The logout method is similar to the login route. The logout method will remove the token the user has stored as a cookie by setting the token cookie to null. Then, it will inform the user that they have been logged out successfully.
Finally, add the highlighted lines to implement an auth-status route that lets the user client check whether or not the user is logged in and allowed to access private assets:
const express = require('express');
const cors = require('cors');

const cookieParser = require('cookie-parser')

const app = express();

let corsOptions = {
  origin: 'http://localhost:3000',
  credentials: true,
}

app.use(cors(corsOptions));
app.use(cookieParser())

app.use('/login', (req, res) => {
    res.cookie("token", "this is a secret token", {
      httpOnly: true,
      maxAge: 1000 * 60 * 60 * 24 * 14, // 14 Day Age,
      domain: "localhost",
      sameSite: 'Lax',
    }).send({
      authenticated: true,
      message: "Authentication Successful."});
});

app.use('/logout', (req, res) => {
  res.cookie("token", null, {
    httpOnly: true,
    maxAge: 1000 * 60 * 60 * 24 * 14, // 14 Day Age,
    domain: "localhost",
    sameSite: 'Lax',
  }).send({
    authenticated: false,
    message: "Logout Successful."
  });
});

app.use('/auth-status', (req, res) => {
  console.log(req.cookies)

  if (req.cookies?.token === "this is a secret token") {
    res.send({isAuthenticated: true})
  } else {
    res.send({isAuthenticated: false})
  }
})

app.listen(8080, () => console.log('API active on http://localhost:8080'));
Your auth-status route checks for a token cookie that matches the expected value for the user authentication token. It then responds with a boolean value to indicate whether or not the user is authenticated.
Save and close the file when finished. You’ve made the necessary changes in your backend to allow your frontend to track the user’s authentication status through your back-end API.
Next, you will make the necessary front-end changes to implement HTTP-only cookie-based token storage.
Move to the front-end directory and open the Login.js file:
- cd ..
- cd front-end/src/components/
- nano Login.js
Add the highlighted line to modify the loginUser function in your Login component:
...

async function loginUser(credentials) {
  return fetch('http://localhost:8080/login', {
    method: 'POST',
    credentials: 'include',
    headers: {
      'Content-Type': 'application/json'
    },
    body: JSON.stringify(credentials)
  }).then(data => data.json())
}

...
You set the credentials header of your fetch requests to include, which tells the loginUser function to send any credentials that might be set as cookies on API calls to the login path that you just modified on your back-end.
Next, you will remove the setToken input property to the Login component and its use at the end of the handleSubmit callback since you won’t keep a token in memory anymore.
You will also need to trigger a refresh at the end of the handlesubmit function so that your application refreshes upon clicking the login button and the newly set token cookie is recognized by the client application. Add the highlighted line:
...
  const handleSubmit = async (e) => {
    e.preventDefault();
    const token = await loginUser({
        username: emailRef.current.value,
        password: passwordRef.current.value
    })
    window.location.reload(false);
  }
...
Your Login.js file should now look like this:
import React, { useRef } from 'react';

async function loginUser(credentials) {
  return fetch('http://localhost:8080/login', {
    method: 'POST',
    credentials: 'include',
    headers: {
      'Content-Type': 'application/json'
    },
    body: JSON.stringify(credentials)
  }).then(data => data.json())
}

export default () => {
  const emailRef = useRef();
  const passwordRef = useRef();

  const handleSubmit = async (e) => {
    e.preventDefault();
    const token = await loginUser({
        username: emailRef.current.value,
        password: passwordRef.current.value
    })
    window.location.reload(false);
  }

  return(
    <div className='login-wrapper'>
      <h1>Login</h1>
      <form onSubmit={handleSubmit}>
        <label>
          <p>Username</p>
          <input type="text" ref={emailRef} />
        </label>
        <label>
          <p>Password</p>
          <input type="password" ref={passwordRef} />
        </label>
        <div>
          <button type="submit">Submit</button>
        </div>
      </form>
    </div>
  );
}
Save and close the file.
Since you are no longer keeping the authentication token in memory, you cannot check if you have an authentication token present when you need to determine if the user should log in or if they can access private assets.
To make these changes, open the App.js file for your front-end:
- cd ..
- nano App.js
Import the useState hook from the react package and initialize a new authenticated state variable and its setter to reflect the authentication status of the user:
import logo from './logo.svg';
import './App.css';

import { useState } from 'react'

...

function App() {
  let [authenticated, setAuthenticated] = useState(false);

  if (!token) {
    return <Login setToken={setToken} />
  }

  return(
    <div className="App wrapper">
      <h1 className="App-header">
        JWT-Storage-Tutorial Application
      </h1>
      <BrowserRouter>
        <Switch>
          <Route path="/subscriber-feed">
            <SubscriberFeed />
          </Route>
        </Switch>
      </BrowserRouter>
    </div>
  );
}

export default App;
The useState hook will check the user’s authentication status by making a request to your back-end API that can tell if a valid authentication token is actively held as a cookie for the front-end client.
Next, remove the setToken and getToken functions, the token variable, and the conditional rendering of the login component. Then, create two new functions called getAuthStatus and isAuthenticated with the highlighted lines:
import logo from './logo.svg';
import './App.css';

import { useState } from 'react'

import { BrowserRouter, Route, Switch } from 'react-router-dom';
import SubscriberFeed from "./components/SubscriberFeed";
import Login from './components/Login';

function App() {
  let [authenticated, setAuthenticated] = useState(false);

  async function getAuthStatus() {
    return fetch('http://localhost:8080/auth-status', {
      method: 'GET',
      credentials: 'include',
      headers: {
        'Content-Type': 'application/json'
      },
    }).then(data => data.json())
  }

  async function isAuthenticated() {
    const authStatus = await getAuthStatus();
    setAuthenticated(authStatus.isAuthenticated);
  }

  return(
    <div className="App wrapper">
      <h1 className="App-header">
        JWT-Storage-Tutorial Application
      </h1>
      <BrowserRouter>
        <Switch>
          <Route path="/subscriber-feed">
            <SubscriberFeed />
          </Route>
        </Switch>
      </BrowserRouter>
    </div>
  );
}

export default App;
The getAuthStatus function will make a GET request to the auth-status route of your back-end app to retrieve the user’s authentication status, pending whether or not the user sent the request with a valid auth token cookie.
By setting the value of the credentials option to include, fetch will send any credentials that the browser may store for the user client as cookies. The isAuthenticated function will call the getAuthStatus function and set the authenticated state of your app to a boolean value reflecting the user’s authentication status.
Next, you will import the useEffect hook with the highlighted lines:
import logo from './logo.svg';
import './App.css';

import { useState, useEffect } from 'react'

import { BrowserRouter, Route, Switch } from 'react-router-dom';
import SubscriberFeed from "./components/SubscriberFeed";
import Login from './components/Login';

function App() {
  let [authenticated, setAuthenticated] = useState(false);

  async function getAuthStatus() {
    return fetch('http://localhost:8080/auth-status', {
      method: 'GET',
      credentials: 'include',
      headers: {
        'Content-Type': 'application/json'
      },
    }).then(data => data.json())
  }

  async function isAuthenticated() {
    const authStatus = await getAuthStatus();
    setAuthenticated(authStatus.isAuthenticated)
  }

  useEffect(() => {
    isAuthenticated();
  }, [])

...
This modification will call the login route to check the authentication status in the useEffect hook. Including an empty dependency array for the useEffect hook can help to avoid memory leaks in your application.
To conditionally render the login component on the application homepage, add the highlighted lines:
...

function App() {
  let [authenticated, setAuthenticated] = useState(false);
  let [loading, setLoading] = useState(true)

  async function getAuthStatus() {
    await setLoading(true);
    return fetch('http://localhost:8080/auth-status', {
      method: 'GET',
      credentials: 'include',
      headers: {
        'Content-Type': 'application/json'
      },
    }).then(data => data.json())
  }

  async function isAuthenticated() {
    const authStatus = await getAuthStatus();
    await setAuthenticated(authStatus.isAuthenticated);
    await setLoading(false)
  }

  useEffect(() => {
    isAuthenticated();
  }, [])

  return (
    <>
      {!loading && (
        <>
          {!authenticated && <Login />}

          {authenticated && (
            <div className="App wrapper">
              <h1 className="App-header">
                JWT-Storage-Tutorial Application
              </h1>
              <BrowserRouter>
                <Switch>
                  <Route path="/subscriber-feed">
                    <SubscriberFeed />
                  </Route>
                  <Route path="/xss-helper">
                    <XSSHelper />
                  </Route>
                </Switch>
              </BrowserRouter>
            </div>
          )}
        </>
      )}
    </>
  );
}

export default App;
If the authenticated variable is set to false, your application will render the login component. Otherwise, the application homepage and all its routes, including private pages, would render instead.
You add a new loading state variable to avoid rendering anything until the call to the auth-status route of your back-end application is completed. Because the authenticated state variable is initially set to false, the client will assume that the user has not logged in until the API call to the authentication-status route is completed and the authenticated state variable is updated.
You will next create a logoutUser function that calls your logout route on the back-end API. Add the highlighted lines to the file:
import logo from './logo.svg';
import './App.css';

import { useState, useEffect } from 'react';

import { BrowserRouter, Route, Switch } from 'react-router-dom';
import SubscriberFeed from "./components/SubscriberFeed";
import Login from './components/Login';
import XSSHelper from './components/XSSHelper'

function App() {
  let [authenticated, setAuthenticated] = useState(false);
  let [loading, setLoading] = useState(true)

  async function getAuthStatus() {
    await setLoading(true);
    return fetch('http://localhost:8080/auth-status', {
      method: 'GET',
      credentials: 'include',
      headers: {
        'Content-Type': 'application/json'
      },
    }).then(data => data.json())
  }

  async function isAuthenticated() {
    const authStatus = await getAuthStatus();
    await setAuthenticated(authStatus.isAuthenticated);
    await setLoading(false);
  }

  async function logoutUser() {
    await fetch('http://localhost:8080/logout', {
      method: 'POST',
      credentials: 'include',
      headers: {
        'Content-Type': 'application/json'
      },
    })
    isAuthenticated();
  }

  useEffect(() => {
    isAuthenticated();
  }, [])

  return (
    <>
      {!loading && (
        <>
          {!authenticated && <Login />}

          {authenticated && (
            <div className="App wrapper">
              <h1 className="App-header">
                JWT-Storage-Tutorial Application
              </h1>
              <button onClick={logoutUser}>Logout</button>
              <BrowserRouter>
                <Switch>
                  <Route path="/subscriber-feed">
                    <SubscriberFeed />
                  </Route>
                  <Route path="/xss-helper">
                    <XSSHelper />
                  </Route>
                </Switch>
              </BrowserRouter>
            </div>
          )}
        </>
      )}
    </>
  );
}

export default App;
You will create a log-out button to log the user out, setting its onClick attribute to a callback function that calls your logout route on the back-end API. The route will respond with a set-cookie header that sets the token cookie of the client to null, effectively rendering the authentication status of your front-end application to a falsy value.
You will also call the isAuthenticated function at the end of the logout callback function, which will update your application’s status to reflect the user’s unauthenticated status by setting the authenticated state variable to false.
Save and close the file when finished.
Now you can test the HTTP-only cookie-based token storage system. Refresh the web application to implement the modifications you just made.
Then, clear the contents of your browser storage to remove any lingering tokens in browser storage. Next, navigate to the same maliciously crafted URL as in Step 4 to see if an attacker can still steal your token via injected JavaScript:
localhost:3000/xss-helper?code=<a href="javascript:alert(`Your token object is ${localStorage.getItem('token')}. It has been sent to a malicious server >:)`);">Click Me!</a>
You may need to log back in to your site to see the XSS Helper Active line. You should see the following pop-up that states Your token object is null after clicking on the link that reads Click Me!:
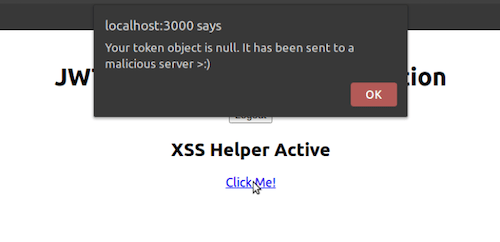
The injected JavaScript cannot find the token object, so the pop-up shows a null value. Close the pop-up message.
You should now be able to log out of the app by pressing the Logout button.
In this step, you improved the security of your application by switching from using browser storage for auth token persistence to using HTTP-only cookies.
Conclusion
In this tutorial, you created a React and Node web application with a user login feature in a Docker container. You implemented an authentication system with a vulnerable token storage method to test your site’s security. You then exploited this method with a reflected XSS attack payload, enabling you to assess vulnerabilities when using browser storage to store authentication cookies. Finally, you mitigated the XSS vulnerability in the initial implementation by setting up an authentication system that uses HTTP-only cookies rather than browser storage to store authentication tokens. You now have a front-end and back-end application with an HTTP-only cookie-based authentication token system.
To improve the security and usability of your application’s authentication process, you might integrate third-party authentication tools like PassportJS or an OAuth API, such as DigitalOcean’s OAuth API. For more on the OAuth framework, you can review An Introduction to OAuth 2.
Thanks for learning with the DigitalOcean Community. Check out our offerings for compute, storage, networking, and managed databases.
About the author(s)
FOSS enthusiast and technical writer.
Still looking for an answer?
This textbox defaults to using Markdown to format your answer.
You can type !ref in this text area to quickly search our full set of tutorials, documentation & marketplace offerings and insert the link!
 This work is licensed under a Creative Commons Attribution-NonCommercial- ShareAlike 4.0 International License.
Become a contributor for community
Get paid to write technical tutorials and select a tech-focused charity to receive a matching donation.

DigitalOcean Documentation
Full documentation for every DigitalOcean product.

Resources for startups and AI-native businesses
The Wave has everything you need to know about building a business, from raising funding to marketing your product.
The developer cloud
Scale up as you grow — whether you're running one virtual machine or ten thousand.

Start building today
From GPU-powered inference and Kubernetes to managed databases and storage, get everything you need to build, scale, and deploy intelligent applications.
