By Mitchell Anicas and Vinayak Baranwal

Introduction
OAuth 2 lets third-party apps access user data without handling passwords. Instead of asking users for their credentials, OAuth 2 delegates authentication to the service provider (like Google or GitHub) and issues tokens that represent specific permissions.
Here’s what you need to know: OAuth 2 is an authorization framework, not authentication. It answers “What can this app do?” not “Who is this user?” When you click “Sign in with Google” on a website, that’s typically OpenID Connect (which adds authentication) built on top of OAuth 2.
Why OAuth 2 exists: Before OAuth 2, applications either asked users for passwords (security risk) or required users to share API keys (too permissive). OAuth 2 solves this by letting users grant limited, revocable permissions. For example, a backup app can access your Google Drive files without your Google password, and you can revoke access anytime.
This guide shows you how OAuth 2 works, which grant types to use for different scenarios, and how to implement secure OAuth 2 flows in your applications.
Deploy your frontend applications from GitHub using DigitalOcean App Platform. Let DigitalOcean focus on scaling your app.
Key Takeaways
Before diving into the technical details, here are the essential points about OAuth 2:
- OAuth 2 provides authorization, not authentication. It allows applications to obtain permission to access resources but does not verify the user’s identity on its own.
- The OAuth 2 flow is defined by four core roles: Resource Owner, Client, Authorization Server, and Resource Server, each of which plays a part in enabling secure access.
- The Authorization Code grant is the standard approach for server-side applications where the client secret can be kept confidential.
- PKCE, or Proof Key for Code Exchange, is essential for public clients as it protects against authorization code interception attacks.
- Tokens issued by OAuth 2 have limited lifespans; access tokens expire, and refresh tokens allow applications to obtain new access tokens without user intervention.
- Scopes in OAuth 2 define the permissions being requested. Each authorization request specifies which resources and actions the application can access, such as read, write, or administrative privileges.
- OAuth 1 is now deprecated. OAuth 2 has replaced OAuth 1.0 due to improved security and a more straightforward implementation process.
From an application developer’s point of view, a service’s API fulfills both the resource and authorization server roles. We refer to both roles combined as the Service or API role.
What Is OAuth 2?
OAuth 2 is an authorization framework defined in RFC 6749 that enables third-party applications to obtain limited access to a user’s resources on an HTTP service. The framework standardizes how applications request and receive permission to access user data without exposing user credentials.
Think of OAuth 2 like a valet key for your car: you give a parking attendant a limited-use key that only opens the door and starts the engine, but doesn’t open the trunk or glove compartment. Similarly, OAuth 2 gives applications specific permissions (scopes) to access certain resources, without granting full account access.
OAuth 2 solves a critical security problem: applications no longer need to store user passwords. Instead, users authorize applications through the service provider (like Google or GitHub), which issues tokens that represent the granted permissions. This reduces the attack surface and gives users granular control over what each application can access.
How OAuth 2 Works: The Basic Flow
OAuth 2 follows a six-step pattern regardless of which grant type you use. Understanding this flow helps you debug issues and choose the right grant type for your application.
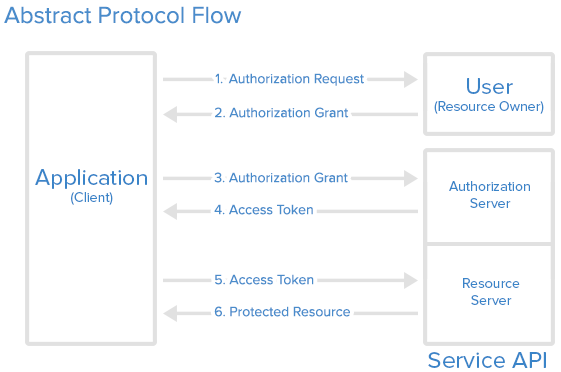
Step 1: Application requests authorization. Your application redirects the user to the authorization server with a request for specific permissions (scopes).
Step 2: User authorizes the application. The user logs in (if needed) and approves or denies your application’s request. If approved, the authorization server generates an authorization grant.
Step 3: Application requests access token. Your application exchanges the authorization grant (plus your client credentials) for an access token. This happens server-to-server.
Step 4: Authorization server issues access token. If everything checks out, the server returns an access token (and optionally a refresh token) to your application.
Step 5: Application requests protected resource. Your application uses the access token to make API requests on behalf of the user.
Step 6: Resource server serves the resource. The API validates the token and returns the requested data if the token is valid and has the required scopes.
The specific grant type you choose determines how steps 1-4 work, but steps 5-6 are the same for all flows.
OAuth 2 vs Authentication vs OpenID Connect
Understanding the difference between OAuth 2, authentication, and OpenID Connect prevents common implementation mistakes.
OAuth 2 is authorization. It answers “What can this application do?” by granting permissions to access resources. OAuth 2 doesn’t verify who the user is; it assumes authentication already happened.
Authentication verifies identity. It answers “Who is this user?” by confirming credentials (username/password, biometrics, etc.). Authentication happens before OAuth 2 authorization begins.
OpenID Connect (OIDC) adds authentication to OAuth 2. Built on OAuth 2, OpenID Connect adds an ID token that contains user identity information. When you see “Sign in with Google,” that’s typically OpenID Connect using OAuth 2 underneath.
Here’s a comparison table:
| Aspect | OAuth 2 | Authentication | OpenID Connect |
|---|---|---|---|
| Purpose | Authorization (permissions) | Identity verification | Both authentication and authorization |
| Answers | “What can this app do?” | “Who is this user?” | “Who is this user and what can they do?” |
| Token Type | Access token | Session token/cookie | ID token + access token |
| Use Case | API access, third-party integrations | Login systems | Social login, single sign-on |
| Example | App accessing your GitHub repos | Logging into your email | “Sign in with Google” button |
When to use each:
- Use OAuth 2 alone when you only need to grant API access (e.g., a backup tool accessing your cloud storage).
- Use authentication when building your own login system (e.g., username/password for your application).
- Use OpenID Connect when you need both identity and permissions (e.g., social login that also accesses user profile data).
Note: Many developers confuse OAuth 2 with authentication because popular implementations (like “Sign in with Google”) combine both. The OAuth 2 flow includes an authentication step (user logs in), but OAuth 2 itself only handles the authorization that follows.
OAuth 2 Roles Explained
OAuth 2 defines four roles that interact during the authorization process. Understanding these roles clarifies how OAuth 2 works in practice.
Resource Owner: The user who owns the resources (data, account, etc.) and can grant access to them. In real-world terms, this is you when you click “Allow” to let an app access your Google Drive files.
Client: The application requesting access to the user’s resources. This could be a mobile app, web application, or server-side service. The client must be registered with the authorization server before it can participate in OAuth 2 flows.
Authorization Server: The server that authenticates the resource owner and issues access tokens after successful authorization. This is typically the same service hosting the user’s account (e.g., Google’s authorization server for Google accounts).
Resource Server: The server hosting the protected resources (user data, APIs, etc.). It accepts and validates access tokens to determine if requests should be fulfilled. Often, the authorization server and resource server are the same service, but they can be separate for distributed architectures.
From an application developer’s perspective, the authorization server and resource server are often combined into a single “API” or “Service” that you’re integrating with. For example, DigitalOcean’s API handles both authorization (issuing tokens) and resource serving (providing droplet data).
Application Registration and Client Credentials
Before your application can use OAuth 2, you must register it with the service provider. Registration happens through the service’s developer portal or API management interface.
Application Registration Requirements
During registration, you’ll provide:
- Application Name: A human-readable name that users will see during authorization (e.g., “My Backup Tool”).
- Application Website: Your application’s homepage or documentation URL.
- Redirect URI (Callback URL): The exact URL where the authorization server will send users after they authorize or deny your application. This must match exactly what you specify in authorization requests.
Security Note: Register multiple redirect URIs if your application runs on different environments (development, staging, production). Never use wildcards or overly permissive redirect URIs, as attackers can exploit them to steal authorization codes.
Client ID and Client Secret
After registration, the service issues client credentials:
Client ID: A publicly exposed string that identifies your application. It’s safe to include in client-side code, URLs, and public repositories. The Client ID is used to build authorization URLs and identify which application is requesting access.
Client Secret: A confidential string that authenticates your application to the authorization server. Store it securely on your server (environment variables, secret managers) and only use it in server-to-server communication.
Security Critical: Never expose client secrets in:
- Frontend JavaScript code or mobile apps (use PKCE instead)
- Git repositories, even in .env files (use .gitignore)
- URLs or query parameters
- Client-side storage (localStorage, cookies)
- Error messages or logs
- Public documentation or screenshots
Compromised secrets require regeneration and redeployment of all clients.
OAuth 2 Authorization Grant Types
An authorization grant is a credential representing the resource owner’s authorization to access their protected resources. OAuth 2 defines several grant types, each optimized for different application architectures based on security requirements, client capabilities, and whether user interaction is possible.
Authorization Code: The most common grant type, designed for server-side applications where the client secret can be securely stored. This is a redirection-based flow that works through the user’s browser.
Client Credentials: Used for machine-to-machine communication where no user is involved. The application accesses its own resources or service account.
Device Code: Designed for input-constrained devices (smart TVs, IoT devices) that lack browsers or keyboards. Users authorize on a separate device.
Deprecated Grant Types: OAuth 2 originally included Implicit Flow and Resource Owner Password Credentials grant types. Both are now considered insecure and deprecated:
- Implicit Flow: Tokens were returned directly in the URL fragment, making them vulnerable to interception. Use Authorization Code with PKCE instead.
- Password Grant: Applications collected user passwords directly, violating OAuth 2’s core security principle. Never use this grant type.
The grant type you choose depends on your application architecture, security requirements, and the capabilities of your client application. We’ll explore each recommended grant type in detail below.
Authorization Code Flow (Step-by-Step)
The Authorization Code grant type is the standard for server-side web applications, mobile apps, and single-page applications. It’s secure because the access token is never exposed to the user-agent (browser); only the authorization code is transmitted, which is then exchanged server-side for the token.
When to Use Authorization Code Flow
Use this flow when:
- Your application has a server component that can securely store the client secret
- You’re building a web application, mobile app, or desktop application
- You need the highest level of security for user authorization
Step 1: Build the Authorization URL
The application redirects the user to an authorization URL that includes several parameters:
https:/v1/oauth/authorize?response_type=code&client_id=CLIENT_ID&redirect_uri=CALLBACK_URL&scope=read&state=RANDOM_STATE_STRING
URL Components Explained:
response_type=code: Tells the authorization server you’re requesting an authorization code grantclient_id=CLIENT_ID: Your registered application’s client IDredirect_uri=CALLBACK_URL: Must exactly match a redirect URI registered with your applicationscope=read: The permissions you’re requesting (common scopes:read,write,admin)state=RANDOM_STATE_STRING: A random value you generate to prevent CSRF attacks. Store this in the user’s session and verify it when the callback is received
Security Best Practice: Always include a state parameter with a cryptographically random value. Verify this value matches when processing the callback to prevent cross-site request forgery (CSRF) attacks.
Step 2: User Authorizes the Application
When the user clicks the authorization link, they’re redirected to the authorization server. If not already logged in, they authenticate with their credentials. Then they see a consent screen showing:
- Which application is requesting access
- What permissions (scopes) are being requested
- Which account the access will be granted for
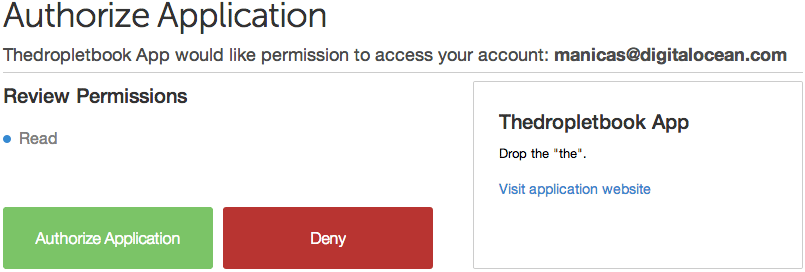
The user can approve or deny the request. If they approve, the authorization server generates an authorization code.
Step 3: Receive Authorization Code
After user approval, the authorization server redirects the user back to your redirect_uri with an authorization code:
https:/callback?code=AUTHORIZATION_CODE&state=RANDOM_STATE_STRING
Important: The authorization code is short-lived (typically 10 minutes or less) and can only be used once. Exchange it immediately for an access token.
Step 4: Exchange Code for Access Token
Your server makes a POST request to the token endpoint, sending the authorization code along with your client credentials:
POST https://cloud.digitalocean.com/v1/oauth/token
Content-Type: application/x-www-form-urlencoded

client_id=CLIENT_ID&client_secret=CLIENT_SECRET&grant_type=authorization_code&code=AUTHORIZATION_CODE&redirect_uri=CALLBACK_URL
This request must be made server-to-server; never expose your client secret in client-side code.
Step 5: Receive Access Token
If the authorization code is valid and hasn’t expired, the authorization server responds with tokens:
{
  "access_token": "ACCESS_TOKEN",
  "token_type": "bearer",
  "expires_in": 2592000,
  "refresh_token": "REFRESH_TOKEN",
  "scope": "read",
  "uid": 100101
}
Token Response Fields:
access_token: Use this to authenticate API requests. Store it securely and never expose it in URLs or client-side code.token_type: Usually"bearer", indicating how to use the token (in theAuthorizationheader).expires_in: Token lifetime in seconds (e.g., 2592000 = 30 days).refresh_token: Optional token used to obtain new access tokens without user interaction.scope: The permissions granted (may be a subset of requested scopes).
Your application is now authorized. Use the access token to make API requests on behalf of the user, within the granted scope, until the token expires or is revoked.
Complete Implementation Example
This example demonstrates a production-ready Express.js server implementing the full Authorization Code flow. It includes all security best practices: state parameter validation to prevent CSRF attacks, proper error handling for common OAuth 2 failure scenarios, automatic token refresh to maintain seamless user sessions, and secure token storage. The implementation handles the complete lifecycle from initial authorization request through token exchange, refresh, and API usage.
// Express.js example - OAuth 2 Authorization Code flow
const express = require('express');
const crypto = require('crypto');
const axios = require('axios');

const app = express();
const CLIENT_ID = process.env.OAUTH_CLIENT_ID;
const CLIENT_SECRET = process.env.OAUTH_CLIENT_SECRET;
const REDIRECT_URI = 'https://your-app.com/callback';
const AUTHORIZATION_URL = 'https://cloud.digitalocean.com/v1/oauth/authorize';
const TOKEN_URL = 'https://cloud.digitalocean.com/v1/oauth/token';

// Store state values in session (use Redis in production)
const stateStore = new Map();

// Step 1: Redirect user to authorization server
app.get('/auth', (req, res) => {
  // Generate cryptographically random state
  const state = crypto.randomBytes(32).toString('hex');
  stateStore.set(state, { timestamp: Date.now() });

  // Build authorization URL
  const authUrl = new URL(AUTHORIZATION_URL);
  authUrl.searchParams.set('response_type', 'code');
  authUrl.searchParams.set('client_id', CLIENT_ID);
  authUrl.searchParams.set('redirect_uri', REDIRECT_URI);
  authUrl.searchParams.set('scope', 'read write');
  authUrl.searchParams.set('state', state);

  res.redirect(authUrl.toString());
});

// Step 2-4: Handle callback and exchange code for token
app.get('/callback', async (req, res) => {
  const { code, state, error } = req.query;

  // Validate state parameter
  if (!stateStore.has(state)) {
    return res.status(400).send('Invalid state parameter');
  }
  stateStore.delete(state); // Use state only once

  // Handle authorization denial
  if (error) {
    return res.status(400).send(`Authorization failed: ${error}`);
  }

  if (!code) {
    return res.status(400).send('Authorization code missing');
  }

  try {
    // Exchange authorization code for access token
    // Use URLSearchParams to send form data, not JSON
    const tokenResponse = await axios.post(TOKEN_URL,
      new URLSearchParams({
        grant_type: 'authorization_code',
        code: code,
        redirect_uri: REDIRECT_URI,
        client_id: CLIENT_ID,
        client_secret: CLIENT_SECRET
      }), {
        headers: {
          'Content-Type': 'application/x-www-form-urlencoded'
        }
      }
    );

    const { access_token, refresh_token, expires_in } = tokenResponse.data;

    // Store tokens securely (use encrypted database in production)
    // In this example, we'll store in session
    req.session.accessToken = access_token;
    req.session.refreshToken = refresh_token;
    req.session.tokenExpiry = Date.now() + (expires_in * 1000);

    res.redirect('/dashboard');
  } catch (error) {
    // Handle token exchange errors
    if (error.response) {
      const { error: errorCode, error_description } = error.response.data;
      console.error('Token exchange failed:', errorCode, error_description);

      if (errorCode === 'invalid_grant') {
        // Authorization code expired or already used
        return res.status(400).send('Authorization code expired. Please try again.');
      } else if (errorCode === 'invalid_client') {
        // Client credentials invalid
        return res.status(500).send('Server configuration error');
      }
    }

    res.status(500).send('Token exchange failed');
  }
});

// Step 5-6: Use access token to make API requests
app.get('/api/droplets', async (req, res) => {
  let accessToken = req.session.accessToken;

  // Check if token expired
  if (Date.now() >= req.session.tokenExpiry) {
    // Refresh the token
    try {
      const refreshResponse = await axios.post(TOKEN_URL,
        new URLSearchParams({
          grant_type: 'refresh_token',
          refresh_token: req.session.refreshToken,
          client_id: CLIENT_ID,
          client_secret: CLIENT_SECRET
        }), {
          headers: {
            'Content-Type': 'application/x-www-form-urlencoded'
          }
        }
      );

      accessToken = refreshResponse.data.access_token;
      req.session.accessToken = accessToken;
      req.session.tokenExpiry = Date.now() + (refreshResponse.data.expires_in * 1000);
    } catch (error) {
      // Refresh failed, redirect to re-authorize
      return res.redirect('/auth');
    }
  }

  try {
    const apiResponse = await axios.get('https://api.digitalocean.com/v2/droplets', {
      headers: {
        'Authorization': `Bearer ${accessToken}`
      }
    });

    res.json(apiResponse.data);
  } catch (error) {
    if (error.response?.status === 401) {
      // Token invalid, redirect to re-authorize
      return res.redirect('/auth');
    }
    res.status(error.response?.status || 500).json({ error: 'API request failed' });
  }
});
Key implementation details:
- State validation: Prevents CSRF attacks by verifying the state parameter matches what you sent
- Error handling: Handles authorization denial, expired codes, and invalid tokens
- Token refresh: Automatically refreshes expired tokens before making API requests
- Secure storage: Tokens stored in session (use encrypted database in production)
- One-time code use: Authorization codes are single-use; attempting to reuse them fails
Proof Key for Code Exchange (PKCE)
PKCE (pronounced “pixie”) is a security extension to the Authorization Code flow that prevents authorization code interception attacks. It’s essential for public clients (mobile apps, single-page applications) that cannot securely store client secrets.
Why PKCE Matters
Without PKCE, here’s the exact attack:
- You install a legitimate app (“Photo Editor”) and a malicious app (“Free Wallpapers”) on your phone
- The malicious app registers a custom URL scheme:
photoeditor://callback(pretending to be the legitimate app) - When you authorize the Photo Editor app, the authorization code gets sent to:
photoeditor://callback?code=ABC123 - The malicious app intercepts this URL (since it registered the same scheme) and steals the code
ABC123 - The malicious app exchanges the code for an access token using the legitimate app’s public client ID
- Result: The malicious app now has full access to your account
With PKCE:
- The legitimate Photo Editor generates a secret
code_verifier(e.g.,dBjftJeZ4CVP-mB92K27uhbUJU1p1r_wW1gFWFOEjXk) before starting OAuth - It creates a
code_challengeby hashing this verifier:SHA256(code_verifier)→E9Melhoa2OwvFrEMTJguCHaoeK1t8URWbuGJSstw-cM - The authorization URL includes:
&code_challenge=E9Melhoa2OwvFrEMTJguCHaoeK1t8URWbuGJSstw-cM - Even if the malicious app intercepts the authorization code, it can’t exchange it without the original
code_verifier - When the legitimate app exchanges the code, it sends:
&code_verifier=dBjftJeZ4CVP-mB92K27uhbUJU1p1r_wW1gFWFOEjXk - The authorization server hashes it, confirms it matches the challenge, and issues the token
- Result: The malicious app’s exchange attempt fails with
invalid_granterror
PKCE makes the authorization code useless without the secret only your app knows.
How PKCE Works
Step 1: Generate Code Verifier and Challenge
Before redirecting to the authorization server, your client generates:
- Code Verifier: A cryptographically random string (43-128 characters, URL-safe)
- Code Challenge: A transformation of the verifier (typically SHA256 hash, base64url-encoded)
// Example PKCE generation (conceptual example)
const codeVerifier = generateRandomString(43);
const codeChallenge = base64url(sha256(codeVerifier));
Step 2: Include Challenge in Authorization Request
Add the code challenge and method to your authorization URL:
https:/v1/oauth/authorize?
response_type=code&
client_id=CLIENT_ID&
redirect_uri=CALLBACK_URL&
code_challenge=CODE_CHALLENGE&
code_challenge_method=S256&
scope=read
Step 3: Send Verifier with Token Request
When exchanging the authorization code for a token, include the original code verifier:
POST https://cloud.digitalocean.com/v1/oauth/token

client_id=CLIENT_ID&
grant_type=authorization_code&
code=AUTHORIZATION_CODE&
redirect_uri=CALLBACK_URL&
code_verifier=CODE_VERIFIER
Step 4: Server Validates
The authorization server:
- Hashes the
code_verifierusing the specified method (S256 = SHA256) - Compares it to the stored
code_challenge - Only issues a token if they match
Best Practice: Always use PKCE, even for confidential clients. It adds minimal complexity while significantly improving security. Most modern OAuth 2 libraries handle PKCE automatically.
Client Credentials Grant Type
The Client Credentials grant type enables machine-to-machine communication where no user is involved. The application authenticates using its own credentials and receives an access token for its service account.
When to Use Client Credentials
Use this grant type when:
- Your application needs to access its own resources (not user resources)
- You’re building server-to-server integrations
- No user interaction is required or possible
- You need to update application settings via API
Common Use Cases:
- Background jobs accessing APIs
- Microservices authenticating to each other
- Applications updating their own OAuth registration details
- Automated systems performing administrative tasks
Client Credentials Flow
The flow is straightforward since no user interaction is needed:
Step 1: Request Access Token
Make a POST request to the token endpoint with your client credentials:
POST https://oauth.example.com/token
Content-Type: application/x-www-form-urlencoded

grant_type=client_credentials&
client_id=CLIENT_ID&
client_secret=CLIENT_SECRET&
scope=read
Step 2: Receive Access Token
The authorization server validates your credentials and returns an access token:
{
  "access_token": "ACCESS_TOKEN",
  "token_type": "bearer",
  "expires_in": 3600,
  "scope": "read"
}
Note that refresh tokens are typically not issued for client credentials grants. Since no user is involved, the application can request a new access token directly whenever the current one expires, using the same client credentials.
Note: DigitalOcean does not currently support the client credentials grant type. This example uses a hypothetical authorization server for illustration purposes.
Device Code Grant Type
The Device Code grant type enables authorization on devices that lack browsers or have limited input capabilities. Users authorize on a separate device (like their phone or computer) while the constrained device polls for the authorization result.
When to Use Device Code Flow
Use this grant type for:
- Smart TVs and streaming devices
- IoT devices without displays
- Game consoles
- Printers and other embedded systems
- Command-line tools running on headless servers
Device Code Flow
Step 1: Request Device and User Codes
The device makes a POST request to the device authorization endpoint:
POST https://oauth.example.com/device
Content-Type: application/x-www-form-urlencoded

client_id=CLIENT_ID&
scope=read
Step 2: Receive Device and User Codes
The authorization server responds with codes the user needs to enter:
{
  "device_code": "IO2RUI3SAH0IQuESHAEBAeYOO8UPAI",
  "user_code": "RSIK-KRAM",
  "verification_uri": "https://example.okta.com/device",
  "verification_uri_complete": "https://example.okta.com/device?user_code=RSIK-KRAM",
  "interval": 10,
  "expires_in": 1600
}
Response Fields:
device_code: Used by the device to poll for authorization statususer_code: Short code the user enters (often displayed asRSIK-KRAMfor readability)verification_uri: URL where the user enters the codeverification_uri_complete: Complete URL with user code pre-filled (useful for QR codes)interval: Minimum seconds between polling requestsexpires_in: How long the codes remain valid
Step 3: Display Codes to User
The device displays the user code and verification URL (often as a QR code). The user:
- Opens the verification URL on a device with a browser
- Enters the user code
- Authenticates and approves the authorization request
Step 4: Device Polls for Token
While the user authorizes, the device polls the token endpoint:
POST https://oauth.example.com/token
Content-Type: application/x-www-form-urlencoded

grant_type=urn:ietf:params:oauth:grant-type:device_code&
device_code=IO2RUI3SAH0IQuESHAEBAeYOO8UPAI&
client_id=CLIENT_ID
Polling Responses:
authorization_pending: User hasn’t approved yet; continue pollingslow_down: Polling too frequently; increase intervalaccess_denied: User denied the request; stop pollingexpired_token: Codes expired; start over- Success: Returns access token and refresh token
Best Practice: Respect the interval value and implement exponential backoff. Don’t poll more frequently than the server specifies, as this wastes resources and may trigger rate limiting.
Note: DigitalOcean does not currently support the device code grant type. This example uses a hypothetical authorization server for illustration purposes.
Using Access Tokens
Once you have an access token, use it to authenticate API requests. The standard method is including the token in the Authorization header using the Bearer authentication scheme.
Making Authenticated API Requests
Here’s an example using curl:
curl -X GET \
  -H "Authorization: Bearer ACCESS_TOKEN" \
  https://api.digitalocean.com/v2/droplets
For POST requests with a JSON body:
curl -X POST \
  -H "Authorization: Bearer ACCESS_TOKEN" \
  -H "Content-Type: application/json" \
  -d '{"name":"example-droplet","region":"nyc1","size":"s-1vcpu-1gb","image":"ubuntu-22-04"}' \
  https://api.digitalocean.com/v2/droplets
Token Validation and Error Handling
The resource server validates the access token on every request. Here are the actual HTTP responses you’ll encounter:
Success Response (200 OK):
HTTP/1.1 200 OK
Content-Type: application/json

{
  "droplets": [...],
  "meta": {...}
}
Token Missing or Invalid (401 Unauthorized):
HTTP/1.1 401 Unauthorized
Content-Type: application/json
WWW-Authenticate: Bearer error="invalid_token", error_description="The access token expired"

{
  "id": "unauthorized",
  "message": "Unable to authenticate you"
}
Insufficient Scope (403 Forbidden):
HTTP/1.1 403 Forbidden
Content-Type: application/json

{
  "id": "forbidden",
  "message": "You do not have access to the requested resource"
}
Handling Token Expiration:
When you receive 401 Unauthorized, check the response body for the specific error. Common scenarios:
-
Token expired: Error description mentions “expired” or “invalid_token”
- If you have a refresh token: Exchange it for a new access token
- If no refresh token: Redirect user through authorization flow again
-
Token revoked: User or service revoked the token
- Clear stored tokens and restart authorization flow
-
Token malformed: Token format is incorrect
- Check that you’re sending it in the
Authorization: Bearer TOKENheader format - Verify the token wasn’t truncated or modified
- Check that you’re sending it in the
Security Note: Never log access tokens, include them in URLs, or expose them in client-side JavaScript. Treat access tokens like passwords: store them securely and transmit them only over HTTPS.
Refresh Token Flow
Refresh tokens enable applications to obtain new access tokens without requiring user interaction. This provides a seamless user experience while maintaining security through token expiration.
When Access Tokens Expire
Access tokens have limited lifespans (typically 1 hour to 30 days, depending on the service). When a token expires:
- API requests return
401 Unauthorized - Users would otherwise need to re-authorize frequently
- Refresh tokens solve this by enabling automatic token renewal
How Refresh Tokens Work
Step 1: Request New Access Token
When your access token expires, exchange the refresh token for a new one:
POST https://cloud.digitalocean.com/v1/oauth/token
Content-Type: application/x-www-form-urlencoded

grant_type=refresh_token&
client_id=CLIENT_ID&
client_secret=CLIENT_SECRET&
refresh_token=REFRESH_TOKEN
Step 2: Receive New Tokens
The authorization server validates the refresh token and issues new tokens:
{
  "access_token": "NEW_ACCESS_TOKEN",
  "token_type": "bearer",
  "expires_in": 2592000,
  "refresh_token": "NEW_REFRESH_TOKEN",
  "scope": "read"
}
Token Rotation: Some services issue a new refresh token with each refresh (token rotation). Always save the new refresh token, as the old one may be invalidated. Other services reuse the same refresh token until it’s explicitly revoked.
Refresh Token Best Practices
- Store refresh tokens securely: Use encrypted storage, never in plaintext
- Handle refresh token expiration: Refresh tokens can also expire; redirect users to re-authorize if needed
- Revoke unused tokens: If a user logs out, revoke both access and refresh tokens
- Monitor token usage: Unusual refresh patterns may indicate compromised tokens
When to Use OAuth 2
Understanding when OAuth 2 is the right choice helps you avoid over-engineering or security pitfalls. This section covers appropriate use cases and scenarios where OAuth 2 might not be the best fit.
Use OAuth 2 For
1. Third-Party App Integrations
Real examples:
- Zapier accessing your Gmail to create automated workflows (uses OAuth to read/send emails without your password)
- Trello Power-Ups connecting to Google Drive (OAuth grants access to specific folders only)
- Social media scheduling tools (Buffer, Hootsuite) posting to Twitter/LinkedIn on your behalf
- Cloud backup services (Backblaze, Carbonite) syncing from Dropbox/OneDrive
Implementation: Authorization Code flow with read and write scopes
2. “Connect Your Account” Features
Real examples:
- E-commerce checkout offering “Sign in with Amazon” to pre-fill shipping addresses
- Music streaming apps importing playlists from Spotify using their API
- Fitness apps syncing workout data from Apple Health or Google Fit
- Calendar aggregators (Calendly, Fantastical) displaying events from multiple calendar services
Implementation: Authorization Code flow, typically with OpenID Connect for identity + data access
3. Mobile App API Access
Real examples:
- Instagram mobile app accessing user photos, posting content, retrieving feed data
- Banking apps accessing transaction data from backend APIs
- Delivery apps (DoorDash, Uber Eats) accessing user location and order history
Implementation: Authorization Code with PKCE (no client secret stored in app)
4. Server-to-Server Automation
Real examples:
- CI/CD pipelines (GitHub Actions, CircleCI) deploying to DigitalOcean using API tokens
- Monitoring tools (Datadog, New Relic) accessing infrastructure APIs to collect metrics
- Backup scripts running on cron jobs to archive data via API
Implementation: Client Credentials flow (no user interaction)
5. IoT and Smart Devices
Real examples:
- Smart home hubs (SmartThings, Home Assistant) controlling Philips Hue lights
- Smart TVs accessing Netflix, YouTube, Disney+ accounts
- Digital photo frames displaying Google Photos albums
Implementation: Device Code flow (user authorizes on phone/computer)
Don’t Use OAuth 2 For
1. Your Own Application’s Login System
OAuth 2 is designed for third-party authorization, not for authenticating users of your own application. When users log into your app with credentials you manage, you don’t need OAuth 2.
Why not use OAuth 2 here:
- OAuth 2 adds unnecessary complexity when you control both the client and authorization server
- You already have the user’s credentials, so there’s no need for token-based delegation
- Traditional authentication (username/password with bcrypt hashing) is simpler and more appropriate
- OAuth 2 requires redirect flows and token management that aren’t needed for direct authentication
- Session-based authentication is more efficient for your own users
What to use instead:
For your own login system, use standard authentication patterns:
// CORRECT: Simple authentication for your own users
app.post('/login', async (req, res) => {
  const user = await User.findOne({ email: req.body.email });
  if (!user) {
    return res.status(401).json({ error: 'Invalid credentials' });
  }

  const valid = await bcrypt.compare(req.body.password, user.passwordHash);
  if (valid) {
    req.session.userId = user.id;  // Simple session-based auth
    res.json({ success: true });
  } else {
    res.status(401).json({ error: 'Invalid credentials' });
  }
});
When OAuth 2 makes sense for login:
Use OAuth 2 only when offering “Sign in with Google/GitHub” social login, where you’re delegating authentication to a third-party provider:
// CORRECT: OAuth 2 for social login (third-party authentication)
app.get('/auth/google', passport.authenticate('google', {
  scope: ['profile', 'email']
}));
2. Internal Microservices Communication
For services within your infrastructure:
- Use mTLS (mutual TLS certificates) for service-to-service authentication
- Use service mesh (Istio, Linkerd) with built-in identity
- Use API Gateway with internal API keys
- OAuth 2 adds unnecessary complexity when you control both client and server
3. Simple API Keys Are Sufficient
Use API keys instead of OAuth when:
- Accessing public data that doesn’t require user permission (weather APIs, stock prices)
- Your API has a flat permission model (no user-specific data)
- You’re providing access to services, not user resources
Example: OpenWeatherMap API, CoinGecko API, public transportation APIs
4. Real-Time Communication
WebSockets, WebRTC, or gRPC streams are better suited for:
- Live chat applications
- Multiplayer games
- Real-time collaboration tools
- Streaming video/audio
Use OAuth 2 to establish the initial session, then switch to connection-based protocols.
Common OAuth 2 Implementation Gotchas
Avoid these common mistakes when implementing OAuth 2:
1. Insecure Redirect URI Validation
Problem: Accepting redirect URIs that don’t exactly match registered URIs, or using wildcards.
Solution: Validate redirect URIs exactly, character-for-character. Register separate URIs for each environment:
// WRONG - Wildcard allows attacker.com
const ALLOWED_REDIRECTS = ['https://*.myapp.com/callback'];

// CORRECT - Explicit list
const ALLOWED_REDIRECTS = [
  'https://app.myapp.com/callback',
  'https://staging.myapp.com/callback',
  'http://localhost:3000/callback'  // Development only
];

if (!ALLOWED_REDIRECTS.includes(redirectUri)) {
  throw new Error('redirect_uri_mismatch');
}
Common mistakes:
- Trailing slash differences:
https://app.com/callback≠https://app.com/callback/ - Protocol matters:
http://≠https:// - Port matters:
http://localhost:3000≠http://localhost:8080
2. Missing State Parameter Validation
Problem: Not validating the state parameter enables CSRF attacks where attackers trick users into authorizing malicious applications.
How the attack works:
- Attacker starts OAuth flow for victim’s account
- Attacker captures the authorization URL with their state value
- Attacker tricks victim into clicking the link (via phishing email)
- Victim authorizes, thinking they’re logging into attacker’s app
- Authorization code gets sent to attacker’s redirect URI
- Attacker’s app now has access to victim’s account
Solution: Generate cryptographically random state, validate it matches:
const crypto = require('crypto');

// Generate state
const state = crypto.randomBytes(32).toString('hex');
req.session.oauthState = state;  // Store in session

// Validate state in callback
if (req.query.state !== req.session.oauthState) {
  return res.status(403).send('Possible CSRF attack detected');
}
delete req.session.oauthState;  // Use once
3. Storing Tokens Insecurely
Problem: Storing access tokens in localStorage, cookies without HttpOnly flag, or logging them.
Solution - Web Applications:
// WRONG - Vulnerable to XSS attacks
localStorage.setItem('access_token', token);
sessionStorage.setItem('access_token', token);

// CORRECT - Server-side session with HttpOnly cookies
res.cookie('session_id', sessionId, {
  httpOnly: true,      // JavaScript can't access it
  secure: true,        // HTTPS only
  sameSite: 'lax',     // CSRF protection
  maxAge: 24 * 60 * 60 * 1000  // 24 hours
});
// Store the actual token server-side in Redis/database, indexed by session_id
Solution - Mobile Applications:
// iOS - Use Keychain
import Security

let query: [String: Any] = [
    kSecClass as String: kSecClassGenericPassword,
    kSecAttrAccount as String: "oauth_access_token",
    kSecValueData as String: token.data(using: .utf8)!,
    kSecAttrAccessible as String: kSecAttrAccessibleWhenUnlockedThisDeviceOnly
]
SecItemAdd(query as CFDictionary, nil)
// Android - Use EncryptedSharedPreferences (API 23+)
import androidx.security.crypto.EncryptedSharedPreferences
import androidx.security.crypto.MasterKey

val masterKey = MasterKey.Builder(context)
    .setKeyScheme(MasterKey.KeyScheme.AES256_GCM)
    .build()

val sharedPreferences = EncryptedSharedPreferences.create(
    context,
    "oauth_prefs",
    masterKey,
    EncryptedSharedPreferences.PrefKeyEncryptionScheme.AES256_SIV,
    EncryptedSharedPreferences.PrefValueEncryptionScheme.AES256_GCM
)

sharedPreferences.edit()
    .putString("access_token", token)
    .apply()
Never do this:
- Don’t log tokens:
console.log(accessToken) - Don’t store in plain cookies without HttpOnly flag
- Don’t commit tokens to version control
- Don’t include tokens in error messages or stack traces
4. Not Handling Token Expiration
Problem: Assuming tokens never expire, leading to sudden authentication failures.
Solution: Check token expiry before each request, refresh proactively:
async function makeAuthenticatedRequest(url) {
  // Check if token expires in next 5 minutes
  const expiryBuffer = 5 * 60 * 1000;  // 5 minutes in milliseconds
  const tokenExpiry = new Date(req.session.tokenExpiry);

  if (Date.now() + expiryBuffer >= tokenExpiry.getTime()) {
    // Token expired or about to expire, refresh it
    await refreshAccessToken();
  }

  // Now make the request with fresh token
  return axios.get(url, {
    headers: { 'Authorization': `Bearer ${req.session.accessToken}` }
  });
}
5. Scope Creep
Problem: Requesting broad permissions reduces user trust and authorization rates.
// WRONG - Requesting unnecessary permissions
const scopes = 'read write delete admin user:email repo';
// User sees: "This app wants to delete your data and access all repos"
// Authorization rate: ~40%

// CORRECT - Request minimum required
const scopes = 'read user:email';
// User sees: "This app wants to read your data and email"
// Authorization rate: ~85%
Progressive permissions
Request additional scopes only when needed:
- Initial login: Request
readanduser:emailonly - When user clicks “Export Data”: Request
read:backupscope - When user enables auto-posting: Request
write:postsscope
6. Ignoring PKCE for Public Clients
Problem: Not using PKCE for mobile apps or SPAs leaves authorization codes vulnerable to interception.
Solution: Always implement PKCE for public clients:
- Mobile apps: Mandatory (no way to securely store client secret)
- Single-Page Apps (SPAs): Mandatory (JavaScript can be inspected)
- Desktop apps: Recommended (executables can be decompiled)
- Server-side apps: Recommended (defense-in-depth)
Most OAuth 2 libraries handle PKCE automatically (Passport.js, NextAuth.js, AppAuth iOS/Android).
Troubleshooting Common OAuth 2 Issues
When OAuth 2 flows fail, the error messages can be cryptic. Here’s how to diagnose and fix the most common problems:
“invalid_client” Error
What it means: The authorization server doesn’t recognize your client ID or client secret.
Common causes:
- Client ID or secret copied incorrectly
- Client secret exposed and regenerated (old secret no longer works)
- Application not registered with the service
How to fix:
Step 1: Verify Client ID
# Print your current client ID
echo "Current CLIENT_ID: $OAUTH_CLIENT_ID"

# Compare with developer portal:
# - DigitalOcean: https://cloud.digitalocean.com/account/api/applications
# - GitHub: https://github.com/settings/developers
# - Google: https://console.cloud.google.com/apis/credentials
Look for:
- Leading/trailing whitespace in your .env file
- Copy-paste errors (some characters look similar:
0vsO,1vsl) - Client ID from wrong environment (dev vs production)
Step 2: Check Client Secret
// Add temporary logging (REMOVE after debugging)
console.log('Client Secret length:', process.env.OAUTH_CLIENT_SECRET?.length);
console.log('First 4 chars:', process.env.OAUTH_CLIENT_SECRET?.substring(0, 4));
// Compare with developer portal (first few characters)
If the secret was regenerated:
- Go to your service’s developer portal
- Look for “Regenerate Secret” or “Reset Secret” button
- Check if there’s a timestamp showing recent regeneration
- Copy the NEW secret and update your
.envfile - Restart your application
Step 3: Verify Application Status
Some services require approval:
- Check if your app is in “Pending” or “Under Review” status
- Verify you’ve completed all required fields (logo, privacy policy URL)
- Check your email for approval/rejection notifications
Example error response:
{
  "error": "invalid_client",
  "error_description": "Client authentication failed"
}
“invalid_grant” Error
What it means: The authorization code is invalid, expired, or already used.
Common causes:
- Authorization code expired (typically 10 minutes)
- Code already exchanged for a token (codes are single-use)
- Code doesn’t match the redirect URI used in the authorization request
- Clock skew between your server and authorization server
How to fix:
Scenario 1: Code Expired
// WRONG - Queuing code for later processing
app.get('/callback', (req, res) => {
  const { code } = req.query;
  jobQueue.add({ code });  // Process in 2 minutes
  res.send('Please wait...');
});

// CORRECT - Exchange immediately
app.get('/callback', async (req, res) => {
  const { code } = req.query;
  const tokens = await exchangeCodeForToken(code);  // Do it NOW
  req.session.tokens = tokens;
  res.redirect('/dashboard');
});
Timing example:
- 10:00:00 AM - User authorizes, code generated
- 10:09:30 AM - You exchange code - Success
- 10:10:01 AM - Code expires
- 10:11:00 AM - Another exchange attempt -
invalid_grant
Scenario 2: Redirect URI Mismatch
// Authorization request
const authUrl = `${AUTH_URL}?redirect_uri=https://app.com/callback`;

// Token exchange - MUST use EXACT same redirect_uri
const params = new URLSearchParams({
  code: code,
  redirect_uri: 'https://app.com/callback',  // Must match exactly
  // Even trailing slash matters!
});

// These would cause invalid_grant:
// redirect_uri: 'https://app.com/callback/'   (extra slash)
// redirect_uri: 'https://app.com/oauth/callback'  (different path)
// redirect_uri: 'http://app.com/callback'    (http vs https)
Scenario 3: Code Already Used
// Prevent double-clicks from exchanging code twice
const usedCodes = new Set();

app.get('/callback', async (req, res) => {
  const { code } = req.query;

  if (usedCodes.has(code)) {
    return res.status(400).send('Code already used');
  }

  usedCodes.add(code);

  try {
    const tokens = await exchangeCodeForToken(code);
    // ... success
  } catch (err) {
    usedCodes.delete(code);  // Allow retry if network error
    throw err;
  }
});
Scenario 4: Clock Skew
# Check your server's time
date -u
# Compare with actual UTC time: https://time.is/UTC

# If off by more than 2 minutes, sync it:
sudo ntpdate -s time.nist.gov
# Or install NTP daemon:
sudo systemctl enable --now systemd-timesyncd
Example error response:
{
  "error": "invalid_grant",
  "error_description": "The provided authorization grant is invalid, expired, revoked, or does not match the redirection URI used in the authorization request"
}
“redirect_uri_mismatch” Error
What it means: The redirect URI in your authorization request doesn’t match a registered URI.
Common causes:
- Typo in redirect URI (trailing slash, http vs https, port number)
- Redirect URI not registered in developer portal
- Using localhost in production or production URL in development
How to fix:
Step 1: Extract the exact URI from your code
// Add logging to see EXACTLY what you're sending
const redirectUri = process.env.REDIRECT_URI;
console.log('Sending redirect_uri:', redirectUri);
console.log('URI length:', redirectUri.length);
console.log('URI bytes:', Buffer.from(redirectUri).toString('hex'));
Step 2: Copy from developer portal
- Go to your app settings in the developer portal
- Find “Redirect URIs” or “Callback URLs” section
- Use browser’s “Inspect Element” to copy the EXACT value:
// In browser console, on the developer portal page:
document.querySelector('input[name="redirect_uri"]').value
- Compare character-by-character
Step 3: Check common mismatches
// Common mismatches that fail:
const registeredUris = [
  'https://app.com/callback'
];

// These will NOT match:
'https://app.com/callback/'       // Extra trailing slash
'http://app.com/callback'         // http vs https
'https://www.app.com/callback'    // Missing www
'https://app.com:443/callback'    // Explicit port
'https://app.com/callback?code=x' // Query params included
'https://app.com/CALLBACK'        // Case sensitive on some providers
Step 4: Environment-specific URIs
# .env.development
REDIRECT_URI=http://localhost:3000/callback

# .env.production
REDIRECT_URI=https://app.com/callback
Register BOTH in your developer portal:
- Development:
http://localhost:3000/callback - Staging:
https://staging.app.com/callback - Production:
https://app.com/callback
Step 5: URL encoding
// If your redirect URI has special characters, encode it
const redirectUri = 'https://app.com/oauth/callback';
const encoded = encodeURIComponent(redirectUri);
// https%3A%2F%2Fapp.com%2Foauth%2Fcallback

// Most libraries handle this automatically, but double-check:
const authUrl = `${AUTH_URL}?redirect_uri=${encoded}`;
Example error response:
{
  "error": "redirect_uri_mismatch",
  "error_description": "The redirect URI provided does not match a registered redirect URI"
}
“invalid_scope” Error
What it means: One or more requested scopes are invalid or not available for your application.
Common causes:
- Scope name misspelled
- Scope not available for your application type
- Requesting scopes that require special approval
How to fix:
- Check the service’s documentation for valid scope names
- Verify your application type supports the requested scopes
- Some scopes require approval: check your application’s permissions in the developer portal
Example error response:
{
  "error": "invalid_scope",
  "error_description": "The requested scope is invalid, unknown, or malformed"
}
“access_denied” Error
What it means: The user denied your authorization request.
Common causes:
- User clicked “Deny” on the consent screen
- User closed the browser before approving
- Application requested too many permissions
How to fix:
- Request only the minimum scopes needed
- Explain clearly why you need each permission
- Handle the denial gracefully: show a message and offer to try again
Example error response:
https:/callback?error=access_denied&state=STATE_VALUE
Token Exchange Returns 400 But No Error Details
What it means: The request format is incorrect, but the server isn’t providing specific error information.
Common causes:
- Missing required parameters
- Wrong Content-Type header (should be
application/x-www-form-urlencoded) - Parameters sent as JSON instead of form data
- Missing client credentials
How to fix:
- Verify you’re sending a POST request (not GET)
- Set
Content-Type: application/x-www-form-urlencodedheader - Send parameters as form data, not JSON
- Include all required parameters:
grant_type,code,client_id,client_secret,redirect_uri
Debugging tip: Log the exact request you’re sending:
console.log('Request URL:', TOKEN_URL);
console.log('Request body:', new URLSearchParams({
  grant_type: 'authorization_code',
  code: code,
  // ... other params
}).toString());
State Parameter Mismatch
What it means: The state parameter in the callback doesn’t match what you sent.
Common causes:
- State not stored properly (lost session, server restart)
- State reused (should be single-use)
- CSRF attack attempt
How to fix:
// Use persistent session store
const RedisStore = require('connect-redis').default;
const session = require('express-session');

app.use(session({
  store: new RedisStore({ client: redisClient }),
  secret: process.env.SESSION_SECRET,
  resave: false,
  saveUninitialized: false,
  cookie: { secure: true, httpOnly: true, maxAge: 600000 } // 10 min
}));

// Generate and store state
app.get('/auth', (req, res) => {
  const state = crypto.randomBytes(32).toString('hex');
  req.session.oauthState = state;
  req.session.save(); // Force save to Redis
  // ... redirect with state
});

// Validate and delete state
app.get('/callback', (req, res) => {
  if (!req.session.oauthState || req.session.oauthState !== req.query.state) {
    return res.status(403).send('State mismatch - possible CSRF attack');
  }
  delete req.session.oauthState;  // Single use
  req.session.save();
  // ... continue with token exchange
});
Token Works But API Returns 403
What it means: Your token is valid, but it doesn’t have the required scope for the operation.
Common causes:
- Requested
readscope but trying to performwriteoperation - Service granted fewer scopes than requested
- Scope names differ between services
How to fix:
Step 1: Check granted scopes
// When you receive tokens, log the granted scopes
const tokenResponse = await exchangeCode(code);
console.log('Requested scopes:', 'read write delete');
console.log('Granted scopes:', tokenResponse.scope);
// Output might be: "read write" (delete was denied)

// Store granted scopes for later checks
req.session.grantedScopes = tokenResponse.scope.split(' ');
Step 2: Verify before making requests
function requireScope(requiredScope) {
  return (req, res, next) => {
    const granted = req.session.grantedScopes || [];

    if (!granted.includes(requiredScope)) {
      return res.status(403).json({
        error: 'insufficient_scope',
        message: `This operation requires '${requiredScope}' scope`,
        granted: granted,
        help: 'Re-authorize with additional scopes'
      });
    }
    next();
  };
}

// Use in routes
app.post('/api/droplets', requireScope('write'), async (req, res) => {
  // This route requires 'write' scope
});

app.delete('/api/droplets/:id', requireScope('delete'), async (req, res) => {
  // This route requires 'delete' scope
});
Step 3: Request additional scopes
// Progressive authorization - request more scopes when needed
app.post('/enable-auto-backup', (req, res) => {
  const currentScopes = req.session.grantedScopes;

  if (!currentScopes.includes('write')) {
    // Redirect to re-authorize with additional scope
    const authUrl = new URL(AUTHORIZATION_URL);
    authUrl.searchParams.set('scope', 'read write');  // Add write scope
    authUrl.searchParams.set('prompt', 'consent');     // Force re-consent
    return res.redirect(authUrl.toString());
  }

  // User already has write scope, enable feature
  enableAutoBackup();
});
Step 4: Check service-specific scope names
// Different services use different scope naming conventions:

// GitHub
const githubScopes = 'repo user:email';  // Namespace format

// Google
const googleScopes = 'https://www.googleapis.com/auth/drive.readonly';  // URL format

// DigitalOcean
const doScopes = 'read write';  // Simple keywords

// Always check the service's documentation:
// - GitHub: https://docs.github.com/en/apps/oauth-apps/building-oauth-apps/scopes-for-oauth-apps
// - Google: https://developers.google.com/identity/protocols/oauth2/scopes
// - DigitalOcean: https://docs.digitalocean.com/reference/api/oauth-api/
Example API error:
{
  "id": "forbidden",
  "message": "You do not have access to the requested resource"
}
Debugging with curl:
# Make request and check which scope is needed
curl -X POST https://api.digitalocean.com/v2/droplets \
  -H "Authorization: Bearer YOUR_TOKEN" \
  -H "Content-Type: application/json" \
  -d '{"name":"test"}' \
  -v

# Look for hints in response headers:
# WWW-Authenticate: Bearer scope="write", error="insufficient_scope"
Debugging Checklist
When OAuth 2 isn’t working, check these in order:
1. Client credentials: Are client ID and secret correct?
# Verify environment variables are loaded
echo "CLIENT_ID: ${OAUTH_CLIENT_ID:0:10}..."  # First 10 chars
echo "CLIENT_SECRET length: ${#OAUTH_CLIENT_SECRET}"

# Check for whitespace
echo "$OAUTH_CLIENT_SECRET" | od -c  # Shows hidden characters
2. Redirect URI: Does it match exactly (including protocol, port, path)?
// Log both URIs and compare
console.log('Registered:', 'https://app.com/callback');
console.log('Sending:', process.env.REDIRECT_URI);
console.log('Match:', 'https://app.com/callback' === process.env.REDIRECT_URI);
3. State parameter: Is it being generated, stored, and validated?
// Add logging to trace state lifecycle
console.log('Generated state:', state);
console.log('Stored in session:', req.session.oauthState);
console.log('Received state:', req.query.state);
console.log('Match:', req.session.oauthState === req.query.state);
4. Authorization code: Is it being exchanged immediately (within 10 minutes)?
// Log timing
const codeReceivedAt = Date.now();
const tokens = await exchangeCode(code);
const exchangeDuration = Date.now() - codeReceivedAt;
console.log(`Code exchanged in ${exchangeDuration}ms`);
// Should be < 5000ms in most cases
5. Request format: POST with application/x-www-form-urlencoded?
// Verify request format
const axios = require('axios');

const response = await axios.post(TOKEN_URL,
  new URLSearchParams({  // Form data
    grant_type: 'authorization_code',
    code: code,
    // ...
  }),
  {
    headers: {
      'Content-Type': 'application/x-www-form-urlencoded'  // Correct header
    }
  }
);

// Don't do this:
// axios.post(TOKEN_URL, { grant_type: 'authorization_code', ... })  // Sends as JSON
6. Scopes: Are you requesting valid scopes for your app type?
# Check service documentation for valid scopes
# GitHub: https://docs.github.com/en/apps/oauth-apps/building-oauth-apps/scopes-for-oauth-apps
# Google: https://developers.google.com/identity/protocols/oauth2/scopes
# DigitalOcean: https://docs.digitalocean.com/reference/api/oauth-api/

# Test with minimal scope first
scope=read  # Start here, add more if needed
7. HTTPS: Are all requests over HTTPS (required for OAuth 2)?
# Check your URLs
echo $AUTHORIZATION_URL  # Must start with https://
echo $TOKEN_URL          # Must start with https://
echo $REDIRECT_URI       # Must start with https:// (except localhost)

# Localhost exception:
# http://localhost:3000/callback  OK for development
# http://127.0.0.1:3000/callback  OK for development
# http://192.168.1.5:3000/callback  NOT OK (use https)
8. Server time: Is your server clock synchronized (affects token expiration)?
# Check server time
date -u
# Compare with https://time.is/UTC

# Check time sync status
timedatectl status
# Look for: "System clock synchronized: yes"

# If not synchronized:
sudo timedatectl set-ntp true
sudo systemctl restart systemd-timesyncd
Quick test script:
#!/bin/bash
# oauth-debug.sh - Quick OAuth 2 configuration check

echo "=== OAuth 2 Configuration Check ==="
echo "1. Client ID length: ${#OAUTH_CLIENT_ID}"
echo "2. Client Secret length: ${#OAUTH_CLIENT_SECRET}"
echo "3. Redirect URI: $REDIRECT_URI"
echo "4. Uses HTTPS: $(echo $REDIRECT_URI | grep -q '^https://' && echo 'Yes' || echo 'No')"
echo "5. System time: $(date -u)"
echo "6. NTP synchronized: $(timedatectl show -p NTPSynchronized --value)"
echo "================================="
FAQ
Is OAuth 2 Secure?
Yes, when implemented correctly. OAuth 2 provides several security benefits:
- Users never share passwords with third-party applications
- Tokens have limited lifespans and scopes
- PKCE prevents authorization code interception
- HTTPS is required for all OAuth 2 communications
However, security depends on proper implementation. Follow the security best practices outlined in this guide and use well-maintained OAuth 2 libraries.
Real-world security: OAuth 2 is used by every major tech platform:
- Google (3+ billion users)
- Facebook/Meta (2.9+ billion users)
- GitHub (100+ million developers)
- Microsoft (400+ million Office 365 users)
These platforms process billions of OAuth 2 authorizations daily with minimal security incidents when properly implemented.
Common vulnerabilities to avoid:
- Using Implicit Flow (deprecated, tokens exposed in URL)
- Not implementing PKCE for public clients
- Accepting wildcard redirect URIs
- Storing tokens in localStorage (vulnerable to XSS)
- Not validating state parameter (CSRF attacks)
Is OAuth 2 Used for Authentication or Authorization?
OAuth 2 is an authorization framework. It grants permissions to access resources but doesn’t verify user identity on its own. However, many implementations combine OAuth 2 with authentication (often through OpenID Connect) to provide both identity verification and resource access.
What Is the Difference Between OAuth 2 and OAuth 1?
OAuth 2 replaced OAuth 1.0 due to:
- Simplified implementation: OAuth 2 is easier to implement and understand (no cryptographic signing required)
- Better security: Improved token handling and PKCE support
- Broader use cases: Support for mobile apps, SPAs, and IoT devices
- Industry adoption: OAuth 2 is the de facto standard
OAuth 1.0 is deprecated and should not be used for new projects.
Technical differences
| Feature | OAuth 1.0 | OAuth 2 |
|---|---|---|
| Signatures | Required HMAC-SHA1 signatures on every request | Bearer tokens (simpler) |
| HTTPS | Optional (signatures provided security) | Mandatory |
| Mobile support | Difficult to implement | Native support |
| Token types | Single token type | Multiple token types (Bearer, MAC) |
| Expiration | Tokens never expire | Tokens expire, refresh tokens available |
| Implementation | ~500 lines of code | ~50 lines with libraries |
Adoption timeline
- OAuth 1.0: Released 2007, used by Twitter until 2010
- OAuth 1.0a: Released 2009 (fixed security flaw)
- OAuth 2: Released 2012, adopted by Google, Facebook, Microsoft
- Twitter migrated to OAuth 2 in 2021
- Current: >95% of new OAuth implementations use OAuth 2
Why the change?
OAuth 1.0’s cryptographic signing was:
- Complex to implement correctly
- Caused 80%+ of OAuth integration issues
- Incompatible with mobile apps (couldn’t securely store signing keys)
- Slower (signature calculation overhead)
OAuth 2 simplified the protocol by requiring HTTPS instead of signatures, making it dramatically easier to implement while maintaining security.
What Are OAuth Scopes?
Scopes define the specific permissions an application requests. Common examples:
read: Read-only access to resourceswrite: Ability to modify resourcesadmin: Full administrative accessprofile: Access to user profile informationemail: Access to user email address
Scopes are service-specific. Check the service’s documentation for available scopes.
Real service examples:
GitHub:
const scopes = 'repo user:email read:org';
// repo - Full repo access (read/write)
// user:email - Read user email addresses
// read:org - Read organization membership
Google Drive:
const scopes = [
  'https://www.googleapis.com/auth/drive.readonly',  // Read all files
  'https://www.googleapis.com/auth/drive.file'       // Access app-created files only
].join(' ');
DigitalOcean:
const scopes = 'read write';
// read - View droplets, volumes, etc.
// write - Create, modify, delete resources
Spotify:
const scopes = 'user-read-playback-state user-modify-playback-state';
// user-read-playback-state - See what's playing
// user-modify-playback-state - Control playback (play, pause, skip)
Scope best practices
// Too broad - users will deny
const scopes = 'read write delete admin user:email repo gist';

// Request minimum needed
const scopes = 'read user:email';

// Request additional scopes progressively
if (userWantsToExport) {
  scopes += ' write:backup';  // Only when needed
}
Why scopes matter:
- Users are 3x more likely to authorize requests with limited scopes
- Reduces damage if token is compromised
- Meets principle of least privilege
- Required for security certifications (SOC 2, ISO 27001)
How Long Do OAuth Access Tokens Last?
Access token lifetimes vary by service:
- Short-lived (1 hour): Common for high-security applications
- Medium-lived (24 hours): Balance between security and user experience
- Long-lived (30 days): For applications where frequent re-authorization is disruptive
The expires_in field in the token response indicates the exact lifetime. Use refresh tokens to obtain new access tokens without user interaction.
Is OAuth 2 an Authentication Protocol?
No. OAuth 2 is an authorization framework, not an authentication protocol. It assumes authentication has already occurred (the user logged in to the authorization server) and focuses on granting permissions.
For authentication combined with authorization, use OpenID Connect, which extends OAuth 2 with identity tokens that contain user information.
Can I Use OAuth 2 for Machine-to-Machine Communication?
Yes. Use the Client Credentials grant type for machine-to-machine communication where no user is involved. The application authenticates with its own credentials and receives tokens for its service account.
What Happens If a Refresh Token Expires?
If a refresh token expires or is revoked, your application can no longer obtain new access tokens automatically. You must redirect the user through the authorization flow again to obtain a new authorization grant and refresh token.
Conclusion
OAuth 2 is the industry standard for secure, delegated authorization. It enables applications to access user resources without handling passwords, provides granular permission control through scopes, and supports diverse client types through multiple grant types.
Key takeaways for implementation:
- Use Authorization Code flow with PKCE for most applications
- Always validate redirect URIs and use the
stateparameter - Store tokens securely and handle expiration gracefully
- Request only the minimum scopes needed
- Follow security best practices and use well-maintained libraries
As you build OAuth 2 integrations, remember that security and user experience go hand-in-hand. Proper implementation protects users while providing seamless access to their resources.
Additional Resources
- How To Use OAuth Authentication with DigitalOcean as a User or Developer: Practical guide to using OAuth with DigitalOcean
- How To Use the DigitalOcean API v2: Complete API integration tutorial
- DigitalOcean OAuth API Reference Documentation: Official API documentation
- OAuth Workload Identity Federation for DigitalOcean Droplets (Part 2): Advanced OAuth patterns for infrastructure
- OAuth Workload Identity Federation for DigitalOcean Droplets (Part 3): Production deployment strategies
- The OAuth 2.0 Authorization Framework (RFC 6749): Official OAuth 2 specification
- OAuth 2.0 Security Best Current Practice (RFC 8252): Security recommendations for OAuth 2 implementations
Thanks for learning with the DigitalOcean Community. Check out our offerings for compute, storage, networking, and managed databases.
About the author(s)
Software Engineer @ DigitalOcean. Former Señor Technical Writer (I no longer update articles or respond to comments). Expertise in areas including Ubuntu, PostgreSQL, MySQL, and more.
Building future-ready infrastructure with Linux, Cloud, and DevOps. Full Stack Developer & System Administrator. Technical Writer @ DigitalOcean | GitHub Contributor | Passionate about Docker, PostgreSQL, and Open Source | Exploring NLP & AI-TensorFlow | Nailed over 50+ deployments across production environments.
Still looking for an answer?
This textbox defaults to using Markdown to format your answer.
You can type !ref in this text area to quickly search our full set of tutorials, documentation & marketplace offerings and insert the link!
Which flow is most suitable for system to system communication using REST APIs?
Good explanation of the Grant Types Re: Your diagrams for Grant Type: Authorization Code Link and Grant Type: Implicit. Step 1. User Authorization Request … is this truly the “User/Resource Owner” request or is this the Application/Client request. The arrow shows the source as Application/Client however the text on the arrow indicates User/Resource Owner. Also the detailed text indicates “User”
@author @manicas Why are you sending sensitive data as Query parameters (in URL), even though it isn’t recommended by the OAuth2 specification itself ? See the last point.
Don’t pass bearer tokens in page URLs: Bearer tokens SHOULD NOT be passed in page URLs (for example as query string parameters). Instead, bearer tokens SHOULD be passed in HTTP message headers or message bodies for which confidentiality measures are taken. Browsers, web servers, and other software may not adequately secure URLs in the browser history, web server logs, and other data structures. If bearer tokens are passed in page URLs, attackers might be able to steal them from the history data, logs, or other unsecured locations.
Thank you guys. This tutorial really helped me understand how OAUTH works. I have a little question though I will like to ask what are the steps or how can I generate a signature for my OAUTH requests as I have read that requests without signature may not be so secured.
Thanks.
 This work is licensed under a Creative Commons Attribution-NonCommercial- ShareAlike 4.0 International License.
Become a contributor for community
Get paid to write technical tutorials and select a tech-focused charity to receive a matching donation.

DigitalOcean Documentation
Full documentation for every DigitalOcean product.

Resources for startups and AI-native businesses
The Wave has everything you need to know about building a business, from raising funding to marketing your product.
The developer cloud
Scale up as you grow — whether you're running one virtual machine or ten thousand.

Start building today
From GPU-powered inference and Kubernetes to managed databases and storage, get everything you need to build, scale, and deploy intelligent applications.
