By Kevin Qiu and Brian Hogan

Introduction
Code review has become an inseparable part of the modern software development process. With the advent of distributed version control systems, and especially since the birth of GitHub, the pull request-review-merge model was popularized among the software development community. However, GitHub’s builtin pull request review system leaves a lot to be desired. As a result, many third-party code review tools that integrate with GitHub exist to improve the process. ReviewNinja is one such tool.
ReviewNinja adds a few features on top of the vanilla GitHub pull request review experience. It gives us the ability to explicitly sign off on a pull request by giving “ninja stars”, so there’s no more need for comments like :shipit:, LGTM, or other popular conventions. And you can set policies to block merging if the pull request is not signed off by at least 2 team members, or if someone adds comments like !fix on the pull request.
ReviewNinja is developed and open sourced by SAP. It has a hosted version, but we can deploy it on our own servers and use it for our private GitHub repositories.
In this guide, you’ll deploy a ReviewNinja instance on DigitalOcean using Docker and CoreOS. A production ReviewNinja instance has a few moving parts, so we’ll use docker-machine to create and control a remote Docker host, and docker-compose to describe, build and deploy our stack. We’ll use CoreOS for the Docker host, which is a minimal Linux distribution tailored for cloud deployments. A fresh install of CoreOS only has systemd and the Docker daemon running, so we have more resources available for our applications.
Prerequisites
To complete this tutorial, you will need:
- Docker,
docker-machine, anddocker-composeinstalled on your local machine, so you can build the application image we’ll deploy. You can follow the official installation documentation for Docker to get these tools configured. Bothdocker-machineanddocker-composeare installed automatically with the Docker App on OSX and Windows, or you can install them manually using these links: - Git installed on your local machine, so you can clone the ReviewNinja repository to create the container. Follow the official Git installation documentation if you need to fulfill this prerequisite.
- A DigitalOcean Access Token with both Read and Write access, which you can generate by visiting the Applications & API page. Copy this token, as you will need to use it with
docker-machineto create hosts. - One 1GB CoreOS Droplet, which we’ll configure using
docker-machinein this tutorial. - A GitHub account.
Step 1 — Creating and Activating a CoreOS-based Docker Host
Let’s set up the infrastructure for our deployment. The docker-machine tool lets you provision remote machines as Docker hosts and control them from your local machine. It provides drivers for many popular cloud providers, including DigitalOcean. We’ll use docker-machine to create a CoreOS Droplet for our Docker host.
Switch to your terminal, and issue the following command, using your DigitalOcean Access Token:
docker-machine create --driver=digitalocean \
--digitalocean-access-token=DIGITAL_OCEAN_ACCESS_TOKEN \
--digitalocean-image=coreos-stable \
--digitalocean-region=nyc3 \
--digitalocean-size=1GB \
--digitalocean-ssh-user=core \
reviewninja
We’re telling docker-machine to create a Droplet called reviewninja in the NYC3 data center using the coreos-stable image with 1GB of memory. Note that we specify --ssh-user=core because the default user on a CoreOS installation is core.
When you run this command, you’ll see the following output:
OutputRunning pre-create checks...
Creating machine...
(reviewninja) Creating SSH key...
(reviewninja) Creating Digital Ocean droplet...
(reviewninja) Waiting for IP address to be assigned to the Droplet...
Waiting for machine to be running, this may take a few minutes...
Detecting operating system of created instance...
Waiting for SSH to be available...
Detecting the provisioner...
Provisioning with coreOS...
Copying certs to the local machine directory...
Copying certs to the remote machine...
Setting Docker configuration on the remote daemon...
Checking connection to Docker...
Docker is up and running!
To see how to connect your Docker Client to the Docker Engine running on this virtual machine, run: docker-machine env reviewninja
Let’s see if this new Droplet is recognized by docker-machine. Run the command:
- docker-machine ls
You’ll see the following output, indicating that the Docker host reviewminja is running on a remote IP address using the digitalocean driver:
OutputNAME          ACTIVE   DRIVER         STATE     URL                          SWARM   DOCKER    ERRORS
reviewninja            digitalocean   Running   tcp://your_ip_address:2376            v1.10.3
When we created the Docker host, the last line of the output told us what to do next. It said:
OutputTo see how to connect your Docker Client to the Docker Engine running on this virtual machine, run: docker-machine env reviewninja
So let’s run that command:
- docker-machine env reviewninja
You’ll see this message:
Outputexport DOCKER_TLS_VERIFY="1"
export DOCKER_HOST="tcp://your_server_ip:2376"
export DOCKER_CERT_PATH="/home/kevin/.docker/machine/machines/reviewninja"
export DOCKER_MACHINE_NAME="reviewninja"
# Run this command to configure your shell:
# eval $(docker-machine env reviewninja)
So what’s happening here? The Docker architecture uses a client-server model. A Docker client can communicate through a Unix socket or over TCP. Normally, our Docker client talks to the Docker engine installed locally through a Unix socket. However, there are environment variables you can set to tell the Docker client to communicate to a Docker host over TCP. The output you see is a series of shell commands to set up environment variables that do just that.
The last part says:
Output# Run this command to configure your shell:
# eval $(docker-machine env reviewninja)
When you run that command, you tell the shell to execute these commands which set up the environment variables that will be used for subsequent docker commands.
So go ahead and execute that command in your shell:
- eval $(docker-machine env reviewninja)
Now, if you execute docker info, you will see information about the remote Docker daemon, not your local Docker daemon:
- docker info
The output from that command will look like this:
OutputContainers: 0
 Running: 0
 Paused: 0
 Stopped: 0
Images: 0
Server Version: 1.10.3
 [...]
Labels:
 provider=digitalocean
Note: You may get the following error while running docker commands:
Error response from daemon: client is newer than server (client API version: 1.24, server API version: 1.22)
This means the Docker client version you’re using is not compatible with the version of the server. To fix this, set the environment variable DOCKER_API_VERSION to the same version as the server. For example, if the server wants version 1.22, execute the following command:
- export DOCKER_API_VERSION=1.22
Then try to run the Docker commands again.
Our remote Docker host is now configured and accessible via Docker. Before we can create a ReviewNinja container, we need to do some work with GitHub.
Step 2 — Register a GitHub OAuth Application
ReviewNinja needs to use GitHub’s API to access your repositories, so we’ll register our ReviewNinja installation as a GitHub OAuth application.
First we need to find out the IP address of our server. We can use the docker-machine command to do that:
- docker-machine ip reviewninja
Record the IP address this command displays. Then log in to your GitHub account and go to Settings -> OAuth applications -> Developer applications and press the Register a new application button.
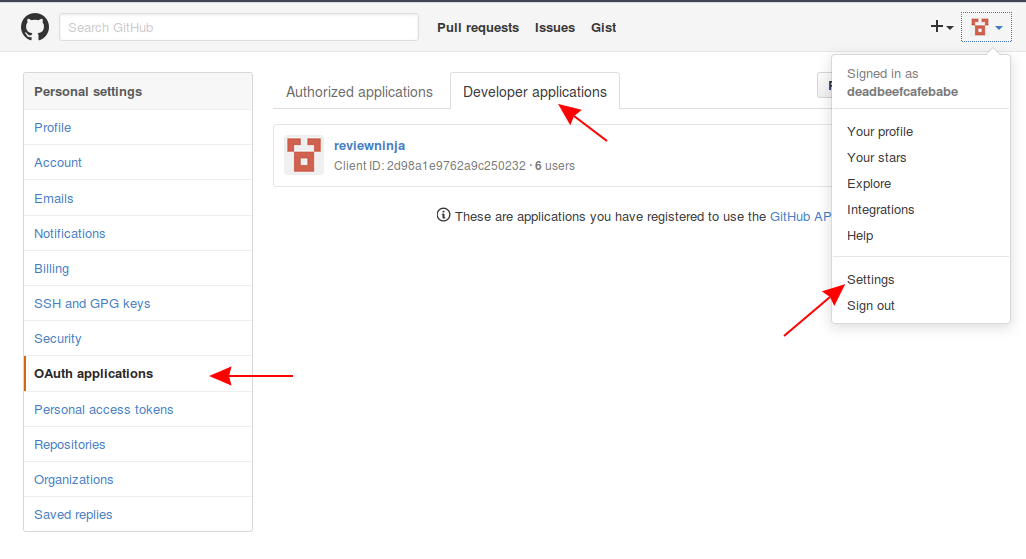
Once you’re presented with the form for the new application, enter the following information:
- Set Name to
review-ninja. - Set Homepage URL to
http://your_ip_address. - Set Authorization Callback URL to
http://your_ip_address/auth/GitHub/callback.
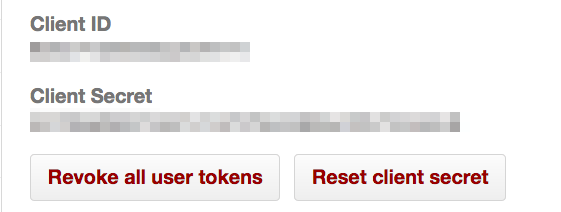
Then press the Register application button to save the changes and create the application. This displays the newly created application on the screen.
Save the values for Client ID and Client Secret somewhere safe; you’ll add them to the ReviewNinja application configuration shortly.
Now that you have your keys, let’s start building our ReviewNinja instance.
Step 3 — Creating the ReviewNinja Docker Container
ReviewNinja is a Node.js application that relies on a storage layer backed by MongoDB. And since we’re putting this in a production environment, we’ll put the Node.js app behind a proxy server so the app server is not directly exposed to the Internet. We’ll use Nginx for this purpose. That’s a lot to configure, so we’ll use docker-compose to deploy multiple related containers in a declarative way. We define the configuration we want, and then use the docker-compose tool to create containers with all the runtime environments specified.
First, we need to get the ReviewNinja source code. Clone the source code on your local machine using Git:
- git clone https://github.com/reviewninja/review.ninja.git
Then navigate into the project’s folder:
- cd review.ninja
This repository contains a Dockerfile, which tells Docker how to build the ReviewNinja application image. If you open this file in your favorite text editor, you’ll see the following content:
FROM node:0.12.2

COPY . /app

RUN npm install -g bower
RUN cd /app; npm install; bower install --allow-root;

WORKDIR /app

VOLUME ["/certs"]

EXPOSE 5000

CMD ["node", "/app/app.js"]
This file specifies the version of Node.js this app will use. Then it copies all of the files from the current folder into an app folder and installs all of the application dependencies. It then exposes port 5000 and launches the app. For a more detailed introduction to Dockerfiles, see this tutorial.
The Dockerfile describes the ReviewNinja application container, but we can describe the components of our stack, including MongoDB and the Nginx proxy, by using a file called docker-compose.yml, which is a YAML file, a popular format for configuration files.
The repository you cloned has a file called docker-compose-example.yml, but we’re going to write our own file from scratch because the example one doesn’t meet our needs.
First, let’s define the storage for our stack. Create the file docker-compose.yml and enter the following configuration:
version: "2"
services:
    db:
        image: mongo
        volumes:
            - /data:/data/db
The db service uses the official MongoDB image on Docker Hub, a central repository of Docker images. By design, Docker containers lose their runtime states when they’re stopped and removed. That’s fine for the web service, since it’s stateless. For our db service, we need to persist the data to a disk so we won’t lose all the code review data if we stop or restart the service. This is where volumes comes in. At runtime, the Docker daemon can run a container that maps volumes in the container to directories on the host.
In our configuration, we’ve specified the following:
        volumes:
            - /data:/data/db
This maps the host machine’s /data folder to /data/db in the container, which happens to be the folder MongoDB is configured to write to inside the container. By creating this mapping, changes made by the app are persisted on the host machine in the /data folder instead of in the container.
Next we define the ReviewNinja application container. Add this into the docker-compose.yml file, after the existing configuration:
services:
    db:
    [...]

    web:
        build: .
        working_dir: /app/
        links:
            - db
        environment:
            MONGODB: mongodb://db/reviewninja
            GITHUB_CLIENT: YOUR_GITHUB_APP_ID
            GITHUB_SECRET: YOUR_GITHUB_APP_SECRET
Note: Ensure that web lines up vertically with the db service definition you previously defined as YAML files are finicky about indentation.
We use build . which tells docker-compose that the image should be built from the Dockerfile that we just explored in the current folder. We then declare a link to the db image, so inside the web container, the name db will resolve to the IP address of the db container. This provides a rudimentary service discovery mechanism; we don’t have to know the IP address of the db container ahead of time and hard code it or pass it via an environment variable. Then we use that link to define the MONGODB environment variable, using mongodb://db/reviewninja as the value.
Fill in GITHUB_CLIENT and GITHUB_SECRET with the client ID and secret for the GitHub app you created. The ReviewNinja application will read these environment variables at runtime.
Finally, let’s define the load-balancing service that will forward requests from port 80 to the port our Node.js app uses. Add this configuration to the file, lining it up vertically with the web service declaration you just created:
services:
    web:
    [...]
    nginx:
        image: nginx
        ports:
            - "80:80"
        volumes:
            - ./reviewninja.conf:/etc/nginx/conf.d/default
        command: /bin/bash -c "echo -e 'upstream backend { server web:5000; }\nserver { listen 80; location / { proxy_pass http://backend; }}' > /etc/nginx/conf.d/default.conf && nginx -g 'daemon off;'"
        links:
            - web
We use the official Nginx image from Docker Hub and declare a port mapping of 80:80, which binds port 80 on the host to port 80 in the container. We then create a volume mapping that stores the Nginx configuration file outside of the container, and we declare a container linkage to the app container so we can locate it by name and proxy requests to it.
The command declaration is quite long, so let’s break it down. It’s actually running two commands on a single line. The first command is echo -e ... > /etc/nginx/conf.d/default.conf, which creates the Nginx config file for ReviewNinja, which looks like this:
upstream backend {
    server web:5000;
}

server {
    listen       80;

    location / {
        proxy_pass http://backend;
    }
}
This defines a backend upstream and points it to web:5000. The value web comes from the docker-compose.yml file in the links section, and port 5000 is the port the Node.js server uses in the web container. Then we declare that our Nginx server will be running on port 80 in the container and should proxy all requests on to backend, our app server.
The second part of the command, nginx -g 'daemon off', is the command that runs the Nginx server process in the container. We need to specify daemon off because Nginx runs in daemon mode by default, detaching itself from the running process. Docker considers any program detached from the container entry point as “exited” and terminates the container, reaping all the processes. As a rule of thumb, any process running inside the Docker container must run in the foreground.
Here’s the entire docker-compose.yml file, just in case you want to double-check your configuration before moving on:
version: "2"
services:
    db:
        image: mongo
        volumes:
            - /data:/data/db
    web:
        build: .
        working_dir: /app/
        links:
            - db
        environment:
            MONGODB: mongodb://db/reviewninja
            GITHUB_CLIENT: YOUR_GITHUB_APP_ID
            GITHUB_SECRET: YOUR_GITHUB_APP_SECRET
    nginx:
        image: nginx
        ports:
            - "80:80"
        volumes:
            - ./reviewninja.conf:/etc/nginx/conf.d/default
        command: /bin/bash -c "echo -e 'upstream backend { server web:5000; }\nserver { listen 80; location / { proxy_pass http://backend; }}' > /etc/nginx/conf.d/default.conf && nginx -g 'daemon off;'"
        links:
            - web
Take a look at the docker-compose documentation if you want to explore more about the syntax and options for docker-compose.yml.
That takes care of our configuration for this application. Save the docker-compose.yml file; it’s time to deploy this app.
Step 4 — Build and Deploy the Containers
We’ve configured docker-compose to deploy our ReviewNinja app, a MongoDB instance to hold the data, and an Nginx proxy. Before we deploy these containers, let’s verify that the reviewninja Docker machine is still active:
- docker-machine active
You should see:
Outputreviewninja
If you don’t see that output, be sure to run
- eval $(docker-machine env reviewninja)
again to make sure your environment settings are correct. Then try again.
Once you are sure you have an active machine, use docker-compose to build out your stack:
- docker-compose build
This process may take a very long time as it downloads and configures all of the dependencies for the ReviewNinja application on the Docker host. You’ll see the following output:
Outputdb uses an image, skipping
Building web
Step 1 : FROM node:0.12.2
0.12.2: Pulling from library/node
[...]
Successfully built 106a1992d538
Once the build process completes, verify that you have a successful image:
- docker images
You’ll see the following output which indicates that the image reviewninja_web was created successfully:
OutputREPOSITORY          TAG                 IMAGE ID            CREATED             SIZE
reviewninja_web     latest              106a1992d538        3 minutes ago       946.6 MB
Now we can launch our database, our ReviewNinja application, and our Nginx proxy on our remote server with a single command:
- docker-compose up -d
This brings up all the containers we defined in the docker-compose file. We use -d (for “detach”) so all the containers run in the background and we have our terminal back in our control.
OutputCreating network "reviewninja_default" with the default driver
Pulling db (mongo:latest)...
latest: Pulling from library/mongo
[...]
Digest: sha256:d3f19457c816bb91c5639e3b1b50f67370e3b3a58b812d73446d7b966469c65e
Status: Downloaded newer image for mongo:latest
Creating reviewninja_db_1
Creating reviewninja_web_1
Creating reviewninja_nginx_1
Let’s verify that the containers are up and running. Execute the following command:
- docker ps
You’ll see output that looks like this:
OutputCONTAINER ID        IMAGE               COMMAND                  CREATED             STATUS              PORTS                         NAMES
29f8e6f770d3        nginx               "nginx -g 'daemon off"   43 seconds ago      Up 41 seconds       0.0.0.0:80->80/tcp, 443/tcp   reviewninja_nginx_1
164564dd450a        reviewninja_web     "node /app/app.js"       45 seconds ago      Up 43 seconds       5000/tcp                      reviewninja_web_1
7cd9d03eb3b9        mongo               "/entrypoint.sh mongo"   46 seconds ago      Up 44 seconds       27017/tcp                     reviewninja_db_1
We also want to make sure the services are running properly. To do that, we use the docker logs command to see the output of a container. Let’s check out the logs for the ReviewNinja web application. We can reference the container either by its ID, listed in the CONTAINER ID column in the preceding output, or by its name. In our case, the name is reviewninja_web_1, so let’s look the logs for that container:
- docker logs reviewninja_web_1
You’ll see output from the ReviewNinja app indicating that it is listening for connections:
OutputIn server/app.js
checking configs
✓ configs seem ok
Host:        http://localhost:5000
GitHub:      https://GitHub.com
GitHub-Api:  https://api.GitHub.com
bootstrap certificates
bootstrap static files
apply migrations
[...]
bootstrap mongoose
[...]
bootstrap passport
[...]
bootstrap controller
[...]
bootstrap api
[...]
bootstrap webhooks
[...]
bootstrap monkey patch

✓ bootstrapped, app listening on localhost:5000
The output indicates that ReviewNinja is listening on port 5000.
To access it from the web, we’ll need to use the IP of our Docker host, which is our CoreOS server. If you forgot the IP address of your server, use docker-machine to find out.
- docker-machine ip reviewninja
Point your browser to http://your_server_ip and you’ll be greeted by the ninja:
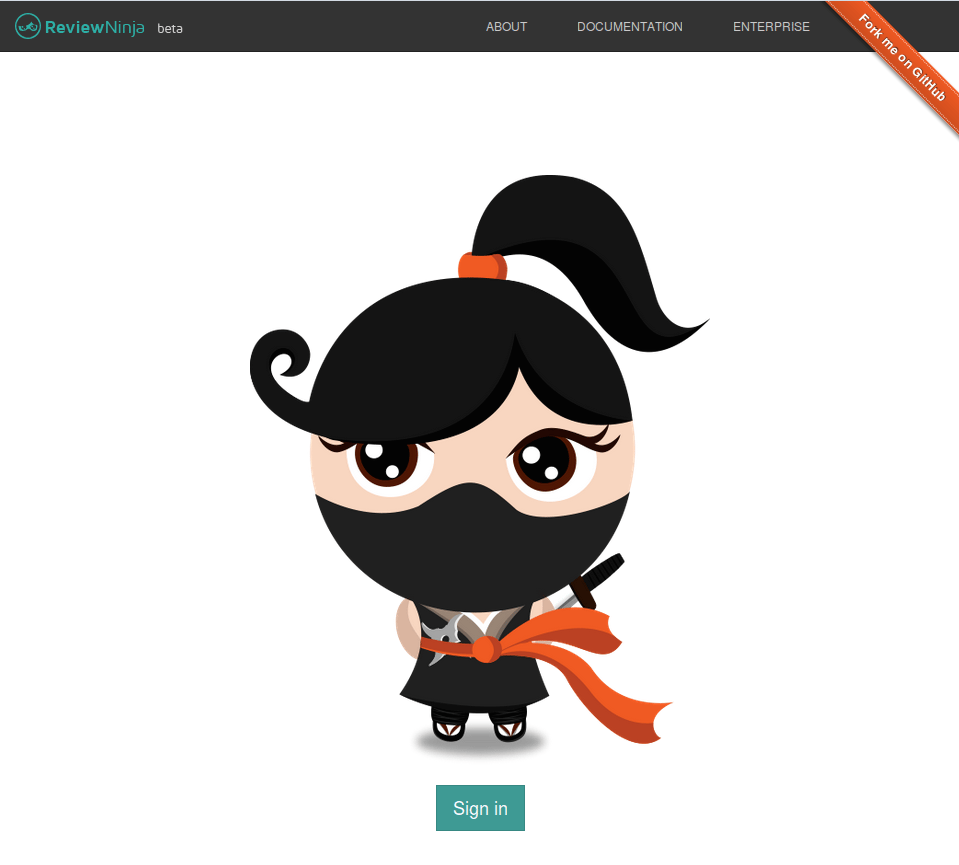
Finally, we’re ready to use the application with our own code.
Step 5 — Using ReviewNinja with a Repository
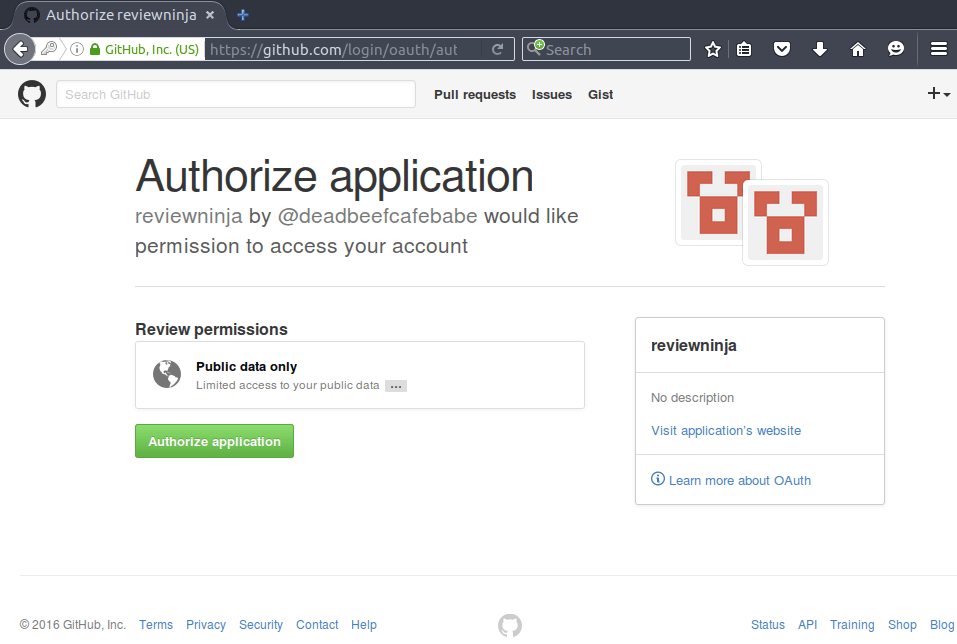
Let’s try out our new instance of ReviewNinja on a test repository. We’ll provide feedback on a pull request, address the issue, accept the changes, and merge the pull request in.
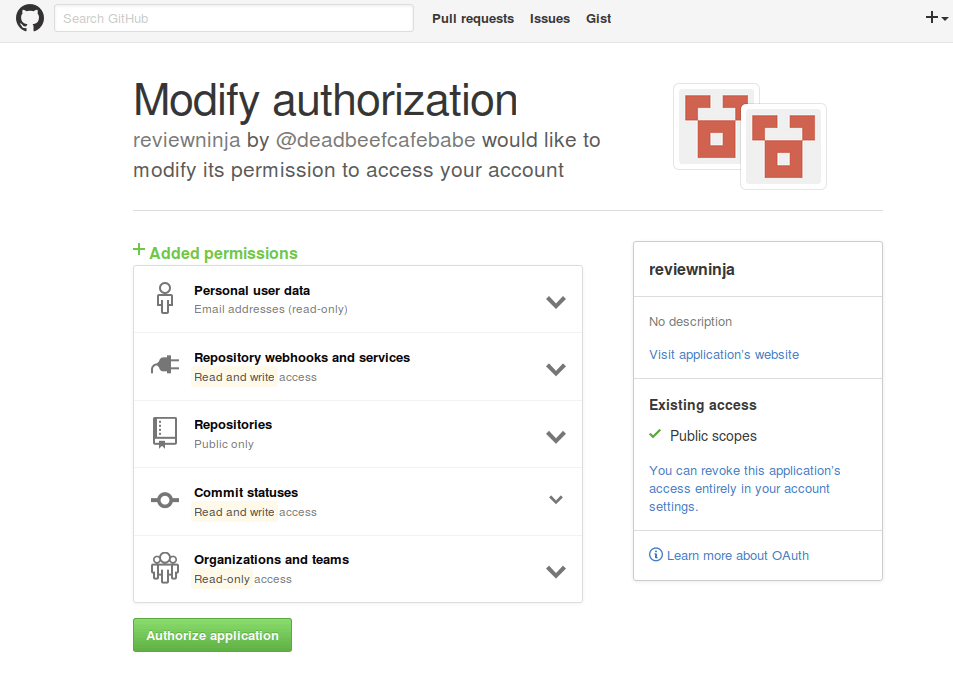
First we need to allow the ReviewNinja app to access our GitHub account. Click on Sign In, and you will be redirected to GitHub to sign in. You will be asked if you’ll allow ReviewNinja to access your GitHub account:
Once you authorize the application, you’ll be taken to ReviewNinja’s main interface. If you have private repositories that you would like ReviewNinja to use, you can click on the Enable private repos link:

You will then be redirected to GitHub to revise your authorization of the ReviewNinja app to include access to your private repos:
Once you have granted ReviewNinja the access you want it to have, you can add a repository so you can use ReviewNinja for your pull request workflow. When it’s your first time using ReviewNinja, you have the opportunity to add a sample ReviewNinja-Welcome repository:
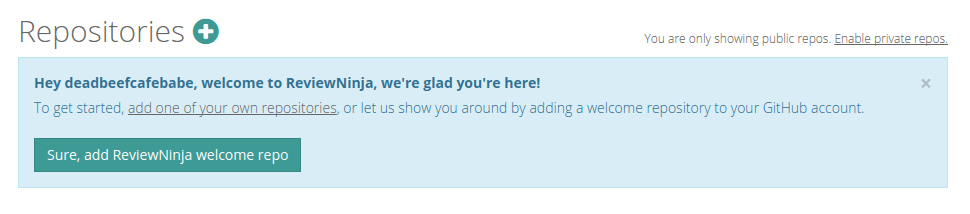
Create that sample repository so we can walk through some basic ReviewNinja features. This creates the repository on Github under your account and adds it to ReviewNinja.
The sample repository contains a ReadMe.md file that is supposed to outline some of the features of ReviewNinja’s code review flow. The ReviewNinja-Welcome repository already has a pull request open from a branch your_github_username-patch-1 that has the updated copy of the ReadMe.md file. The name of the branch will vary based on your username.
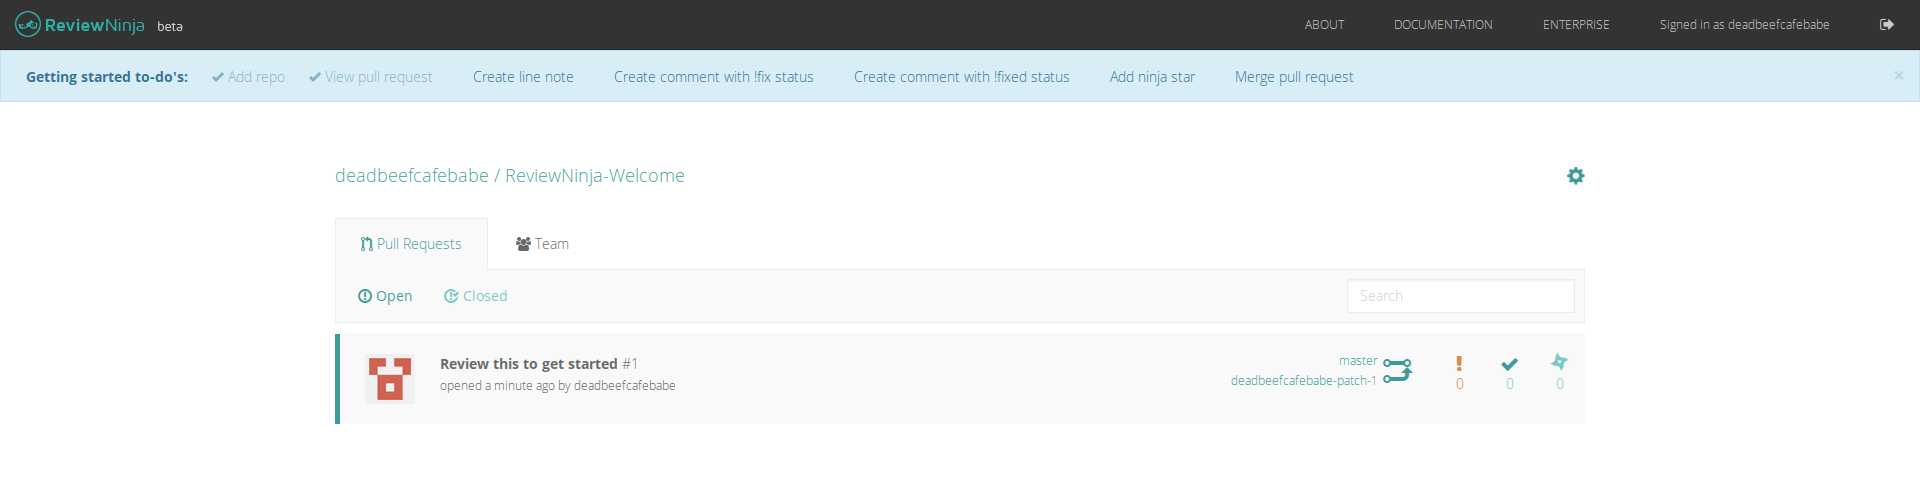
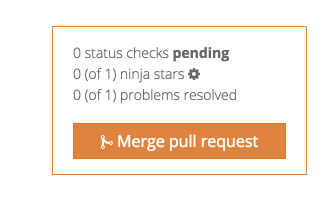
Click on that branch and you will see the main code review interface where you can browse the diffs and add comments. You will also see the pull request status box, which outlines the status of the pull request and outstanding problems.
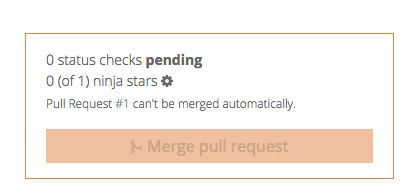
The Merge pull request button is amber right now because the status of the pull request is “pending”. The status will change based on condition which you can tweak by clicking on the gear button. By default, it requires at least 1 ninja star for the button to turn green.
We will see that in action later on, but for now, let’s add a line comment. Click on the line of code that says
+ convenience we also have a dropdown menu to add these comments
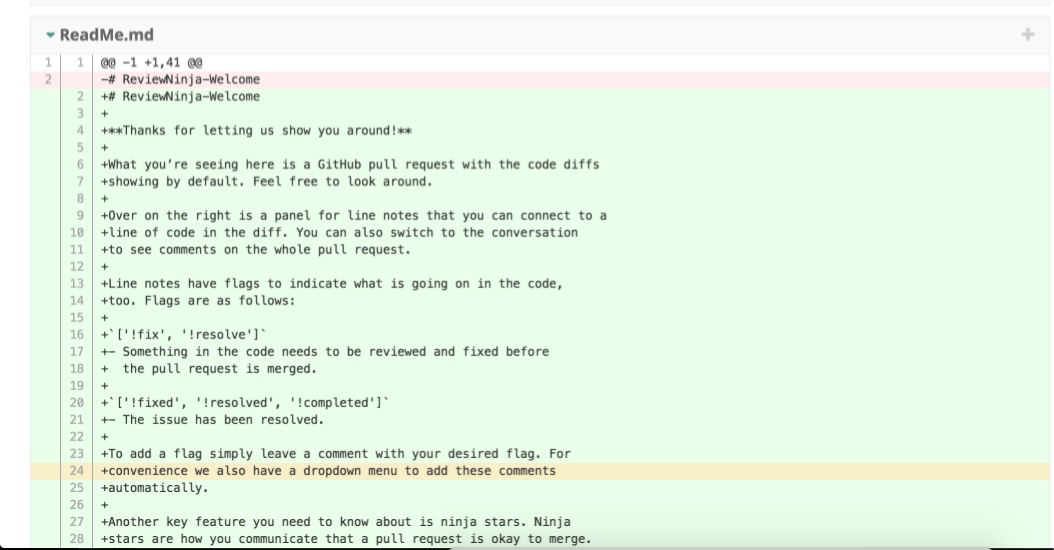
Let’s be a little pedantic here and suggest that the word dropdown should be changed to drop-down. Add a comment using the comment box on the right side of the screen, and flag this as a blocking issue by adding !fix to your comment, as shown in the following figure:
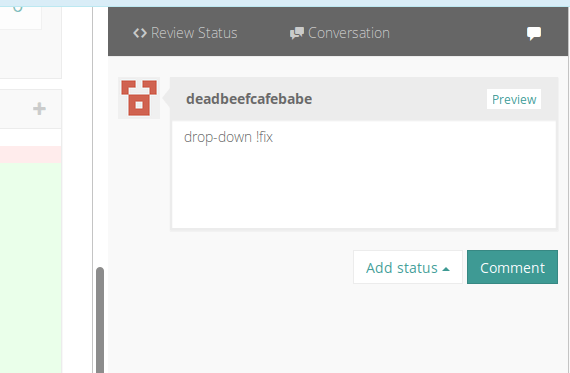
A flagged comment will be regarded as a “problem” on the pull request which the author of the pull request needs to address before ReviewNinja will allow it to be merged.
Refresh the page and you’ll now see the new problem listed above the Merge pull request button:
Let’s fix that problem. On your local machine, use Git to clone the repository:
- git clone git@GitHub.com:your_github_username/ReviewNinja-Welcome.git
- cd ReviewNinja-Welcome
Then check out the branch that needs work:
- git checkout your_github_username-patch-1
Open ReadMe.md in your favorite text editor and change the line to say drop-down instead of dropdown:
label ReadMe.md
To add a flag simply leave a comment with your desired flag. For
convenience we also have a drop-down menu to add these comments
automatically.
Save the file in your editor, then add and commit your changes:
- git add ReadMe.md
- git commit -m "Address code review feedback"
Next, push the changes to the branch to Github:
- git push origin your_github_username-patch-1
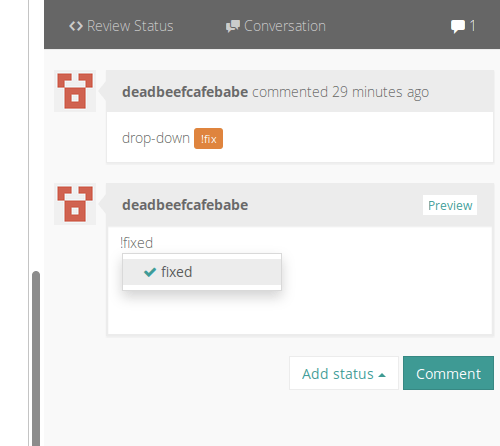
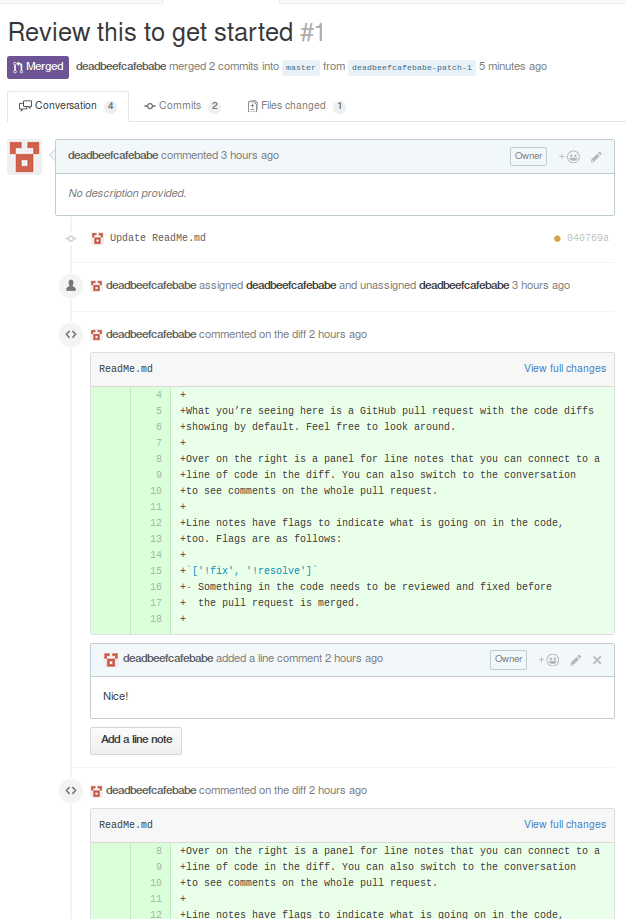
Now, refresh the ReviewNinja interface in your browser . You will see that the code is updated, and if you click the line again, you can reply to the existing comment with !fixed or !resolved, as shown in the following figure:
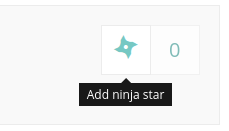
Finally, now that we’re satisfied with the pull request, let’s give it a ninja star as a formal sign-off. Click the Add ninja star button:
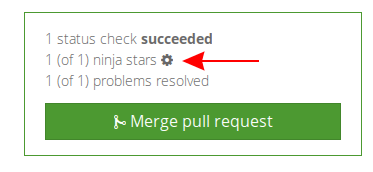
Then refresh the browser and observe that the pull request status is updated to “succeeded” and the Merge pull request button is green:

You can customize the success condition of a pull request by clicking on the gear button:
Go ahead and click “Merge pull request”. After the page is reloaded (you may have to refresh it manually), you will see that the status of the pull request is changed to “Merged”.
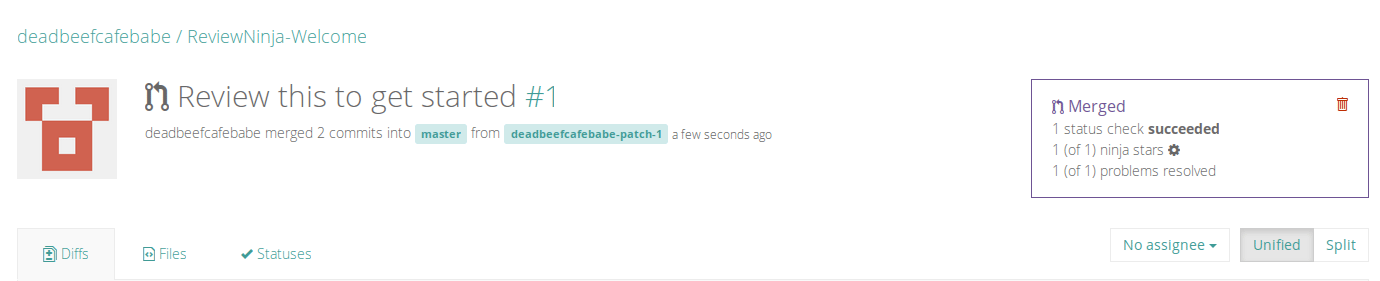
One thing to bear in mind: ReviewNinja pull requests are GitHub pull requests and vice versa. Comments made on ReviewNinja will automatically be reflected on the GitHub pull request page and vice versa. Pull requests merged through ReviewNinja will also be reflected on GitHub:
This bi-directional synchronization is going to be really handy for teams that want to gradually migrate to ReviewNinja for code review.
Conclusion
In this tutorial, you used Docker, docker-machine, and docker-compose to deploy ReviewNinja, a multi-tiered web application. You learned how to create a Docker image from an existing app, and how to define and deploy your entire infrastructure from the comfort of your local terminal.
You also learned about some powerful features of ReviewNinja, and how to use those features to add some workflow control to the GitHub pull request process.
Happy code reviewing!
Thanks for learning with the DigitalOcean Community. Check out our offerings for compute, storage, networking, and managed databases.
About the author(s)
Managed the Write for DOnations program, wrote and edited community articles, and makes things on the Internet. Expertise in DevOps areas including Linux, Ubuntu, Debian, and more.
Still looking for an answer?
This textbox defaults to using Markdown to format your answer.
You can type !ref in this text area to quickly search our full set of tutorials, documentation & marketplace offerings and insert the link!
 This work is licensed under a Creative Commons Attribution-NonCommercial- ShareAlike 4.0 International License.
Become a contributor for community
Get paid to write technical tutorials and select a tech-focused charity to receive a matching donation.

DigitalOcean Documentation
Full documentation for every DigitalOcean product.

Resources for startups and AI-native businesses
The Wave has everything you need to know about building a business, from raising funding to marketing your product.
The developer cloud
Scale up as you grow — whether you're running one virtual machine or ten thousand.

Start building today
From GPU-powered inference and Kubernetes to managed databases and storage, get everything you need to build, scale, and deploy intelligent applications.
