Sr Technical Content Strategist and Team Lead

Introduction
In Linux, permissions are a fundamental aspect of the operating system’s security model and file management, used to control who can access files and directories and what actions they can perform. Understanding and properly managing these permissions is essential for system administrators, developers, and anyone working with Linux systems.
This tutorial will guide you through the process of setting permissions using the chmod command (which changes file modes), chown (which changes file ownership), and chgrp (which changes group ownership). By mastering these linux commands, you’ll be able to secure your files, implement proper access controls, and prevent unauthorized access to sensitive data on your Linux systems.
Understanding Linux Permissions
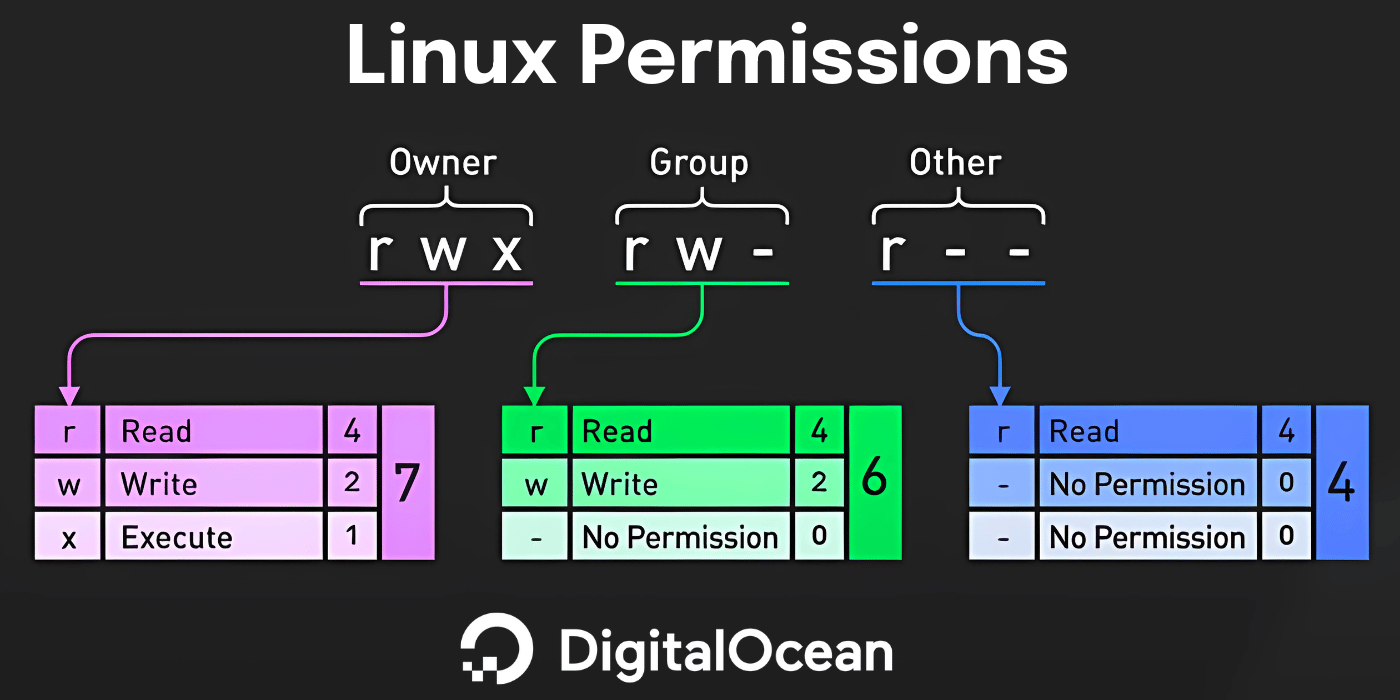
Permissions in Linux are represented by three sets of numbers or letters, each corresponding to a different user or group. This hierarchical permission system is a core component of Linux security, allowing fine-grained control over file and directory access.
The three sets are:
- User (u): The owner of the file or directory. This is typically the person who created the file, though ownership can be transferred.
- Group (g): A collection of users who share the same permission level for the file or directory. Groups help manage permissions for multiple users efficiently.
- Others (o): Everyone else who has access to the system but is neither the owner nor in the assigned group.
For each of these categories, Linux defines three basic permission types:
- Read (r or 4): Allows viewing file contents or listing directory contents
- Write (w or 2): Allows modifying file contents or creating/deleting files within a directory
- Execute (x or 1): Allows running a file as a program or accessing a directory
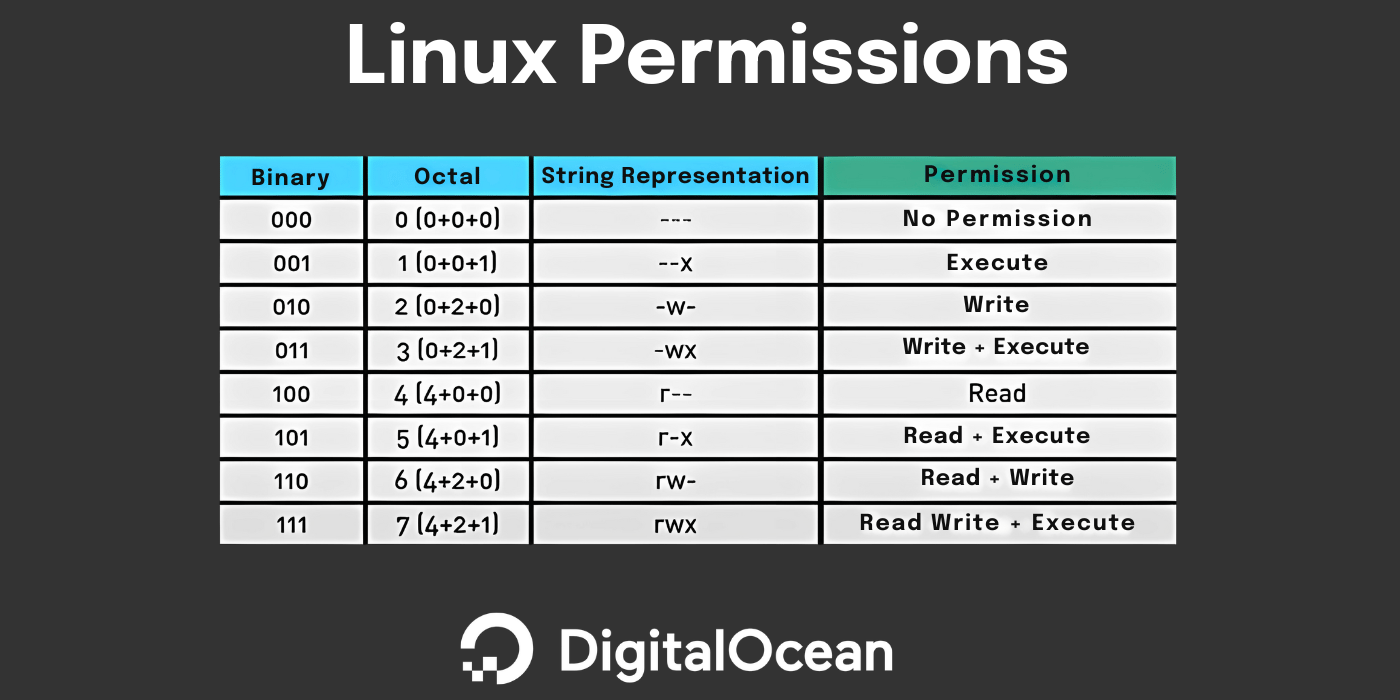
The string representation of permissions, as displayed by the ls -l command, is a 10-character string. The first character indicates the file type (e.g., - for a regular file, d for a directory, l for a symbolic link, etc.). The next nine characters are divided into three groups of three characters each, representing the permissions for the user (owner), group, and others, respectively. Each group consists of a combination of the following characters:
rfor read permissionwfor write permissionxfor execute permission-for no permission
For example, the string -rwxr-xr-- can be broken down as follows:
- The first character
-indicates a regular file. - The next three characters
rwxrepresent the permissions for the user (owner): read, write, and execute. - The next three characters
r-xrepresent the permissions for the group: read and execute. - The final three characters
r--represent the permissions for others: read only.
Understanding this string representation is essential for managing permissions effectively in Linux systems.
Note: Keep your most commonly used linux commands handy with our 50+ Linux commands cheat sheet.
Numeric Representation of Permissions
Linux permissions can also be represented using a numeric (octal) notation, which provides a concise way to specify permissions for all three categories at once:
- 4 represents read permission
- 2 represents write permission
- 1 represents execute permission
These values can be added together to create combinations:
- 7 (4+2+1) = read, write, and execute
- 6 (4+2) = read and write
- 5 (4+1) = read and execute
- 4 = read only
- 3 (2+1) = write and execute
- 2 = write only
- 1 = execute only
- 0 = no permissions
For example, the permission chmod 755 sets:
- Owner: 7 (read, write, execute)
- Group: 5 (read, execute)
- Others: 5 (read, execute)
This numeric system makes it efficient to specify complex permission sets with a simple three-digit number.
The table below summarises the different representations and their permissions:
Special Permissions
Beyond the basic read, write, and execute permissions, Linux also supports special permissions:
-
SUID (Set User ID): When applied to an executable file, it runs with the permissions of the file owner rather than the user executing it.
- Set with:
chmod u+s filenameorchmod 4xxx filename(where xxx represents other permissions) - Example:
chmod 4755 /usr/bin/passwd
- Set with:
-
SGID (Set Group ID): When applied to an executable file, it runs with the permissions of the file group. When applied to a directory, new files created within it inherit the directory’s group.
- Set with:
chmod g+s filenameorchmod 2xxx filename(where xxx represents other permissions) - Example:
chmod 2775 /shared/project_dir
- Set with:
-
Sticky Bit: When set on a directory, files within can only be deleted by their owners, the directory owner, or the root user.
- Set with:
chmod +t directoryorchmod 1xxx directory(where xxx represents other permissions) - Example:
chmod 1777 /tmp
- Set with:
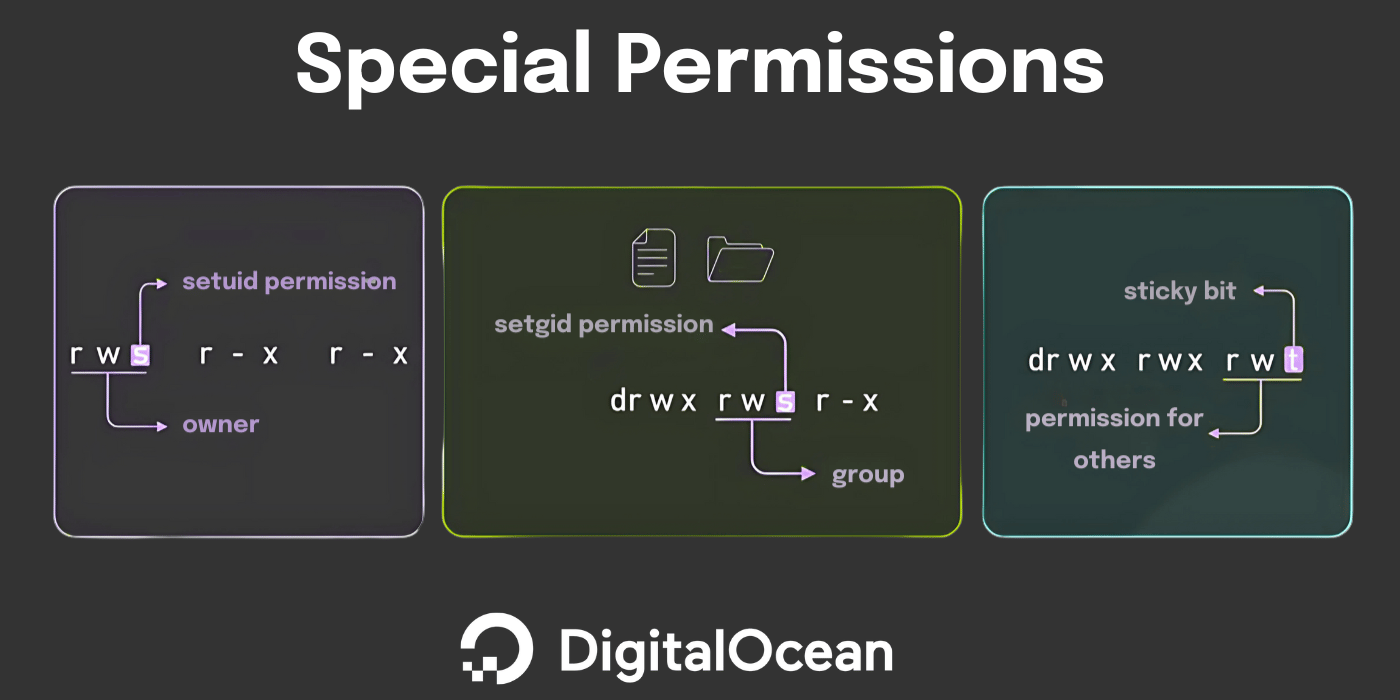
You can combine these special permissions. For example, to set SGID and sticky bit on a directory: chmod 3775 directory (3 = 2+1, SGID + sticky bit).
These special permissions add another layer of control and are particularly useful for system files and shared directories.
How to Check Permissions
Use the ls -l command to view file and directory permissions. The -l flag stands for “long” and displays detailed information about the file or directory, including its permissions, ownership, size, and modification time.
ls -l /path/to/file
Use stat for detailed information about a file or directory. The stat command provides information about the file system status, including file type, permissions, ownership, and timestamps. You can use the -c flag to specify the format of the output.
stat /path/to/file
Some common flags for ls and stat include:
lsflags:-l(long): Displays detailed information about the file or directory.-a(all): Includes hidden files and directories in the listing.-d(directory): Lists only the directory itself, not its contents.
statflags:-c(format): Specifies the format of the output. For example,-c %Adisplays the file permissions in human-readable format.-f(filesystem): Displays information about the file system containing the file, rather than the file itself.-t(terse): Displays the information in a terse format, suitable for parsing by scripts.
File and Directory Permission Basics
Let’s dive into the details of the permission string displayed by the ls -l script.sh command:
-rwxr-xr-- 1 user group 4096 Apr 25 10:00 script.sh
The first character - indicates that script.sh is a regular file. If it were a directory, this character would be d.
The next three characters rwx represent the permissions for the file owner (user). In this case, the owner has:
r(read) permission, allowing them to view the file’s contents.w(write) permission, enabling them to modify the file.x(execute) permission, allowing them to run the file as a program.
The following three characters r-x represent the permissions for the group that owns the file. In this case, the group has:
r(read) permission, allowing them to view the file’s contents.x(execute) permission, enabling them to run the file as a program.- No
w(write) permission, meaning they cannot modify the file.
The final three characters r-- represent the permissions for all other users (others). In this case, others have:
r(read) permission, allowing them to view the file’s contents.- No
w(write) orx(execute) permissions, meaning they cannot modify or run the file.
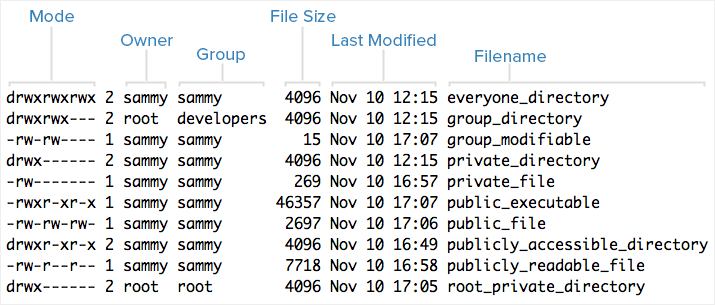
Here is an example screenshot of ls -l output, with labels of each column of output:
Numeric equivalents:
In Linux, permissions can also be represented using a numeric (octal) notation. This system assigns a value to each permission:
r(read) = 4w(write) = 2x(execute) = 1
By adding these values, you can create combinations that represent different permission sets. For example:
rwx(read, write, execute) = 7 (4+2+1)rw-(read, write) = 6 (4+2)r--(read) = 4
Using this numeric system, the permission 755 can be broken down as follows:
- Owner: 7 (rwx) = read, write, execute
- Group: 5 (r-x) = read, execute
- Others: 5 (r–) = read
So, the permission 755 is equivalent to rwxr-xr-x.
To set permissions using the numeric notation, you can use the chmod command followed by the numeric value. For example, to set the permission 755 on a file or directory, you would use the command chmod 755 filename.
The chmod Command: Symbolic and Numeric Modes
chmod Command: Symbolic and Numeric ModesThe chmod command is used to change the mode (permissions) of a file or directory. It supports both symbolic and numeric modes.
Numeric Mode
The following examples demonstrate how to use the chmod command with numeric mode to set permissions on files and directories:
chmod 755 filename
# Sets the permissions of 'filename' to rwxr-x, allowing the owner to read, write, and execute, the group to read and execute, and others to read and execute.

chmod 644 document.txt
# Sets the permissions of 'document.txt' to rw-r--, allowing the owner to read and write, the group to read, and others to read.

chmod 700 private.sh
# Sets the permissions of 'private.sh' to rwx------, allowing the owner to read, write, and execute, and denying all permissions to the group and others.
Symbolic Mode
chmod u+x script.sh     # This command adds execute permission for the user (owner) of the file 'script.sh', allowing them to run the script.
chmod g-w file.txt      # This command removes write permission for the group associated with the file 'file.txt', ensuring that group members cannot modify the file.
chmod o=r file.txt      # This command sets the permissions for others (all users except the owner and group members) to read-only for the file 'file.txt', allowing them to view the file's contents but not modify or execute it.
Examples of chmod Usage
The chmod command is a powerful tool for managing file and directory permissions in Linux. Here are some examples of how to use chmod to achieve specific permission settings:
Giving Read-Only Permission to a User in Linux
To give a user read-only permission to a file, you can use the numeric mode 400. This sets the permission to r--, allowing the owner to read the file but not write or execute it.
chmod 400 file.txt
Giving Write Permission to a Folder in Linux for a User
To give a user write permission to a folder, you can use the symbolic mode u+w. This adds write permission for the user (owner) of the folder, allowing them to modify its contents.
chmod u+w /path/to/folder
Making a Script Executable
To make a script executable, you can use the symbolic mode +x. This adds execute permission for the user (owner) of the script, allowing them to run it.
chmod +x deploy.sh
These examples demonstrate the flexibility of the chmod command in managing permissions for different users and use cases.
How to Use chown and chgrp
chown and chgrpThe chown and chgrp commands are essential tools for managing file and directory ownership in Linux. Understanding how to use these commands is crucial for maintaining proper access controls and ensuring that files and directories are accessible only to authorized users.
The chown Command
The chown command is used to change the ownership of a file or directory. It allows you to specify a new owner and group for the file or directory, ensuring that the correct user or group has access to it. The basic syntax of the chown command is as follows:
sudo chown username file.txt
In this example, username is the new owner of the file file.txt. You can also specify a group along with the owner using the following syntax:
sudo chown username:groupname file.txt
This command sets both the owner and group of file.txt to username and groupname, respectively.
The chgrp Command
The chgrp command is used to change the group ownership of a file or directory. It allows you to specify a new group for the file or directory without changing its owner. The basic syntax of the chgrp command is as follows:
sudo chgrp groupname file.txt
In this example, groupname is the new group owner of the file file.txt.
Recursive Permissions in Linux
In Linux, recursive permissions allow you to apply permissions to a directory and all its contents simultaneously. This is particularly useful when you need to manage permissions for a large number of files or directories.
Basic Syntax
The basic syntax for applying recursive permissions is as follows:
chmod -R permissions directory
In this example, permissions is the permission string you want to apply, and directory is the directory you want to apply the permissions to.
Examples of Recursive Permissions
The following examples demonstrate how to apply recursive permissions to a directory and its contents.
chmod -R 755 /var/www/html
This command sets the permissions of the /var/www/html directory and all its contents to 755. This means the owner has read, write, and execute permissions, the group has read and execute permissions, and others have read and execute permissions.
chown -R user:group /var/www/html
This command changes the ownership of the /var/www/html directory and all its contents to user and sets the group ownership to group. This ensures that the specified user and group have the appropriate access to the directory and its contents.
Common Use Cases
Web hosting folder setup
When setting up a web hosting environment, it’s essential to ensure that the web server has the necessary permissions to access and serve files. For example, you might want to set the permissions of the /var/www/html directory to 755 to allow the web server to read and execute files, while preventing others from writing to the directory. This can be achieved using the following command:
chmod -R 755 /var/www/html
Deploying a script
When deploying a script, you might need to ensure that it has execute permissions. For instance, if you have a script named deploy.sh that needs to be executed during deployment, you can set its permissions to 755 using the following command:
chmod 755 deploy.sh
This allows the owner to read, write, and execute the script, while others can only read and execute it.
Setting group access for collaboration
In a collaborative environment, it’s common to have multiple users working on the same project. To facilitate collaboration, you might need to set group permissions to allow multiple users to access and modify files. For example, if you have a project directory named project and you want to allow members of the developers group to read, write, and execute files within the directory, you can use the following commands:
chown -R :developers project
chmod -R 775 project
The first command sets the group ownership of the project directory and its contents to developers, while the second command sets the permissions to allow the group to read, write, and execute files, while others can only read and execute them.
Common Errors and Solutions
Setting 777 everywhere
Setting permissions to 777 for all files and directories can be a security risk, as it allows anyone to read, write, and execute them. This can lead to unauthorized access and potential security breaches.
Solution: Use more restrictive permissions based on the specific needs of each file or directory. For example, use 755 for directories and 644 for files to allow the owner to write and others to read.
chmod -R 755 /path/to/directory
chmod -R 644 /path/to/file
Forgetting execute permission on scripts
Forgetting to set execute permissions on scripts can prevent them from being executed, leading to errors or unexpected behavior.
Solution: Ensure that scripts have execute permissions set for the appropriate users or groups. For example, to add execute permission for the owner, use the following command:
chmod u+x script.sh
Breaking web/app access with incorrect perms
Incorrect permissions on web or application directories can prevent the server from accessing or serving files, leading to errors or downtime.
Solution: Ensure that the web server has the necessary permissions to access and serve files. For example, to set permissions for the Apache web server to access files in the /var/www/html directory, use the following command:
chown -R www-data:www-data /var/www/html
chmod -R 755 /var/www/html
Best Practices
| DOs | Description | Example Command |
|---|---|---|
| Use least-privilege principle | Start with minimal permissions to ensure security. | chmod 755 directory |
| Use groups for easier collaboration | Assign group permissions for efficient collaboration. | chown -R :group directory |
| Always double-check recursive commands | Verify the impact of recursive commands to avoid unintended changes. | ls -lR directory |
| DON’Ts | Description | Example Command |
|---|---|---|
Avoid using chmod 777 |
Refrain from using chmod 777 unless it’s absolutely necessary to avoid security risks. |
chmod 755 directory |
| Don’t forget to set execute permission on scripts | Ensure scripts have execute permission (chmod +x) to function correctly. | chmod +x script.sh |
| Don’t break app access by over-restricting files | Balance permissions to avoid restricting access to applications. | chmod 644 file.txt |
FAQs
1. How do you set permissions in Linux?
To set permissions in Linux, you use the chmod command. This command allows you to change the permissions of a file or directory. For example, to set the permissions of a file to allow the owner to read, write, and execute, the group to read and execute, and others to read and execute, you would use the following command:
chmod 755 filename
This sets the permissions of filename to rwxr-xr-x, which is equivalent to the numeric value 755.
2. What is chmod 755 or 777?
chmod 755 sets the permissions of a file or directory to allow the owner to read, write, and execute, the group to read and execute, and others to read and execute. This is a common permission setting for directories and executable files.
chmod 777, on the other hand, sets the permissions of a file or directory to allow everyone (owner, group, and others) to read, write, and execute. This is not recommended for security reasons, as it allows anyone to modify or execute the file or directory.
Here’s an example of how to set permissions using chmod 777:
chmod 777 filename
This sets the permissions of filename to rwxrwxrwx, which is equivalent to the numeric value 777.
3. What is chmod 666 or 777?
chmod 666 sets the permissions of a file or directory to allow everyone (owner, group, and others) to read and write, but not execute. This is not a common permission setting, as it does not allow the execution of files.
chmod 777, as mentioned earlier, sets the permissions of a file or directory to allow everyone to read, write, and execute.
Here’s an example of how to set permissions using chmod 666:
chmod 666 filename
This sets the permissions of filename to rw-rw-rw-, which is equivalent to the numeric value 666.
4. What is the meaning of chmod 400?
chmod 400 sets the permissions of a file or directory to allow only the owner to read, and denies all permissions to the group and others. This is a restrictive permission setting, suitable for sensitive files that should only be accessible by the owner.
Here’s an example of how to set permissions using chmod 400:
chmod 400 filename
This sets the permissions of filename to r--------, which is equivalent to the numeric value 400.
Conclusion
Setting permissions in Linux is a crucial aspect of system administration and security. By understanding the different permission settings and how to use them, you can ensure that your files and directories are accessible only to authorized users and that your system is secure and reliable.
For a more comprehensive approach to system security, consider using DigitalOcean’s Cloud Firewalls to protect your infrastructure from unauthorized access. Additionally, DigitalOcean’s Block Storage can help you manage data storage securely and efficiently.
For further learning, make sure to check out the following tutorials:
Thanks for learning with the DigitalOcean Community. Check out our offerings for compute, storage, networking, and managed databases.
About the author
Anish is a Sr Technical Content Strategist and Team Lead at DigitalOcean with 7+ years of experience as an DevOps SRE at Nutanix and Cloud consultant at AMEX, and technical writing at DOCN, and shipping deep infra and AI inference tutorials that help developers deploy production‑ready applications on DigitalOcean.
Still looking for an answer?
This textbox defaults to using Markdown to format your answer.
You can type !ref in this text area to quickly search our full set of tutorials, documentation & marketplace offerings and insert the link!
 This work is licensed under a Creative Commons Attribution-NonCommercial- ShareAlike 4.0 International License.
Become a contributor for community
Get paid to write technical tutorials and select a tech-focused charity to receive a matching donation.

DigitalOcean Documentation
Full documentation for every DigitalOcean product.

Resources for startups and AI-native businesses
The Wave has everything you need to know about building a business, from raising funding to marketing your product.
The developer cloud
Scale up as you grow — whether you're running one virtual machine or ten thousand.

Start building today
From GPU-powered inference and Kubernetes to managed databases and storage, get everything you need to build, scale, and deploy intelligent applications.
