
Introduction
Mirroring is a way of scaling a download site, so the download load can be spread across many servers in many parts of the world. Mirrors host copies of the files and are managed by a mirror director. A mirror director is the center of any mirror system. It is responsible for directing traffic to the closest appropriate mirror so users can download more quickly.
Mirroring is a unique system with its own advantages and disadvantages. Unlike a DNS based system, mirroring is more much more flexible. There is no need to wait for DNS or even to trust the mirroring server (the mirror director can scan the mirror to check its validity and completeness). This is one reason many open source projects use mirrors to harness the generosity of ISPs and server owners to take the load off the open source project’s own servers for downloads.
Unfortunately, a mirroring system will increase the overhead of any HTTP request, as the request must travel to the mirror director before being redirected to the real file. Therefore, mirroring is commonly used for hosting downloads (single large files), but is not recommended for websites (many small files).
This tutorial will show how to set up a MirrorBrain instance (a popular, feature-rich mirror director) and an rsync server (rsync lets mirrors sync files with the director) on one server. Then we will set up one mirror on a different server.
Required:
- Two Ubuntu 14.04 Droplets in different regions; one director and at least one mirror.
Step One — Setting Up Apache
First we need to compile and install MirrorBrain. The entire first part of this tutorial should be done on the mirror director server. We’ll let you know when to switch to the mirror.
Perform these steps as root. If necessary, use sudo to access a root shell:
sudo -i
MirrorBrain is a large Apache module, so we will need to use Apache to serve our files. First install Apache and the modules we require:
apt-get install apache2 libapache2-mod-geoip libgeoip-dev apache2-dev
GeoIP is an IP address to location service and will power MirrorBrain’s ability to redirect users to the best download location. We need to change GeoIP’s configuration file to make it work with MirrorBrain. First open the configuration file:
nano /etc/apache2/mods-available/geoip.conf
Modify it to look like the following. Add the GeoIPOutput Env line, and uncomment the GeoIPDBFile line, and add the MMapCache setting:
<IfModule mod_geoip.c>
        GeoIPEnable On
        GeoIPOutput Env
        GeoIPDBFile /usr/share/GeoIP/GeoIP.dat MMapCache
</IfModule>
Close and save the file (Ctrl-x, then y, then Enter).
Link the GeoIP database to where MirrorBrain expects to find it:
ln -s /usr/share/GeoIP /var/lib/GeoIP
Next let’s enable the modules we just installed and configured:
a2enmod dbd
a2enmod geoip
The geoip module may already be enabled; that’s fine.
Step Two — Installing and Compiling MirrorBrain
Now we need to compile the MirrorBrain module. First install some dependencies:
apt-get install python-pip python-dev libdbd-pg-perl python-SQLObject python-FormEncode python-psycopg2 libaprutil1-dbd-pgsql

pip install cmdln
Use Perl to install some more dependencies.
perl -MCPAN -e 'install Bundle::LWP'
Pay attention to the questions asked here. You should be able to press Enter or say y to accept the defaults.
You should see quite a bit of output, ending with the line:
/usr/bin/make install -- OK
If you get warnings or errors, you may want to run through the configuration again by executing the perl -MCPAN -e ‘install Bundle::LWP’ command again.
Install the last dependency.
perl -MCPAN -e 'install Config::IniFiles'
Now we can download and extract the MirrorBrain source:
wget http://mirrorbrain.org/files/releases/mirrorbrain-2.18.1.tar.gz
tar -xzvf mirrorbrain-2.18.1.tar.gz
Next we need to add the forms module source to MirrorBrain:
cd mirrorbrain-2.18.1/mod_mirrorbrain/
wget http://apache.webthing.com/svn/apache/forms/mod_form.h
wget http://apache.webthing.com/svn/apache/forms/mod_form.c
Now we can compile and enable the MirrorBrain and forms modules:
apxs -cia -lm mod_form.c
apxs -cia -lm mod_mirrorbrain.c
And then the MirrorBrain autoindex module:
cd ~/mirrorbrain-2.18.1/mod_autoindex_mb
apxs -cia mod_autoindex_mb.c
Let’s compile the MirrorBrain GeoIP helpers:
cd ~/mirrorbrain-2.18.1/tools

gcc -Wall -o geoiplookup_city geoiplookup_city.c -lGeoIP
gcc -Wall -o geoiplookup_continent geoiplookup_continent.c -lGeoIP
Copy the helpers into the commands directory:
cp geoiplookup_city /usr/bin/geoiplookup_city
cp geoiplookup_continent /usr/bin/geoiplookup_continent
Install the other internal tools:
install -m 755 ~/mirrorbrain-2.18.1/tools/geoip-lite-update /usr/bin/geoip-lite-update
install -m 755 ~/mirrorbrain-2.18.1/tools/null-rsync /usr/bin/null-rsync
install -m 755 ~/mirrorbrain-2.18.1/tools/scanner.pl /usr/bin/scanner
install -m 755 ~/mirrorbrain-2.18.1/mirrorprobe/mirrorprobe.py /usr/bin/mirrorprobe
Then add the logging file for mirrorprobe (mirrorprobe checks that the mirrors are online):
mkdir /var/log/mirrorbrain
touch /var/log/mirrorbrain/mirrorprobe.log
Now, we can install the MirrorBrain command line management tool:
cd ~/mirrorbrain-2.18.1/mb
python setup.py install
Step Three — Installing PostgreSQL
MirrorBrain uses PostgreSQL, which is easy to set up on Ubuntu. First, let’s install PostgreSQL:
apt-get install postgresql postgresql-contrib
Now let’s go into the PostgreSQL admin shell:
sudo -i -u postgres
Let’s create a MirrorBrain database user. Create a password for this user, and make a note of it, since you’ll need it later:
createuser -P mirrorbrain
Then, set up a database for MirrorBrain:
createdb -O mirrorbrain mirrorbrain
createlang plpgsql mirrorbrain
If you get a notice that the language is already installed, that’s fine:
createlang: language "plpgsql" is already installed in database "mirrorbrain"
We need to allow password authentication for the database from the local machine (this is required by MirrorBrain). First open the configuration file:
nano /etc/postgresql/9.3/main/pg_hba.conf
Then locate line 90 (it should be the second line that looks like this):
 # "local" is for Unix domain socket connections only
 local   all             all                                     peer
Update it to use md5-based password authentication:
local all all md5
Save your changes and restart PostgreSQL:
service postgresql restart
Now let’s quit the PostgreSQL shell (Ctrl-D).
Next, complete the database setup by importing MirrorBrain’s database schema:
cd ~/mirrorbrain-2.18.1
psql -U mirrorbrain -f sql/schema-postgresql.sql mirrorbrain
When prompted, enter the password we set earlier for the mirrorbrain database user.
The output should look like this:
BEGIN
CREATE TABLE
CREATE TABLE
CREATE TABLE
CREATE VIEW
CREATE TABLE
CREATE INDEX
CREATE TABLE
CREATE TABLE
CREATE TABLE
CREATE FUNCTION
CREATE FUNCTION
CREATE FUNCTION
CREATE FUNCTION
CREATE FUNCTION
CREATE FUNCTION
CREATE FUNCTION
CREATE FUNCTION
CREATE FUNCTION
COMMIT
Add the initial data:
psql -U mirrorbrain -f sql/initialdata-postgresql.sql mirrorbrain
Expected output:
INSERT 0 1
INSERT 0 6
INSERT 0 246
You have now installed MirrorBrain and set up a database!
Step Four — Publishing the Mirror
Now add some files to the mirror. We suggest naming the download directory after your domain. Let’s create a directory to serve these files (still as root):
mkdir /var/www/download.example.org
Enter that directory:
cd /var/www/download.example.org
Now we need to add some files. If you already have the files on your server, you will want to cp or mv them into this folder:
cp /var/www/example.org/downloads/* /var/www/download.example.org
If they are on a different server you could use scp (the mirror director server needs SSH access to the other server):
scp root@other.server.example.org:/var/www/example.org/downloads/* download.example.org
You can also just upload new files as you would any other files; for example, by using SSHFS or SFTP.
For testing, you can add three sample files:
cd /var/www/download.example.org
touch apples.txt bananas.txt carrots.txt
Next, we need to set up rsync. rsync is a UNIX tool that allows us to sync files between servers. We will be using it to keep our mirrors in sync with the mirror director. Rsync can operate over SSH or a public rsync:// URL. We will set up the rsync daemon (the rsync:// URL) option. First we need to make a configuration file:
nano /etc/rsyncd.conf
Let’s add this configuration. The path should be to your download directory, and the comment can be whatever you want:
[main]
    path = /var/www/download.example.org
    comment = My Mirror Director with Very Fast Download Speed!
    read only = true
    list = yes
Save the file. Start the rsync daemon:
rsync --daemon --config=/etc/rsyncd.conf
Now we can test this by running the following on a *NIX system. You can use a domain that resolves to your server, or your server’s IP address:
rsync rsync://server.example.org/main
You should see a list of your files.
Step Five — Enabling MirrorBrain
Now that we have our files ready, we can enable MirrorBrain. First we need a MirrorBrain user and group:
groupadd -r mirrorbrain
useradd -r -g mirrorbrain -s /bin/bash -c "MirrorBrain user" -d /home/mirrorbrain mirrorbrain
Now, let’s make the MirrorBrain configuration file that will allow the MirrorBrain management tool to connect to the database:
nano /etc/mirrorbrain.conf
Then add this configuration. Most of these settings are to set up the database connection. Be sure to add the mirrorbrain database user’s password for the dbpass setting:
[general]
instances = main

[main]
dbuser = mirrorbrain
dbpass = password
dbdriver = postgresql
dbhost = 127.0.0.1
dbname = mirrorbrain

[mirrorprobe]
Save the file. Now let’s set up our Apache VirtualHost file for MirrorBrain:
nano /etc/apache2/sites-available/download.example.org.conf
Then add this VirtualHost configuration. You’ll need to modify all of the locations where download.example.org is used to have your own domain or IP address that resolves to your server. You should also set up your own email address for the ServerAdmin setting. Make sure you use the mirrorbrain database user’s password on the DBDParams line:
<VirtualHost *:80>
    ServerName download.example.org
    ServerAdmin webmaster@example.org
    DocumentRoot /var/www/download.example.org

    ErrorLog     /var/log/apache2/download.example.org/error.log
    CustomLog    /var/log/apache2/download.example.org/access.log combined

    DBDriver pgsql
    DBDParams "host=localhost user=mirrorbrain password=database password dbname=mirrorbrain connect_timeout=15"

    <Directory /var/www/download.example.org>
        MirrorBrainEngine On
        MirrorBrainDebug Off
        FormGET On

        MirrorBrainHandleHEADRequestLocally Off
        MirrorBrainMinSize 2048
        MirrorBrainExcludeMimeType application/pgp-keys

        Options FollowSymLinks Indexes
        AllowOverride None
        Order allow,deny
        Allow from all
    </Directory>
</VirtualHost>
It is worth looking at some of the MirrorBrain options available under the Directory tag:
| Name | Usage |
|---|---|
| MirrorBrainMinSize | Sets the minimum size file (in bytes) to be redirected to a mirror to download. This prevents MirrorBrain for redirecting people to download really small files, where the time taken to run the database lookup, GeoIP, etc. is longer than to just serve the file. |
| MirrorBrainExcludeMimeType | Sets which mime types should not be served from a mirror. Consider enabling this for key files or similar; small files that must be delivered 100% accurately. Use this option multiple times in your configuration file to enable it for multiple mime types. |
| MirrorBrainExcludeUserAgent | This option stops redirects for a given user agent. Some clients (e.g. curl) require special configuration to work with redirects, and it may be easier to just serve the files directly to those users. You can use wildcards (e.g. *Chrome/* will disable redirection for any Chrome user). |
A full list of configuration options can be found on the MirrorBrain website.
If you would like more information about basic Apache VirtualHost settings, please check this tutorial.
Save and exit the file.
Make sure your log directory exists:
mkdir /var/log/apache2/download.example.org/
Make a link to the configuration file in the enabled sites directory:
ln -s /etc/apache2/sites-available/download.example.org.conf /etc/apache2/sites-enabled/download.example.org.conf
Now restart Apache:
service apache2 restart
Congratulations, you now have MirrorBrain up and running!
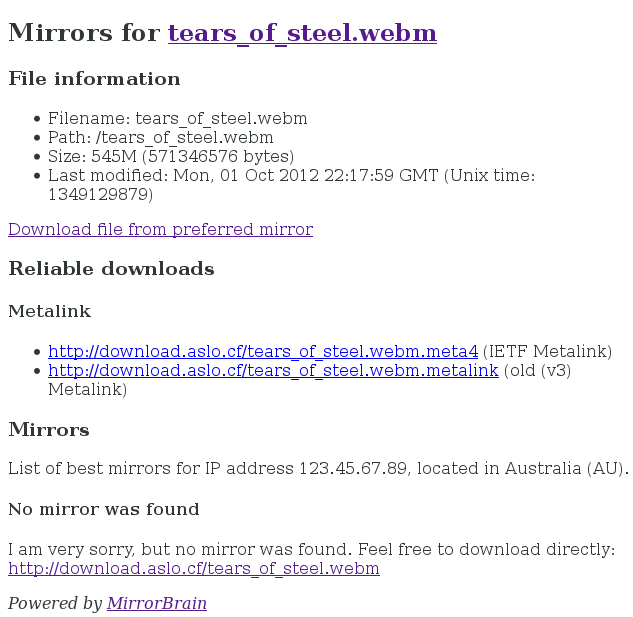
To test that MirrorBrain is working, first visit your download site in a web browser to view the file index. Then click on one of the files to view it. Append “.mirrorlist” to the end of the URL. (Example URL: **http://download.example.org/apples.txt.mirrorlist**.) If all is working, you should see a page like this:
Cron Job Configuration
Before we can start adding mirrors, we still need to set up some mirror scanning and maintenance cron jobs. First, let’s set MirrorBrain to check which mirrors are online (using the mirrorprobe command) every minute:
echo "* * * * * mirrorbrain mirrorprobe" | crontab
And a cron job to scan the mirrors’ content (for availability and correctness of files) every hour:
echo "0 * * * * mirrorbrain mb scan --quiet --jobs 4 --all" | crontab
If you have very quickly changing content, it would be wise to add more scan often, e.g., 0,30 * * * * for every half an hour. If you have a very powerful server, you could increase the number of --jobs to scan more mirrors at the same time.
Clean up the database at 1:30 on Monday mornings:
echo "30 1 * * mon mirrorbrain mb db vacuum" | crontab
And update the GeoIP data around about 2:30 on Monday mornings (the sleep statement is to reduce unneeded load spikes on the GeoIP servers):
echo "31 2 * * mon root sleep $(($RANDOM/1024)); /usr/bin/geoip-lite-update" | crontab
Step Six — Mirroring the Content on Another Server
Now that we have a mirror director set up, let’s create our first mirror. You can follow this section for every mirror you want to add.
For this section, use a different Ubuntu 14.04 server, preferably in a different region.
Once you’ve logged in (as root or using sudo -i), create a mirror content directory:
mkdir -p /var/www/download.example.org
Then copy the content into that directory using the rsync URL that we set up earlier:
rsync -avzh rsync://download.example.org/main /var/www/download.example.org
If you encounter issues with space (IO Error) while using rsync, there is a way around it. You can add the –exclude option to exclude directories which are not as important to your visitors. MirrorBrain will scan your server and not send users to the excluded files, instead sending them to the closest server which has the file. For example, you could exclude old movies and old songs:
rsync -avzh rsync://download.example.org/main /var/www/download.example.org --exclude "movies/old" --exclude "songs/old"
Then we can set your mirror server to automatically sync with the main server every hour using cron (remember to include the --exclude options if you used any):
echo '0 * * * * root rsync -avzh rsync://download.example.org/main /var/www/download.example.org' | crontab
Now we need to publish our mirror over HTTP (for users) and over rsync (for MirrorBrain scanning).
Apache
If you already have an HTTP server on your server, you should add a VirtualHost (or equivalent) to serve the /var/www/download.example.org directory. Otherwise, let’s install Apache:
apt-get install apache2
Then let’s add a VirtualHost file:
nano /etc/apache2/sites-available/london1.download.example.org.conf
Add the following contents. Make sure you set your own values for the ServerName, ServerAdmin, and DocumentRoot directives:
<VirtualHost *:80>
    ServerName london1.download.example.org
    ServerAdmin webmaster@example.org
    DocumentRoot /var/www/download.example.org
</VirtualHost>
Save the file. Enable the new VirtualHost:
ln -s /etc/apache2/sites-available/london1.download.example.org.conf /etc/apache2/sites-enabled/london1.download.example.org.conf
Now restart Apache:
service apache2 restart
rsync
Next, we need to set up the rsync daemon (for MirrorBrain scanning). First open the configuration file:
nano /etc/rsyncd.conf
Then add the configuration, making sure the path matches your download directory. The comment can be whatever you want:
[main]
    path = /var/www/download.example.org
    comment = My Mirror Of Some Cool Files
    read only = true
    list = yes
Save this file.
Start the rsync daemon:
rsync --daemon --config=/etc/rsyncd.conf
Enabling the Mirror on the Director
Now, back on the MirrorBrain server, we need to add the mirror. We can use the mb command (as root). There are quite a few variables in this command, which we’ll explain below:
mb new london1.download.example.org
       -H http://london1.download.example.org
       -R rsync://london1.download.example.org/main
       --operator-name=Example --operator-url=example.org
       -a "Pat Admin" -e pat@example.org
- Replace london1.download.example.org with the nickname for this mirror. It doesn’t have to resolve
- -H should resolve to your server; you can use a domain or IP address
- -R should resolve to your server; you can use a domain or IP address
- The
--operator-name,--operator-url,-a, and-esettings should be your preferred administrator contact information that you want to publish
Then, let’s scan and enable the mirror. You’ll need to use the same nickname you used in the new command:
mb scan --enable london1.download.example.org
Note: If you run into an error like Can’t locate LWP/UserAgent.pm in @INC you should go back to the Step Two section and run perl -MCPAN -e 'install Bundle::LWP' again.
Assuming the scan is successful (MirrorBrain can connect to the server), the mirror will be added to the database.
Testing
Now try going to the MirrorBrain instance on the director server (e.g., download.example.org - not london1.download.example.org). Again, click on a file, and append “.mirrorlist” to the end of the URL. You should now see the new mirror listed under the available mirrors section.
You can add more mirrors with your own servers in other places in the world, or you can use mb new to add a mirror that somebody else is running for you.
Disabling and Re-enabling Mirrors
If you wish to disable a mirror, that is as simple as running:
mb disable london1.download.example.org
Re-enable the mirror using the mb scan --enable london1.download.example.org command as used above.
Thanks for learning with the DigitalOcean Community. Check out our offerings for compute, storage, networking, and managed databases.
About the author(s)
I love coding in Python and GO, for web and desktop, using GTK, Flask, Sugar.
Current fan and former Editorial Manager at DigitalOcean. Hi! Expertise in areas including Ubuntu, Docker, Rails, and more.
Still looking for an answer?
This textbox defaults to using Markdown to format your answer.
You can type !ref in this text area to quickly search our full set of tutorials, documentation & marketplace offerings and insert the link!
 This work is licensed under a Creative Commons Attribution-NonCommercial- ShareAlike 4.0 International License.
Become a contributor for community
Get paid to write technical tutorials and select a tech-focused charity to receive a matching donation.

DigitalOcean Documentation
Full documentation for every DigitalOcean product.

Resources for startups and AI-native businesses
The Wave has everything you need to know about building a business, from raising funding to marketing your product.
The developer cloud
Scale up as you grow — whether you're running one virtual machine or ten thousand.

Start building today
From GPU-powered inference and Kubernetes to managed databases and storage, get everything you need to build, scale, and deploy intelligent applications.
