By Simos Xenitellis and Brian Hogan
Not using Ubuntu 16.04?
Choose a different version or distribution.
Introduction
A Linux container is a grouping of processes that is isolated from the rest of the system through the use of Linux kernel security features, such as namespaces and control groups. It’s a construct similar to a virtual machine, but it’s much more light-weight; you don’t have the overhead of running an additional kernel or simulating the hardware. This means you can easily create multiple containers on the same server.
For example, imagine that you have a server that runs multiple web sites for your customers. In a traditional installation, each web site would be a virtual host of the same instance of the Apache or Nginx web server. But with Linux containers, each web site can be set up in its own container, with its own web server. Using Linux containers, you bundle your application and its dependencies in a container without affecting the rest of the system.
LXD lets you create and manage these containers. LXD provides a hypervisor service to manage the entire life cycle of containers. In this tutorial, you’ll configure LXD and use it to run Nginx in a container. You’ll then route traffic to the container in order to make the web site accessible from the Internet.
Prerequisites
To complete this tutorial, you’ll need the following:
- One Ubuntu 16.04 server, configured by following the tutorial Initial Server Setup with Ubuntu 16.04, with a sudo non-root user and a firewall.
- Optionally, add 20GB or more of Block Storage by following the tutorial Getting Started with DigitalOcean Block Storage. You can use this to store all data related to the containers.
Step 1 — Configuring LXD
LXD is already installed on Ubuntu, but it needs to be configured appropriately before you can use it on a server. You have to set up your user account to manage containers, then configure the type of storage backend to store the containers and configure networking.
Log in to the server using the non-root user account. Then add your user to the lxd group so you can use it to perform all container management tasks:
- sudo usermod --append --groups lxd sammy
Log out of the server and log back in again so that your new SSH session will be updated with the new group membership. Once you’re logged in, you can start configuring LXD.
Now configure the storage backend. The recommended storage backend for LXD is the ZFS filesystem, stored either in a preallocated file or by using Block Storage. To use ZFS support in LXD, update your package list and install the zfsutils-linux package:
- sudo apt-get update
- sudo apt-get install zfsutils-linux
You can now configure LXD. Start the LXD initialization process with the lxd init command:
- sudo lxd init
You’ll be prompted to specify the details for the storage backend. Once you complete that configuration, you’ll configure networking for the containers.
First, you’ll be asked if you want to configure a new storage pool. You should answer yes..
Do you want to configure a new storage pool (yes/no) [default=yes]? yes
Then you’ll be prompted for the storage backend, and you’ll be given two choices: dir or zfs. The dir option tells LXD to store containers in directories on the server’s filesystem. The zfs option uses the ZFS combined filesystem and logical volume manager.
We’ll use the zfs option. By using zfs, we get both storage efficiency and better responsiveness. For example, if we create ten containers from the same initial container image, they all use the disk space of just a single container image. From then on, only their changes to the initial container image will be stored in the storage backend.
OutputName of the storage backend to use (dir or zfs) [default=zfs]: zfs
Once you choose zfs, you’ll be asked to create a new ZFS pool and to name the pool. Choose yes to create the pool, and call the pool lxd:
OutputCreate a new ZFS pool (yes/no) [default=yes]? yes
Name of the new ZFS pool [default=lxd]: lxd
Then you’ll be asked if you want to use an existing block device:
OutputWould you like to use an existing block device (yes/no) [default=no]?
If you say yes, you’ll have to tell LXD where to find that device. If you say no, LXD will use a preallocated file. With this option, you will use the free space on the server itself.
There are two sections that follow, depending on whether you want to use a preallocated file or a block device. Follow the appropriate step for your case. Once you’ve specified the storage mechanism, you’ll configure the networking options for your containers.
Option 1 – Using a Preallocated File
You would use a preallocated file if you do not have access to a separate block-storage device to store containers. Follow these steps to configure LXD to use a preallocated file to store containers.
First, when asked to use an existing block device, enter no:
OutputWould you like to use an existing block device (yes/no) [default=no]? no
Next, you’ll be asked to specify the size of the loop device, which is what LXD calls the preallocated file. Use the suggested default size for the preallocated file:
OutputSize in GB of the new loop device (1GB minimum) [default=15]: 15
As a rule of thumb, 15GB is really the smallest size you should create; you want to preallocate enough space so that you’d have at least 10GB of free space remaining once you’ve created your containers.
Once the device is configured, you’ll be asked to configure the networking settings. Go to Step 2 to continue the setup.
Option 2 – Using a Block Device
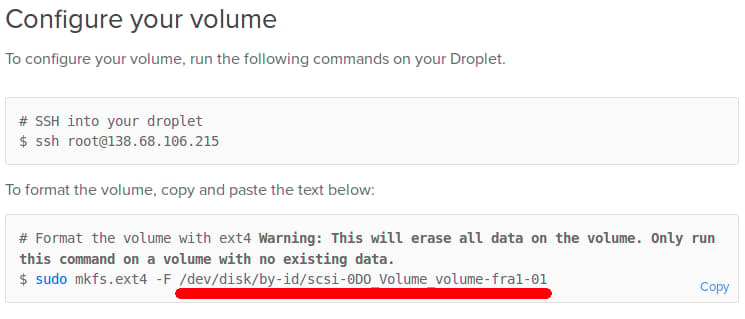
If you’re going to use Block Storage as your storage backend, you’ll need to find the device that points to the Block Storage volume that you created in order to specify it in the configuration of LXD. Go to the Volumes tab in the DigitalOcean control panel, locate your volume, click on the More pop-up, and then click on Config instructions.
Locate the device by looking at the command to format the volume. Specifically, look for the path specified in the sudo mkfs.ext4 -F command. Do not run any of the commands from that page as we just need to find the correct device name to give to LXD. The following figure shows an example of the device name of the volume. You only need the part that is underlined by the red line:
You can also identify the device name with the following command:
- ls -l /dev/disk/by-id/
- total 0
- lrwxrwxrwx 1 root root 9 Sep 16 20:30 scsi-0DO_Volume_volume-fra1-01 -> ../../sda
-
In this case, the device name for the volume is /dev/disk/by-id/scsi-0D0_Volume_volume-fra1-01, although yours may differ.
Once you identify the device name for the volume, continue with the LXD installation. When you’re prompted about using an existing block device, choose yes and provide the path to your device:
Output of the "lxd init" commandWould you like to use an existing block device (yes/no) [default=no]? yes
Path to the existing block device: /dev/disk/by-id/scsi-0DO_Volume_volume-fra1-01
Once you specify the disk, you’ll be asked to configure networking options.
Step 2 — Configuring Networking
Once you’ve configured the storage backend, you’ll be prompted to configure networking for LXD.
First, LXD asks whether you want to make it accessible over the network. Choosing yes would let you manage LXD from your local computer, without having to SSH to this server. Keep the default value of no:
Output of the "lxd init" command — LXD over the networkWould you like LXD to be available over the network (yes/no) [default=no]? no
If you want to enable this option, please read LXD 2.0: Remote hosts and container migration to learn more.
We are then asked to configure a network bridge for LXD containers. This enables the following features:
- Each container automatically gets a private IP address.
- The containers can communicate with each other over the private network.
- Each container can initiate connections to the Internet.
- The containers you create remain inaccessible from the Internet; you cannot make a connection from the Internet and reach a container unless you explicitly enable it. You’ll learn how to allow access to a specifi container in the next step.
When asked to configure the LXD bridge, choose yes:
Output of the "lxd init" command — Networking for the containersDo you want to configure the LXD bridge (yes/no) [default=yes]? yes
You’re then presented with the following dialog:
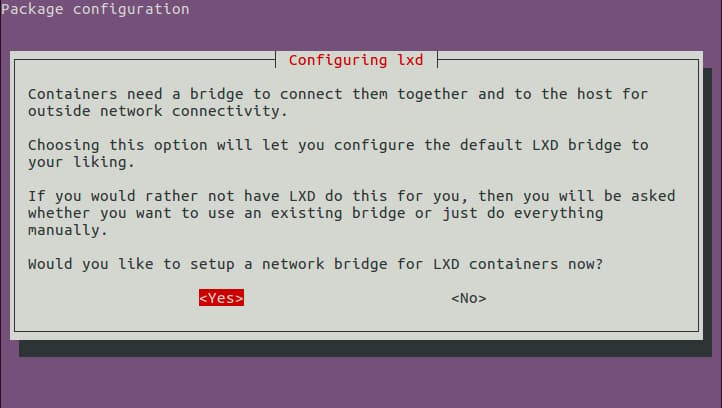
Confirm that you want to set up the network bridge.
You’ll be asked to name the bridge. Accept the default value.
You’ll be asked to perform the networking configuration for both IPv4 and IPv6. In this tutorial we’ll only work with IPv4.
When asked to set up an IPv4 subnet, choose Yes. You’ll be informed that it configured a random subnet for you. Select Ok to continue.
When prompted for a valid IPv4 address, accept the default value.
When prompted for a valid CIDR mask, accept the default value.
When prompted for the first DHCP address, accept the default value. Do the same for the last DHCP address, as well as the maximum number of DHCP clients.
Select Yes when asked to NAT the IPv4 traffic.
When asked to configure an IPv6 subnet, select No. You’ll see the following output once the networking setup completes:
OutputWarning: Stopping lxd.service, but it can still be activated by:
  lxd.socket
LXD has been successfully configured.
You’re ready to create your containers.
Step 3 — Creating the Nginx Container
You have successfully configured LXD, and you’re now ready to to create and manage your first container. You manage containers with the lxc command.
Use lxc list to view the available installed containers:
- lxc list
You’ll see the following output:
Output of the "lxd list" commandGenerating a client certificate. This may take a minute...
If this is your first time using LXD, you should also run: sudo lxd init
To start your first container, try: lxc launch ubuntu:16.04

+------+-------+------+------+------+-----------+
| NAME | STATE | IPV4 | IPV6 | TYPE | SNAPSHOTS |
+------+-------+------+------+------+-----------+
Since this is the first time that the lxc command communicates with the LXD hypervisor, the output lets you know that the command automatically created a client certificate for secure communication with LXD. Then, it shows some information about how to launch a container. Finally, the command shows an empty list of containers, which is expected since we haven’t created any yet.
Let’s create a container that runs Nginx. To do so, we’ll use the lxc launch command to create and start an Ubuntu 16.04 container named webserver.
Create the webserver container:
- lxc launch ubuntu:x webserver
The x in ubuntu:x is a shortcut for the first letter of Xenial, the codename of Ubuntu 16.04. ubuntu: is the identifier for the preconfigured repository of LXD images. You could also use ubuntu:16.04 for the image name.
Note: You can find the full list of all available Ubuntu images by running lxc image list ubuntu: and other distributions by running lxc image list images:.
Because this is the first time you’ve created a container, this command downloads the container image from the Internet and caches it locally so that if you create a new container, it’ll be created more quickly. You’ll see this output as your new container is created:
OutputGenerating a client certificate. This may take a minute...
If this is your first time using LXD, you should also run: sudo lxd init
To start your first container, try: lxc launch ubuntu:16.04

Creating webserver
Retrieving image: 100%
Starting webserver
Now that the container is running, use the lxc list command to show information about it:
- lxc list
The output shows a table with the name of each container, its current state, its IP address, its type, and whether there are snapshots taken.
+-----------+---------+-----------------------+------+------------+-----------+
|  NAME     |  STATE  |         IPV4          | IPV6 |    TYPE    | SNAPSHOTS |
+-----------+---------+-----------------------+------+------------+-----------+
| webserver | RUNNING | 10.10.10.100 (eth0)   |      | PERSISTENT | 0         |
+-----------+---------+-----------------------+------+------------+-----------+
Note: If you enabled IPv6 in LXD, the output of the lxc list command might be too wide for your screen. You can use instead lxc list --columns ns4tS which only shows the name, state, IPv4, type and whether there are snapshots available.
Take note of the container’s IPv4 address. You’ll need it to configure your firewall to allow traffic in from the outside world.
Now let’s set up Nginx inside of the container:
Step 4 — Configuring the Nginx Container
Let’s connect to the webserver container and configure the web server.
Connect to the container with lxc exec command, which takes the name of the container and the commands to execute:
- lxc exec webserver -- sudo --login --user ubuntu
The first -- string denotes that the command parameters for lxc should stop there, and the rest of the line will be passed as the command to be executed inside the container. The command is sudo --login --user ubuntu, which provides a login shell for the preconfigured account ubuntu inside the container.
Note: If you need to connect to the container as root, use the command lxc exec webserver -- /bin/bash instead.
Once inside the container, your shell prompt now looks like the following.
Outputubuntu@webserver:~$
This ubuntu user in the container has sudo access preconfigured and can run sudo commands without supplying a password. This shell is limited to the confines of the container. Anything that you run in this shell stays in the container and cannot escape to the host server.
Let’s set up Nginx in this container. Update the package list of the Ubuntu instance inside the container and install Nginx:
- sudo apt-get update
- sudo apt-get install nginx
Then edit the default web page for this site and add some text that makes it clear that this site is hosted in the webserver container. Open the file /var/www/html/index.nginx-debian.html:
- sudo nano /var/www/html/index.nginx-debian.html
Make the following change to the file:
<!DOCTYPE html>
<html>
<head>
<title>Welcome to nginx on LXD container webserver!</title>
<style>
    body {
        width: 35em;
        margin: 0 auto;
        font-family: Tahoma, Verdana, Arial, sans-serif;
    }
</style>
</head>
<body>
<h1>Welcome to nginx on LXD container webserver!</h1>
<p>If you see this page, the nginx web server is successfully installed and
working. Further configuration is required.</p>
...
We have edited the file in two places and specifically added the text on LXD container webserver. Save the file and exit your editor.
Now log out of the container and return back to the host server:
- logout
Use curl to test that the web server in the container is working. You’ll need the IP addresses of the web containers which you found using the lxd list command earlier.
- curl http://10.10.10.100/
The output should be:
Output<!DOCTYPE html>
<html>
<head>
<title>Welcome to nginx on LXD container webserver!</title>
<style>
    body {
        width: 35em;
        margin: 0 auto;
        font-family: Tahoma, Verdana, Arial, sans-serif;
    }
</style>
</head>
<body>
<h1>Welcome to nginx on LXD container webserver!</h1>
<p>If you see this page, the nginx web server is successfully installed and
working. Further configuration is required.</p>
...
The web server is working, but we can only access it through the private IP. Let’s route external requests to this container so the world can access our web site.
Step 5 — Forwarding Incoming Connections to the Nginx Container
The final piece of the puzzle is to connect the web server container to the Internet. Nginx is installed in a container, and, by default, is inaccessible from the Internet. We need to set up our server to forward any connections that it may receive from the Internet on port 80 to the webserver container. To do this, we’ll create an iptables rule to forward connections. You can learn more about IPTables in How the IPtables Firewall Works and IPtables Essentials: Common Firewall Rules and Commands.
The iptables command requires two IP addresses: the public IP address of the server (your_server_ip) and the private IP address of the nginx container (your_webserver_container_ip), which you can obtain with the lxc list command.
Execute this command to create the rule:
- PORT=80 PUBLIC_IP=your_server_ip CONTAINER_IP=your_container_ip \
- sudo -E bash -c 'iptables -t nat -I PREROUTING -i eth0 -p TCP -d $PUBLIC_IP --dport $PORT -j DNAT --to-destination $CONTAINER_IP:$PORT -m comment --comment "forward to the Nginx container"'
Here’s how the command breaks down:
-t natspecifies that we’re using thenattable for address translation.-I PREROUTINGspecifies that we’re adding the rule to the PREROUTING chain.-i eth0specifies the interface eth0, which is the default public interface on Droplets.-p TCPsays we’re using the the TCP protocol.-d $PUBLIC_IPspecifies the destination IP address for the rule.--dport $PORT: specifies the destination port (such as80).-j DNATsays that we want to perform a jump to Destination NAT (DNAT).--to-destination $CONTAINER_IP:$PORTsays that we want the request to go to the IP address of the specific container and the destination port.
Note: You can reuse this command to set up forwarding rules simply by setting the variables PORT, PUBLIC_IP and CONTAINER_IP at the start of the line. Just change the highlighted values.
You can list the IPTables rules by running this command:
- sudo iptables -t nat -L PREROUTING
You’ll see output similar to this:
[secondary_label Output]
Chain PREROUTING (policy ACCEPT)
target     prot opt source               destination
DNAT       tcp  --  anywhere             your_server_ip       tcp dpt:http /* forward to this container */ to:your_container_ip:80
...
Now test that the web server is actually accessible from the Internet by accessing it from your local computer using the curl command like this:
- curl --verbose 'http://your_server_ip'
You’ll see the headers followed by the contents of the web page you created in the container:
Output*   Trying your_server_ip...
* Connected to your_server_ip (your_server_ip) port 80 (#0)
> GET / HTTP/1.1
> User-Agent: curl/7.47.0
> Accept: */*
>
< HTTP/1.1 200 OK
< Server: nginx/1.10.0 (Ubuntu)
...
<!DOCTYPE html>
<html>
<head>
<title>Welcome to nginx on LXD container webserver!</title>
<style>
    body {
...
This confirms that the requests are going to the container.
Finally, to save the firewall rule so that it is re-applied after a reboot, install the iptables-persistent package:
- sudo apt-get install iptables-persistent
When installing the package, you will be prompted to save the current firewall rules. Accept and save all current rules.
When you reboot your machine, the firewall rule will be present. In addition, the Nginx service in your LXD container will automatically restart.
Now that you’ve set everything up, let’s look at how to tear it down.
Step 5 — Stopping and Removing the Container
You may decide that you want to take down the container and replace it. Let’s walk through that process:
To stop the container, use lxc stop:
- lxc stop webserver
Use the lxc list command to verify the status.
Output+-----------+---------+------+------+------------+-----------+
|   NAME    |  STATE  | IPV4 | IPV6 |    TYPE    | SNAPSHOTS |
+-----------+---------+------+------+------------+-----------+
| webserver | STOPPED |      |      | PERSISTENT | 0         |
+-----------+---------+------+------+------------+-----------+
To remove the container, use lxc delete:
- lxc delete webserver
Running lxc list again shows that there’s no container running:
Output+------+-------+------+------+------+-----------+
| NAME | STATE | IPV4 | IPV6 | TYPE | SNAPSHOTS |
+------+-------+------+------+------+-----------+
Use the lxc help command to see additional options.
To remove the firewall rule that routes traffic to the container, first locate the rule in the list of rules with this command, which associates a line number with each rule:
- sudo iptables -t nat -L PREROUTING --line-numbers
You’ll see your rule, prefixed with a line number, like this:
OutputChain PREROUTING (policy ACCEPT)
num  target     prot opt source               destination
1    DNAT       tcp  --  anywhere             your_server_ip      tcp dpt:http /* forward to the Nginx container */ to:your_container_ip
Use that line number to remove the rule:
- sudo iptables -t nat -D PREROUTING 1
Ensure the rule is gone by listing the rules again:
`sudo iptables -t nat -L PREROUTING --line-numbers`
The rule will be gone:
OutputChain PREROUTING (policy ACCEPT)
num  target     prot opt source               destination
Now save the changes so the rule doesn’t come back when you restart your server:
- sudo netfilter-persistent save
You can now bring up another container with your own settings and add a new firewall rule to forward traffic to it.
Conclusion
You’ve set up a website using Nginx running in an LXD container. From here, you could configure more websites, each confined to its own container, and use a reverse proxy to direct traffic to the appropriate container. The tutorial How to Host Multiple Web Sites with Nginx and HAProxy Using LXD on Ubuntu 16.04 walks you through setting that up.
LXD also lets you take snapshots of the full state of containers, which makes it easy to create backups and roll containers back at a later time. And if you install LXD on two different servers, then it is possible to connect them and migrate containers between servers over the Internet.
For more on LXD, see this series of blog posts on LXD 2.0 written by the maintainer of LXD.
You could also try LXD online and follow the web-based tutorial to get more practice.
Thanks for learning with the DigitalOcean Community. Check out our offerings for compute, storage, networking, and managed databases.
About the author(s)
Managed the Write for DOnations program, wrote and edited community articles, and makes things on the Internet. Expertise in DevOps areas including Linux, Ubuntu, Debian, and more.
Still looking for an answer?
This textbox defaults to using Markdown to format your answer.
You can type !ref in this text area to quickly search our full set of tutorials, documentation & marketplace offerings and insert the link!
Hello, i.m trying this one on a Google Compute Engine instance with Ubuntu 16.04. Everything worked great until step 5. After running the ‘sudo iptables -t nat -L PREROUTING’ command, i saw that on the destination field instead of my server ip, i’ve got my ip in reverse(if i entered let’s say 1.2.3.4 – on destination woud appear 4.3.2.1.bc.googleusercontent.com - ofc this is just an examples). After that if i run ‘curl --verbose ‘http://your_server_ip’’ - i get connection refused. What can i do?
If you’d like a nice web UI to go along with your newly installed LXD setup take a loot at lxdui ( https://github.com/adaptivescale/lxdui ). It’s open source and makes container management with LXD a breeze.
Hello, I made 2 Google Compute Engine Instances:
Instance 1: nginx, php-fpm7.1, mysql,wordpress Instance 2: everything from instance 1 in an LXD Container
Your tutorial works good, but I saw an increase in CPU percentage. On stand-by, without any traffic, instance 1 stays at around 0,4% CPU and instance 2 at around 1,3% CPU. I’ve tested both instances with loader.io with the same load and instance 1 went to around 6% CPU while instance 2 went to around 20% CPU. This is normal? Why? What can I do? I rly love those lxd containers, but this is something I rly don’t like for the moment.
Hello, one quick question: You said that the smallest size for the preallocated file should be 15gb, because I should remain with 10gb free. can you explain further what that means? Let’s say I have a 20gb ssd. I should go with 15gb preallocated file or with 20gb? let’s say I make the preallocated file 15gb, after I make all my containers I should remain with 10gb/15gb?
Hi, this is a really nice tutorial, but my container is not getting an IP address. I followed this to the letter on a brand new droplet. Any suggestions as to why this would happen and how to fix it?
Edit: I created an alpine linux container and it has an IP address and internet access.
I am unsure about how much space is recommended for a zfs pool. 15g sounds a little low. How much pool space does a instance need?
Thanks for a great tutorial. Can you please extend the tutorial for the case where the public IP has two values? One value is the IP address of the host server and the other value is the IP address of the floating IP assigned to the host server?
I tried this by adding to iptables but the floating IP is still not directing to container. 1.2.3.4 is IP address of host and 7.8.9.0 is floating ip assigned to host:
root@w1:~# iptables -t nat -L PREROUTING
Chain PREROUTING (policy ACCEPT)
target     prot opt source               destination
DNAT       tcp  --  anywhere             1.2.3.4        tcp dpt:24 /* forward to the Nginx container */ to:10.35.40.78:22
DNAT       tcp  --  anywhere             7.8.9.0      tcp dpt:24 /* forward to the Nginx container */ to:10.35.40.78:22
DNAT       tcp  --  anywhere             1.2.3.4        tcp dpt:https /* forward to the Nginx container */ to:10.35.40.78:443
DNAT       tcp  --  anywhere             7.8.9.0      tcp dpt:https /* forward to the Nginx container */ to:10.35.40.78:443
DNAT       udp  --  anywhere             1.2.3.4        udp dpt:24 /* forward to the Nginx container */ to:10.35.40.78:22
DNAT       udp  --  anywhere             7.8.9.0      udp dpt:24 /* forward to the Nginx container */ to:10.35.40.78:22
DNAT       tcp  --  anywhere             1.2.3.4        tcp dpt:http /* forward to the Nginx container */ to:10.35.40.78:80
DNAT       tcp  --  anywhere             7.8.9.0      tcp dpt:http /* forward to the Nginx container */ to:10.35.40.78:80
Hi
Is there supposed to be an extra -m comment in there?
As in…
-m comment --comment "forward to the Nginx container"
Hello, I’ve successfully navigated the tutorial and my traffic is correctly routed through to my container.
I have assigned a public ipv4 to my container such that ‘lxc list’ command shows the container running with two IPs - the private (bottom) and the public (top).
+------+---------+-----------------------+------+------------+-----------+
| NAME |  STATE  |         IPV4          | IPV6 |    TYPE    | SNAPSHOTS |
+------+---------+-----------------------+------+------------+-----------+
| c2   | RUNNING | x.x.x.18 (eth0) |      | PERSISTENT | 0         |
|      |         | 10.x.x.25 (eth0)   |      |            |           |
+------+---------+-----------------------+------+------------+-----------+
When an outside source receives the connection from my container, it registers the IP as the HOST IP, not the containers assigned public ipv4. How I can remedy such that assigned ipv4 ‘x.x.x.18’ is seen by the public?
Further: If I set the preforwarding rules using the container private IP (10.x.x.25), the process works with the host IP being seen by the public.
If I use the added public ipv4 (x.x.x.18) to the forwarding rule, communication breaks down and the public can no longer see the container.
Thanks
 This work is licensed under a Creative Commons Attribution-NonCommercial- ShareAlike 4.0 International License.
Become a contributor for community
Get paid to write technical tutorials and select a tech-focused charity to receive a matching donation.

DigitalOcean Documentation
Full documentation for every DigitalOcean product.

Resources for startups and AI-native businesses
The Wave has everything you need to know about building a business, from raising funding to marketing your product.
The developer cloud
Scale up as you grow — whether you're running one virtual machine or ten thousand.

Start building today
From GPU-powered inference and Kubernetes to managed databases and storage, get everything you need to build, scale, and deploy intelligent applications.
