
Introduction
Concourse CI is a modern, scalable continuous integration system designed to automate testing pipelines with a composable, declarative syntax. In previous guides, we installed Concourse on an Ubuntu 16.04 server and secured the web UI with an SSL certificate from Let’s Encrypt.
In this guide, we will demonstrate how to use Concourse to automatically run your project’s test suite when new changes are committed to the repository. To demonstrate, we will configure a continuous integration pipeline for a “hello world” application written with Hapi.js, a Node.js web framework.
To make sure the build and testing procedures are always kept in sync with the code they are associated with, we will add the CI definitions to the application repository itself. Afterwards, we will use Concourse’s fly command line tool to load the pipeline into Concourse. Finally, we will push our changes back up to the repository to both save them more permanently and to kick off a new test in the new CI workflow.
Prerequisites
Before you begin, you will need an Ubuntu 16.04 server with at least 1G of RAM. Complete the following guides to set up a non-root user, install and configure Concourse, install Nginx, obtain a TLS/SSL certificate, and set up a secure reverse proxy to the Concourse web UI. You will need a domain name pointed at your Concourse server to properly secure it:
- Initial Server Setup with Ubuntu 16.04
- How To Install Concourse CI on Ubuntu 16.04
- How To Install Nginx on Ubuntu 16.04
- How To Secure Nginx with Let’s Encrypt on Ubuntu 16.04
- How To Secure Concourse CI with SSL Using Nginx on Ubuntu 16.04
In this tutorial, most of the work will be completed on your local computer rather than the Concourse server. As such, you will also need to make sure a few tools are available on your local machine. You will need a text editor (some examples you might find across various operating systems are nano, vim, TextEdit, Sublime Text, Atom, or Notepad) to create and modify files in the repository. You will also need to install and set up Git on your local system, which you can do by following our Contributing to Open Source: Getting Started with Git guide.
When you have set up your Concourse server and installed Git and a text editor on your local computer, continue below.
Installing the Fly Command Line Tool Locally
When we installed Concourse on the server in the prerequisites, we installed the fly command line tool onto the server so that we could manage the Concourse instance from the command line. However, for daily use it is more convenient to install a copy of the fly binary on your local system where your usual development tools and source code are available.
To get a local copy of fly that matches your server version, visit your Concourse instance in your web browser:
https://your_concourse_url
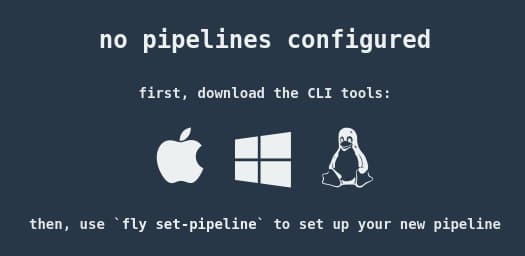
If you are logged out or if you do not have a pipeline currently configured, links to download fly for various platforms will be displayed in the center of the window:
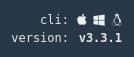
If you are logged in and have a pipeline configured, download links for fly will be available in the lower-right corner of the screen:
Click on the icon representing your local computer’s operating system to download the fly binary.
Next, follow the platform specific instructions to set up fly on your local system.
Linux or macOS
If your local computer runs Linux or macOS, follow these instructions after downloading the appropriate binary.
First, mark the downloaded binary as executable. We will assume that you’ve downloaded the file to your ~/Downloads directory, so adjust the download location if necessary:
- chmod +x ~/Downloads/fly
Next, install the binary to a location in your PATH by typing:
- sudo install ~/Downloads/fly /usr/local/bin
You can verify that the executable is available by typing:
- fly --version
Output3.3.1
If you are able to display the version, fly was installed successfully.
Windows
If your local computer runs Windows, hit the Windows key on your keyboard, type powershell, and hit ENTER.
In the window that appears, make a bin folder by typing:
- mkdir bin
Next, move the fly.exe file from your Downloads folder to the new bin folder by typing:
- mv Downloads/fly.exe bin
Check whether you have a PowerShell profile already available:
- Test-Path $profile
If the response is True, you already have a profile.
If the response is False, you will need to create one by typing:
- New-Item -path $profile -type file -force
Output
    Directory: C:\User\Sammy\Documents\WindowsPowerShell

Mode              LastWriteTime       Length Name
----              -------------       ------ ----
-a----       7/9/2017   5:46 PM            0 Microsoft.PowerShell_profile.ps1
Once you have a profile, edit it with your editor:
- notepad.exe $profile
In the editor window (which will be blank if you had to create your profile), add the following line:
$env:path += ";C:\Users\Sammy\bin"
Save and close the file when you are finished.
Next, set the execution policy to “RemoteSigned” for the current user to allow PowerShell to read the profile:
- Set-ExecutionPolicy -scope CurrentUser RemoteSigned
Finally, source the PowerShell profile by typing:
- . $profile
You should now be able to call the fly.exe executable from any location. Test this by having the binary print its version:
- fly.exe --version
Output3.3.1
Throughout this guide, you will need to replace each instance of the fly command with fly.exe to match the Windows command.
Authenticating with the Concourse Server
After installing fly, log into your remote Concourse server so that you can manage your CI environment locally. A single fly binary can be used to contact and manage multiple Concourse servers, so the command uses a concept called “targets” as a label to identify the server you want to send commands to.
We are using main as the target name for our Concourse server in this guide, but you can substitute whatever target name you want. Enter your Concourse server’s domain name complete with the https:// protocol specification after the -c option to indicate your server location:
- fly -t main login -c https://example.com
You will be prompted to enter the username and password that you configured in the /etc/concourse/web_environment file on the Concourse server:
Outputlogging in to team 'main'

username: sammy
password:

target saved
Once you’ve authenticated, the fly tool will create a configuration file called ~/.flyrc to store your credentials for future commands.
Note: If you upgrade the version of Concourse later on, you can install the matching version of fly command by typing:
- fly -t main sync
This will update the fly binary on your system while leaving your configuration intact.
Forking and Cloning the Example Repository
Now that you have fly set up on your system, we can move on to setting up the repository we will be using to demonstrate Concourse pipelines.
In your web browser, visit the “hello hapi” application on GitHub that we will serve as our example. This application is a simple “hello world” program with a few unit and integration tests, written with Hapi.js, a Node.js web framework.
Since this example is used to demonstrate a variety of continuous integration systems, you may notice some files used to define pipelines for other systems. For Concourse, we will be creating the continuous integration pipeline in our own fork of the repository.
To create your fork of the repository, log in to GitHub and navigate to the project repository. Click the Fork button in the upper-right corner to make a copy of the repository in your account:

If you are a member of a GitHub organization, you may be asked where you would like to fork the repository. Once you select an account or organization, a copy of the repository will be added to your account.
Next, in a terminal on your local computer, move to your home directory:
- cd $HOME
Clone the repository to your local computer using the following command, substituting your own GitHub username:
- git clone git@github.com:your_github_user/hello_hapi
A new directory called hello_hapi will be created in your home directory. Enter the new directory to get started:
- cd hello_hapi
We will be defining a continuous integration pipeline for the example project inside this repository. Before making any changes, it’s a good idea to create and switch to a new branch in Git to isolate our changes:
- git checkout -b pipeline
OutputSwitched to a new branch 'pipeline'
Now that we have a new branch to work in, we can begin defining our continuous integration pipeline.
Setting the Continuous Integration Process for the Application
We will be defining our pipeline and all of its associated files within the project repository itself. This helps ensure that the continuous integration processes are always kept in sync with the code it tests.
The test suite is already defined within a directory called test. It includes one unit test and two basic integration tests. The command to run the tests is defined in the package.json file under the name test within the scripts object. In an environment with npm and Node.js installed, you can run the tests by typing npm test (after installing the project dependencies with npm install). These are the procedures we will need to replicate in our pipeline.
To get started, create a directory called ci within the repository to house the continuous integration assets for the project. We will also create two subdirectories called ci/tasks and ci/scripts to hold the individual task definitions that the pipeline references and the scripts that the tasks call.
Create the necessary directory structure by typing:
- mkdir -p ci/{tasks,scripts}
Next, we can begin to create the individual files that Concourse will use.
Defining the Pipeline
Create and open a file called pipeline.yml within the ci directory with your text editor (we will show the nano editor in this guide, but you should substitute the text editor for your system). As the extension indicates, Concourse files are defined using the YAML data serialization format:
- nano ci/pipeline.yml
We can now start setting up our pipeline.
Define the NPM Cache Resource Type
Inside the file, we will begin by defining a new resource type:
---
resource_types:
  - name: npm-cache
    type: docker-image
    source:
      repository: ymedlop/npm-cache-resource
      tag: latest
To separate the processes in continuous integration from the data that passes through the system, Concourse offloads all state information to abstractions called resources. Resources are external sources of data that Concourse can use to pull information from or push information to. This is how all data enters the continuous integration system and how all data is shared between jobs. Concourse does not provide any mechanism for storing or passing state internally between jobs.
The resource_types heading allows you to define new kinds of resources that you can use in your pipeline such as email notifications, Twitter integrations, or RSS feeds. The new resource type we are defining tells Concourse how to use npm-cache-resource, a resource provided as a Docker image that allows Concourse to install the dependencies of a Node.js project and share them share between jobs.
Define the Repository and Caching Resources
Next, we need to define the actual resources for the pipeline:
. . .

resources:
  - name: hello_hapi
    type: git
    source: &repo-source
      uri: https://github.com/your_github_user/hello_hapi
      branch: master
  - name: dependency-cache
    type: npm-cache
    source:
      <<: *repo-source
      paths:
        - package.json
This section defines two resources that the Concourse CI jobs need to complete their tasks. Concourse uses resource definitions to watch upstream systems for changes and to understand how to pull down the resource when jobs require them. By default, Concourse checks each resource for new versions once per minute. Jobs requiring the resource that have the “trigger” option set will automatically kick off a new build when a new version is available.
The first resource represents your fork of the hello_hapi repository on GitHub. The “source” line contains a YAML anchor called “repo-source” which labels the element for future reference. This lets us to include the content of the element (the “uri” and “branch” definitions) in a different location later in the document.
The second resource, called “dependency-cache”, uses the “npm-cache” resource type we defined to download the project’s dependencies. In the “source” specification of this resource, we use the <<: *repo-source line to reference and extend the elements pointed to by the &repo-source anchor. This inserts the uri and branch settings from our application repository resource into this second resource. An additional element called “paths” points to the package.json file where the project dependencies are defined.
Define the Dependency Gathering and Testing Jobs
Finally, we define the actual continuous integration processes using Concourse jobs:
. . .

jobs:
  - name: Install dependencies
    plan:
      - get: hello_hapi
        trigger: true
      - get: dependency-cache
  - name: Run tests
    plan:
      - get: hello_hapi
        trigger: true
        passed: [Install dependencies]
      - get: dependency-cache
        passed: [Install dependencies]
      - task: run the test suite
        file: hello_hapi/ci/tasks/run_tests.yml
In this section, we define two jobs, each of which consist of a name and a plan. Each of our plans, in turn, contain “get” and “task” elements. The task items specify how to execute an action while the get items indicate the resource dependencies of the task.
The first job does not have any task statements. This is a bit unusual, but makes sense when we look at what it is doing and how it can be used. The first get statement requires the hello_hapi resource and specifies the trigger: true option. This tells Concourse to automatically fetch the repository and begin a new build of this job every time a new commit is detected in the hello_hapi repository.
The second get statement in the first job (get: dependency-cache) requires the resource we defined that downloads and caches the project’s Node.js dependencies. This statement evaluates the requirements found in the package.json file and downloads them. With no tasks defined for this job, no other actions are taken, but the downloaded dependencies will be available to subsequent jobs.
Note: In this specific example, there is only a single additional job, so the benefits of caching the Node.js dependencies as an independent step aren’t fully realized (adding the get statements to the testing job that follows would be enough to download the dependencies). However, almost all work with Node.js require the project dependencies, so if you had separate jobs that could potentially be done in parallel, the benefits of a separate dependency cache would become more clear.
The second job (name: Run tests) starts off by declaring the same dependencies with one notable difference. The “passed” constraint causes the get statements to only match resources that have successfully traversed previous steps in the pipeline. This is how dependencies between jobs are formed to chain together pipeline processes.
After the get statements, a task called “run the test suite” is defined. Rather than defining the steps to complete inline, it tells Concourse to pull the definition from a file in the repository it fetched. We will create this file next.
When you are finished, the complete pipeline should look like this:
---
resource_types:
  - name: npm-cache
    type: docker-image
    source:
      repository: ymedlop/npm-cache-resource
      tag: latest

resources:
  - name: hello_hapi
    type: git
    source: &repo-source
      uri: https://github.com/your_github_user/hello_hapi
      branch: master
  - name: dependency-cache
    type: npm-cache
    source:
      <<: *repo-source
      paths:
        - package.json

jobs:
  - name: Install dependencies
    plan:
      - get: hello_hapi
        trigger: true
      - get: dependency-cache
  - name: Run tests
    plan:
      - get: hello_hapi
        trigger: true
        passed: [Install dependencies]
      - get: dependency-cache
        passed: [Install dependencies]
      - task: run the test suite
        file: hello_hapi/ci/tasks/run_tests.yml
Save and close the file when you are finished.
Defining the Test Task
While the pipeline definition outlined the structure of our continuous integration process, it deferred defining the actual testing task to another file. Extracting tasks help keep the pipeline definition concise and easier to read, but does require you to read multiple files to understand the entire process.
Open a new file under the ci/tasks directory called run_tests.yml:
- nano ci/tasks/run_tests.yml
To define a task, you need to specify the type of operating system the worker needs to have, define the image used to run the tasks, name any input or output the task will use, and specify the command to run.
Paste the following contents to set up our testing task:
---
platform: linux

image_resource:
  type: docker-image
  source:
    repository: node
    tag: latest

inputs:
  - name: hello_hapi
  - name: dependency-cache

run:
  path: hello_hapi/ci/scripts/run_tests.sh
In the above configuration, we specify that this task requires a Linux worker. The Concourse server itself can satisfy this requirement with no additional configuration.
Next, we indicate an image that will be used by the worker to run the task. Although you can create and use your own image types, in practice, this will almost always be a Docker image. Since our repository is a Node.js application, we select the latest “node” image to run our tests since it has the appropriate tooling already installed.
Concourse tasks can specify inputs and outputs to indicate the resources it needs access to and the artifacts it will produce. The inputs correspond to the resources pulled down at the “job” level earlier. The contents of these resources are made available to the task environment as a top level directory that can be manipulated during the task run. Here, the application repository will be available under the hello_hapi directory and the Node.js dependencies will be available under a directory called dependency-cache. Your execution step may need to move files or directories to their expected location at the start of tasks and place artifacts in output locations at the end of tasks.
Finally, the run item lists the path to the command to run. Each task can only be a single command with arguments, so while it’s possible to construct a command inline by composing a bash string, it’s more common to point the task to a script file. In this case, we point to a script in the hello_hapi input directory located at hello_hapi/ci/scripts/run_tests.sh. We will create this script next.
Save and close the file when you are finished.
Defining the Test Script
Finally, we need to create the script that the task will execute. Open a new file called run_tests.sh located at ci/scripts/run_tests.sh:
- nano ci/scripts/run_tests.sh
This script will manipulate the inputs of the testing environment to move items to their correct location. It will then run the test suite defined in the repository by running npm test.
Paste the following into the new file:
#!/usr/bin/env bash

set -e -u -x

mv dependency-cache/node_modules hello_hapi
cd hello_hapi && npm test
First, we indicate that this script should be executed by the Docker container’s bash interpreter. The set options modify the shell’s default behavior to cause any errors or unset variables to stop script execution and to print each command as they are executed. These help make the script safer and give greater visibility for debugging purposes.
The first command that we run moves the cached dependencies, located in the node_modules directory, from within the dependency-cache directory to the hello_hapi directory. Remember, both of these directories are available because we specified them as inputs in the task definition. This new location is where npm will look for the downloaded dependencies it requires.
Afterwards, we move into the application repository and run npm test to execute the defined test suite.
When you are finished, save and close the file.
Before moving on, mark the new script as executable so that it can be run directly:
- chmod +x ci/scripts/run_tests.sh
Our pipeline and all of the associated files have now been defined.
Setting Up the Pipeline in Concourse
Before we merge the pipeline branch back into main and push it up to GitHub, we should go ahead and load our pipeline into Concourse. Concourse will watch our repository for new commits and run our continuous integration procedures when changes are detected.
While we need to load the pipeline manually, as Concourse executes the pipeline, it will read the tasks and scripts from the directories within the repository. Any changes to the pipeline itself will need to be reloaded into Concourse to take effect, but because we didn’t define everything inline, changes to tasks or scripts will be automatically noticed when they are uploaded as part of a commit.
To set up a new pipeline, target your Concourse server with the fly command using the set-pipeline action. We need to pass the name of the new pipeline with -p option and pass the pipeline configuration file with the -c option:
- fly -t main set-pipeline -p hello_hapi -c ci/pipeline.yml
You will be prompted to confirm the configuration before continuing. Type y and hit ENTER:
Output. . .

apply configuration? [yN]: y
pipeline created!
you can view your pipeline here: https://example.com/teams/main/pipelines/hello_hapi

the pipeline is currently paused. to unpause, either:
  - run the unpause-pipeline command
  - click play next to the pipeline in the web ui
As the output indicates, the pipeline has been accepted but is currently paused. You can unpause the pipeline with either fly or the web UI. We will use the web UI.
In your web browser, visit your Concourse server and log in. You should see your new pipeline defined visually:
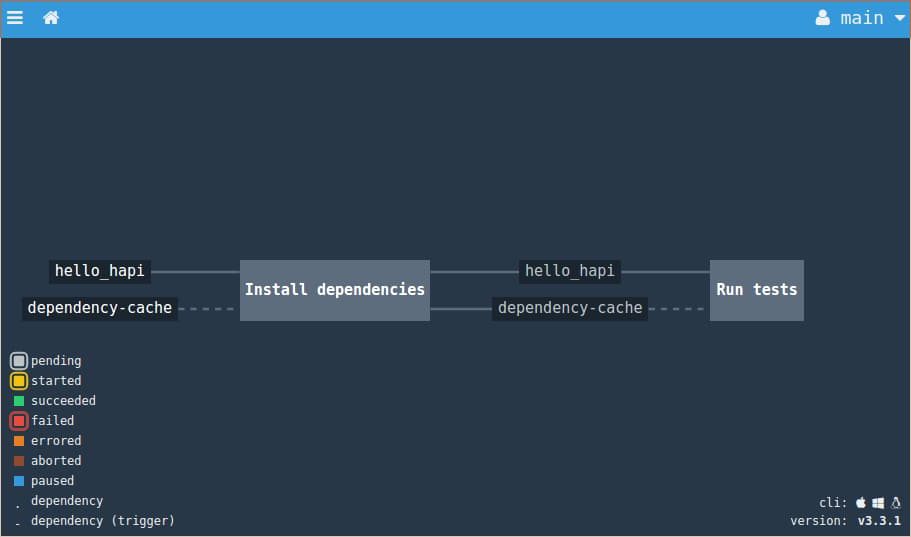
The pending jobs are represented by grey boxes and the resources are smaller, dark blocks. Jobs triggered by resource changes are connected by solid lines while non-triggering resources use broken lines. Resources flowing out of jobs indicate that a passed constraint has been set on the next job.
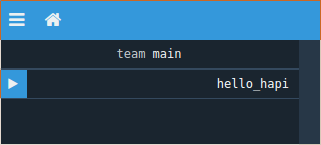
The blue header indicates that the pipeline is currently paused. Click the menu icon (three stacked horizontal lines) in the upper-left corner to open the menu. You should see an entry for your pipeline (you may need log out and back in if the pipeline isn’t visible). Click the blue play icon next to the pipeline to unpause:
The pipeline should now be unpaused and will begin to operate.
At the very beginning, various resources and jobs may turn orange, indicating that errors occurred. This happens because various Docker images need to be downloaded and the pipeline branch still needs to be merged into the main branch of our repository to make the task and script files available.
Committing the Changes to Git
Now that the continuous integration process is defined, we can commit it to our git repository and add it to Concourse.
Add the new ci directory to the staging area by typing:
- git add ci
Verify the files to be committed by checking the status:
- git status
OutputOn branch pipeline
Changes to be committed:
  (use "git reset HEAD <file>..." to unstage)

	new file:   ci/pipeline.yml
	new file:   ci/scripts/run_tests.sh
	new file:   ci/tasks/run_tests.yml
Commit the changes by typing:
- git commit -m 'Add Concourse pipeline'
The changes are now committed to our pipeline branch. We can merge the branch back into the master branch by switching branches and merging:
- git checkout master
- git merge pipeline
Now, push the master branch with the new changes back up to GitHub:
- git push origin master
The commit will kick off a new build within sixty seconds and Concourse will have access to the pipeline tasks and scripts after pulling down the changes.
Viewing the New Build
Back in the Concourse web UI, a new build will begin progressing through the pipeline within the next minute:
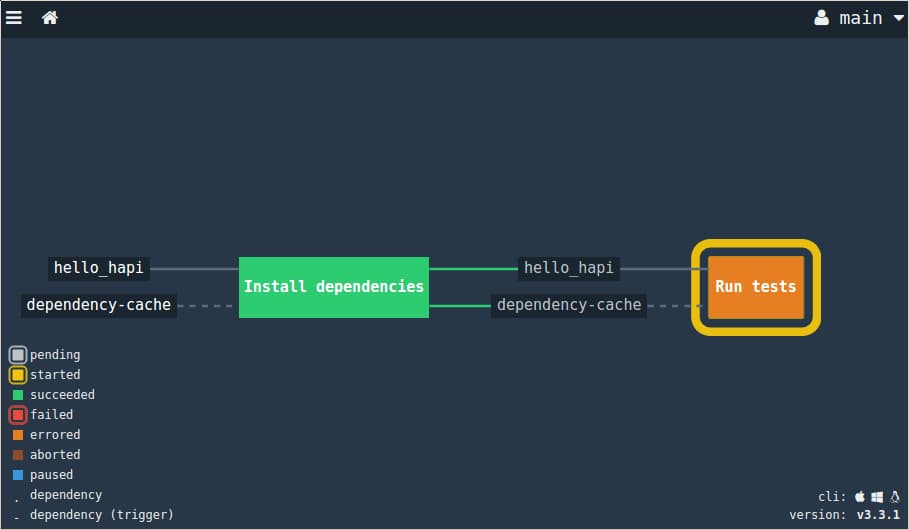
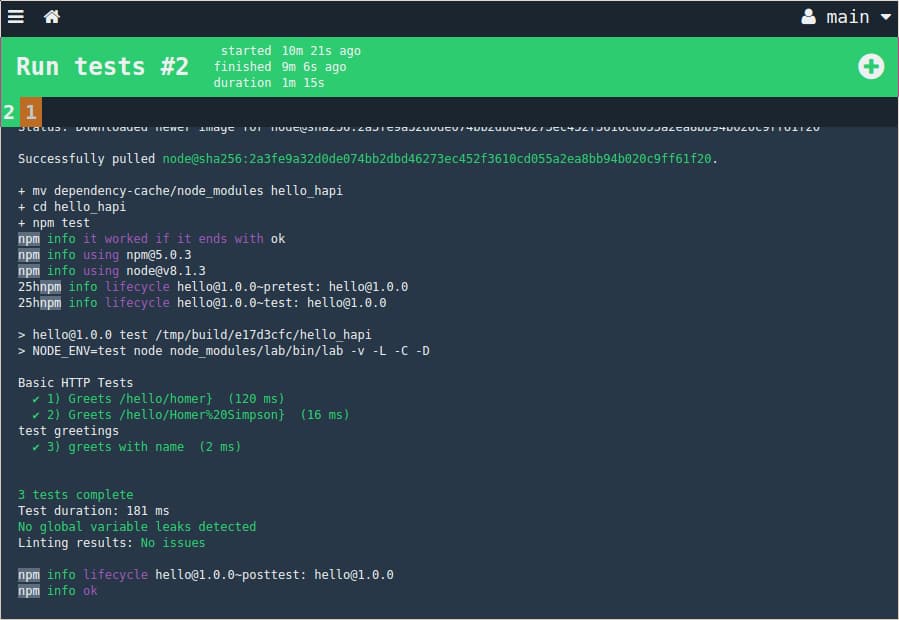
The yellow outline indicates that the job is currently in progress. To monitor the progress, click on the Run tests job to see the current output. Once the job is complete, the complete output will be available and the job should turn green:
Click the home icon to go back to the main pipeline screen. The green status of each job indicates that the latest commit has passed all stages of the pipeline:
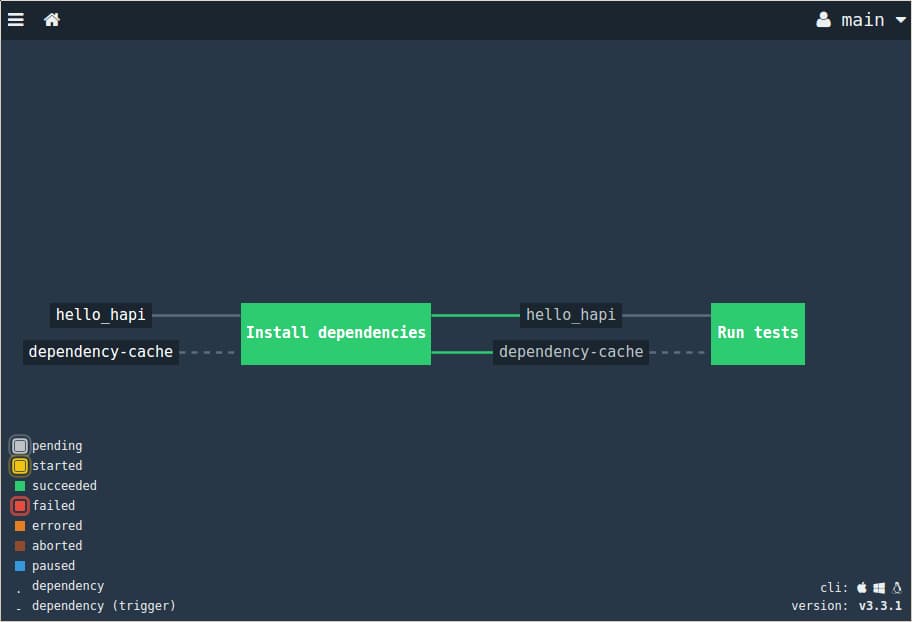
The pipeline will continue to monitor the repository and automatically run new tests as changes are committed.
Conclusion
In this guide, we set up a Concourse pipeline to automatically monitor a repository for changes. When changes are detected, Concourse pulls down the latest version of the repository and uses a Docker container to install and cache the project dependencies. The build then progresses to the testing stage where the dependencies are copied over and the repository’s test suite is run to check whether any breaking changes were introduced.
Concourse provides a lot of flexibility and power to define isolated testing procedures and store them within the repository itself. If you’d like to learn more about how to leverage Concourse for your own projects, check out the official documentation.
Thanks for learning with the DigitalOcean Community. Check out our offerings for compute, storage, networking, and managed databases.
Tutorial Series: Setting Up and Using Concourse CI on Ubuntu 16.04
Concourse CI is a modern, flexible continuous integration server which aims to simplify common abstractions and encourage building repeatable, decoupled automated testing. In this series, we will cover how to install and secure a Concourse CI server on Ubuntu 16.04. Afterwards, we will explore how to develop and implement a continuous integration pipeline for your project.
About the author
Former Senior Technical Writer at DigitalOcean, specializing in DevOps topics across multiple Linux distributions, including Ubuntu 18.04, 20.04, 22.04, as well as Debian 10 and 11.
Still looking for an answer?
This textbox defaults to using Markdown to format your answer.
You can type !ref in this text area to quickly search our full set of tutorials, documentation & marketplace offerings and insert the link!
 This work is licensed under a Creative Commons Attribution-NonCommercial- ShareAlike 4.0 International License.
Become a contributor for community
Get paid to write technical tutorials and select a tech-focused charity to receive a matching donation.

DigitalOcean Documentation
Full documentation for every DigitalOcean product.

Resources for startups and AI-native businesses
The Wave has everything you need to know about building a business, from raising funding to marketing your product.
The developer cloud
Scale up as you grow — whether you're running one virtual machine or ten thousand.

Start building today
From GPU-powered inference and Kubernetes to managed databases and storage, get everything you need to build, scale, and deploy intelligent applications.
