![How To Set Up Password Authentication with Apache on Ubuntu 18.04 [Quickstart]](https://www.digitalocean.com/api/static-content/v1/images?src=%2F_next%2Fstatic%2Fmedia%2Fintro-to-cloud.d49bc5f7.jpeg&width=1920 "How To Set Up Password Authentication with Apache on Ubuntu 18.04 [Quickstart]")
Introduction
This tutorial will walk you through password-protecting assets on an Apache web server running on Ubuntu 18.04. Completing these steps will provide your server with additional security so that unauthorized users cannot access certain parts of your page.
For a more detailed version of this tutorial, with more explanations of each step, please refer to How To Set Up Password Authentication with Apache on Ubuntu 18.04.
Prerequisites
In order to complete this tutorial, you will need access to the following on an Ubuntu 18.04 server:
-
A
sudouser on your server -
An Apache2 web server
-
A site secured with SSL
Step 1 — Install the Apache Utilities Package
We’ll install a utility called htpasswd, part of the apache2-utils package to manage usernames and passwords with access to restricted content.
- sudo apt update
- sudo apt install apache2-utils
Step 2 — Create the Password File
We’ll create the first user as follows (replace `first_username with username of your choice):
- sudo htpasswd -c /etc/apache2/.htpasswd first_username
You will be asked to supply and confirm a password for the user.
Leave out the -c argument for any additional users you wish to add so you don’t overwrite the file:
- sudo htpasswd /etc/apache2/.htpasswd another_user
Step 3 — Configure Apache Password Authentication
In this step, we need to configure Apache to check this file before serving our protected content. We will do this by using the site’s virtual host file, but there is another option detailed in the longer tutorial if you don’t have access or prefer to use .htaccess files instead.
Open up the virtual host file that you wish to add a restriction to with a text editor such as nano:
- sudo nano /etc/apache2/sites-enabled/default-ssl.conf
Authentication is done on a per-directory basis. In our example, we’ll restrict the entire document root, but you can modify this listing to only target a specific directory within the web space.
In this step, add the following highlighted lines in your file:
<VirtualHost *:80>
  ServerAdmin webmaster@localhost
  DocumentRoot /var/www/html
  ErrorLog ${APACHE_LOG_DIR}/error.log
  CustomLog ${APACHE_LOG_DIR}/access.log combined

  <Directory "/var/www/html">
      AuthType Basic
      AuthName "Restricted Content"
      AuthUserFile /etc/apache2/.htpasswd
      Require valid-user
  </Directory>
</VirtualHost>
Check the configuration with the following command:
You can restart the server to implement your password policy, and then check the status of your server.
- sudo systemctl restart apache2
- sudo systemctl status apache2
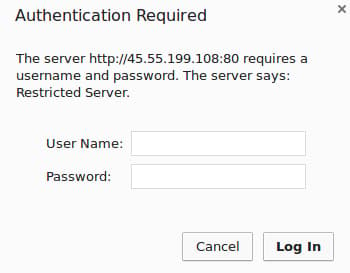
Step 4 — Confirm Password Authentication
To confirm that your content is protected, try to access your restricted content in a web browser. You should be presented with a username and password prompt:
Related Tutorials
Here are links to more detailed guides related to this tutorial:
Thanks for learning with the DigitalOcean Community. Check out our offerings for compute, storage, networking, and managed databases.
About the author
Community and Developer Education expert. Former Senior Manager, Community at DigitalOcean. Focused on topics including Ubuntu 22.04, Ubuntu 20.04, Python, Django, and more.
Still looking for an answer?
This textbox defaults to using Markdown to format your answer.
You can type !ref in this text area to quickly search our full set of tutorials, documentation & marketplace offerings and insert the link!
 This work is licensed under a Creative Commons Attribution-NonCommercial- ShareAlike 4.0 International License.
Become a contributor for community
Get paid to write technical tutorials and select a tech-focused charity to receive a matching donation.

DigitalOcean Documentation
Full documentation for every DigitalOcean product.

Resources for startups and AI-native businesses
The Wave has everything you need to know about building a business, from raising funding to marketing your product.
The developer cloud
Scale up as you grow — whether you're running one virtual machine or ten thousand.

Start building today
From GPU-powered inference and Kubernetes to managed databases and storage, get everything you need to build, scale, and deploy intelligent applications.
