By Melissa Anderson and Kathleen Juell
Not using Ubuntu 18.04?
Choose a different version or distribution.
Introduction
FTP, short for File Transfer Protocol, is a network protocol that was once widely used for moving files between a client and server. It has since been replaced by faster, more secure, and more convenient ways of delivering files. Many casual Internet users expect to download directly from their web browser with https, and command-line users are more likely to use secure protocols such as the scp or SFTP.
FTP is still used to support legacy applications and workflows with very specific needs. If you have a choice of what protocol to use, consider exploring the more modern options. When you do need FTP, however, vsftpd is an excellent choice. Optimized for security, performance, and stability, vsftpd offers strong protection against many security problems found in other FTP servers and is the default for many Linux distributions.
In this tutorial, you’ll configure vsftpd to allow a user to upload files to his or her home directory using FTP with login credentials secured by SSL/TLS.
Prerequisites
To follow along with this tutorial you will need:
- An Ubuntu 18.04 server, and a non-root user with sudo privileges: You can learn more about how to set up a user with these privileges in our Initial Server Setup with Ubuntu 18.04 guide.
Step 1 — Installing vsftpd
Let’s start by updating our package list and installing the vsftpd daemon:
- sudo apt update
- sudo apt install vsftpd
When the installation is complete, let’s copy the configuration file so we can start with a blank configuration, saving the original as a backup:
- sudo cp /etc/vsftpd.conf /etc/vsftpd.conf.orig
With a backup of the configuration in place, we’re ready to configure the firewall.
Step 2 — Opening the Firewall
Let’s check the firewall status to see if it’s enabled. If it is, we’ll ensure that FTP traffic is permitted so firewall rules don’t block our tests.
Check the firewall status:
- sudo ufw status
In this case, only SSH is allowed through:
OutputStatus: active

To                         Action      From
--                         ------      ----
OpenSSH                    ALLOW       Anywhere
OpenSSH (v6)               ALLOW       Anywhere (v6)
You may have other rules in place or no firewall rules at all. Since only SSH traffic is permitted in this case, we’ll need to add rules for FTP traffic.
Let’s open ports 20 and 21 for FTP, port 990 for when we enable TLS, and ports 40000-50000 for the range of passive ports we plan to set in the configuration file:
- sudo ufw allow 20/tcp
- sudo ufw allow 21/tcp
- sudo ufw allow 990/tcp
- sudo ufw allow 40000:50000/tcp
- sudo ufw status
Our firewall rules should now look like this:
OutputStatus: active

To                         Action      From
--                         ------      ----
OpenSSH                    ALLOW       Anywhere
990/tcp                    ALLOW       Anywhere
20/tcp                     ALLOW       Anywhere
21/tcp                     ALLOW       Anywhere
40000:50000/tcp            ALLOW       Anywhere
OpenSSH (v6)               ALLOW       Anywhere (v6)
20/tcp (v6)                ALLOW       Anywhere (v6)
21/tcp (v6)                ALLOW       Anywhere (v6)
990/tcp (v6)               ALLOW       Anywhere (v6)
40000:50000/tcp (v6)       ALLOW       Anywhere (v6)
With vsftpd installed and the necessary ports open, let’s move on to creating a dedicated FTP user.
Step 3 — Preparing the User Directory
We will create a dedicated FTP user, but you may already have a user in need of FTP access. We’ll take care to preserve an existing user’s access to their data in the instructions that follow. Even so, we recommend that you start with a new user until you’ve configured and tested your setup.
First, add a test user:
- sudo adduser sammy
Assign a password when prompted. Feel free to press ENTER through the other prompts.
FTP is generally more secure when users are restricted to a specific directory. vsftpd accomplishes this with chroot jails. When chroot is enabled for local users, they are restricted to their home directory by default. However, because of the way vsftpd secures the directory, it must not be writable by the user. This is fine for a new user who should only connect via FTP, but an existing user may need to write to their home folder if they also have shell access.
In this example, rather than removing write privileges from the home directory, let’s create an ftp directory to serve as the chroot and a writable files directory to hold the actual files.
Create the ftp folder:
- sudo mkdir /home/sammy/ftp
Set its ownership:
- sudo chown nobody:nogroup /home/sammy/ftp
Remove write permissions:
- sudo chmod a-w /home/sammy/ftp
Verify the permissions:
- sudo ls -la /home/sammy/ftp
Outputtotal 8
4 dr-xr-xr-x  2 nobody nogroup 4096 Aug 24 21:29 .
4 drwxr-xr-x  3 sammy  sammy   4096 Aug 24 21:29 ..
Next, let’s create the directory for file uploads and assign ownership to the user:
- sudo mkdir /home/sammy/ftp/files
- sudo chown sammy:sammy /home/sammy/ftp/files
A permissions check on the ftp directory should return the following:
- sudo ls -la /home/sammy/ftp
Outputtotal 12
dr-xr-xr-x 3 nobody nogroup 4096 Aug 26 14:01 .
drwxr-xr-x 3 sammy  sammy   4096 Aug 26 13:59 ..
drwxr-xr-x 2 sammy  sammy   4096 Aug 26 14:01 files
Finally, let’s add a test.txt file to use when we test:
- echo "vsftpd test file" | sudo tee /home/sammy/ftp/files/test.txt
Now that we’ve secured the ftp directory and allowed the user access to the files directory, let’s modify our configuration.
Step 4 — Configuring FTP Access
We’re planning to allow a single user with a local shell account to connect with FTP. The two key settings for this are already set in vsftpd.conf. Start by opening the config file to verify that the settings in your configuration match those below:
- sudo nano /etc/vsftpd.conf
. . .
# Allow anonymous FTP? (Disabled by default).
anonymous_enable=NO
#
# Uncomment this to allow local users to log in.
local_enable=YES
. . .
Next, let’s enable the user to upload files by uncommenting the write_enable setting:
. . .
write_enable=YES
. . .
We’ll also uncomment the chroot to prevent the FTP-connected user from accessing any files or commands outside the directory tree:
. . .
chroot_local_user=YES
. . .
Let’s also add a user_sub_token to insert the username in our local_root directory path so our configuration will work for this user and any additional future users. Add these settings anywhere in the file:
. . .
user_sub_token=$USER
local_root=/home/$USER/ftp
Let’s also limit the range of ports that can be used for passive FTP to make sure enough connections are available:
. . .
pasv_min_port=40000
pasv_max_port=50000
Note: In step 2, we opened the ports that we set here for the passive port range. If you change the values, be sure to update your firewall settings.
To allow FTP access on a case-by-case basis, let’s set the configuration so that users have access only when they are explicitly added to a list, rather than by default:
. . .
userlist_enable=YES
userlist_file=/etc/vsftpd.userlist
userlist_deny=NO
userlist_deny toggles the logic: When it is set to YES, users on the list are denied FTP access. When it is set to NO, only users on the list are allowed access.
When you’re done making the changes, save the file and exit the editor.
Finally, let’s add our user to /etc/vsftpd.userlist. Use the -a flag to append to the file:
- echo "sammy" | sudo tee -a /etc/vsftpd.userlist
Check that it was added as you expected:
- cat /etc/vsftpd.userlist
Outputsammy
Restart the daemon to load the configuration changes:
- sudo systemctl restart vsftpd
With the configuration in place, let’s move on to testing FTP access.
Step 5 — Testing FTP Access
We’ve configured the server to allow only the user sammy to connect via FTP. Let’s make sure that this works as expected.
Anonymous users should fail to connect: We’ve disabled anonymous access. Let’s test that by trying to connect anonymously. If our configuration is set up properly, anonymous users should be denied permission. Open another terminal window and run the following command. Be sure to replace 203.0.113.0 with your server’s public IP address:
- ftp -p 203.0.113.0
OutputConnected to 203.0.113.0.
220 (vsFTPd 3.0.3)
Name (203.0.113.0:default): anonymous
530 Permission denied.
ftp: Login failed.
ftp>
Close the connection:
- bye
Users other than sammy should fail to connect: Next, let’s try connecting as our sudo user. They should also be denied access, and it should happen before they’re allowed to enter their password:
- ftp -p 203.0.113.0
OutputConnected to 203.0.113.0.
220 (vsFTPd 3.0.3)
Name (203.0.113.0:default): sudo_user
530 Permission denied.
ftp: Login failed.
ftp>
Close the connection:
- bye
The user sammy should be able to connect, read, and write files: Let’s make sure that our designated user can connect:
- ftp -p 203.0.113.0
OutputConnected to 203.0.113.0.
220 (vsFTPd 3.0.3)
Name (203.0.113.0:default): sammy
331 Please specify the password.
Password: your_user's_password
230 Login successful.
Remote system type is UNIX.
Using binary mode to transfer files.
ftp>
Let’s change into the files directory and use the get command to transfer the test file we created earlier to our local machine:
- cd files
- get test.txt
Output227 Entering Passive Mode (203,0,113,0,169,12).
150 Opening BINARY mode data connection for test.txt (16 bytes).
226 Transfer complete.
16 bytes received in 0.0101 seconds (1588 bytes/s)
ftp>
Next, let’s upload the file with a new name to test write permissions:
- put test.txt upload.txt
Output227 Entering Passive Mode (203,0,113,0,164,71).
150 Ok to send data.
226 Transfer complete.
16 bytes sent in 0.000894 seconds (17897 bytes/s)
Close the connection:
- bye
Now that we’ve tested our configuration, let’s take steps to further secure our server.
Step 6 — Securing Transactions
Since FTP does not encrypt any data in transit, including user credentials, we’ll enable TLS/SSL to provide that encryption. The first step is to create the SSL certificates for use with vsftpd.
Let’s use openssl to create a new certificate and use the -days flag to make it valid for one year. In the same command, we’ll add a private 2048-bit RSA key. By setting both the -keyout and -out flags to the same value, the private key and the certificate will be located in the same file:
- sudo openssl req -x509 -nodes -days 365 -newkey rsa:2048 -keyout /etc/ssl/private/vsftpd.pem -out /etc/ssl/private/vsftpd.pem
You’ll be prompted to provide address information for your certificate. Substitute your own information for the highlighted values below:
OutputGenerating a 2048 bit RSA private key
............................................................................+++
...........+++
writing new private key to '/etc/ssl/private/vsftpd.pem'
-----
You are about to be asked to enter information that will be incorporated
into your certificate request.
What you are about to enter is what is called a Distinguished Name or a DN.
There are quite a few fields but you can leave some blank
For some fields there will be a default value,
If you enter '.', the field will be left blank.
-----
Country Name (2 letter code) [AU]:US
State or Province Name (full name) [Some-State]:NY
Locality Name (eg, city) []:New York City
Organization Name (eg, company) [Internet Widgits Pty Ltd]:DigitalOcean
Organizational Unit Name (eg, section) []:
Common Name (e.g. server FQDN or YOUR name) []: your_server_ip
Email Address []:
For more detailed information about the certificate flags, see OpenSSL Essentials: Working with SSL Certificates, Private Keys and CSRs
Once you’ve created the certificates, open the vsftpd configuration file again:
- sudo nano /etc/vsftpd.conf
Toward the bottom of the file, you will see two lines that begin with rsa_. Comment them out so they look like this:
. . .
# rsa_cert_file=/etc/ssl/certs/ssl-cert-snakeoil.pem
# rsa_private_key_file=/etc/ssl/private/ssl-cert-snakeoil.key
. . .
Below them, add the following lines that point to the certificate and private key we just created:
. . .
rsa_cert_file=/etc/ssl/private/vsftpd.pem
rsa_private_key_file=/etc/ssl/private/vsftpd.pem
. . .
After that, we will force the use of SSL, which will prevent clients that can’t deal with TLS from connecting. This is necessary to ensure that all traffic is encrypted, but it may force your FTP user to change clients. Change ssl_enable to YES:
. . .
ssl_enable=YES
. . .
After that, add the following lines to explicitly deny anonymous connections over SSL and to require SSL for both data transfer and logins:
. . .
allow_anon_ssl=NO
force_local_data_ssl=YES
force_local_logins_ssl=YES
. . .
After this, configure the server to use TLS, the preferred successor to SSL, by adding the following lines:
. . .
ssl_tlsv1=YES
ssl_sslv2=NO
ssl_sslv3=NO
. . .
Finally, we will add two more options. First, we will not require SSL reuse because it can break many FTP clients. We will require “high” encryption cipher suites, which currently means key lengths equal to or greater than 128 bits:
. . .
require_ssl_reuse=NO
ssl_ciphers=HIGH
. . .
The finished file section should look like this:
# This option specifies the location of the RSA certificate to use for SSL
# encrypted connections.
#rsa_cert_file=/etc/ssl/certs/ssl-cert-snakeoil.pem
#rsa_private_key_file=/etc/ssl/private/ssl-cert-snakeoil.key
rsa_cert_file=/etc/ssl/private/vsftpd.pem
rsa_private_key_file=/etc/ssl/private/vsftpd.pem
ssl_enable=YES
allow_anon_ssl=NO
force_local_data_ssl=YES
force_local_logins_ssl=YES
ssl_tlsv1=YES
ssl_sslv2=NO
ssl_sslv3=NO
require_ssl_reuse=NO
ssl_ciphers=HIGH
When you’re done, save and close the file.
Restart the server for the changes to take effect:
- sudo systemctl restart vsftpd
At this point, we will no longer be able to connect with an insecure command-line client. If we tried, we’d see something like:
Outputftp -p 203.0.113.0
Connected to 203.0.113.0.
220 (vsFTPd 3.0.3)
Name (203.0.113.0:default): sammy
530 Non-anonymous sessions must use encryption.
ftp: Login failed.
421 Service not available, remote server has closed connection
ftp>
Next, let’s verify that we can connect using a client that supports TLS.
Step 7 — Testing TLS with FileZilla
Most modern FTP clients can be configured to use TLS encryption. We will demonstrate how to connect with FileZilla because of its cross-platform support. Consult the documentation for other clients.
When you first open FileZilla, find the Site Manager icon just above the word Host, the left-most icon on the top row. Click it:

A new window will open. Click the New Site button in the bottom right corner:
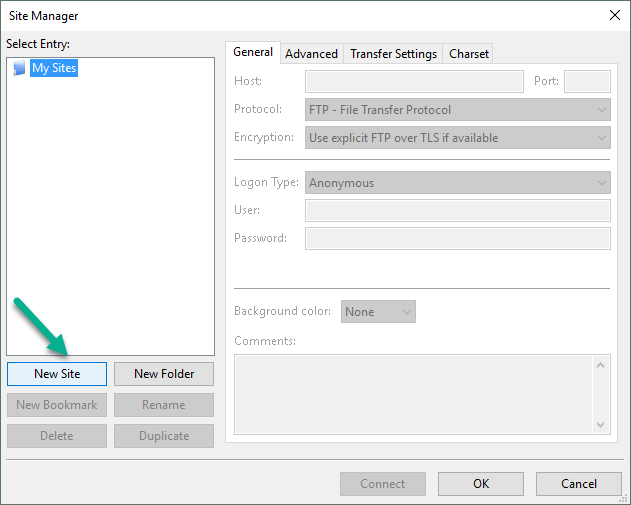 Under My Sites a new icon with the words New site will appear. You can name it now or return later and use the Rename button.
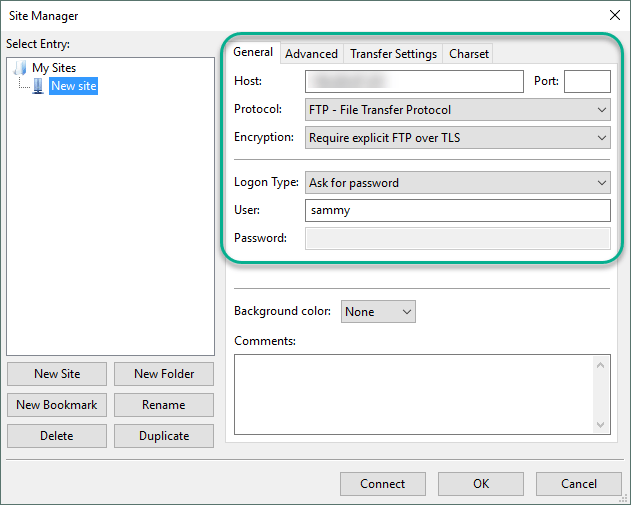
Fill out the Host field with the name or IP address. Under the Encryption drop down menu, select Require explicit FTP over TLS.
For Logon Type, select Ask for password. Fill in your FTP user in the User field:
Click Connect at the bottom of the interface. You will be asked for the user’s password:
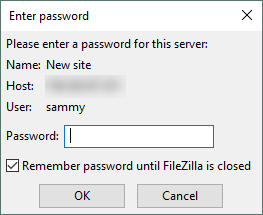
Click OK to connect. You should now be connected with your server with TLS/SSL encryption.
Upon success, you will be presented with a server certificate that looks like this:
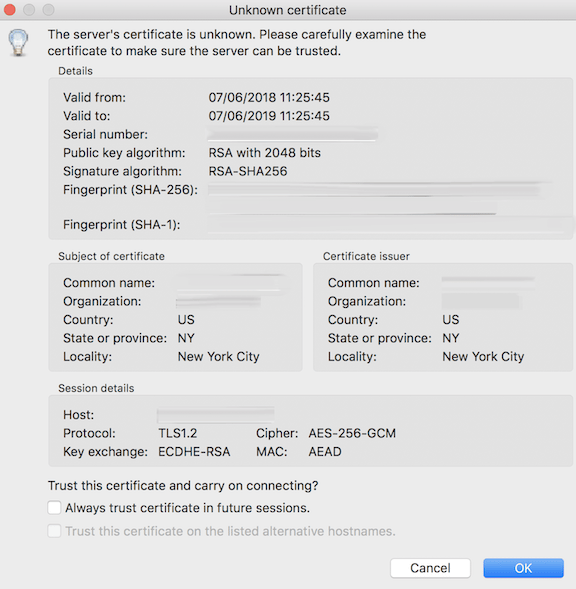
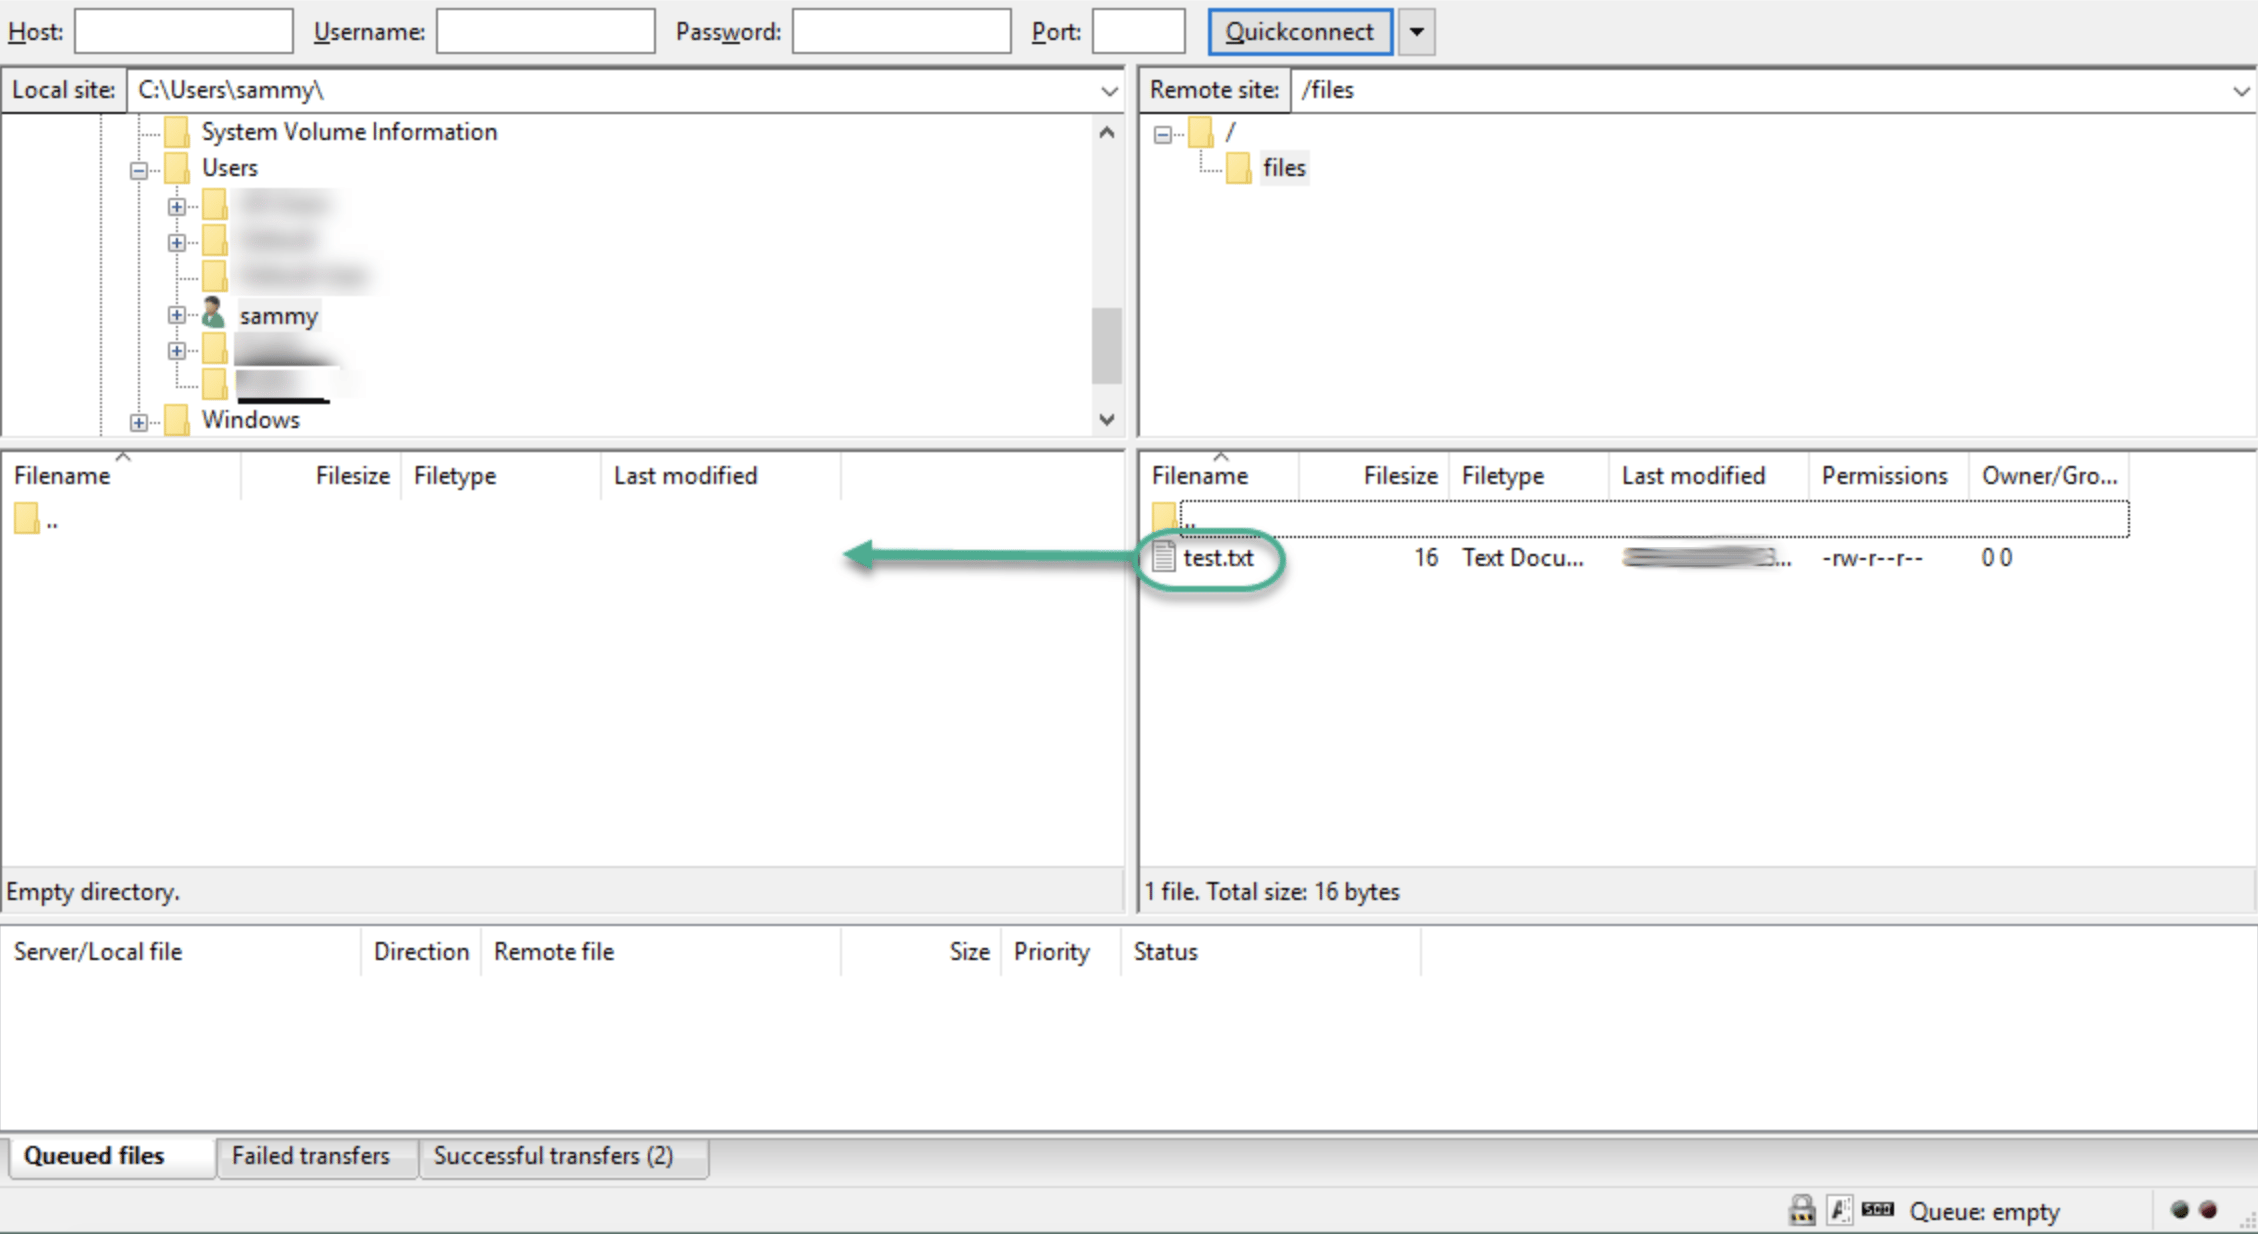
When you’ve accepted the certificate, double-click the files folder and drag upload.txt to the left to confirm that you’re able to download files:
When you’ve done that, right-click on the local copy, rename it to upload-tls.txt and drag it back to the server to confirm that you can upload files:
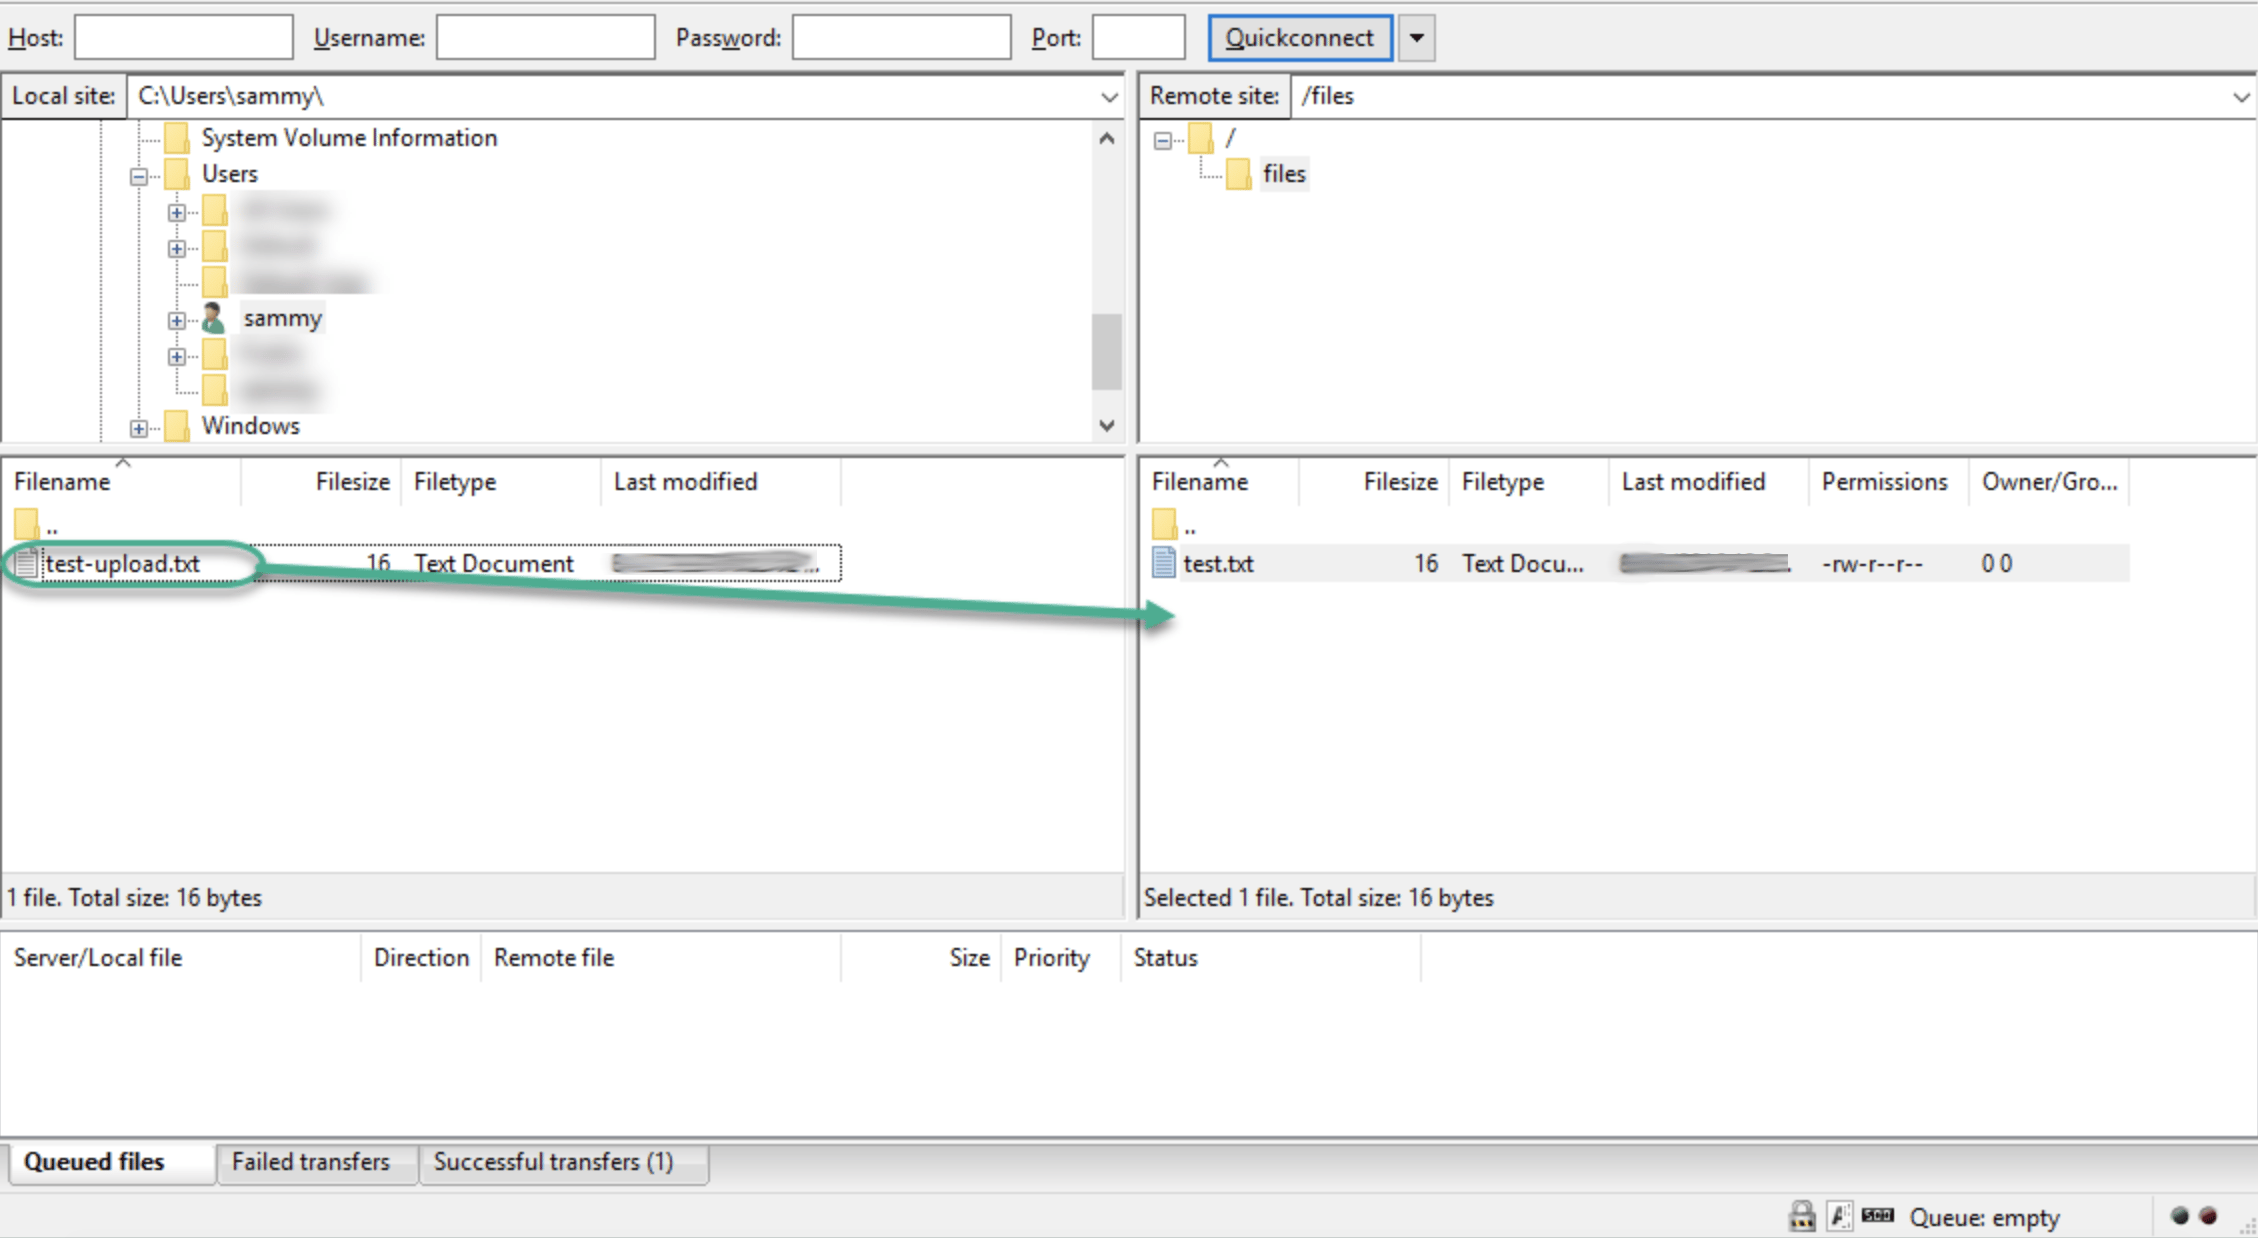
You’ve now confirmed that you can securely and successfully transfer files with SSL/TLS enabled.
Step 8 — Disabling Shell Access (Optional)
If you’re unable to use TLS because of client requirements, you can gain some security by disabling the FTP user’s ability to log in any other way. One relatively straightforward way to prevent it is by creating a custom shell. This will not provide any encryption, but it will limit the access of a compromised account to files accessible by FTP.
First, open a file called ftponly in the bin directory:
- sudo nano /bin/ftponly
Add a message telling the user why they are unable to log in:
#!/bin/sh
echo "This account is limited to FTP access only."
Save the file and exit your editor.
Change the permissions to make the file executable:
- sudo chmod a+x /bin/ftponly
Open the list of valid shells:
- sudo nano /etc/shells
At the bottom add:
. . .
/bin/ftponly
Update the user’s shell with the following command:
- sudo usermod sammy -s /bin/ftponly
Now try logging into your server as sammy:
- ssh sammy@your_server_ip
You should see something like:
OutputThis account is limited to FTP access only.
Connection to 203.0.113.0 closed.
This confirms that the user can no longer ssh to the server and is limited to FTP access only.
Conclusion
In this tutorial we covered setting up FTP for users with a local account. If you need to use an external authentication source, you might want to look into vsftpd’s support of virtual users. This offers a rich set of options through the use of PAM, the Pluggable Authentication Modules, and is a good choice if you manage users in another system such as LDAP or Kerberos.
Thanks for learning with the DigitalOcean Community. Check out our offerings for compute, storage, networking, and managed databases.
About the author(s)
Former Developer at DigitalOcean community. Expertise in areas including Ubuntu, Docker, Ruby on Rails, Debian, and more.
Still looking for an answer?
This textbox defaults to using Markdown to format your answer.
You can type !ref in this text area to quickly search our full set of tutorials, documentation & marketplace offerings and insert the link!
Great Article, but I want to know how can I change the user FTP directory to /var/www/html/sammy/ftp instead of the /home/sammy/ftp ?
I simply couldn’t get this to work. It is such a well written article, but no matter how hard I tried, I always got a “connection refused” message. As soon as I changed from ftp to sftp, everything started to work.
Great Articel! What if we try to ftp with the root user? Can we make a difference if the user is root then we can see the all folder in the /home directory or something?
everything ok except now i cant login with root ssh :/ i have only access with ftp
When I log in via SFTP remotely, I get this error and am logged out immediately:
Received message too long 1416128883
Ensure the remote shell produces no output for non-interactive sessions.
How to create symlink from /home/user/ftp/files to /var/www so files go to /var/www? or change the config of vsftpd.conf to /var/www ?
Should port 990 be in vsftpd config?
Why should we open it in firewall? Where is it used?
Maybe we should open it only in implicit ssl mode:
implicit_ssl=YES
listen_port=990
Explicit TLS works OK over ports 20/21 + passive range without 990 in firewall.
Status:	Connecting to server-name:21...
Status:	Connection established, waiting for welcome message...
Status:	Initializing TLS...
Status:	Verifying certificate...
Status:	TLS connection established.
Great guide, thank you!
For others following along, there were a couple of stumbling blocks for me.
The first was that inetd/xinetd were not installed by default for me, so I had to run vsftpd standalone by setting listen=YES in /etc/vsftpd.conf, and then enabling via system vsftpd start.
The second issue for me was that in the generation of the TLS key, the example has the same value for -keyout and -out, which causes OpenSSL to throw an error. We need something like
sudo openssl req -x509 -nodes -days 365 -newkey rsa:2048 -keyout /etc/ssl/private/vsftpd.pem -out /etc/ssl/certs/vsftpd.pem
(Note the different paths). I generally prefer to use the suffix .key for my key files, but this is arbitrary.
Awesome Article 👏
I was reading the documentation of using FTP Service on Ubuntu… https://ubuntu.com/server/docs/service-ftp
Found that we can restrict shell access simply by doing this 👇
To allow users with a shell of /usr/sbin/nologin access to FTP, but have no shell access, edit /etc/shells adding the nologin shell:
# /etc/shells: valid login shells
/bin/csh
/bin/sh
/usr/bin/es
/usr/bin/ksh
/bin/ksh
/usr/bin/rc
/usr/bin/tcsh
/bin/tcsh
/usr/bin/esh
/bin/dash
/bin/bash
/bin/rbash
/usr/bin/screen
/usr/sbin/nologin
Is this the right way to do it ?
I followed the article and seems my FTP server accepts connections and am able to establish TLS connections with my username but at the end I get the following errors from my Filezilla client.
Error: GnuTLS error -15 in gnutls_record_recv: An unexpected TLS packet was received. Error: Could not read from socket: ECONNABORTED - Connection aborted Error: Disconnected from server Error: Failed to retrieve directory listing
I also tried using LFTP but when I try to see the directory using LS command or use GET command I get “ls: Login failed: 530 Permission denied.” error message. Any idea what could cause this?
Thanks, Ramin
 This work is licensed under a Creative Commons Attribution-NonCommercial- ShareAlike 4.0 International License.
Become a contributor for community
Get paid to write technical tutorials and select a tech-focused charity to receive a matching donation.

DigitalOcean Documentation
Full documentation for every DigitalOcean product.

Resources for startups and AI-native businesses
The Wave has everything you need to know about building a business, from raising funding to marketing your product.
The developer cloud
Scale up as you grow — whether you're running one virtual machine or ten thousand.

Start building today
From GPU-powered inference and Kubernetes to managed databases and storage, get everything you need to build, scale, and deploy intelligent applications.
