By Erika Heidi
Developer Advocate

###Introduction
In software engineering, profiling is a technique used to analyze applications at run-time, in order to identify possible bottlenecks and performance issues within an application. It is an essential resource for software optimization. Profiling differs from benchmarking because it analyzes the application at code level, while benchmarking is intended to analyze the overall application performance as experienced by the end user.
A profiler is a software that will gather detailed information about the application in order to generate statistics and insightful data about memory usage, frequency and duration of function calls, time to respond to a request, amongst other things.
XHProf is a profiler designed to analyze PHP applications. Created and open sourced by Facebook, XHProf works as a passive profiler, which means it will work in the background while having minimum impact on the application’s performance, making it suitable to be used on production environments.
XHGui offers a rich interface for visualizing data collected via XHProf.
This tutorial will show you how to install XHProf and XHGui for profiling a PHP application running on Ubuntu 14.04.
XHProf currently does not support PHP 7. If you are using PHP 7 on your server, you can try the tideways/php-profiler-extension instead, which works as a drop-in replacement for XHProf.
##Prerequisites
In order to follow this guide, you will need:
- An Ubuntu 14.04 server with a non-root sudo user, which you can set up by following our Initial Server Setup guide
- A functional PHP web server environment running a PHP application that will be analyzed
When you are ready to move on, log into your server using your sudo account.
##Step 1 — Install the Server Dependencies
In case you don’t have pecl installed on your server, you should get it installed now. We’ll need it to get both xhprof and the mongo PHP extension set up.
First, update the package manager cache with:
- sudo apt-get update
Next, we’ll install pecl with the php-pear package. We’ll also need php5-dev in order to install PHP modules via pecl, and php5-mcrypt for setting up XHGui:
- sudo apt-get install php-pear php5-dev php5-mcrypt
To enable the mcrypt extension, run:
- sudo php5enmod mcrypt
Lastly, we will need Git to install XHGui. If Git isn’t already installed on your server, you can install it now with:
- sudo apt-get install git
##Step 2 — Install XHProf
Now we should get XHProf installed and enabled. To install it via pecl, run:
- sudo pecl install xhprof-beta
Next, we need to activate the xhprof extension. To facilitate this process while also keeping Ubuntu/Debian standards, we are going to create a separate ini configuration file and enable it using the command php5enmod.
Create a new ini configuration file inside /etc/php5/mods-available:
- sudo nano /etc/php5/mods-available/xhprof.ini
Include the following contents in this file:
extension=xhprof.so
To enable the module configuration file, run:
- sudo php5enmod xhprof
Now the only thing left to do is to restart the web server in order to apply the changes. On LAMP environments (Apache), you can do this with:
- sudo service apache2 restart
On LEMP environments(Nginx + PHP5-FPM), you should restart the php5-fpm service with:
- sudo service php5-fpm restart
The xhprof extension should now be installed and activated. To confirm, you can run:
- php --ri xhprof
The output should be similar to this:
Outputxhprof

xhprof => 0.9.2
CPU num => 1
##Step 3 — Install MongoDB
The next step is to get MongoDB and the mongo PHP extension installed on the server. MongoDB is used by XHGui to store the data obtained via XHProf’s application analysis.
To install MongoDB, run:
- sudo apt-get install mongodb
To install the MongoDB PHP extension, run:
- sudo pecl install mongo
The installation will ask for your input at some point, to choose if you want to enable enterprise authentication for MongoDB. You can leave the default value (no) and just press enter to continue with the installation.
Now we need to activate the mongo PHP extension, following the same procedure we used for the xhprof extension. Create a new configuration file at /etc/php5/mods-available/mongo.ini:
- sudo nano /etc/php5/mods-available/mongo.ini
Include the following contents in the file:
extension=mongo.so
To enable the module configuration file, run:
- sudo php5enmod mongo
Now restart the web server to apply the changes. On LAMP environments (Apache), you can do this with:
- sudo service apache2 restart
On LEMP environments(Nginx + PHP5-FPM), you should restart the php5-fpm service with:
- sudo service php5-fpm restart
The mongo extension should now be installed and activated. To confirm, you can run:
- php --ri mongo
The output should be similar to this:
Outputmongo

MongoDB Support => enabled
Version => 1.6.12
Streams Support => enabled
SSL Support => enabled
                   Supported Authentication Mechanisms
MONGODB-CR => enabled
SCRAM-SHA-1 => enabled
MONGODB-X509 => enabled
GSSAPI (Kerberos) => disabled
PLAIN => disabled
...
##Step 4 — Set Up MongoDB Indexes (Optional) This is an optional but recommended step that will improve the overall performance of XHGui when storing and accessing data from MongoDB.
Access the MongoDB client via command line with:
- mongo
Now, run the following sequence of commands in order to create the indexes for XHGui:
- use xhprof
- db.results.ensureIndex( { 'meta.SERVER.REQUEST_TIME' : -1 } )
- db.results.ensureIndex( { 'profile.main().wt' : -1 } )
- db.results.ensureIndex( { 'profile.main().mu' : -1 } )
- db.results.ensureIndex( { 'profile.main().cpu' : -1 } )
- db.results.ensureIndex( { 'meta.url' : 1 } )
To exit the MongoDB client, run:
- exit
##Step 5 — Install XHGui The next step is to install XHGui and set it up as a virtual host on your web server.
We will start by cloning the XHGui repository from Github. Because we need to serve XHGui’s contents as a virtual host on the web server, we will place the cloned repository inside /var/www.
It is recommended that you set up the XHGui directory to be owned by your regular user. In this example, we are going to use sammy as username and group, but you should replace these values with your own username and group.
- sudo mkdir -p /var/www/xhgui
- sudo chown -R sammy.sammy /var/www/xhgui
- cd /var/www
- git clone https://github.com/perftools/xhgui.git xhgui
To install XHGui’s dependencies, execute the included installer:
- cd xhgui
- php install.php
After the dependencies are successfully installed, we need to configure a virtual host to serve the contents of xhgui. The next sections cover how to create a virtual host for xhgui on both LAMP and LEMP environments.
###Setting Up XHGui’s Virtual Host on LAMP
When using Apache as the web server, we first need to make sure mod_rewrite is enabled. To enable it, run:
- sudo a2enmod rewrite
Create a new virtual host file under /etc/apache2/sites-available:
- sudo nano /etc/apache2/sites-available/xhgui.conf
Place the following contents inside this file:
[label /etc/apache2/sites-available/xhgui.conf]
<VirtualHost *:80>
    DocumentRoot /var/www/xhgui/webroot
    ServerName xhgui.example.com

    <Directory "/var/www/xhgui/webroot">
        Options Indexes MultiViews FollowSymLinks
        AllowOverride All
        Require all granted
    </Directory>
</VirtualHost>
Notice that the document root should point to the subdirectory webroot inside XHGui’s main directory.
If you currently don’t have a subdomain you can use for this virtual host, you can use a dummy domain name and create an entry in your local /etc/hosts file pointing the ServerName that you set to the server’s IP address. For more information on how to create Apache virtual hosts, you can check our How to Set Up Apache Virtual Hosts on Ubuntu 14.04 guide.
Enable the virtual host with:
- sudo a2ensite xhgui
To apply the changes, reload Apache with:
- sudo service apache2 reload
###Setting Up XHGui’s Virtual Host on LEMP
Start by creating a new virtual host file on /etc/nginx/sites-available:
- sudo nano /etc/nginx/sites-available/xhgui
Place the following contents inside this file:
server {
    listen   80;
    server_name xhgui.example.com;
    root   /var/www/xhgui/webroot/;
    index  index.php;

    location / {
        try_files $uri $uri/ /index.php?$uri&$args;
    }

    location ~ \.php$ {
                try_files $uri =404;
                fastcgi_split_path_info ^(.+\.php)(/.+)$;
                fastcgi_pass unix:/var/run/php5-fpm.sock;
                fastcgi_index index.php;
                include fastcgi_params;
    }
}
Notice that the document root should point to the subdirectory webroot inside XHGui’s main directory.
If you currently don’t have a subdomain you can use for this virtual host, you can use a dummy domain name and create an entry in your local /etc/hosts file pointing the server_name that you set to the server’s IP address. For more information on how to create Nginx virtual hosts, you can check our How to Set Up Nginx Server Blocks on Ubuntu 14.04 guide.
To enable the new virtual host, run:
- sudo ln -s /etc/nginx/sites-available/xhgui /etc/nginx/sites-enabled/xhgui
Now, restart Nginx to apply the changes:
- sudo service nginx restart
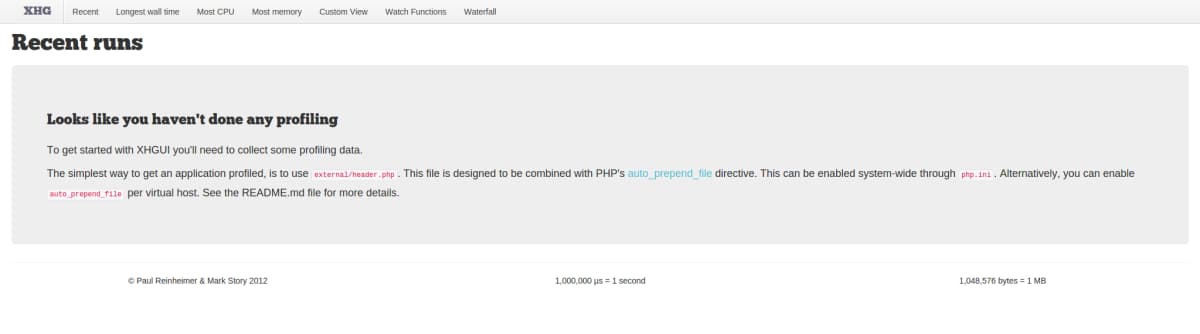
##Step 6 — Set Up XHProf At this point, you should be able to access XHGui’s interface from your browser by visiting the server name that you specified in your web server configuration. As we didn’t start collecting profiling data yet, you should see a page like this:
The XHProf extension is already installed on the server, but we still need to activate the profiling process for your application. This is typically done by including a PHP directive on your web server that automatically prepends a piece of code to all PHP scripts being executed. It’s important to point out that by default, XHProf will only profile 1 out of 100 requests made to the application.
XHGui provides a default PHP header that you can prepend to your scripts in order to initialize profiling for your application. If you followed along with all steps in this tutorial, the header file should be located at /var/www/xhgui/external/header.php.
The next sections will show you how to automatically prepend this header file to all your PHP scripts on both Apache and Nginx environments. For this example, we will enable profiling for a WordPress application that is hosted as the main website on this server.
Enabling Profiling on Apache
Let’s edit the Apache configuration file for the website that we want to profile. In this example, we will enable profiling for the main Apache website hosted on this server, defined at /etc/apache2/sites-available/000-default.conf. Open this file with your command line editor of choice:
- sudo nano /etc/apache2/sites-available/000-default.conf
Include the highlighted line inside the existing <VirtualHost> block:
<VirtualHost *:80>
  ...
  php_admin_value auto_prepend_file "/var/www/xhgui/external/header.php"
  ...
</VirtualHost>
Save the file and exit. Restart Apache to apply the changes:
- sudo service apache2 restart
Enabling Profiling on Nginx
Let’s edit the Nginx configuration file for the website that we want to profile. In this example, we will enable profiling for the default website hosted on this server, defined at /etc/nginx/sites-available/default. Open this file with your command line editor of choice:
- sudo nano /etc/nginx/sites-available/default
Now look for the block that defines how .php scripts are handled. Include the highlighted line inside this block:
 location ~ \.php$ {
   ...
   fastcgi_param PHP_VALUE "auto_prepend_file=/var/www/xhgui/external/header.php";
   ...
}
Save the file and exit. Restart Nginx to apply the changes:
- sudo service nginx restart
##Step 7 — Getting Started with XHGui
Everything is now properly set up, but dependending on the amount of views your website usually gets, it might take some time before the first profiling data shows up in XHGui. This is due to the fact that by default XHProf will only profile 1 out of 100 requests received. You might need to navigate through your website and reload it a few times before any profile data will be available.
###XHGui Overview
When profiling information is available, you should see a page like this:
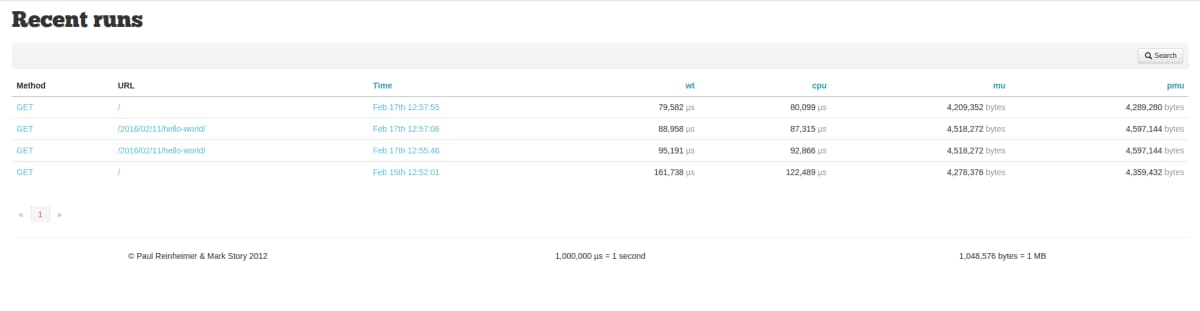
Below you can find a quick description of each field in this overview table:
- Method: The Method used in the analyzed request
- URL: The URL that was profiled
- Time: The time when this profiling data was collected
- wt (Wall Time): How long this request took to be completed
- cpu: The time spent by the CPU to perform this request
- mu (Memory Usage): Average memory used during this request
- pmu (Peak Memory Usage): Peak of memory usage during this request
To see the details of a profiling run, use the link in the time field. You should see a page like this:
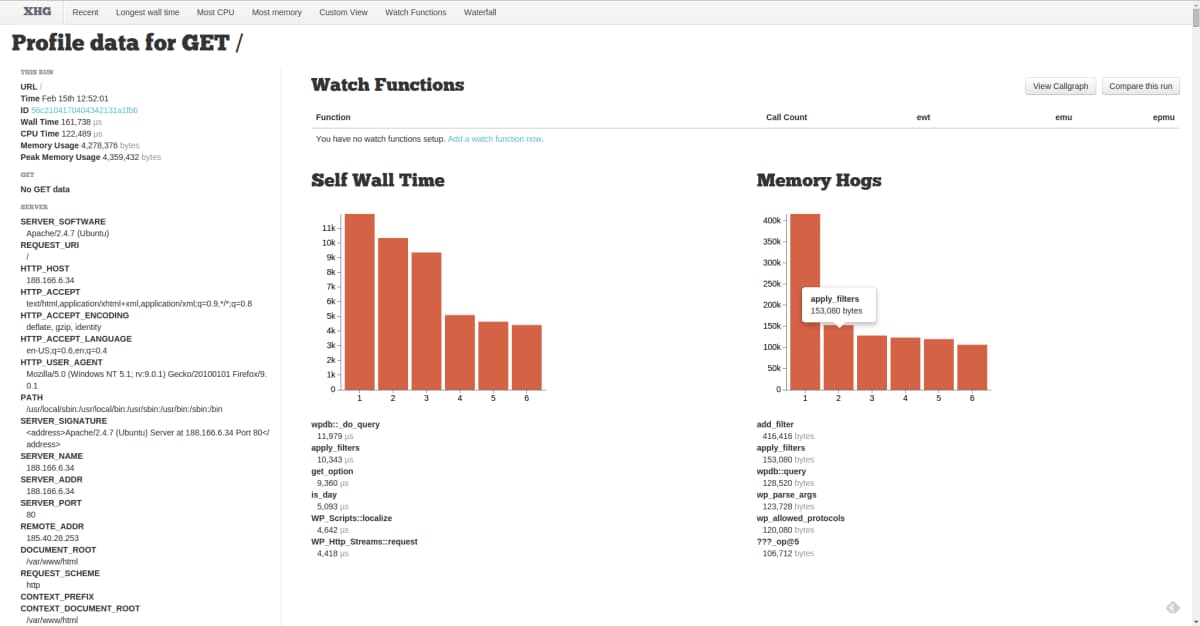
On the left side you can see information about the request that was analyzed, such as the method used, the script name and URL, request parameters, among other things. On the main page content, you can identify the functions or methods that took most time to be executed, as well as the functions or methods that had the higher memory consumption. All this information is related to a specific profiling run and request.
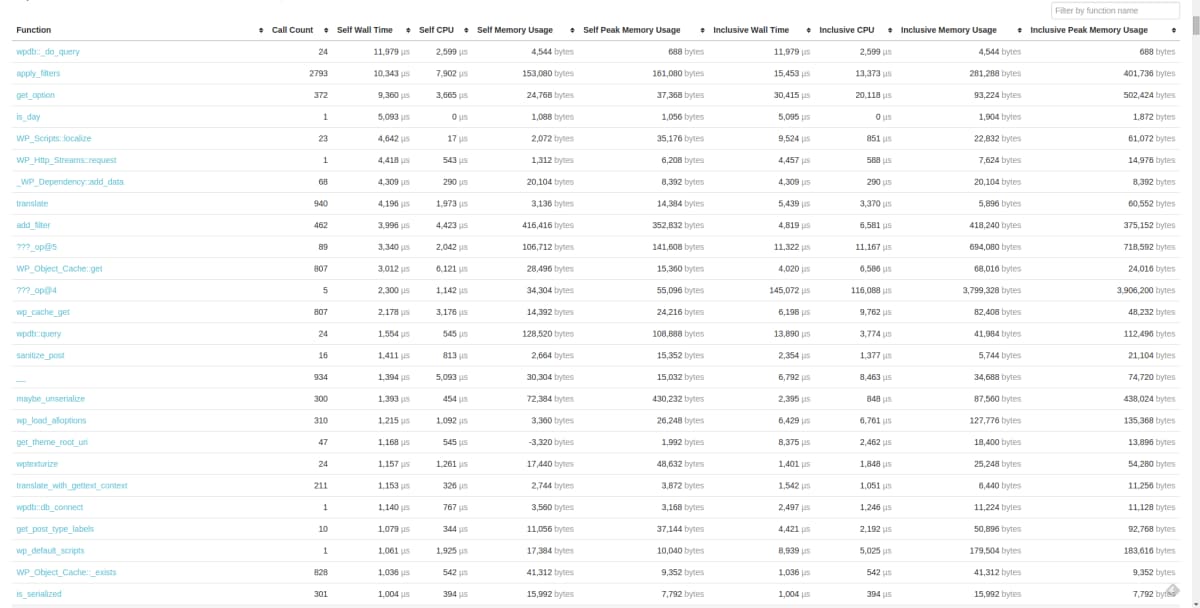
###Inspecting Function Calls
If you scroll down to the bottom of the page, you will have access to a table with detailed information about all function calls executed during this request, including how many times the function or method was executed, how long it took to run, how much memory it used, and many other interesting details. You can use the table header to order the listing by any of these parameters. You can also use the search box on the right to search for a specific function or method name.
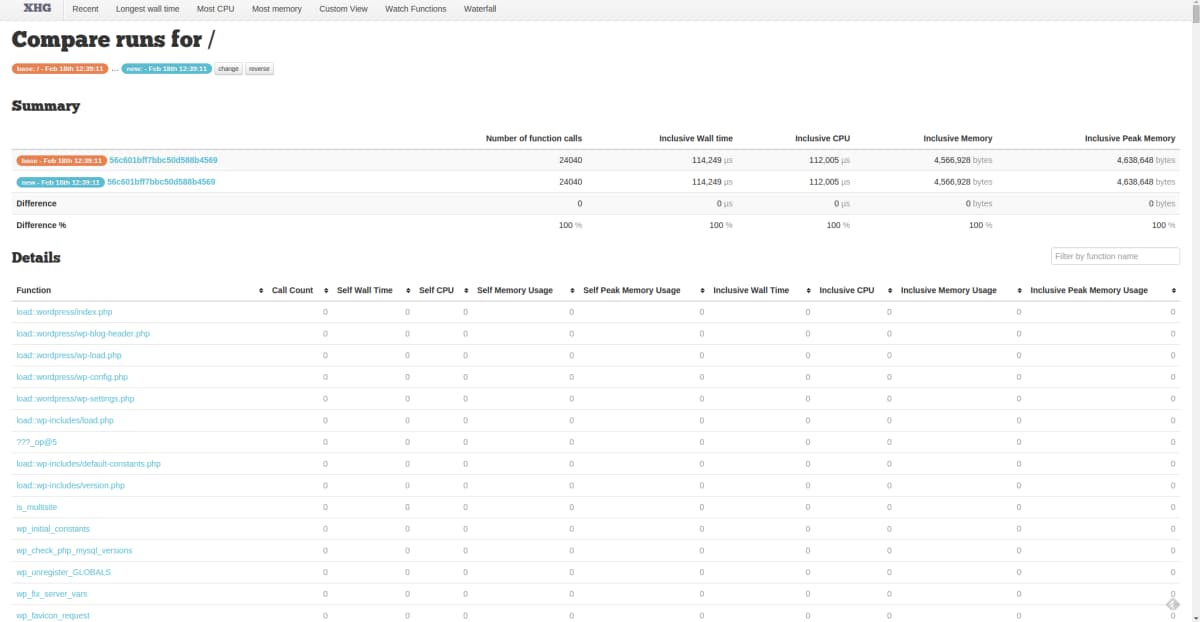
###Comparing Runs One of the most useful features of XHGui is the comparison tool that you can use to compare two different profiling runs. This gives you the ability to make changes to your code and compare multiple runs to see if your changes resulted in any performance gains to the application.
While looking at a set of profile data, to the right of the Watch Functions section, you can see a button named Compare This Run. Clicking on this button will show you a list of all profiling runs executed for that specific URL, where you can choose one of the items in the list to generate a comparison view. Just choose which run you want to compare to, and click on the Compare button.
This is how the comparison view looks like:
##Conclusion
Profiling is an important technique for software optimization, giving you detailed insights about your application at code level. With the help of tools like XHProf and XHGui you can effectively identify problematic portions of your code and monitor the impact of code changes in the application’s performance.
For more information about the configuration options available for XHGui, check the official Github repository.
Thanks for learning with the DigitalOcean Community. Check out our offerings for compute, storage, networking, and managed databases.
About the author
Dev/Ops passionate about open source, PHP, and Linux. Former Senior Technical Writer at DigitalOcean. Areas of expertise include LAMP Stack, Ubuntu, Debian 11, Linux, Ansible, and more.
Still looking for an answer?
This textbox defaults to using Markdown to format your answer.
You can type !ref in this text area to quickly search our full set of tutorials, documentation & marketplace offerings and insert the link!
php install.php will currently fail with
  Problem 1
    - alcaeus/mongo-php-adapter 1.0.0 requires mongodb/mongodb ^1.0.1 -> satisfiable by mongodb/mongodb[1.0.1, 1.0.2].
    - alcaeus/mongo-php-adapter 1.0.1 requires mongodb/mongodb ^1.0.1 -> satisfiable by mongodb/mongodb[1.0.1, 1.0.2].
    - alcaeus/mongo-php-adapter 1.0.2 requires mongodb/mongodb ^1.0.1 -> satisfiable by mongodb/mongodb[1.0.1, 1.0.2].
    - alcaeus/mongo-php-adapter 1.0.3 requires mongodb/mongodb ^1.0.1 -> satisfiable by mongodb/mongodb[1.0.1, 1.0.2].
    - mongodb/mongodb 1.0.2 requires ext-mongodb ^1.1.0 -> the requested PHP extension mongodb is missing from your system.
    - mongodb/mongodb 1.0.1 requires ext-mongodb ^1.1.0 -> the requested PHP extension mongodb is missing from your system.
    - Installation request for alcaeus/mongo-php-adapter ^1.0 -> satisfiable by alcaeus/mongo-php-adapter[1.0.0, 1.0.1, 1.0.2, 1.0.3].
It looks like the php extension mongo has been deprecated and the extension mongodb should be used instead.
Agreed with last comment. sudo pecl install mongodb instead of sudo pecl install mongo, and use mongodb in place of mongo in the remaining steps. That’s what worked for me, anyway.
404 not found error https://github.com/perftools/xhgui/issues/196
In Nginx conf:
location / { try_files $uri $uri/ /index.php?$uri&$args; } QUERY_STRING in $_SERVER : “/run/view&id=58a28dbf6602cf14fc1119f2”
Should be:
location / { try_files $uri $uri/ /index.php?$args; }
I had to tweak the Nginx server configuration as below to get xhgui to load:
   location / {
        try_files $uri $uri/ /index.php?$is_args$args;
    }

    location ~ \.php$ {
                try_files $uri /index.php =404;
                fastcgi_pass php-upstream;
                fastcgi_index index.php;
                fastcgi_param SCRIPT_FILENAME $document_root$fastcgi_script_name;
                include fastcgi_params;
    }
asssuming I have in the main Nginx config:
upstream php-upstream { server php-fpm:9000; }
php_admin_value auto_prepend_file “/var/www/xhgui/external/header.php”
Is no longer available in xhgui project. need to update the article please. thanks.
 This work is licensed under a Creative Commons Attribution-NonCommercial- ShareAlike 4.0 International License.
Become a contributor for community
Get paid to write technical tutorials and select a tech-focused charity to receive a matching donation.

DigitalOcean Documentation
Full documentation for every DigitalOcean product.

Resources for startups and AI-native businesses
The Wave has everything you need to know about building a business, from raising funding to marketing your product.
The developer cloud
Scale up as you grow — whether you're running one virtual machine or ten thousand.

Start building today
From GPU-powered inference and Kubernetes to managed databases and storage, get everything you need to build, scale, and deploy intelligent applications.
