By Sági-Kazár Márk

Status: Deprecated
This article covers a version of Ubuntu that is no longer supported. If you are currently operate a server running Ubuntu 12.04, we highly recommend upgrading or migrating to a supported version of Ubuntu:
- Upgrade to Ubuntu 14.04.
- Upgrade from Ubuntu 14.04 to Ubuntu 16.04
- Migrate the server data to a supported version
Reason: Ubuntu 12.04 reached end of life (EOL) on April 28, 2017 and no longer receives security patches or updates. This guide is no longer maintained.
See Instead:
This guide might still be useful as a reference, but may not work on other Ubuntu releases. If available, we strongly recommend using a guide written for the version of Ubuntu you are using. You can use the search functionality at the top of the page to find a more recent version.
Introduction
This tutorial will show you how to install Virtualmin/Webmin on an Ubuntu cloud server and how to setup a DNS Master and a DNS Slave server. The setup covers all required steps.
Please note that this setup is for the Ubuntu cloud server, however it could possibly work for other cloud server OS distress.
Overview
- Requirements
- Notes
- First steps
- Installing the primary server
- Installing the secondary server
- Configure Cluster and DNS
                    <li><a href="#configuring-webmin-server">Configuring Webmin Server</a></li>
		<li><a href="#configuring-secondary-dns">Configuring Secondary DNS</a></li>
		<li><a href="#master-ip">Setting the Master IP Address (optional)</a></li>
		<li><a href="#basic-setup">Basic setup of DNS server</a></li>
		<li><a href="#new-zone">Create new DNS zone</a></li>
	</ul>
</li>
<li><a href="#main-domain">Pointing the main domain to DigitalOcean's name servers</a></li>
<li><a href="#other-options">Other options</a></li>
Requirements
- Two Ubuntu 12.04 LTS (x32/x64) cloud servers
		<li><b>Primary server</b> (minimum: 1GB, 1CPU, 30SSD; optimal: up to your needs)</li>
		<li><b>Secondary server</b> (minimum: 512MB)</li>
	</ul>
</li>
<li><b>Domain name</b> - Set its name servers to DigitalOcean's name servers. (Maybe you can do this <i>after</i> server install because of the technical check.)</li>
Notes
Virtualmin is a powerful web hosting control panel. You can manage your virtual domains, mailboxes, and databases. It is based on Webmin, a powerful control panel, which you can manage your server with.
Important: You cannot manage your main domain's DNS as we use DigitalOcean's name servers, so you have to setup your DNS records on the DigitalOcean control panel. If you create a virtual server in Virtualmin, you HAVE TO disable DNS.
First Steps
Let's start. Create two droplets (cloud servers). For the first usage, I recommend the following configurations:
<li>Primary server
	<ul>
		<li>1GB RAM</li>
		<li>1 CPU</li>
		<li>Ubuntu 12.04 LTS x64</li>
		<li>server1.example.com</li>
		<li>198.199.103.8</li>
		<li>Virtualmin</li>
	</ul>
</li>
<li>Secondary server
	<ul>
		<li>512MB RAM</li>
		<li>1 CPU</li>
		<li>Ubuntu 12.04 LTS x64</li>
		<li>server2.example.com</li>
		<li>198.199.103.178</li>
		<li>Webmin</li>
	</ul>
</li>
If you don't know how to create cloud servers, please refer to this article.
Please note: Virtualmin only works with LTS versions. (For other OS, please check the compatibility here.)
In this tutorial I use the hostname server1.example.com with the IP address 198.199.103.8 and the hostname server2.example.com with the IP address 198.199.103.178. These settings might differ for you, so you have to replace them where appropriate.
Setting up domain DNS (optional)
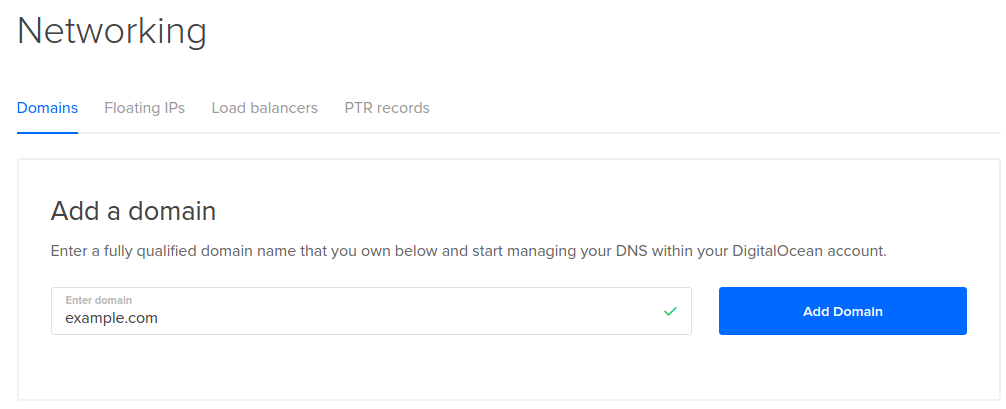
Now go to the Networking tab in the Control Panel. Enter your domain name (`example.com` in this example) in the Add a domain field:
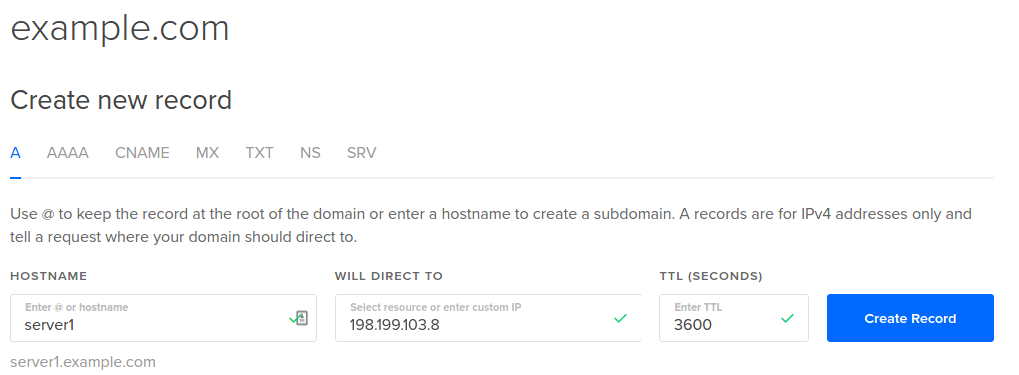
Click on the A record type. In the HOSTNAME field, enter "server1" and in the WILL DIRECT TO field, type 198.199.103.8 (our IP address in this example). Click the Create Record button when you are finished. Repeat this process again, using "server2" as the hostname the second time.
Optional: You can create Address records to have ns1.example.com and ns2.example.com keeping with the convention of naming name servers nsN.domain.tld.
You don't have to point the domain to DigitalOcean's name servers. You can use your provider's name servers for the main domain. This will be discussed later.
Other notes: This tutorial assumes that you are logged in with root user. If not, please get root permissions, because I omit the sudo:
sudo su
Installing the Primary Server
This server will be our primary DNS and Virtualmin server. The first step is to edit the hosts file:
nano /etc/hosts
Make it look like this:
127.0.0.1       localhost
198.199.103.8   server1.example.com        server1 ns1.example.com
198.199.103.178 server2.example.com        server2 ns2.example.com

# The following lines are desirable for IPv6 capable hosts
::1     ip6-localhost ip6-loopback
fe00::0 ip6-localnet
ff00::0 ip6-mcastprefix
ff02::1 ip6-allnodes
ff02::2 ip6-allrouters
Make sure your system has a fully-qualified domain name:
hostname -f
You should see server1.example.com
Now download the script and install Virtualmin:
wget http://software.virtualmin.com/gpl/scripts/install.sh
chmod +x install.sh
./install.sh
Answer 'y' for the asked question. There sould be no more questions. After the installation you can login here:
https://server1.example.com:10000
or
https://198.199.103.8:10000
Login with root. You will see a Post-Installation Wizard. For now just click next until you see this:
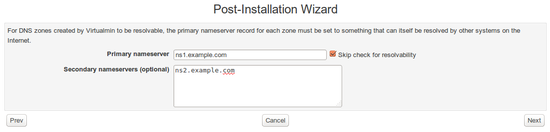
Make the settings look like the picture (You can also enter server1.example.com as primary, and server2.example.com as secondary DNS). If you confirmed that DNS has refreshed correctly, you can omit checking the checkbox.
Keep clicking next until the end of wizard.
Installing the Secondary Server
This server will be our secondary DNS and Webmin server
The first step is to edit the hosts file again:
nano /etc/hosts
Make it look like this:
127.0.0.1       localhost
198.199.103.178 server2.example.com        server2 ns2.example.com
198.199.103.8   server1.example.com        server1 ns1.example.com

# The following lines are desirable for IPv6 capable hosts
::1     ip6-localhost ip6-loopback
fe00::0 ip6-localnet
ff00::0 ip6-mcastprefix
ff02::1 ip6-allnodes
ff02::2 ip6-allrouters
Add the Webmin repositories to sources.list and install Webmin:
echo "deb http://download.webmin.com/download/repository sarge contrib" >> /etc/apt/sources.list.d/webmin.list
echo "deb http://webmin.mirror.somersettechsolutions.co.uk/repository sarge contrib" >> /etc/apt/sources.list.d/webmin.list
wget -O - http://www.webmin.com/jcameron-key.asc | apt-key add -
apt-get update
apt-get install -y webmin
Install BIND9 DNS server:
apt-get install bind9
After the installation you can login here:
https://server2.example.com:10000
or
https://198.199.103.178:10000
Configuring Cluster and DNS
Configuring Webmin Server
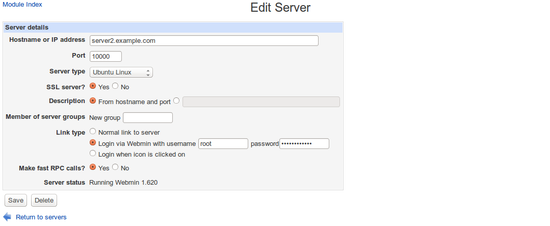
Go back to the Virtualmin server. Log in with root and go to the Webmin section. Browse Webmin>Webmin Servers Index.
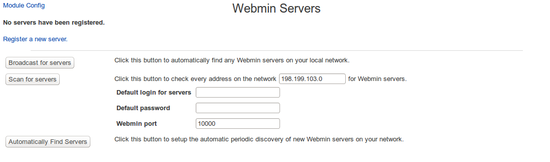
Click Register a new server.
Enter server2.example.com as the hostname of your slave server.
Select Ubuntu OS as OS type.
Select a Link type of Login via Webmin with username, and enter the authentication details for your root account.
Change Make fast RPC calls? to Yes.
Click Save.
Configuring Secondary DNS
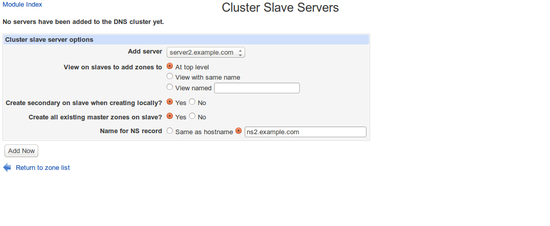
Now go to Servers>BIND DNS Server and click on Cluster Slave Servers.
In the Add server drop-down menu, select your slave server (if it's the only server you've added, you won't have to select it, as it will already be selected).
Set the Create secondary on slave when creating locally? option to Yes.
If you have already created any domains on your Virtualmin server, set the Create all existing master zones on slave? option to Yes.
If you entered ns2.example.com in the Post-Installation Wizard as secondary name server, then change the Name for NS record option to textbox and enter it.
Click Add server and return to the Module Index.
Click Apply Configuration in the right corner.
Setting the Master IP Address (optional)
By default, Virtualmin will use the IP address that the master server's hostname resolves to as the IP that the slaves should contact to transfer records. However, on some systems this IP is 127.0.0.1, which will not work. If you edited the hosts file at the beginning of the tutorial this should not be a problem, but I'll show you how to solve this.
Go to Servers>BIND DNS Server, and click on Module Config.
In the Cluster slave servers section, find the Default master server IP for remote slave zones field.
Enter the IP address of your master server.
Click Save. Any DNS zones created from now on will use that IP.
Click Apply Configuration in the right corner.
Please note: that it won't update existing DNS zones.

Basic Setup of DNS server
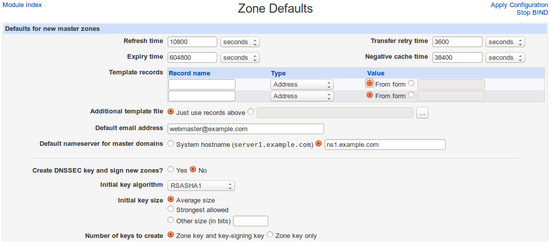
There are some more options that you should check. Go to Servers>BIND DNS Server and click on Zone defaults
Set the Default email address to an existing email address (Some technical check requires to set an existing email address).
Set Default nameserver for master domains to ns1.example.com (optional).
Click Apply Configuration in the right corner.
Create new DNS zone
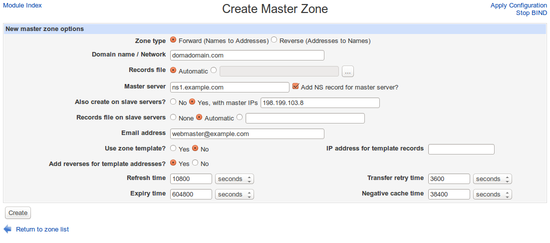
Now it's time to test our settings. Click on Create master Zone. Enter your domain name.
Check your settings (By default, the IP address for address records will be the primary server's IP address).
Click Create.
Check your master zone on primary and slave zone on the secondary server.
Pointing the Main Domain to DigitalOcean's Name Servers
The most common problem is that in some cases there is a technical check which requires an email address. That email address is set in the DNS zone file, which is hostmaster@domain.tld, postmaster@domain.tld, etc. by default. Some domain providers let you edit this email address, but most of them do not.
You can solve this problem by pointing the domain to DigitalOcean's name servers. Of course you can't do that immediately. After completing this tutorial you have to create a virtual domain in postfix module and create an alias for hostmaster@domain.tld or you can create a virtual server in Virtualmin for domain example.com, which will create these aliases for you, but remember to disable DNS zone.
Other Options
If you want only DNS management, you can install two Webmin instances instead of Virtualmin and Webmin, but this way you have to create DNS records manually. It is the same as Webmin installation above, but you have to do it twice. From Configure Cluster and DNS the steps are the same.
You can use your secondary DNS server for more than one Virtualmin server. In this case the primary DNS server is the virtualmin server, the secondary is the webmin server. This means that you have several Virtualmin servers which are primary DNS servers and you have only one secondary server.
You can use two Virtualmin server as DNS servers. In this case each virtualmin server wil conatin the master zone for the domains added to them. This means that if you create a virtual server in virtualmin1, then virtualmin1 will be the primary DNS server for that domain.
All done!
You have successfully finished this tutorial.
Thanks for learning with the DigitalOcean Community. Check out our offerings for compute, storage, networking, and managed databases.
About the author
Still looking for an answer?
This textbox defaults to using Markdown to format your answer.
You can type !ref in this text area to quickly search our full set of tutorials, documentation & marketplace offerings and insert the link!
I have a question about setting up dns:
“You have to create Address records to have server1.example.com and server2.example.com as your server hostnames. Click on Show in the DNS section next to your domain. Click on Add a new A record and enter server1 in the Name field and 198.199.103.8 in the IP address field. Do this for server2 as well.”
Hostname: server1.example.com IP-address server1 Hostname: server2.example.com IP-address server2
Im not sure if I should use the IP-address of server1 or server2 for server2.example.com
One last question, do I need to set up A records for server1.example.com & server2.example.com at my domain registrar or not? At the moment I have added the A records at Digital Ocean’s zone management and at my domain registrar I assigned the name servers ns1.digitalocean.com, ns2.digitalocean.com, ns3.digitalocean.com.
@NiVanc: Why are you configuring DNS on your virtualmin setup if you’re not going to use it for serving your DNS zone files?
You only have to set up A records on the DNS nameservers that you are going to use.
@thedarkangel771: It should work externally as long as you do not have a firewall blocking connections to port 53.
I have a question…
I have added a new master zone on primary dns. When i checked on the slave dns, the zone is there, but when i click on the edit record, it is not transferred.
The master zone from the primary dns successfully replicated on secondary. But the secondary dns seems not to have transferred its records…
Any ideas?
Hi There,
i am trying to forward all my domains to my marketplace site hosted with DO . Right now i have to manually forward each domain by url redirect or url forwarding to my marketplace.
What i want is to basically forward my domains by simply changing the nameserver, i don’t want to do url redirect or url forwarding or domain alias for each domain.
for example if you go to rackcargo.com
it redirects to for sale page https://www.domainmarket.com/buynow/rackcargo.com
basically they only update the name server and domain is automatically transferred to the right page on the main website.
please kindly let me know if this tutorial above is similar to what i am looking.
Any help is greatly apprecaited. Willing to pay for this solution.
thank you
Hi, i have read and applied to all things. DNS is now good working, i have a question, how can i work cluster with my 2 webmin server? i could do only DNS but i need also virtualmin and domain synchronization. i want to see my domains same time with files /sql. is it possible? Thank you.
 This work is licensed under a Creative Commons Attribution-NonCommercial- ShareAlike 4.0 International License.
Become a contributor for community
Get paid to write technical tutorials and select a tech-focused charity to receive a matching donation.

DigitalOcean Documentation
Full documentation for every DigitalOcean product.

Resources for startups and AI-native businesses
The Wave has everything you need to know about building a business, from raising funding to marketing your product.
The developer cloud
Scale up as you grow — whether you're running one virtual machine or ten thousand.

Start building today
From GPU-powered inference and Kubernetes to managed databases and storage, get everything you need to build, scale, and deploy intelligent applications.
