Sr Technical Content Strategist and Team Lead

Introduction
Nginx is a powerful proxy and web server utilized by some of the largest sites to handle client connections and serve content. While most users are familiar with the basic features of Nginx, there are other capabilities that might not be readily apparent in typical usage.
In this guide, we will explore a set of features that can aid in testing new content and gathering statistics about your users. These can be extremely useful for content development purposes, to do simple A/B testing, and to know the behavior of different groups of users who frequent your sites. Nginx has the ability to easily incorporate these functions into the web server itself.
Simple A/B Testing with the Split Clients Module
We will start off by showing you how to configure some basic A/B testing through Nginx itself. We can do this with a standard HTTP module called http_split_clients. Unless explicitly disabled during a custom compilation, this should be available in any standard Nginx installation.
The module provides a single directive called, unsurprisingly, split_clients which splits connection requests into two or more categories based on the configured requirements. This directive is defined in the http context, outside of any server blocks. It designates value to check for in each connection and creates a variable in which to store the results.
The basic syntax of the directive looks something like this:
http {

    . . .

    split_clients "variable_to_evaluate" $new_variable {
        percent_group%        value_to_store;
        percent_group%        value_to_store;
    }

}
The directive works by interpolating the value of the first variable passed in and hashing the result. The same value will always produce the same hash, allowing for consistent results. The variable being checked must produce a string when evaluated.
The lines within the split_clients block represent various “buckets” or alternatives which are defined by the percentage that they should consume of the available hash space. This creates hash “ranges” which match a certain number of hashes determined by the provided percentage. Each of these define a value that should be set when the hash is within that bucket’s range. The second variable given during the split_clients definition is set to this value.
This is much simpler to understand when considering an example. Take a look at the following block:
split_clients "${remote_addr}" $designtest {
    10%         ".first";
    10%         ".second";
    *           "";
}
In the example above, we are evaluating the connection’s value for $remote_addr, which is set by Nginx to the client’s IP address. The value of the client’s IP address is hashed using the murmurhash2 hashing algorithm. At this point, Nginx checks which range of hashes the calculated hash falls within. Since the murmurhash2 implementation that Nginx employs uses 32-bits, the hashes will be between 0 to 4294967295 (the highest 32-bit number).
Since the first group defined specifies 10% of the total hashes, this will match from 0 to 429496729, which is the first tenth of the available range. Values that produce a hash within this range will set the $designtest variable to the value of “.first”.
IP addresses with hashes from roughly 429496730 to 858993459, the hash range represented by the next 10% of available hashes, will match the second line. In these cases, the $designtest variable will be set to “.second”.
For all other IP address hashes, (roughly from 858993460 to 4294967295), the $designtest variable will be set to an empty string.
How To Implement this on a Server
This basically allows us to randomly map a certain percentage of connections to different variable values. Once this is done, we can use that variable to serve different content.
For instance, we could add a server and location block that serves different content depending on the value of the $designtest variable. The example below utilizes this variable to decide which index file to serve:
http {

    . . .

    split_clients "${remote_addr}" $designtest {
        10%     ".first";
        10%     ".second";
        *       "";
    }

    server {
        listen 80;
        server_name localhost;
        root /usr/share/nginx/html;

        index index${designtest}.html;

        location / {
            try_files $uri $uri/ =404;
        }
    }
}
For IP addresses with hashes that fall into the first group, Nginx will try to serve a file called index.first.html. Likewise, for IP addresses that fall into the second group, Nginx will look for a file called index.second.html. If the IP address is in the third group, the $designtest variable will be set to an empty string, so a conventional index.html file will be served.
Now, if we create the three index files in our document root, these will be served to different users depending on the resulting hash of their IP address:
echo "<h1>First Site</h1>" | sudo tee /usr/share/nginx/html/index.first.html
echo "<h1>Second Site</h1>" | sudo tee /usr/share/nginx/html/index.second.html
echo "<h1>Default Site</h1>" | sudo tee /usr/share/nginx/html/index.html
If you make the above changes to your Nginx configuration and restart the web server, you can test this out. We can check that our config file does not have syntax errors and then restart the service by typing:
sudo nginx -t
sudo service nginx restart
If we visit the site in our browser, we will see one of the three files above. Likely, it will be the last one since it will be served to 80% of site visitors. If you wish to see how it will display for other users, you can visit the site through a proxy server or using some web tools.
For instance, the GeoPeeker site can be used to view your site from various locations throughout the world. If you type in your domain name, you may see at least one of your alternative sites being shown:

Another similar site is LocaBrowser, which allows you to select from various countries. Keep in mind that the division of pages being served is not based on geolocation, but on the hash of the IP address, so it does not mean that all visitors from one country will be served the same file.
While the above example is a simple one, the concept can be expanded quite a lot. You can use the variables set by the split_clients directive to set cookies and user IDs, pass headers to backend proxies, etc. If you would like to A/B test more completely, you may wish to use the variable you set to determine the document root being served to different parties.
It’s also important to remember that the ${remote_addr} check is just a useful example. You can hash based on the value of any of Nginx’s variables that works in strings. You can find a list of those included with the Core module Core module variables, although other variables are available through other modules. Check the documentation for more information.
Setting Tracking Pixels with the empty_gif Directive
One way that administrators try to account for the users who visit their site is through tracking pixels. Tracking pixels are a benign way for administrators to gather data about which IP addresses are visiting which pages at what time through simple logging.
The way a traditional tracking pixel works is by embedding a tiny transparent image on the page. When a user visits the site, the image is requested as part of the process to load the page. The administrator can put these requests into a separate log, along with the IP address where the request came from, what page the client was loading when making the request, etc. This type of information can be the basis for data analysis regarding visitors’ actions on your website.
The empty_gif module provides this functionality within Nginx. While any request can be used for tracking, the empty_gif directive allows you to serve a tiny transparent .gif file that exists in memory, avoiding disk access. This will speed up requests for this resource. The directive is valid in any location context.
Most often, this directive is used in conjunction with a separate log directive to separate the requests for later analysis. For instance, your configuration could have a section that looks like this:
. . .

http {

    log_format tracking '[$time_local] : $remote_addr : $remote_user : '
                        '$args : $http_referer : $http_user_agent';

    server {

        . . .


        location = /logme.gif {
            empty_gif;
            access_log /var/log/nginx/tracking.log tracking;
            expires epoch;
        }
    }
}
Here, we set up a log_format in the http context to record the information we wish to keep track of. This can be whatever you’d like.
Afterwards, we can set up a location block to match a specific .gif request. We are using the = modifier so that any requests for the .gif will be matched quickly and efficiently without searching for better matches elsewhere. You can choose any .gif name you would like.
Inside, we use the empty_gif directive to serve the transparent 1x1 pixel .gif from memory. We tell requests for this location to log to a separate file using the format we specified earlier. Finally, we set the expire to “epoch”, which should inform browsers not to cache the .gif, allowing us to track each time the visitor hits the page.
Now, we can add an image requesting the image we selected to our pages. For instance, an extremely simple page could look like this:
<html>
    <head>
        <title>Your Site</title>
    </head>
    <body>
        <h1>Normal Content</h1>
        <img src="/logme.gif">
    </body>
</html>
When a visitor hits this page, the /logme.gif image will be requested, causing Nginx to write to our tracking.log file with details about the request. This can be built out to a more sophisticated system by tweaking your log_format and parsing your logs using text processing tools.
Differentiating Content Based on Geography
Earlier, we showed you how to configure Nginx to automatically divide users into groups for the purpose of A/B testing with the split_clients module. Nginx can also divide users into groups automatically based on the location of their IP address.
IP addresses are mapped to approximate locations using a set of tables that certain providers compile. They receive this information primarily from numerous registries that are responsible for allocating IP space in different geographic areas. The information that can be gleaned from someone’s IP address is an approximation only and should be used as a “best guess” as opposed to a highly accurate method of pinpointing the origin of traffic.
Acquiring the Location Databases
Nginx can use this data to separate clients using various directives included in the ngx_http_geoip_module module. The databases of IP address to location mappings are not included though, so you will have to acquire those separately.
On Ubuntu, you can get the country-level mappings by typing:
sudo apt-get update
sudo apt-get install geoip-database
A more generic way of getting the country-level mappings is by downloading the files with wget. We can create a directory to store the database and then download the file by typing:
sudo mkdir -p /usr/local/share/GeoIP
cd /usr/local/share/GeoIP
sudo wget http://geolite.maxmind.com/download/geoip/database/GeoLiteCountry/GeoIP.dat.gz
We need to unzip the file by typing:
sudo gunzip GeoIP.dat.gz
For the more specific city-level database, you can download with wget as well:
sudo mkdir -p /usr/local/share/GeoIP
cd /usr/local/share/GeoIP
sudo wget http://geolite.maxmind.com/download/geoip/database/GeoLiteCity.dat.gz
Again, we’ll need to unzip the files:
sudo gunzip GeoLiteCity.dat.gz
Configuring Nginx to Use Location Data
After we have the location databases in place, we can configure Nginx to take advantage of the data.
We can tell Nginx where to find each of the databases on disk by setting the following directives. These must be set in the http context in the Nginx configuration file:
. . .

http {
    # If you downloaded the country-level data using `apt-get` uncomment and use:
    #geoip_country /usr/share/GeoIP/GeoIP.dat;
    # If you downloaded the country-level data using `wget`, use:
    geoip_country /usr/local/share/GeoIP/GeoIP.dat;
    geoip_city /usr/local/share/GeoIP/GeoLiteCity.dat;

    . . .
}
Once the location has been set, you can take advantage of the variables that Nginx uses for each of these databases. The country-level database gives us access to the following variables:
$geoip_country_code: The two-letter country code used to represent a country. For example, “US” for the United States, or “RU” for Russia. These can be found ISO 3166-1 alpha-2.$geoip_country_code3: Almost the same as the above, but using the three-letter variant. For example, “USA” or “RUS”.$geoip_country_name: The name mapped to the country code as shown in the linked list. For example “New Zealand” for “NZ”.
The city-level database provides us with a larger number of variables. With that database, we have access to:
$geoip_area_code: A legacy area code field for US telephone numbers. This should not be relied on for accurate data.$geoip_city_continent_code: A two-letter continent code.$geoip_city_country_code: The same two-letter country code provided by the country-level database.$geoip_city_country_code3: The same three-letter country code provided by the country-level database.$geoip_city_country_name: The same country name as provided by the country-level database.$geoip_dma_code: The DMA region or metro code for US locations. This can be found in Google’s AdWords API, found Google AdWords API - Cities & DMA Regions.$geoip_latitude: An estimate of the latitude of the originating IP.$geoip_longitude: An estimate of the longitude of the originating IP.$geoip_region: A two-character region code used to represent a political region, such as a territory, state, province, etc.$geoip_region_name: The full name associated with the above region code.$geoip_city: The city name associated with the originating IP.$geoip_postal_code: The postal code of the area where the IP is located.
Again, it is important to emphasize that the data available through these variables is on a best-guess basis. Even so, this provides us with some great opportunities to serve different content to different areas.
Often we will use one of the variables above with the map directive to set the value of another variable conditionally. This lets us create a variable with a value determined by what the database tells us about the client’s location.
The map directive should also be used in the http context. For instance, we can configure our site to show different content if the visitor is from Australia or Singapore. The best way to check this is probably through one of the two or three-letter country codes found in either the country or city databases.
We’ll use the $geoip_country_code for this example. The value of that variable will determine what we store in the $site_version variable we are creating. We will be using this to determine the document root from which to serve:
http {
    # If you downloaded the country-level data using `apt-get` uncomment and use:
    #geoip_country /usr/share/GeoIP/GeoIP.dat;
    # If you downloaded the country-level data using `wget`, use:
    geoip_country /usr/local/share/GeoIP/GeoIP.dat;
    geoip_city    /usr/local/share/GeoIP/GeoLiteCity.dat;

    map $geoip_country_code $site_version {
        default     "";
        AU          "/australia";
        SG          "/singapore";
    }

    . . .
}
This sets the value of $site_version, a variable we are creating specifically for this purpose. If the visitor’s country code indicates that they are from Australia (AU), we will set $site_version to “/australia”. If the visitor is from Singapore (“SG”), we will set $site_version to “/singapore”. If their country code indicates any other value, we will set the $site_version to an empty string.
This allows us to modify the document root for our visitors from specific countries. This is an arbitrary choice to demonstrate one way that you can differentiate content based on the client’s geo-location data.
To modify the document root, we would just need to set the root directive within the server block to be something like this:
http {
    # If you downloaded the country-level data using `apt-get` uncomment and use:
    #geoip_country /usr/share/GeoIP/GeoIP.dat;
    # If you downloaded the country-level data using `wget`, use:
    geoip_country /usr/local/share/GeoIP/GeoIP.dat;
    geoip_city    /usr/local/share/GeoIP/GeoLiteCity.dat;

    map $geoip_country_code $site_version {
        default     "";
        AU          "/australia";
        SG          "/singapore";
    }

    . . .

    server {
        . . .

        root /usr/share/nginx/html${site_version};

        . . .

    }
}
If the user is from Australia, the document root for serving requests will be changed to /usr/share/nginx/html/australia. Likewise, for visitors from Singapore, the content will be served from /usr/share/nginx/html/singapore. For other visitors, the $site_version variable was set to an empty string, so they will continue to receive content out of /usr/share/nginx/html.
We can set up the default /usr/share/nginx/html document root to test this easily. Start by moving to that location:
cd /usr/share/nginx/html
Next, we can create the directories we mentioned and insert some very basic content into an index.html file within each of the new directories. This will allow us to see whether our location is impacting the content we are served:
sudo mkdir australia && echo "<h1>australia</h1>" | sudo tee australia/index.html
sudo mkdir singapore && echo "<h1>singapore</h1>" | sudo tee singapore/index.html
After this is all set up, we can test our configuration and reload Nginx:
sudo nginx -t
sudo service nginx restart
Now, we can take advantage of the GeoPeeker site again to see if we are served different content from different locations. Both Australia and Singapore are options that the site allows you to check.
Here, you can see the default page for a visitor coming from the United States or Ireland, and the test text we added for people visiting from Australia or Singapore:
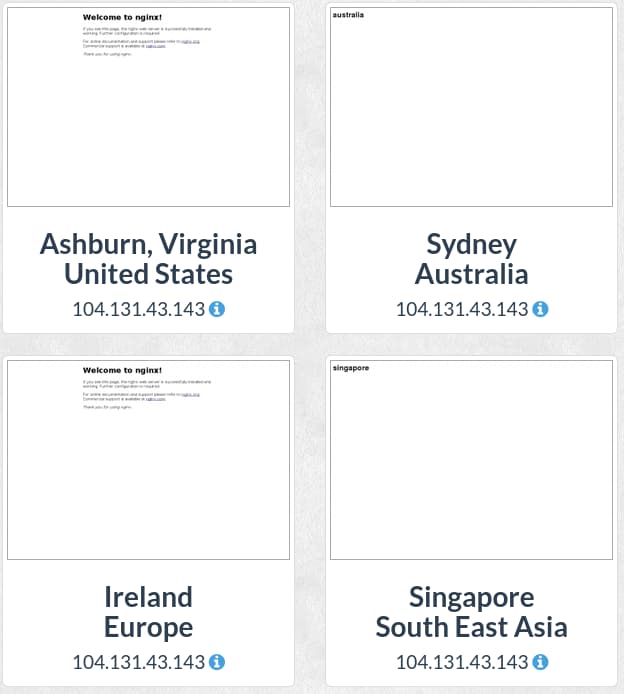
This validates that Nginx is correctly selecting the content to serve by checking the client’s IP address against the location database.
Conclusion
By taking advantage of these strategies and capabilities, you can begin to gather analytics to help you make more informed decisions about your site content. While there are certainly many external tools available for capturing this type of data, having the option to use Nginx-native tools can be a good choice before investing the time in other solutions.
Thanks for learning with the DigitalOcean Community. Check out our offerings for compute, storage, networking, and managed databases.
About the author
Anish is a Sr Technical Content Strategist and Team Lead at DigitalOcean with 7+ years of experience as an DevOps SRE at Nutanix and Cloud consultant at AMEX, and technical writing at DOCN, and shipping deep infra and AI inference tutorials that help developers deploy production‑ready applications on DigitalOcean.
Still looking for an answer?
This textbox defaults to using Markdown to format your answer.
You can type !ref in this text area to quickly search our full set of tutorials, documentation & marketplace offerings and insert the link!
Excelente tutorial, no lo entendí a la perfección por la limitación de mi idioma, pero me dio muy buenas grandes bases para lograr el efecto que se trata de realizar.
Gracias
Got here while researching A/B (Green/Blue) deployments (huge DO fan/customer).
I can see how the example covered in the “Simple A/B Testing with the Split Clients Module” section of this article can be applied, especially using ngx_http_core_module variables. Thank you Justin for the excellent tutorial.
 This work is licensed under a Creative Commons Attribution-NonCommercial- ShareAlike 4.0 International License.
Become a contributor for community
Get paid to write technical tutorials and select a tech-focused charity to receive a matching donation.

DigitalOcean Documentation
Full documentation for every DigitalOcean product.

Resources for startups and AI-native businesses
The Wave has everything you need to know about building a business, from raising funding to marketing your product.
The developer cloud
Scale up as you grow — whether you're running one virtual machine or ten thousand.

Start building today
From GPU-powered inference and Kubernetes to managed databases and storage, get everything you need to build, scale, and deploy intelligent applications.
