
Introduction
In this tutorial, we will teach you how to use HAProxy as a layer 4 load balancer for your WordPress servers–specifically the web application tier. Load balancing the application servers adds redundancy to your setup, which increases reliability in case of server failures or networking issues, and spreads the load across multiple servers for increased read performance. We are assuming that your setup includes a WordPress application server that connects to a separate MySQL database server (see the prerequisites for a tutorial on how to set that up).
Layer 4 load balancing is suitable for your site if you are only running a single web server application. If your environment is more complex (e.g. you want to run WordPress and a static web server on separate servers, with a single entry point), you will need to look into Application Layer (Layer 7) load balancing.
This tutorial is written with WordPress as the example, but its general concepts can be used to load balance other, stateless web applications.
Prerequisites
Before continuing with this tutorial, you should have completed the tutorial on setting up a WordPress site with a separate database server (or have a similar setup): How To Set Up a Remote Database to Optimize Site Performance with MySQL
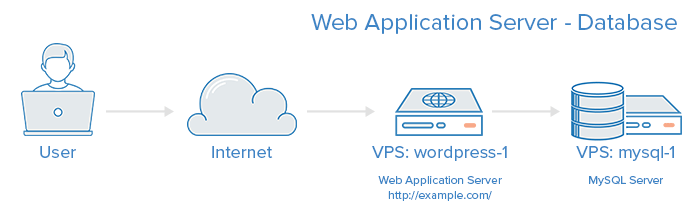
After following that tutorial to set up WordPress on separate web application and database servers, you should have two VPSs. Because we will be dealing with several VPSs, for reference purposes, we will call your two existing VPSs the following:
- wordpress-1: Your WordPress web application server
- mysql-1: Your MySQL server for WordPress
An abstract view of your environment currently looks something like this:
In addition to your current environment, we will require two additional VPSs during this tutorial. We will call them:
- wordpress-2: Your second WordPress web application server
- haproxy-www: Your HAProxy server, for load balancing
If you are unfamiliar with basic load-balancing concepts or terminology, like layer 4 load balancing or backends or ACLs, here is an article that explains the basics: An Introduction to HAProxy and Load Balancing Concepts.
Our Goal
By the end of this tutorial, we want to have an environment that looks like this:
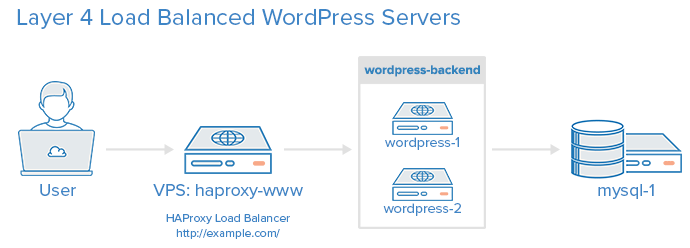
That is, your users will access your WordPress site by going to your HAProxy Server, which will forward them to your load balanced WordPress Application Servers in a round-robin fashion. Your two (or more, if you wish) will both access your MySQL database.
Snapshot Your Current Environment
Optional: Before continuing with this tutorial, you will want to create snapshots of your current environment. Snapshotting serves two purposes in this tutorial:
- To revert to a working environment if a mistake is made
- To do a one-time replication of the original server, eliminating the need to install and configure PHP and Nginx again
Note: Beginning in October 2016, snapshots cost $0.05 per gigabyte per month, based on the amount of utilized space within the filesystem.
Take a snapshot of your wordpress-1 and mysql-1 VPSs.
Now that we have snapshots, we are ready to move on to building out the rest of our environment.
Create Your Second Web Application Server
Now we need to create a second VPS that will share the load with our original web application server. There are two options for this:
- Create a new VPS from the snapshot you took of the original VPS, wordpress-1
- Create a new VPS from scratch and manually set it up with the same software and configuration as wordpress-1
With either method, be sure to select the Private Networking option if it’s available. Private networking is recommended for all of the VPSs used in this tutorial.
If you do not have a private networking option, substitute the private IP addresses with your VPSs public IP addresses. Note that using public IP addresses when you are transmitting sensitive data, such as unencrypted database passwords between your application and database servers, is not good practice because that information will travel over the public internet.
Option 1: Create New VPS With Snapshot
Create a new VPS called wordpress-2, using the snapshot you took of wordpress-1.
If you opted for this method, skip over “Option 2” to the “Synchronize Web Application Files” section.
Option 2: Create New VPS From Scratch
This is an alternative to “Option 1.”
If you want to set up the wordpress-2 server from scratch, instead of using a snapshot of wordpress-1, make sure that you install the same software. Refer to the Set Up the Web Server section of the prerequisite document if you don’t remember how you installed and configured your original WordPress server.
For a quick reference, here is a list of the pertinent software and configuration files that you will need to install or replicate:
Software:
- MySQL Client
- Nginx
- PHP
To install this software, run the following on your wordpress-2 server:
sudo apt-get update
sudo apt-get install mysql-client
sudo apt-get install nginx php5-fpm php5-mysql
Configuration Files that need to be edited or created to match your original application server:
- /etc/php5/fpm/php.ini
- /etc/php5/fpm/pool.d/www.conf
- /etc/nginx/sites-available/example.com
- /etc/nginx/sites-enabled/example.com
Don’t forget to restart PHP and Nginx once you are done configuring the software, with these commands:
sudo service php5-fpm restart
sudo service nginx restart
After you are done installing and configuring your new application server, we will need to synchronize the WordPress application files.
Synchronize Web Application Files
Before the application can be load balanced, we need to ensure that the new server’s web application files are synchronized with your original WordPress server. The location of these files is dependent on where you installed WordPress, and a few other files. In addition to the php files that WordPress needs to run, files uploaded and plugins installed through the WordPress interface need to be synchronized as they are uploaded or installed. In the prerequisite document, we installed WordPress in /var/www/example.com–we will use this location for all of our examples, but you need to substitute this with your actual WordPress install path.
There are a several ways to synchronize files between servers–NFS or glusterFS are both suitable options. We will use glusterFS to fulfill our synchronization needs because it allows each application server to store its own copy of the application files, while maintaining consistency across the file system. Here is a conceptual diagram of our target shared storage:
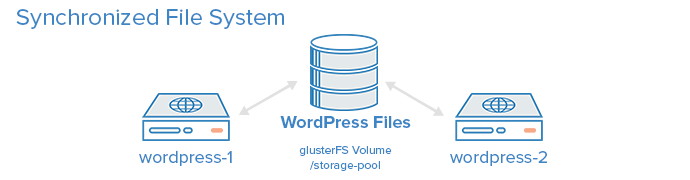
If you are unfamiliar with any of the glusterFS terminology that is used in this section please refer to this GlusterFS Tutorial, on which this section is based on.
Note: The following subsections jump between wordpress-1 and wordpress-2 servers frequently. Be sure to run the commands on the proper servers, or you will run into problems!
Edit Hosts File
Note: If you have an internal DNS, and it has records for the private IP addresses of your VPSs, feel free to skip this step and substitute those host names for the rest of the glusterFS setup commands and configuration.
Otherwise, on wordpress-1 and wordpress-2 VPSs:
Edit /etc/hosts:
sudo vi /etc/hosts
Add the following two lines, substituting the highlighted words with your application servers’ IP respective IP addresses:
<pre> <span class=“highlight”>wordpress_1_private_IP</span> wordpress-1 <span class=“highlight”>wordpress_2_private_IP</span> wordpress-2 </pre>
Save and quit.
Install GlusterFS and Configure a Replicated Volume
On wordpress-1 and wordpress-2 VPSs:
Use apt-get to install the glusterFS server software:
sudo apt-get install glusterfs-server
On wordpress-1, run the following command to peer with your wordpress-2:
sudo gluster peer probe wordpress-2
On wordpress-2, run the following command to peer with wordpress-1:
sudo gluster peer probe wordpress-1
On wordpress-1 and wordpress-2, to create the location where glusterFS will store the files it manages, run:
sudo mkdir /gluster-storage
On wordpress-1, to create a replicating glusterFS volume called volume1, which will store its data in /gluster-storage on both of your application servers, run:
<pre> sudo gluster volume create <span class=“highlight”>volume1</span> replica 2 transport tcp wordpress-1:<span class=“highlight”>/gluster-storage</span> wordpress-2:<span class=“highlight”>/gluster-storage</span> force </pre> <pre> Expected Output: volume create: volume1: success: please start the volume to access data </pre>
On wordpress-1 again, run the following command to start the glusterFS volume that you just created, volume1:
<pre> sudo gluster volume start <span class=“highlight”>volume1</span> </pre> <pre> Expected Output: volume start: volume1: success </pre>
On wordpress-1, if you want to see information about the glusterFS volume you just created and started, run:
sudo gluster volume info
You should see that you have two glusterFS “bricks”, one for each WordPress server.
Now that we have a glusterFS volume running, let’s mount it so we can use it as a replicating filesystem.
Mount Shared Storage
Let’s mount the filesystem on wordpress-1 first.
On wordpress-1, edit fstab so our shared file system will mount on boot:
sudo vi /etc/fstab
Add the following line to the end of the file to use /storage-pool as our mount point. Feel free to substitute this (here and for the rest of this glusterFS setup):
<pre> wordpress-1:<span class=“highlight”>/volume1</span> <span class=“highlight”>/storage-pool</span> glusterfs defaults,_netdev 0 0 </pre>
Save and Quit.
On wordpress-1, you are now able to mount the glusterFS volume to the /storage_pool filesystem:
<pre> sudo mkdir <span class=“highlight”>/storage-pool</span> sudo mount <span class=“highlight”>/storage-pool</span> </pre>
That mounts the shared volume, /storage-pool, on your wordpress-1 VPS. You can run df -h and it should be listed as a mounted filesystem. Next, we will follow a similar process to mount the shared storage on wordpress-2.
On wordpress-2, edit fstab so our shared file system will mount on boot:
sudo vi /etc/fstab
Add the following line to the end of the file to use /storage-pool as our mount point. If you used a different value, make sure you substitute that in here:
<pre> wordpress-2:<span class=“highlight”>/volume1</span> <span class=“highlight”>/storage-pool</span> glusterfs defaults,_netdev 0 0 </pre>
On wordpress-2, you are now able to mount the glusterFS volume to the /storage_pool filesystem:
sudo mkdir /storage-pool
sudo mount /storage-pool
Now, any files that are created, modified, or deleted in the /storage-pool filesystem will be synchronized across both servers, even if one of the servers goes down temporarily.
Move WordPress Files to Shared Storage
The next step is to move wordpress-1’s WordPress files to the shared storage. Please substitute the highlighted words with your own values. /var/www/example.com represents where your WordPress files were located (and where Nginx is looking for the files), and example.com by itself is simply the directory’s basename.
On wordpress-1, run these commands to move your WordPress application files to your shared filesystem, /storage-pool:
<pre> sudo mv <span class=“highlight”>/var/www/example.com</span> /storage-pool/ sudo chown www-data:www-data /storage-pool/<span class=“highlight”>example.com</span> </pre>
Next, you will want to create a symbolic link, that points to the WordPress files on the shared filesystem, where your WordPress files were originally stored by running:
<pre> sudo ln -s /storage-pool/<span class=“highlight”>example.com</span> <span class=“highlight”>/var/www/example.com</span> </pre>
Now your WordPress files are located on the shared filesystem, /storage-pool, and they are still accessible to Nginx via their original location, /var/www/example.com.
Point New Application Server to Shared Storage
The next step is to create a symbolic link on our new web application server that points to the WordPress files on the shared filesystem.
If you created wordpress-2 using the snapshot option, run the following commands on wordpress-2:
<pre> sudo rm <span class=“highlight”>/var/www/example.com</span> sudo ln -s /storage-pool/<span class=“highlight”>example.com</span> <span class=“highlight”>/var/www/example.com</span> </pre>
If you created *wordpress-2 from scratch, run the following commands on wordpress-2:
<pre> sudo mkdir -p <span class=“highlight”>/var/www</span> sudo ln -s /storage-pool/<span class=“highlight”>example.com</span> <span class=“highlight”>/var/www/example.com</span> </pre>
That’s it for synchronizing the WordPress application files! The next step is giving our new application server, wordpress-2, access to the database.
Create a New Database User
Because MySQL identifies users by username and source host, we need to create a new wordpressuser that can connect from our new application server, wordpress-2.
On your database VPS, mysql-1, connect to the MySQL console:
mysql -u root -p
In the following MySQL statements, replace all of the highlighted words with whatever is appropriate for your environment:
- wordpressuser: your MySQL WordPress user. Ensure it is the same as the already existing username
- wordpress_2_private_IP:the private IP of your wordpress-2 VPS
- password: your MySQL WordPress user’s password. Ensure it is the same as the already existing password (and that it’s a good password!)
Run this statement create a MySQL user that can connect from your new WordPress server, wordpress-2:
<pre> CREATE USER ‘<span class=“highlight”>wordpressuser</span>’@‘<span class=“highlight”>wordpress_2_private_IP</span>’ IDENTIFIED BY ‘<span class=“highlight”>password</span>’; </pre>
Again, substitute your own values for wordpressuser, wordpress_2_private_IP, and, if your database isn’t named “wordpress”, make sure to change that as well.
<pre> GRANT SELECT,DELETE,INSERT,UPDATE ON <span class=“highlight”>wordpress</span>.* TO ‘<span class=“highlight”>wordpressuser</span>’@‘<span class=“highlight”>wordpress_2_private_IP</span>’; FLUSH PRIVILEGES; </pre>
Now your second web application server, wordpress-2, can log in to MySQL on your database server, mysql-1.
Not Yet Load Balanced
Note that there are two web application servers that are running but the application isn’t load balanced because each server has to be accessed via their respective Public IP Addresses. We want to be able to access the application via the same URL, such as http://example.com/, and have the traffic balanced between the two web application servers. This is where HAProxy comes in.
Install HAProxy
Create a new VPS with Private Networking. For this tutorial, we will call it haproxy-www.
In our haproxy-www VPS, let’s install HAProxy with apt-get:
sudo apt-get update
sudo apt-get install haproxy
We need to enable the HAProxy init script, so HAProxy will start and stop along with your VPS.
sudo vi /etc/default/haproxy
Change the value of ENABLED to 1 to enable the HAProxy init script:
ENABLED=1
Save and quit. Now HAProxy will start and stop with your VPS. Also, you can now use the service command to control your HAProxy. Let’s check to see if it is running:
user@haproxy-www:/etc/init.d$ sudo service haproxy status
haproxy not running.
It is not running. That’s fine, because it needs to be configured before we can use it. Let’s configure HAProxy for our environment next.
HAProxy Configuration
HAProxy’s configuration file is divided into two major sections:
- Global: sets process-wide parameters
- Proxies: consists of defaults, listen, frontend, and backend parameters
Again, if you are unfamiliar with HAProxy or basic load-balancing concepts and terminology, please refer to this link: An Introduction to HAProxy and Load Balancing Concepts
HAProxy Configuration: Global
All of the HAProxy configuration should be done on your HAProxy VPS, haproxy-www.
First, let’s make a copy of the default haproxy.cfg file:
cd /etc/haproxy; sudo cp haproxy.cfg haproxy.cfg.orig
Now open haproxy.cfg in a text editor:
sudo vi /etc/haproxy/haproxy.cfg
You will see that there are two sections already defined: global and defaults. First we will make a few changes to some of the default parameters.
Under defaults, look for the following lines:
mode    http
option  httplog
Replace the word “http” with "tcp in both instances:
mode    tcp
option  tcplog
Selecting tcp as the mode configures HAProxy to perform layer 4 load balancing. In our case, this means that all of the incoming traffic on a specific IP address and port will be forwarded to the same backend. If you are unfamiliar with this concept, please read the Types of Load Balancing section in our Intro to HAProxy.
Do not close the config file yet! We will add the proxy configuration next.
HAProxy Configuration: Proxies
The first thing we want to add is a frontend. For a basic layer 4 load balancing setup, a frontend listens for traffic on a specific IP address and port then forwards incoming traffic to a specified backend.
At the end of the file, let’s add our frontend, www. Be sure to replace haproxy_www_public_IP with the public IP of your haproxy-www VPS:
<pre> frontend www bind <span class=“highlight”>haproxy_www_public_IP</span>:80 default_backend wordpress-backend </pre>
Here is an explanation of what each line in the frontend config snippet above means:
- frontend www: specifies a frontend named “www”, as we will use it to handle incoming www traffic
- bind haproxy_www_public_IP:80: replace
haproxy_www_public_IPwith haproxy-www’s public IP address. This tells HAProxy that this frontend will handle the incoming network traffic on this IP address and port - default_backend wordpress-backend: this specifies that all of this frontend’s traffic will be forwarded to wordpress-backend, which we will define in the next step
After you are finished configuring the frontend, continue adding the backend by adding the following lines. Be sure to replace the highlighted words with the appropriate values:
<pre> backend wordpress-backend balance roundrobin mode tcp server wordpress-1 <span class=“highlight”>wordpress_1_private_IP</span>:80 check server wordpress-2 <span class=“highlight”>wordpress_2_private_IP</span>:80 check </pre>
Here is an explanation of what each line in the backend config snippet above means:
- backend wordpress-backend: specifies a backend named “wordpress-backend”
- balance roundrobin: specifies that this backend will use the “roundrobin” load balancing algorithm
- mode tcp: specifies that this backend will use “tcp” or layer 4 proxying
- server wordpress-1 …: specifies a backend server named “wordpress-1”, the private IP (which you must substitute) and port that it is listening on, 80 in this case. The “check” option makes the load balancer periodically perform a health check on this server
- server wordpress-2 …: this specifies a backend server named “wordpress-2”
Now save and quit. HAProxy is now ready to be started, but let’s enable logging first.
Enabling HAProxy Logging
Enabling logging in HAProxy is very simple. First edit the rsyslog.conf file:
sudo vi /etc/rsyslog.conf
Then find the following two lines, and uncomment them to enable UDP syslog reception. It should look like the following when you are done:
$ModLoad imudp
$UDPServerRun 514
$UDPServerAddress 127.0.0.1
Now restart rsyslog to enable the new configuration:
sudo service rsyslog restart
HAProxy logging is is now enabled! The log file will be created at /var/log/haproxy.log once HAProxy is started.
Start HAProxy and PHP/Nginx
On haproxy-www, start HAProxy to make your config changes take effect:
sudo service haproxy restart
Depending on how you set up your new application server, you might need to restart your WordPress application by restarting PHP and Nginx.
On wordpress-2, restart PHP and Nginx by running these commands:
sudo service php5-fpm restart
sudo service nginx restart
Now WordPress should be running on both of your application servers, and they are load balanced. But there is still one last configuration change to be made.
Update WordPress Configuration
Now that your WordPress application’s URL has changed, we must update a couple of settings in WordPress.
On either WordPress server, edit your wp-config.php. It is located where you installed WordPress (in the tutorial, it was installed in /var/www/example.com but your installation may vary):
<pre> cd <span class=“highlight”>/var/www/example.com</span>; sudo vi wp-config.php </pre>
Find the line near the top that says define('DB_NAME', 'wordpress'); and add the following lines above it, substituting the highlighted values,:
<pre> define(‘WP_SITEURL’, ‘<span class=“highlight”>http://haproxy_www_public_IP</span>’); define(‘WP_HOME’, ‘<span class=“highlight”>http://haproxy_www_public_IP</span>’); </pre>
Save and quit. Now the WordPress URLs are configured to point to your load balancer instead of only your original WordPress server, which comes into play when you try and access the wp-admin Dashboard.
Load Balancing Complete!
Your web application servers are now load balanced! Your load balanced WordPress is now accessible to your user via the public IP address or domain name of your load balancer, haproxy-www!
Conclusion
Now the load of your users will be spread between your two WordPress servers. Additionally, if one of your WordPress application servers goes down, your site will still be available because the other WordPress server will be forwarded all of the traffic!
With this setup, remember that your HAProxy load balancer server, haproxy-www, and your database server, mysql-1, need to be running for your site to work properly.
<div class=“author”>By Mitchell Anicas</div>
Thanks for learning with the DigitalOcean Community. Check out our offerings for compute, storage, networking, and managed databases.
Tutorial Series: Load Balancing WordPress with HAProxy
Adding a load balancer to your server environment is a great way to increase reliability and performance. The first tutorial in this series will introduce you to load balancing concepts and terminology, followed by two tutorials that will teach you how to use HAProxy to implement layer 4 or layer 7 load balancing in your own WordPress environment. The last tutorial covers SSL termination with HAProxy.
About the author
Software Engineer @ DigitalOcean. Former Señor Technical Writer (I no longer update articles or respond to comments). Expertise in areas including Ubuntu, PostgreSQL, MySQL, and more.
Still looking for an answer?
This textbox defaults to using Markdown to format your answer.
You can type !ref in this text area to quickly search our full set of tutorials, documentation & marketplace offerings and insert the link!
If i want to have a varnish server to cache the wordpress, which node should varnish be installed?
Thanks!
Hi, Tang. I’m sure Mitchell will jump in but I’m actually using Varnish in front of two WP Nginx servers in a similar fashion that Mitchell describe use of the HA Proxy server. Hope this helps.
Regards, Kory
Tang: There are a variety of ways to set up HAProxy / Varnish–how you should set it up depends on what you are trying to accomplish.
Here is a link that goes over the pros and cons of different HAProxy/Varnish setups: http://blog.haproxy.com/2012/08/25/haproxy-varnish-and-the-single-hostname-website/
Hope this helps!
Hi,
If I am using fastcgi_cache with my nginx to cache the WordPress + WooCommerce installation, will these configurations still work?
I am writing the cache to a folder in /var/run as it’s mounted as tmpfs. I could mount it to filesystem though since SSD on DO is pretty fast anyway but still would prefer to write cache into RAM directly.
Is there any changes to make from this article to make it work with fastcgi_cache?
– Sam
Within Enabling HAProxy Logging, the following line is missing in the original rsyslog.conf:
$UDPServerAddress 127.0.0.1
U stated “Then find the following two lines, and un-comment them…” but your block shows three. That’s kinda confusing since the third line is missing from the source file. I added it in - Not sure if that was appropriate…?
Also, after running thru this several times, I all my resources (css, js, etc.) are interpreted but transferred with MIME type text/html… So that breaks everything. Whate should I look into to get this corrected?
Thnx
–Jason
Nice tutorial, thank you. One question though, with that setup isn’t HA Proxy a single point of failure?
Very nice tutorial. The only thing I suggest, is, if you want to balance a web application, such has wordpress, you should use Layer 7 LB… instead of using “mode tcp” you should stick with “mode http”, which in fact is HAProxy speciality. ;)
thanks for this great tutorial. is there any much difference if i use centos instead… hope you show this with using centos man… thank you! :)
 This work is licensed under a Creative Commons Attribution-NonCommercial- ShareAlike 4.0 International License.
Become a contributor for community
Get paid to write technical tutorials and select a tech-focused charity to receive a matching donation.

DigitalOcean Documentation
Full documentation for every DigitalOcean product.

Resources for startups and AI-native businesses
The Wave has everything you need to know about building a business, from raising funding to marketing your product.
The developer cloud
Scale up as you grow — whether you're running one virtual machine or ten thousand.

Start building today
From GPU-powered inference and Kubernetes to managed databases and storage, get everything you need to build, scale, and deploy intelligent applications.
