By Dylan Seidt and Brian Hogan

Introduction
When working on a project with multiple developers, it can be frustrating when one person pushes to a repository and then another begins making changes on an outdated version of the code. Mistakes like these cost time, which makes it worthwhile to set up a script to keep your repositories in sync. You can also apply this method in a production environment to push hotfixes and other changes quickly.
While other solutions exist to complete this specific task, writing your own script is a flexible option that leaves room for customization in the future.
GitHub lets you configure webhooks for your repositories, which are events that send HTTP requests when events happen. For example, you can use a webhook to notify you when someone creates a pull request or pushes new code.
In this guide you will develop a Node.js server that listens for a GitHub webhook notification whenever you or someone else pushes code to GitHub. This script will automatically update a repository on a remote server with the most recent version of the code, eliminating the need to log in to a server to pull new commits.
Prerequisites
To complete this tutorial, you will need:
- One Ubuntu 16.04 server set up by following the Ubuntu 16.04 initial server setup guide, including a non-root user with
sudoprivileges and a firewall. - Git installed on your local machine. You can follow the tutorial Contributing to Open Source: Getting Started with Git to install and set up Git on your computer.
- Node.js and
npminstalled on the remote server using the official PPA, as explained explained in How To Install Node.js on Ubuntu 16.04. Installing the distro-stable version is sufficient as it provides us with the recommended version without any additional configuration. - A repository on Github that contains your project code. If you don’t have a project in mind, feel free to fork this example which we’ll use in the rest of the tutorial.
Step 1 — Setting Up a Webhook
We’ll start by configuring a webhook for your repository. This step is important because without it, Github doesn’t know what events to send when things happen, or where to send them. We’ll create the webhook first, and then create the server that will respond to its requests.
Sign in to your GitHub account and navigate to the repository you wish to monitor. Click on the Settings tab in the top menu bar on your repository’s page, then click Webhooks in the left navigation menu. Click Add Webhook in the right corner and enter your account password if prompted. You’ll see a page that looks like this:
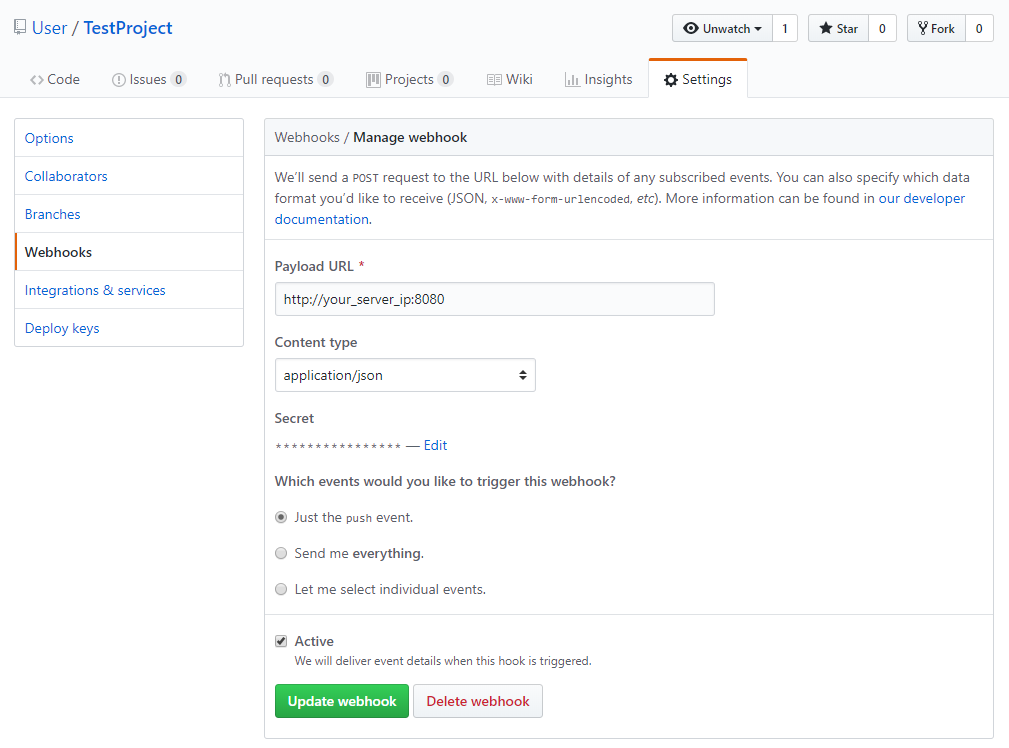
- In the Payload URL field, enter
http://your_server_ip:8080. This is the address and port of the Node.js server we’ll write soon. - Change the Content type to
application/json. The script we will write will expect JSON data and won’t be able to understand other data types. - For Secret, enter a secret password for this webhook. You’ll use this secret in your Node.js server to validate requests and make sure they came from GitHub.
- For Which events would you like to trigger this webhook, select just the push event. We only need the push event since that is when code is updated and needs to be synced to our server.
- Select the Active checkbox.
- Review the fields and click Add webhook to create it.
The ping will fail at first, but rest assured your webhook is now configured. Now let’s get the repository cloned to the server.
Step 2 — Cloning the Repository to the Server
Our script can update a repository, but it cannot handle setting up the repository initially, so we’ll do that now. Log in to your server:
- ssh sammy@your_server_ip
Ensure you’re in your home directory. Then use Git to clone your repository. Be sure to replace sammy with your GitHub username and hello_hapi with the name of your Github project.
- cd
- git clone https://github.com/sammy/hello_hapi.git
This will create a new directory containing your project. You’ll use this directory in the next step.
With your project cloned, you can create the webhook script.
Step 3 — Creating the Webhook Script
Let’s create our server to listen for those webhook requests from GitHub. We’ll write a Node.js script that launches a web server on port 8080. The server will listen for requests from the webhook, verify the secret we specified, and pull the latest version of the code from GitHub.
Navigate to your home directory:
- cd ~
Create a new directory for your webhook script called NodeWebhooks:
- mkdir ~/NodeWebhooks
Then navigate to the new directory:
- cd ~/NodeWebhooks
Create a new file called webhook.js inside of the NodeWebhooks directory.
- nano webhook.js
Add these two lines to the script:
var secret = "your_secret_here";
var repo = "/home/sammy/hello_hapi";
The first line defines a variable to hold the secret you created in Step 1 which verifies that requests come from GitHub. The second line defines a variable that holds the full path to the repository you want to update on your local disk. This should point to the repository you checked out in Step 2.
Next, add these lines which import the http and crypto libaries into the script. We’ll use these to create our web server and hash the secret so we can compare it with what we receive from GitHub:
let http = require('http');
let crypto = require('crypto');
Next, include the child_process library so you can execute shell commands from your script:
const exec = require('child_process').exec;
Next, add this code to define a new web server that handles GitHub webhook requests and pulls down the new version of the code if it’s an authentic request:
http.createServer(function (req, res) {
    req.on('data', function(chunk) {
        let sig = "sha1=" + crypto.createHmac('sha1', secret).update(chunk.toString()).digest('hex');

        if (req.headers['x-hub-signature'] == sig) {
            exec('cd ' + repo + ' && git pull');
        }
    });

    res.end();
}).listen(8080);
The http.createServer() function starts a web server on port 8080 which listens for incoming requests from Github. For security purposes, we validate that the secret included in the request matches the one we specified when creating the webhook in Step 1. The secret is passed in the x-hub-signature header as an SHA1-hashed string, so we hash our secret and compare it to what GitHub sends us.
If the request is authentic, we execute a shell command to update our local repository using git pull.
The completed script looks like this:
const secret = "your_secret_here";
const repo = "~/your_repo_path_here/";

const http = require('http');
const crypto = require('crypto');
const exec = require('child_process').exec;

http.createServer(function (req, res) {
    req.on('data', function(chunk) {
        let sig = "sha1=" + crypto.createHmac('sha1', secret).update(chunk.toString()).digest('hex');

        if (req.headers['x-hub-signature'] == sig) {
            exec('cd ' + repo + ' && git pull');
        }
    });

    res.end();
}).listen(8080);
If you followed the initial server setup guide, you will need to allow this web server to communicate with the outside web by allowing traffic on port 8080:
- sudo ufw allow 8080/tcp
Now that our script is in place, let’s make sure that it is working properly.
Step 4 - Testing the Webhook
We can test our webhook by using node to run it in the command line. Start the script and leave the process open in your terminal:
- cd ~/NodeWebhooks
- nodejs webhook.js
Return to your project’s page on Github.com. Click on the Settings tab in the top menu bar on your repository’s page, followed by clicking Webhooks in the left navigation menu. Click Edit next to the webhook you set up in Step 1. Scroll down until you see the Recent Deliveries section, as shown in the following image:
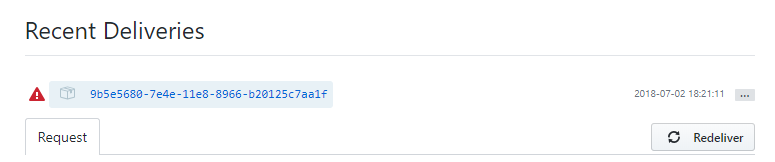
Press the three dots to the far right to reveal the Redeliver button. With the node server running, click Redeliver to send the request again. Once you confirm you want to send the request, you’ll see a successful response. This is indicated by a 200 OK response code after redelivering the ping.
We can now move on to making sure our script runs in the background and starts at boot. Use CTRL+C stops the node webhook server.
Step 5 — Installing the Webhook as a Systemd Service
systemd is the task manager Ubuntu uses to control services. We will set up a service that will allow us to start our webhook script at boot and use systemd commands to manage it like we would with any other service.
Start by creating a new service file:
- sudo nano /etc/systemd/system/webhook.service
Add the following configuration to the service file which tells systemd how to run the script. This tells Systemd where to find our node script and describes our service.
Make sure to replace sammy with your username.
[Unit]
Description=Github webhook
After=network.target

[Service]
Environment=NODE_PORT=8080
Type=simple
User=sammy
ExecStart=/usr/bin/nodejs /home/sammy/NodeWebhooks/webhook.js
Restart=on-failure

[Install]
WantedBy=multi-user.target
Enable the new service so it starts when the system boots:
- sudo systemctl enable webhook.service
Now start the service:
- sudo systemctl start webhook
Ensure the service is started:
- sudo systemctl status webhook
You’ll see the following output indicating that the service is active:
Output● webhook.service - Github webhook
   Loaded: loaded (/etc/systemd/system/webhook.service; enabled; vendor preset: enabled)
   Active: active (running) since Fri 2018-08-17 19:28:41 UTC; 6s ago
 Main PID: 9912 (nodejs)
    Tasks: 6
   Memory: 7.6M
      CPU: 95ms
   CGroup: /system.slice/webhook.service
           └─9912 /usr/bin/nodejs /home/sammy/NodeWebhooks/webhook.js
You are now able to push new commits to your repository and see the changes on your server.
From your desktop machine, clone the repository:
- git clone https://github.com/sammy/hello_hapi.git
Make a change to one of the files in the repository. Then commit the file and push your code to GitHub.
- git add index.js
- git commit -m "Update index file"
- git push origin master
The webhook will fire and your changes will appear on your server.
Conclusion
You have set up a Node.js script which will automatically deploy new commits to a remote repository. You can use this process to set up additional repositories that you’d like to monitor. You could even configure it to deploy a website or application to production when you push your repository.
Thanks for learning with the DigitalOcean Community. Check out our offerings for compute, storage, networking, and managed databases.
About the author(s)
Hello, I'm Dylan!
Managed the Write for DOnations program, wrote and edited community articles, and makes things on the Internet. Expertise in DevOps areas including Linux, Ubuntu, Debian, and more.
Still looking for an answer?
This textbox defaults to using Markdown to format your answer.
You can type !ref in this text area to quickly search our full set of tutorials, documentation & marketplace offerings and insert the link!
In the WebHook.js file, what is the point of parsing the chunk into the variable payload if you don’t use it afterwards? Was this a typo?
Well now that’s what I’ve been looking for. Can you please explain this line though?
Environment=NODE_PORT=8080
I don’t think I understand it correctly. Trying to set thing up for a gaming system at ruby fortune. Almost done, but having some troubles with Node.js. Actually, I did get it, thank to your guide but still… have no clue what that line means.
I have gotten to the end of this tutorial although I cannot seem to have the changes pushed to the GitHub repository show on the DigitalOcean Server. All my web hooks are being delivered on Git, does anyone have an inkling of the issue?
I used the dotenv library to store the port, secret, and repo directory in a .env file. That way I could keep my webhook listener project in GitHub without having to store any confidential info in my repo. I also wanted to keep the port number secret, just in case someone tried to do something fishy, there. So my final code looked like:
require("dotenv").config();
const secret = process.env.SECRET;
const repo = process.env.REPO;

const http = require('http');
const crypto = require('crypto');
const exec = require('child_process').exec;

http.createServer(function (req, res) {
    req.on('data', function(chunk) {
        let sig = "sha1=" + crypto.createHmac('sha1', secret).update(chunk.toString()).digest('hex');

        if (req.headers['x-hub-signature'] == sig) {
            exec('cd ' + repo + ' && git pull');
        }
    });

    res.end();
}).listen(process.env.PORT);
Everything worked great when I was testing, but when I actually ran the service, I got undefined for all of my process.env.* variables. It turns out that the service is not able to pull in the .env file from the local directory. As a workaround, I was able to specify the location of the .env file in the require() statement like this:
require("dotenv").config({path: __dirname + "/.env"});
Thanks for a great tutorial!
P.S. My .env file looked something like this:
SECRET=MY_SUPER_SECRET_SECRET
REPO=/path/to/my/repo
PORT=12345
I have a private repo and it asks for username and password on successful push. Any idea how to do this?
In webhook.js I see exec('cd ' + repo + ' && git pull');
I have a private GitHub repo I am trying to pull, the pull isn’t working. I’m guessing that is because it’s failing to authenticate with my UN/PW.
Any suggestions for dealing with private repos?
Hey Brian, thank you for a helpful tutorial. I’ve got it to work mostly, but I’m having a problem during the check: req.headers[‘x-hub-signature’] == sig
I printed the two out, and they are somehow different, so the pull is not triggered. Do you have an idea why that might be? I checked the ‘secret’ in my GitHub webhook and in my project, and they are the same.
I had one issue. My repository is located in my home dir on the webserver and the web site is located in /var/www/html. To ensure the changes are pushed from the repository to the site I amended the webhooks.js script with the following under the if statement.
if (req.headers['x-hub-signature'] == sig)
{
   exec('cd ' + repo + ' && ../updatesite.sh');
}
the script updatesite.sh then contains
cd /root/<repo>
git pull
cd  .git/hooks
./post-receive
And post-receive is as per the guide
#!/bin/sh
GIT_WORK_TREE=/var/www/html git checkout -f
This avoids having the git repository in /var/www/html etc.
Question(s). Is this the best way to achieve this ? Any issues I should be aware of ?
 This work is licensed under a Creative Commons Attribution-NonCommercial- ShareAlike 4.0 International License.
Become a contributor for community
Get paid to write technical tutorials and select a tech-focused charity to receive a matching donation.

DigitalOcean Documentation
Full documentation for every DigitalOcean product.

Resources for startups and AI-native businesses
The Wave has everything you need to know about building a business, from raising funding to marketing your product.
The developer cloud
Scale up as you grow — whether you're running one virtual machine or ten thousand.

Start building today
From GPU-powered inference and Kubernetes to managed databases and storage, get everything you need to build, scale, and deploy intelligent applications.
