By Ayoosh Kathuria and Shaoni Mukherjee

Introduction
If you have dipped your toes in building deep neural networks or started exploring the field, then there is a high chance you might have come across PyTorch. PyTorch offers more than just building basic neural networks. It gives you the tools to customize, optimize, and scale your models with ease and precision. It is very important to understand the core building blocks of PyTorch and how they interact under the hood.
This guide will explore essential intermediate concepts in PyTorch, including:
- The differences between
nn.Module,torch.nn.functional, andnn.Parameter—and how to decide which one to use. - Configuring training setups with advanced options like layer-specific learning rates and custom learning rate schedules.
- Implementing custom weight initialization strategies for better model performance.
Whether you’re training a custom model from scratch or refining an existing architecture, mastering these techniques will give you greater flexibility and control in your deep learning workflow. Let’s get started.
Key Points
- Dynamic Computational Graphs: PyTorch uses dynamic computation graphs (define-by-run), making debugging and model building more intuitive and Pythonic.
- Tensor Operations: PyTorch tensors are similar to NumPy arrays but optimized for GPU acceleration, making large-scale computations faster and more efficient.
- Autograd System: PyTorch’s automatic differentiation engine helps compute gradients effortlessly, enabling seamless backpropagation for training deep neural networks.
- Modular Neural Networks with
torch.nn: PyTorch’snn.Moduleclass allows for easy construction and management of complex models. - Training Workflow: A typical PyTorch training loop involves defining a model, loss function, optimizer, and then iterating over data to update weights.
nn.Module vs nn.Functional
This is something that comes quite a lot especially when you are reading open source code. In PyTorch, layers are often implemented as either one of torch.nn.Module objects or torch.nn.Functional functions. Which one to use? Which one is better?
The torch.nn.Module is basically the cornerstone of PyTorch. The way it works is you first define an nn.Module object, and then invoke its forward method to run it. This is an object-oriented way of doing things.
On the other hand, nn.functional provides some layers/activations in the form of functions that can be directly called on the input rather than defining an object. For example, in order to rescale an image tensor, you call torch.nn.functional.interpolate on an image tensor.
So, how do we choose what to use when? When the layer/activation/loss we are implementing has a loss.
Understanding Stateful-ness
Normally, any layer can be seen as a function. For example, a convolutional operation is just a bunch of multiplication and addition operations. So, it makes sense for us to just implement it as a function right? But wait, the layer holds weights which need to be stored and updated while we are training. Therefore, from a programmatic angle, a layer is more than function. It also needs to hold data, which changes as we train our network.
I now want to stress that the data held by the convolutional layer changes. This means that the layer has a state that changes as we train. For us to implement a function that does the convolutional operation, we would also need to define a data structure to hold the weights of the layer separately from the function itself. Then, we would make this external data structure an input to our function.
Or, to avoid the hassle, we could define a class to hold the data structure and make the convolutional operation a member function. This would really ease our job, as we don’t have to worry about stateful variables existing outside of the function. In these cases, we would prefer to use the nn.Module objects where we have weights or other states that might define the behaviour of the layer. For example, a dropout / Batch Norm layer behaves differently during training and inference.
On the other hand, where no state or weights are required, one could use the nn.functional. Examples being, resizing (nn.functional.interpolate), average pooling (nn.functional.AvgPool2d).
Despite the above reasoning, most of the nn.Module classes have their nn.functional counterparts. However, the above line of reasoning is to be respected during practical work.
nn.Parameter
An important class in PyTorch is the nn.Parameter class, which, to my surprise, has gotten little coverage in PyTorch introductory texts. Consider the following case.
class net(nn.Module):
  def __init__(self):
    super().__init__()
    self.conv = nn.Linear(10,5)

  def forward(self, x):
    return self.linear(x)

myNet = net()

#prints the weights and bias of Linear Layer
print(list(myNet.parameters()))
Each nn.Module has a parameters() function which returns, well, its trainable parameters. We have to implicitly define what these parameters are. In the definition of nn.Conv2d, the authors of PyTorch, defined the weights and biases to be parameters of a layer. However, notice one thing, that when we defined net, we didn’t need to add the parameters of nn.Conv2d to parameters of net. It happened implicitly by setting nn.Conv2d object as a member of the net object.
The nn.Parameter class, which subclasses the Tensor class, internally facilitates this. When we invoke the parameters() function of an nn.Module object, it returns all its members, which are nn.Parameter objects.
All the training weights of nn.Module classes are implemented as nn.Parameter objects. Whenever a nn.Module (nn.Conv2d in our case) is assigned as a member of another nn.Module, the “parameters” of the assignee object (i.e., the weights of nn.Conv2d) are also added to the “parameters” of the object that is being assigned to (parameters of the net object). This is called registering “parameters” of nn.Module
If you try to assign a tensor to the nn.Module object, it won’t show up in the parameters() unless you define it as nn.Parameter object. This has been done to facilitate scenarios where you might need to cache a non-differentiable tensor, for example in case, caching previous output in case of RNNs.
class net1(nn.Module):
  def __init__(self):
    super().__init__()
    self.conv = nn.Linear(10,5)
    self.tens = torch.ones(3,4)                       # This won't show up in a parameter list

  def forward(self, x):
    return self.linear(x)

myNet = net1()
print(list(myNet.parameters()))

##########################################################

class net2(nn.Module):
  def __init__(self):
    super().__init__()
    self.conv = nn.Linear(10,5)
    self.tens = nn.Parameter(torch.ones(3,4))                       # This will show up in a parameter list

  def forward(self, x):
    return self.linear(x)

myNet = net2()
print(list(myNet.parameters()))

##########################################################

class net3(nn.Module):
  def __init__(self):
    super().__init__()
    self.conv = nn.Linear(10,5)
    self.net  = net2()                      # Parameters of net2 will show up in list of parameters of net3

  def forward(self, x):
    return self.linear(x)

myNet = net3()
print(list(myNet.parameters()))
nn.ModuleList and nn.ParameterList()
I remember using a nn.ModuleList when I was implementing YOLO v3 in PyTorch. I had to create the network by parsing a text file containing the architecture. I stored all the corresponding nn.Module objects in a Python list and then made the list a member of my nn.Module object representing the network.
To simplify it, something like this.
layer_list = [nn.Conv2d(5,5,3), nn.BatchNorm2d(5), nn.Linear(5,2)]

class myNet(nn.Module):
  def __init__(self):
    super().__init__()
    self.layers = layer_list

  def forward(x):
    for layer in self.layers:
      x = layer(x)

net = myNet()

print(list(net.parameters()))  # Parameters of modules in the layer_list don't show up.
As you see, unlike when we would register individual modules, assigning a Python List doesn’t register the parameters of Modules inside the list. To fix this, we wrap our list with the nn.ModuleList class, and then assign it as a member of the network class.
layer_list = [nn.Conv2d(5,5,3), nn.BatchNorm2d(5), nn.Linear(5,2)]

class myNet(nn.Module):
  def __init__(self):
    super().__init__()
    self.layers = nn.ModuleList(layer_list)

  def forward(x):
    for layer in self.layers:
      x = layer(x)

net = myNet()

print(list(net.parameters()))  # Parameters of modules in layer_list show up.
Similarly, a list of tensors can be registered by wrapping the list inside a nn.ParameterList class.
Weight Initialisation
Weight initialisation can influence the results of your training. What’s more, you may require different weight initialisation schemes for different sorts of layers. This can be accomplished by the modules and apply functions. modules is a member function of nn.Module class that returns an iterator containing all the member nn.Module members are objects of a nn.Module function. Then use the apply function can be called on each nn.Module to set its initialisation.
import matplotlib.pyplot as plt
%matplotlib inline

class myNet(nn.Module):

  def __init__(self):
    super().__init__()
    self.conv = nn.Conv2d(10,10,3)
    self.bn = nn.BatchNorm2d(10)

  def weights_init(self):
    for module in self.modules():
      if isinstance(module, nn.Conv2d):
        nn.init.normal_(module.weight, mean = 0, std = 1)
        nn.init.constant_(module.bias, 0)

Net = myNet()
Net.weights_init()

for module in Net.modules():
  if isinstance(module, nn.Conv2d):
    weights = module.weight
    weights = weights.reshape(-1).detach().cpu().numpy()
    print(module.bias)                                       # Bias to zero
    plt.hist(weights)
    plt.show()
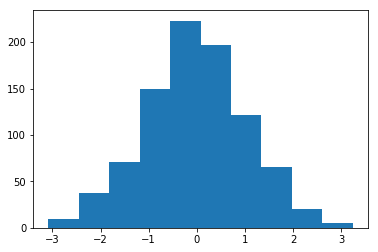
Histogram of weights initialised with Mean = 1 and Std = 1
There are a plethora of in-place initialisation functions to be found in the torch.nn.init module.
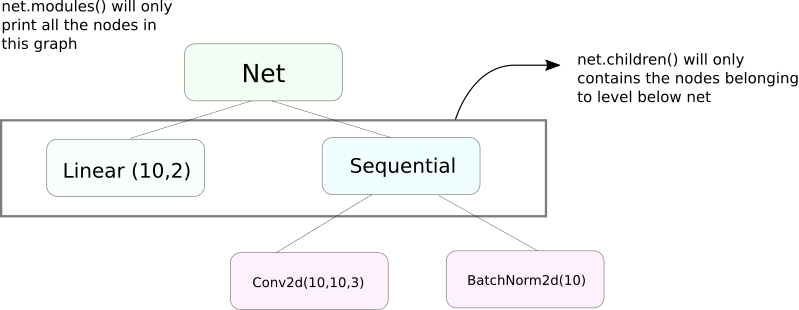
modules() vs children()
A very similar function to modules is children. The difference is a slight but an important one. As we know, a nn.Module object can contain other nn.Module objects as it’s data members.
children() will only return a list of the nn.Module objects, are data members of the object on which children are being called.
On the other hand, nn.Modules go recursively inside each nn.Module object, creating a list of each nn.Module object that comes along the way until there are no nn.module objects left. Note, modules() also return the nn.Module on which it has been called as part of the list.
Note that the above statement remains true for all objects/classes that subclass from nn.Module class.
class myNet(nn.Module):
  def __init__(self):
    super().__init__()
    self.convBN =  nn.Sequential(nn.Conv2d(10,10,3), nn.BatchNorm2d(10))
    self.linear =  nn.Linear(10,2)

  def forward(self, x):
    pass

Net = myNet()

print("Printing children\n------------------------------")
print(list(Net.children()))
print("\n\nPrinting Modules\n------------------------------")
print(list(Net.modules()))
So, when we initialize the weights, we might want to use the modules() function since we can’t go inside the nn.Sequential object and initialise the weight for its members.
Printing Information About the Network
We may need to print information about the network, whether it be for the user or debugging purposes. PyTorch provides a really neat way to print a lot of information about our network using it’s named_* functions. There are 4 such functions.
named_parameters. Returns an iterator which gives a tuple containing the name of the parameters (if a convolutional layer is assigned asself.conv1, then its parameters would beconv1.weightandconv1.bias) and the value returned by the__repr__function of thenn.Parameter
2. named_modules. Same as above, but the iterator returns modules like modules() function does.
3. named_children Same as above, but the iterator returns modules like children() returns
4. named_buffers Return buffer tensors such as the running mean average of a Batch Norm layer.
for x in Net.named_modules():
  print(x[0], x[1], "\n-------------------------------")
Different Learning Rates For Different Layers
In this section, we will learn how to use different learning rates for our different layers. In general, we will cover how to have different hyperparameters for different groups of parameters, whether it be different learning rates for different layers, or different learning rates for biases and weights.
The idea to implement such a thing is fairly simple. In our previous post, where we implemented a CIFAR classifier, we passed all the parameters of the network as a whole to the optimiser object.
class myNet(nn.Module):
  def __init__(self):
    super().__init__()
    self.fc1 = nn.Linear(10,5)
    self.fc2 = nn.Linear(5,2)

  def forward(self, x):
    return self.fc2(self.fc1(x))

Net = myNet()
optimiser = torch.optim.SGD(Net.parameters(), lr = 0.5)
However, the torch.optim class allows us to provide different sets of parameters having different learning rates in the form of a dictionary.
optimiser = torch.optim.SGD([{"params": Net.fc1.parameters(), 'lr' : 0.001, "momentum" : 0.99},
                             {"params": Net.fc2.parameters()}], lr = 0.01, momentum = 0.9)
In the above scenario, the parameters of `fc1` use a learning rate of 0.01 and a momentum of 0.99. If a hyperparameter is not specified for a group of parameters (like `fc2`), they use the default value of that hyperparameter, given as an input argument to the optimiser function. You could create parameter lists on the basis of different layers, or whether the parameter is a weight or a bias, using the named_parameters() function we covered above.
Learning Rate Scheduling
Scheduling your learning rate is going to follow is a major hyperparameter that you want to tune. PyTorch provides support for scheduling learning rates with its torch.optim.lr_scheduler module, which has a variety of learning rate schedules. The following example demonstrates one such example.
scheduler = torch.optim.lr_scheduler.MultiStepLR(optimiser, milestones = [10,20], gamma = 0.1)
The above scheduler, multiplies the learning rate by gamma each time when we reach epochs contained in the milestones list. In our case, the learning rate is multiplied by 0.1 at the 10nth and the 20nth epoch. You will also have to write the line scheduler.step in the loop in your code that goes over the epochs so that the learning rate is updated.
Generally, the training loop is made of two nested loops, where one loop goes over the epochs, and the nested one goes over the batches in that epoch. Make sure you call the scheduler.step at the start of the epoch loop so your learning rate is updated. Be careful not to write it in the batch loop, otherwise your learning rate may be updated at the 10th batch rather than the 10th epoch.
Also, remember that scheduler.step is no replacement for optim.step, and you’ll have to call optim.step every time you backprop backwards. (This would be in the “batch” loop.)
Saving your Model
You might want to save your model for later use in inference or just create training checkpoints. When it comes to saving models in PyTorch, you have two options.
First, use torch.save. This is equivalent to serialising the entire nn.Module object using Pickle. This saves the entire model to disk. You can load this model later into memory with torch.load.
torch.save(Net, "net.pth")

Net = torch.load("net.pth")

print(Net)
The above will save the entire model with weights and architecture. If you only need to save the weights, instead of saving the entire model, you can save just the state_dict of the model. The state_dict is basically a dictionary that maps the nn.Parameter objects of a network to their values.
As demonstrated above, one can load an existing state_dict into a nn.Module object. Note that this doesn’t involve saving of entire model but only the parameters. You will have to create the network with layers before you load the state dict. If the network architecture is not the same as the one whose state_dict we saved, PyTorch will throw up an error.
for key in Net.state_dict():
  print(key, Net.state_dict()[key])

torch.save(Net.state_dict(), "net_state_dict.pth")

Net.load_state_dict(torch.load("net_state_dict.pth"))
An optimiser object from torch.optim also has a state_dict object, which is used to store the hyperparameters of optimisation algorithms. It can be saved and loaded in a similar way we did above by calling load_state_dict on an optimiser object.
Frequently Asked Questions (FAQs)
Q1. What is PyTorch used for?
PyTorch is an open-source deep learning framework widely used for building, training, and deploying neural networks. It’s favored in research for its flexibility and in production for its performance. PyTorch supports tasks in computer vision, NLP, and more.
Q2. How is PyTorch different from TensorFlow?
PyTorch uses dynamic computation graphs, meaning the graph is built on-the-fly during runtime. This makes debugging and experimentation easier and more intuitive compared to TensorFlow’s static graph approach. It also feels more native to Python users.
Q3. Can I use PyTorch with a GPU?
Yes, PyTorch offers seamless GPU support using CUDA. You can accelerate training by moving your model or data to the GPU with commands like .to("cuda") or .cuda(), making large-scale computations much faster.
Q4. Is PyTorch good for beginners?
Definitely. PyTorch has a straightforward, Pythonic syntax that aligns well with NumPy. Its simplicity makes it ideal for learning deep learning fundamentals and rapidly prototyping models.
Q5. What are tensors in PyTorch?
Tensors are the fundamental data structures in PyTorch, similar to multidimensional arrays. They enable efficient mathematical operations on both CPUs and GPUs and form the building blocks of neural network computations.
Conclusion
Getting started with PyTorch might sound overwhelming at first, but it does open the door to building powerful deep learning models with clarity and control. So, whether you are experimenting with a simple feedforward network or developing state-of-the-art architecture, PyTorch gives you the tools to stay close to your model-building logic while helping you with GPU acceleration and a flexible programming style.
As you go deeper into PyTorch, you’ll discover a vibrant ecosystem of tools for vision, NLP, optimization, and distributed training. From torchvision and torchaudio to torchtext, PyTorch has grown beyond a framework into a complete deep learning platform.
In short, mastering PyTorch isn’t just about using another library; it’s about building a strong foundation in modern deep learning. So dive in, experiment freely, and don’t be afraid to make mistakes. With every line of code, you’re moving one step closer to mastering the art of deep learning.
Thanks for learning with the DigitalOcean Community. Check out our offerings for compute, storage, networking, and managed databases.
About the author(s)
With a strong background in data science and over six years of experience, I am passionate about creating in-depth content on technologies. Currently focused on AI, machine learning, and GPU computing, working on topics ranging from deep learning frameworks to optimizing GPU-based workloads.
Still looking for an answer?
This textbox defaults to using Markdown to format your answer.
You can type !ref in this text area to quickly search our full set of tutorials, documentation & marketplace offerings and insert the link!
 This work is licensed under a Creative Commons Attribution-NonCommercial- ShareAlike 4.0 International License.
Become a contributor for community
Get paid to write technical tutorials and select a tech-focused charity to receive a matching donation.

DigitalOcean Documentation
Full documentation for every DigitalOcean product.

Resources for startups and AI-native businesses
The Wave has everything you need to know about building a business, from raising funding to marketing your product.
The developer cloud
Scale up as you grow — whether you're running one virtual machine or ten thousand.

Start building today
From GPU-powered inference and Kubernetes to managed databases and storage, get everything you need to build, scale, and deploy intelligent applications.
