By Tim Lisko, sandfly and Anish Singh Walia
Introduction
What is Sandfly Security?
In today’s complex cloud environments, securing your Linux infrastructure is critical. Traditional security tools often rely on endpoint agents, which can introduce performance overhead, create stability risks, and struggle with compatibility across diverse and legacy systems. Sandfly Security offers a modern, agentless approach to Linux intrusion detection and incident response, providing deep visibility without the operational friction of conventional solutions.
Sandfly is an automated compromise and intrusion detection platform that continuously hunts for malicious activity on your Linux systems, 24 hours a day. It operates by connecting to your Droplets via the SSH protocol, deploying ephemeral scanners that perform deep forensic analysis and then remove themselves completely. This agentless methodology allows Sandfly to detect threats—from malware and rootkits to suspicious user behavior—without requiring any software to be permanently installed on your endpoints. This eliminates the risk of agent-related performance degradation or kernel conflicts, making it a safe and reliable choice for production environments.
Key Takeaways
- Agentless Security: Sandfly Security provides comprehensive Linux intrusion detection without requiring software installation on endpoints, eliminating performance overhead and compatibility risks.
- One-Click Deployment: The DigitalOcean Marketplace 1-Click App automates the entire Sandfly deployment process, from Docker container setup to database initialization, reducing setup time from hours to minutes.
- Secure Architecture: The recommended setup uses dedicated service accounts, SSH key-based authentication, and DigitalOcean Cloud Firewalls to implement defense-in-depth security principles.
- Continuous Monitoring: Automated scanning schedules with trickle mode ensure comprehensive threat detection while minimizing performance impact on production systems.
- Scalable Solution: Sandfly’s agentless approach allows rapid deployment across diverse Linux environments, from cloud droplets to legacy systems and embedded devices. When scaling to monitor multiple Droplets, be aware of DigitalOcean Droplet count limits, which may affect large-scale rollouts. For optimal performance, select a droplet size that matches your environment’s requirements; refer to Choosing a Droplet Plan for detailed guidance.
DigitalOcean Partnership
DigitalOcean has partnered with Sandfly Security to offer a streamlined, 1-Click App on the DigitalOcean Marketplace, simplifying the deployment of this powerful security platform.
“Sandfly has been a long-time customer and fan of DigitalOcean. Not only have they been an extremely reliable cloud provider for us, but they are built on Linux and Sandfly is built for Linux. It’s always been a natural match for us and one that DigitalOcean’s customers can benefit from, easily deploying Sandfly to secure their environment.”, Craig Rowland, CEO of Sandfly.
The 1-Click App automates what would otherwise be a multi-step manual installation involving Docker containers, database initialization, and network configuration, lowering the barrier to entry for enterprise-grade Linux security.
“Sandfly is one of the most exciting pieces of security tech I’ve seen recently. We’re excited to not only be a customer but also offer an integrated solution to our customers through the DigitalOcean Marketplace. This technology addresses Linux security in a really novel and compelling way.”, Timothy Lisko, Deputy CISO at DigitalOcean.
What You’ll Learn
This tutorial provides a comprehensive, step-by-step guide to deploying the Sandfly Security 1-Click App on DigitalOcean. By following this guide, you will:
- Deploy a Sandfly server Droplet from the DigitalOcean Marketplace.
- Create a dedicated, secure service account on your target Droplets for Sandfly to use.
- Configure secure, passwordless SSH key-based authentication.
- Implement a DigitalOcean Cloud Firewall to enforce a strict, least-privilege network policy.
- Configure and schedule automated security scans from the Sandfly web console.
By the end of this tutorial, you will have a production-ready Sandfly installation actively monitoring your Linux infrastructure for threats. Note: we are using Ubuntu/Debian-based distribution commands for this article but Sandfly is extensible to all linux distributions.
Prerequisites
Before you begin this guide, you will need the following:
- An active DigitalOcean account.
- At least one existing Linux Droplet to monitor. This guide will refer to this as your target Droplet.
- The public IP addresses of your Linux Droplets.
- A local computer with an SSH client installed to connect to your Droplets. For guidance, refer to the tutorial on How to Connect to Droplets with SSH.
Step 1 — Deploying the Sandfly Security 1-Click App
Your first step is to create the Sandfly server Droplet using the pre-configured image from the DigitalOcean Marketplace. This image contains all the necessary components and an automated setup script to get you started quickly.
Navigate to the DigitalOcean Marketplace and search for “Sandfly Security”. Alternatively, you can go directly to the (https://marketplace.digitalocean.com/apps/sandflysecurity) and click the Create Sandfly Security Droplet button.
You will be taken to the standard Droplet creation page with the Sandfly image pre-selected. Configure your Droplet with the following settings:
- Choose a plan:
- Sandfly’s documentation recommends a server with a minimum of 8GB of RAM for production use
- For this tutorial, a General Purpose Droplet with at least 4 GB of RAM and 2 vCPUs is a good starting point for smaller environments, as suggested by the Marketplace listing’s API example
- You can scale this up later as your monitoring needs grow
- Choose a datacenter region:
- For optimal performance and reduced network latency, select the same region where your target Droplets are located
- Authentication:
- Select SSH key as your authentication method
- This is significantly more secure than using a password and is a foundational security best practice
- Select your existing public SSH key or add a new one
- For detailed guidance on SSH key management, see our SSH Key Management documentation
- Finalize details:
- Choose how many Droplets to create (1 for this server)
- Select a descriptive hostname, such as sandfly-server. This will help you easily identify the Droplet in your control panel
- Optionally, add tags or assign the Droplet to a specific project
Once you have configured these options, click the Create Droplet button at the bottom of the page. DigitalOcean will now provision your Sandfly server, which may take a few minutes.
Step 2 — Initial Server Login and Setup
The Sandfly 1-Click App is designed to perform an automated installation the first time you log in. During this process, it will configure the necessary Docker containers, initialize the database, and generate a secure, random password for the web interface.
Once your sandfly-server Droplet is created and its public IP address is visible in the control panel, connect to it via SSH as the root user. Replace <your_sandfly_droplet_ip> with your Droplet’s actual IP address.
ssh root@<your_sandfly_droplet_ip>
Upon your first successful connection, the server will automatically execute a setup script.
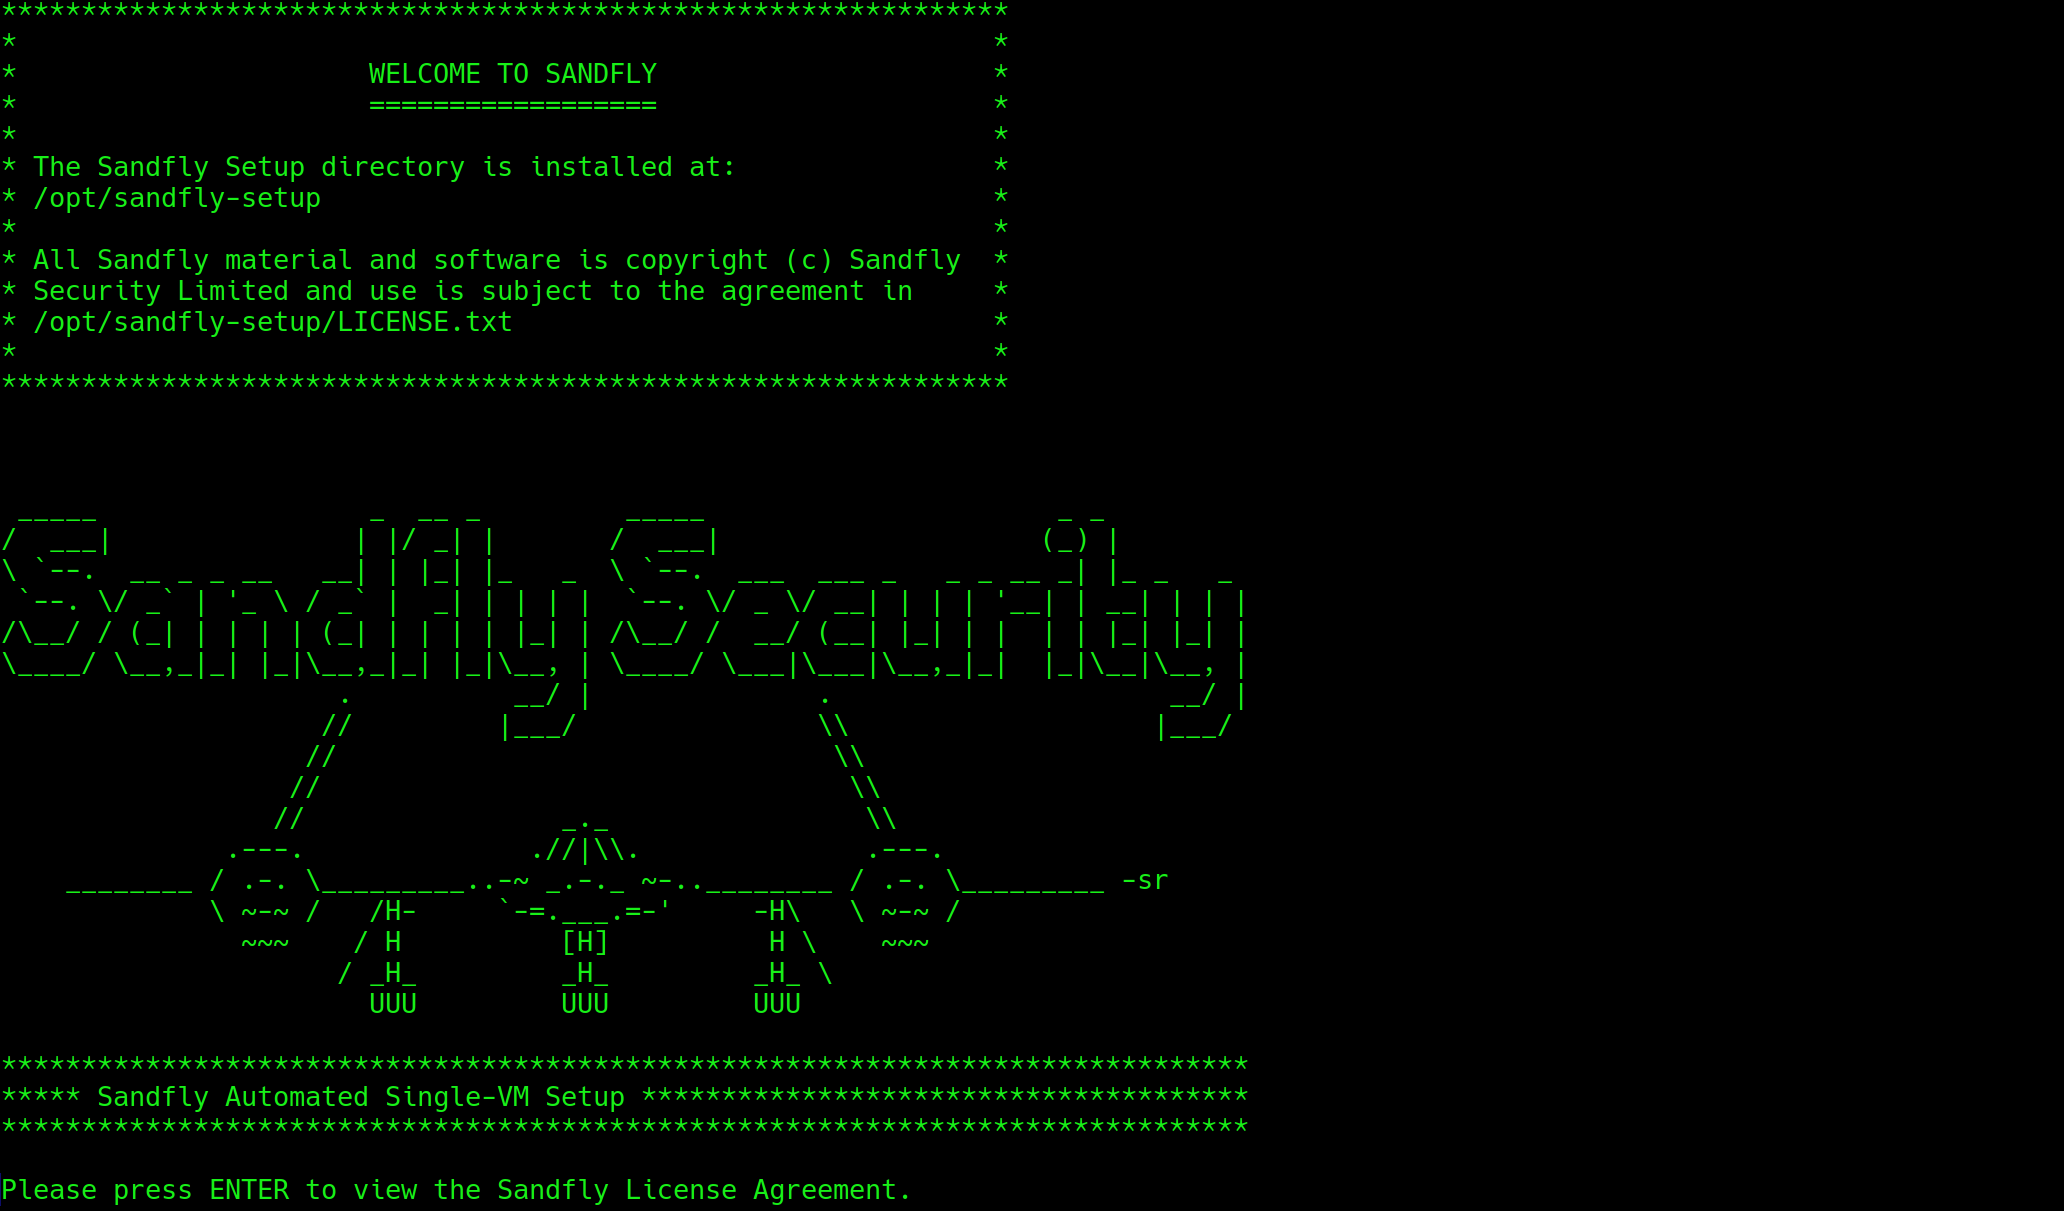
You will see output on your screen as it pulls Docker images and configures the Sandfly application stack. This process may take several minutes to complete.
When the script finishes, it will display a message containing the randomly generated password for the admin user of the Sandfly web UI. The output will look similar to this:
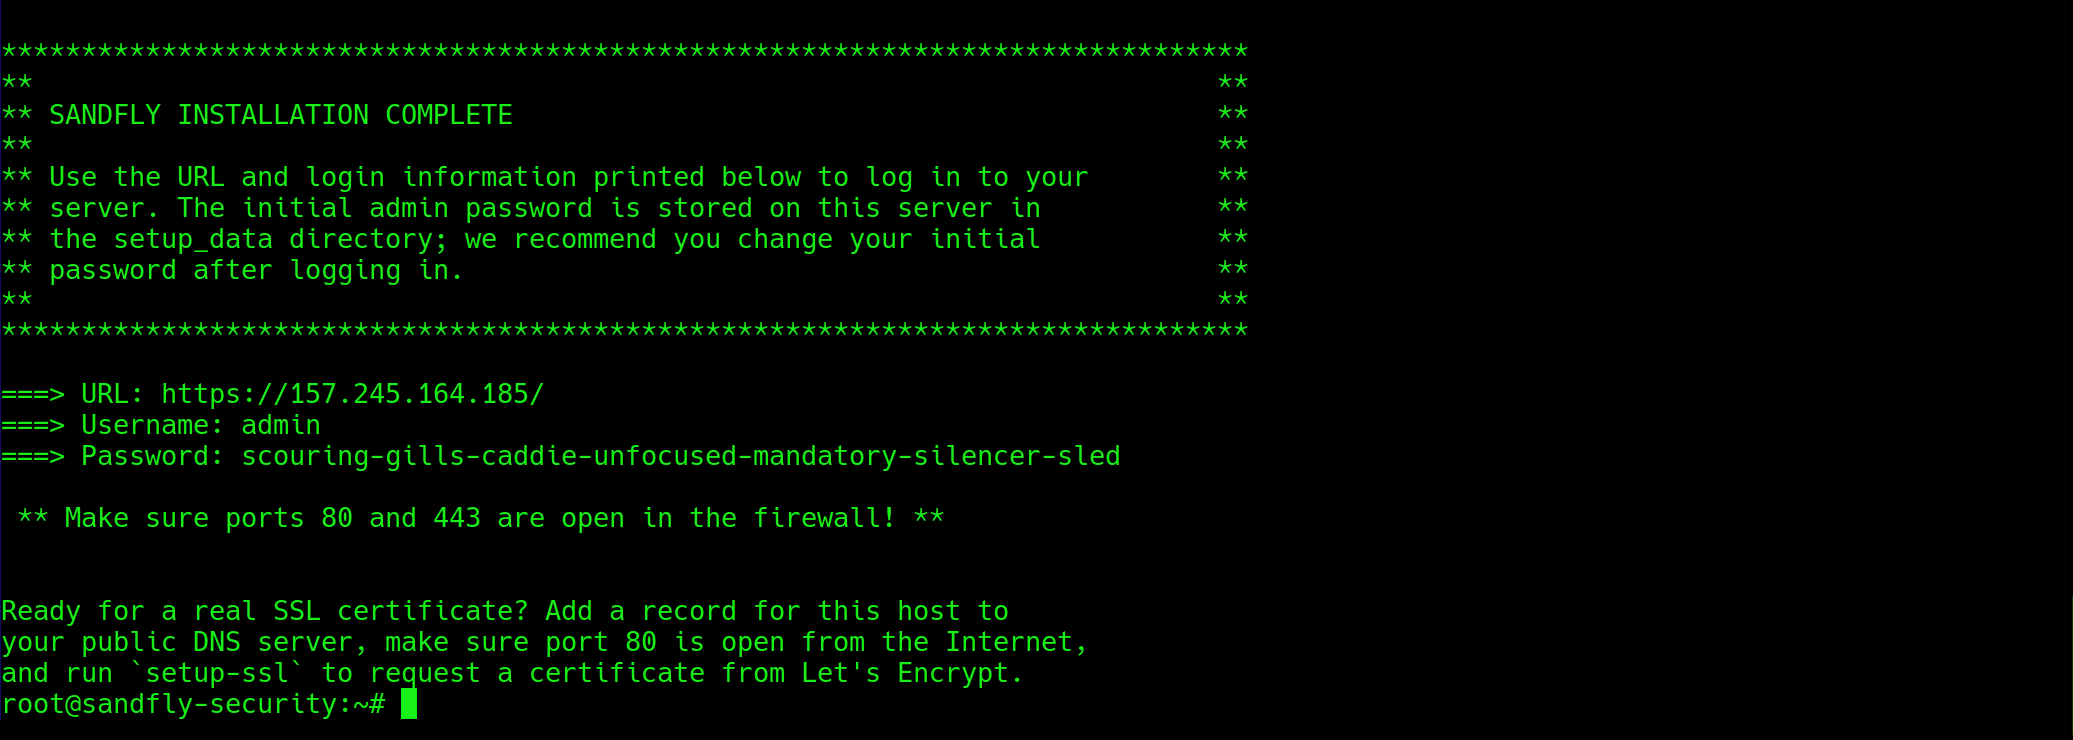
This is the only time this password will be displayed. It is critical that you copy this password and store it in a secure location, such as a password manager. You will need it in a later step to log in to the Sandfly web console.
Note: If you cleared the screen and didn’t save the password, you can get it again by using the command:
cat /opt/sandfly-setup/setup/setup_data/admin.password.txt
This file contains the password used for the setup above. Once you login and change the password the data here will no longer be valid.
Step 3 — Creating a Secure Service Account on Target Droplets
To perform its comprehensive security checks, Sandfly requires root-level privileges on the systems it scans. However, allowing a service to connect directly as the root user is a significant security risk and goes against the principle of least privilege.
The security best practice is to create a dedicated, non-root service account on each target Droplet and grant it the ability to execute commands with root privileges via sudo.
This approach compartmentalizes access and creates a clear audit trail for all actions performed by the scanning service.
You must perform the following steps on every Ubuntu Droplet you intend to monitor with Sandfly.
First, log in to your target Droplet as the root user:
ssh root@<your_target_droplet_public_ip>
Next, use the adduser command to create a new user. We will name this user sandfly-scanner. The adduser utility is a user-friendly script that will automatically create a home directory and prompt you to set a password.
adduser sandfly-scanner
You will be prompted to enter and confirm a new password for the user. Choose a strong, unique password and store it securely. You can press ENTER to skip the subsequent prompts for the user’s full name and other information.
OutputAdding user \`sandfly-scanner'...
Adding new group \`sandfly-scanner' (1001)...
Adding new user \`sandfly-scanner' (1001) with group \`sandfly-scanner'...
Creating home directory \`/home/sandfly-scanner'...
Copying files from \`/etc/skel'...
New password:
Retype new password:
passwd: password updated successfully
Changing the user information for sandfly-scanner
Enter the new value, or press ENTER for the default
 Full Name:
 Room Number:
 Work Phone:
 Home Phone:
 Other:
Is the information correct? Y
Now that the user is created, you need to grant it sudo privileges. On Ubuntu, the recommended way to do this is by adding the user to the sudo group. By default, all members of this group are granted full root privileges via the sudo command.
Use the usermod command with the -aG flags to append the user to the sudo group:
usermod -aG sudo sandfly-scanner
To verify that the user was successfully added to the group, you can use the getent command:
getent group sudo
The output should show sandfly-scanner as a member of the sudo group.
Outputsudo:x:27:<your_username>,sandfly-scanner
Repeat this process for every Droplet you wish to monitor. You have now created a secure, auditable service account for Sandfly to use.
Optional: Further in the sandfly setup you can provide the password for this account to sudo or you can remove the password all together by giving the sandfly account special sudo permissions that don’t require a password. You can do this by adding the following line to the /etc/sudoers.d/sandfly file:
echo "sandfly-scanner ALL=(ALL) NOPASSWD: ALL" > /etc/sudoers.d/sandfly
Repeat this process for every Droplet you wish to monitor. You have now created a secure, auditable service account for Sandfly to use.
Two notes for consideration:
- You may wish to name the Sandfly account something inconspicuous to avoid attackers knowing a system is monitored. If so, please choose another name for the sandfly account that you like. Sandfly can be configured to login as a valid account username so the name itself doesn’t matter, just as long as it’s legal on Linux.
- If you ever stop using sandfly, be sure to remove these accounts from the target droplets.
Step 4 — Configuring SSH Key-Based Authentication
With the service account created, the next step is to set up SSH key-based authentication.
This will allow the Sandfly server to log in to your target Droplets as the sandfly-scanner user securely and without a password, which is essential for automated scanning.
Using SSH keys is far more secure than password authentication. A crucial aspect of this setup is to create a new, dedicated SSH key pair specifically for this service.
Reusing an existing key (such as your personal administrative key) is a security anti-pattern. By creating a unique key, you ensure that if this specific key is ever compromised, the access is limited only to the Sandfly scanning function, containing the “blast radius” of the incident.
First, connect to your sandfly-server Droplet via SSH if you are not already logged in.
ssh root@<your_sandfly_droplet_public_ip>
On the sandfly-server, generate a new SSH key pair. We will use the modern and secure ed25519 algorithm. The -f flag specifies the file path for the key, and -C adds a descriptive comment.
ssh-keygen -t ed25519 -f ~/.ssh/sandfly_scanner_key -C "sandfly-scanner-key"
When prompted for a passphrase, press ENTER twice to leave it empty.
You may choose to add a passphrase to the key for use with Sandfly. Sandfly supports encrypted keys, but you must put the passphrase in when adding the credentials in the UI. Because Sandfly encrypts all keys it manages this may not be necessary however.
Additionally, you may choose to generate an SSH keypair within Sandfly’s UI. Shifting this responsibility to Sandfly can help mitigate the potential risks associated with key handling: the private key will not be visible again via the UI after creation, reduced likelihood of forgetting key material in an unprotected file system location, etc.
Using this method requires you login to the UI as outlined below or in the Sandfly documentation.
Next, display the contents of the newly created public key:
cat ~/.ssh/sandfly_scanner_key.pub
The output will be a single line of text starting with ssh-ed25519. Copy this entire line to your clipboard. You will now add this public key to the sandfly-scanner user’s authorized_keys file on each target Droplet.
Now, on each target Droplet, perform the following commands. If you are still logged in as root, first switch to the sandfly-scanner user:
su - sandfly-scanner
As the sandfly-scanner user, create a .ssh directory in its home folder and set the correct permissions. SSH is very strict about permissions; if they are too open, it will refuse to use the key for authentication.
mkdir ~/.ssh
chmod 700 ~/.ssh
Next, create the authorized_keys file inside the .ssh directory and set its permissions:
touch ~/.ssh/authorized_keys
chmod 600 ~/.ssh/authorized_keys
Finally, append the public key you copied from the sandfly-server into the authorized_keys file. Replace PASTE_PUBLIC_KEY_HERE with the actual public key from your clipboard.
echo "PASTE_PUBLIC_KEY_HERE" >> ~/.ssh/authorized_keys
Exit from the sandfly-scanner user session and then from the target Droplet.
exit
exit
Repeat this process of adding the public key for every target Droplet. Your Sandfly server is now configured to securely authenticate to your target Droplets.
Step 5 — Configuring the Sandfly Web Console
With the server and target Droplets prepared, you can now configure the Sandfly application through its web-based user interface. This involves logging in, activating your license, and adding the credentials and hosts for scanning.
First Login and License Activation
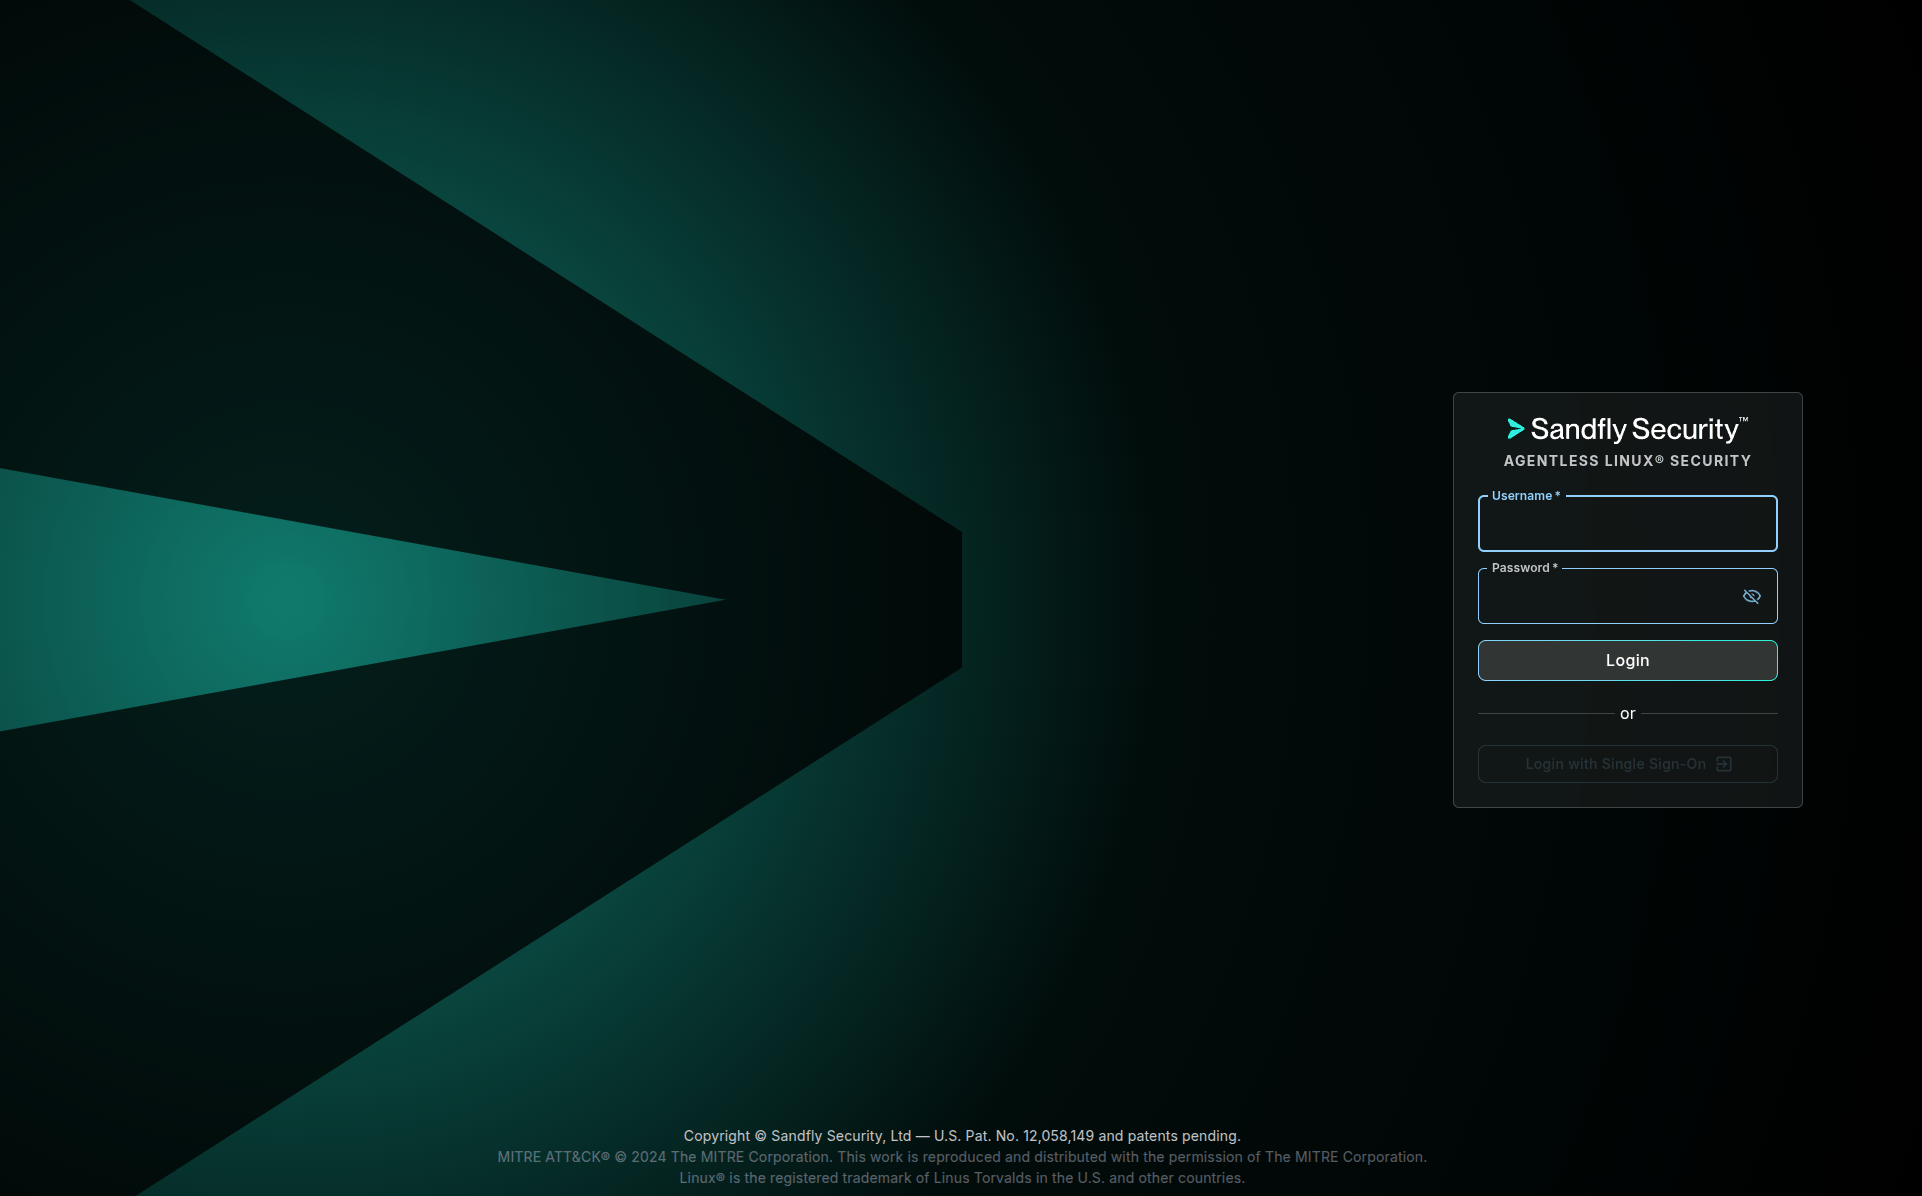
Open a web browser and navigate to your Sandfly server’s public IP address using HTTPS:
<https://<your_sandfly_droplet_public_ip>
Your browser will likely show a security warning because the server is using a self-signed SSL certificate by default. This is expected. Proceed past the warning to the login page.
Log in with the username admin and the randomly generated password you saved during the initial server setup in Step 2.
If you installed Sandfly with the DigitalOcean Marketplace image, a license has automatically been generated and the system is ready for adding hosts. If you did not install via the Marketplace, please contact Sandfly if you need a license.

Adding Scan Credentials
Next, you need to provide Sandfly with the SSH private key and user credentials it will use to connect to your target Droplets. Sandfly is designed with a robust security model where all credentials are encrypted with a public key upon entry.
Keys are stored in this encrypted state and can only be decrypted by the scanning nodes, meaning they cannot be viewed again through the UI or even if the server database is compromised if run in Sandfly’s Maximum Security Mode (which requires you run a node on a separate VM than the server).
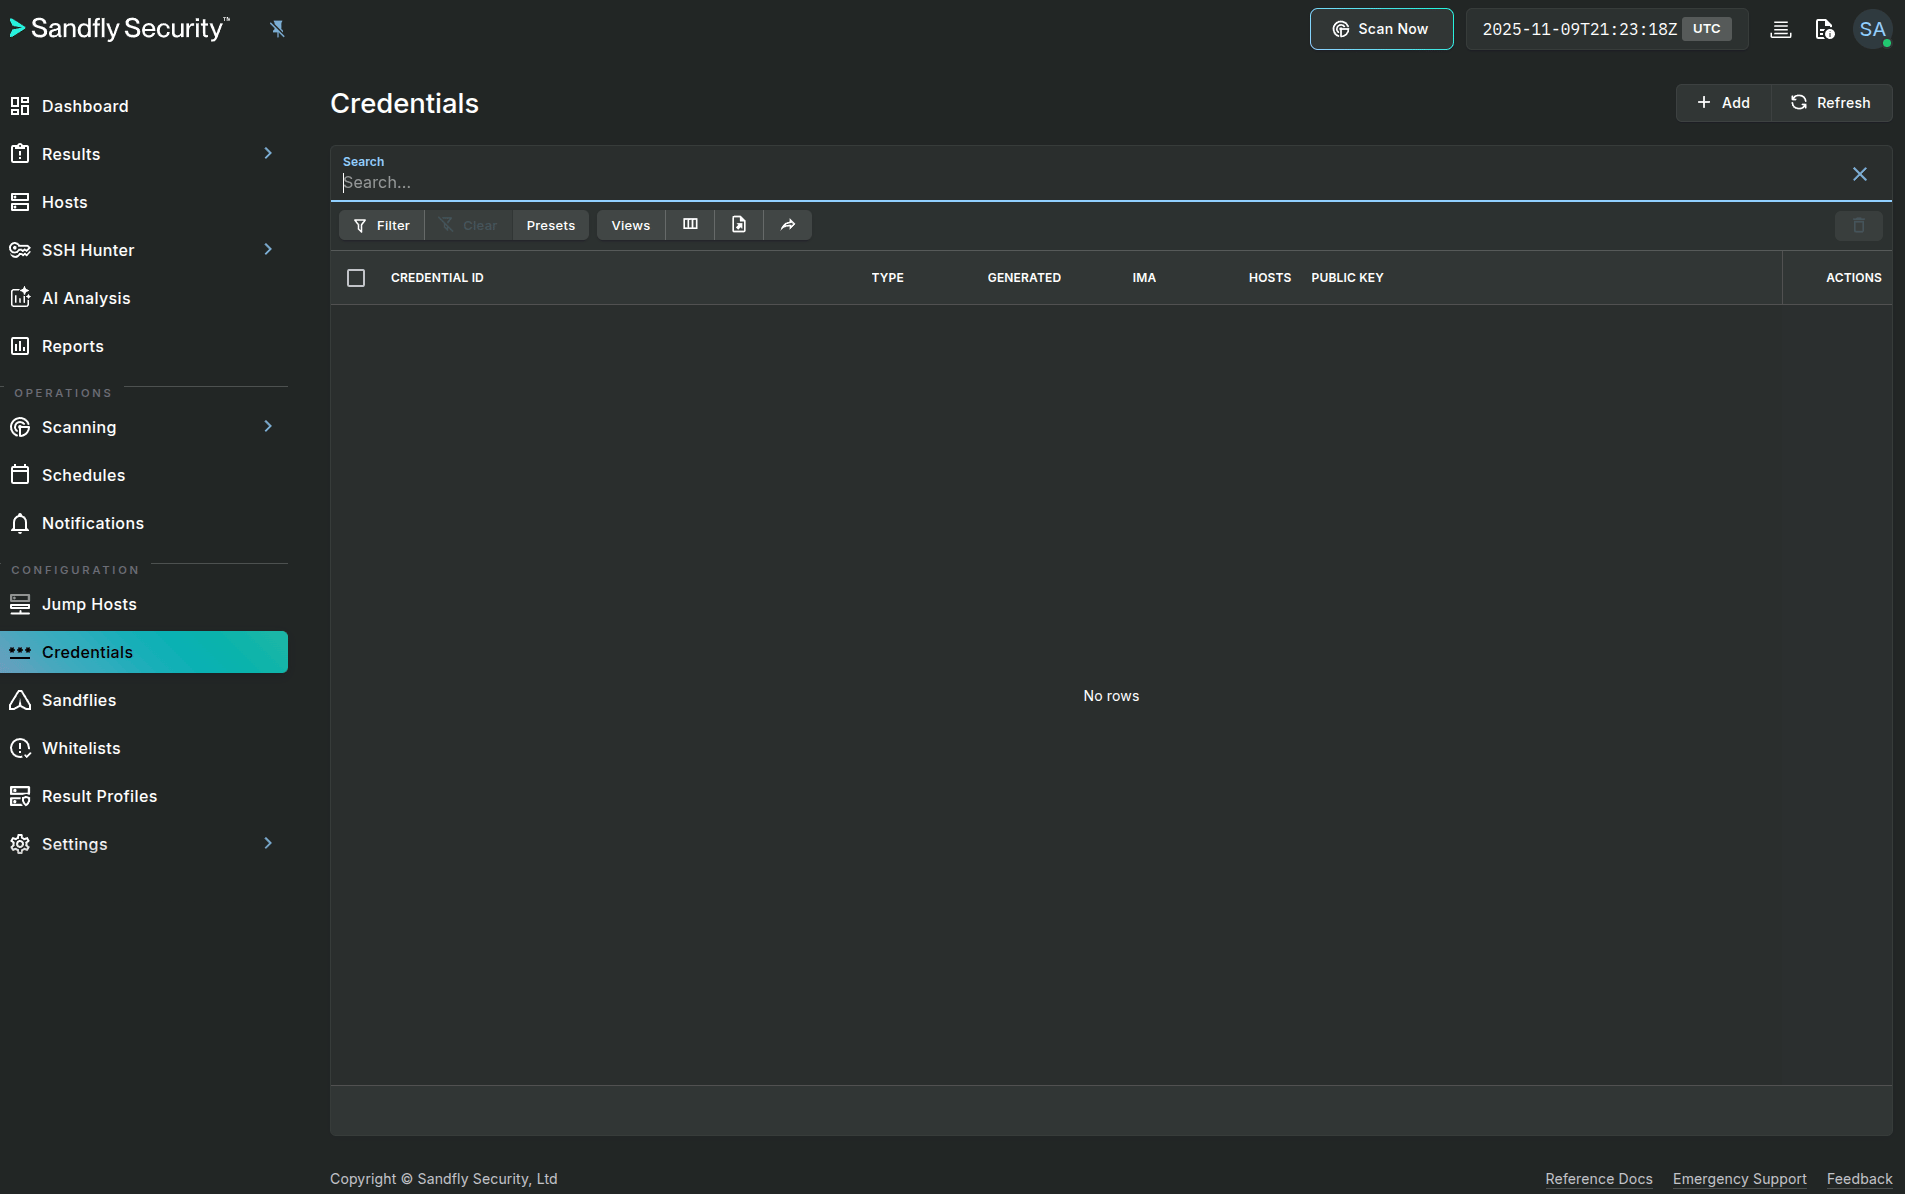
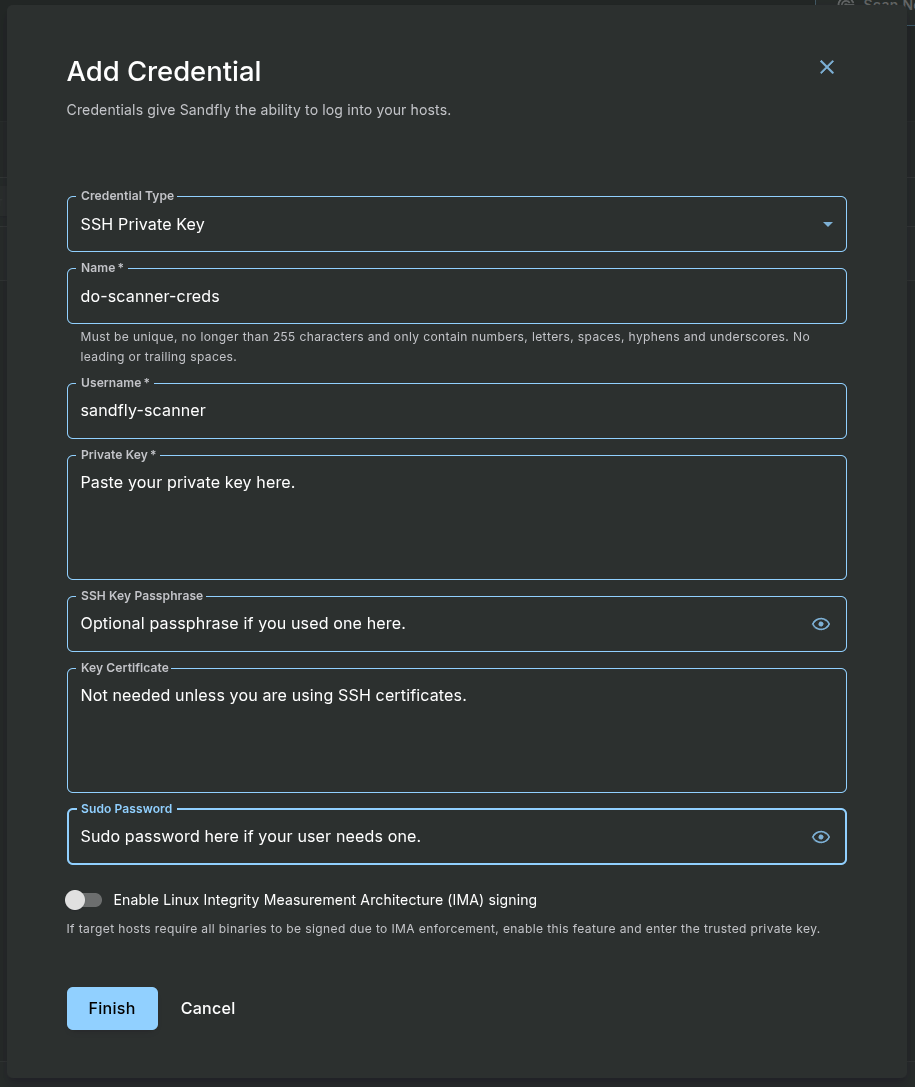
In the Sandfly UI, navigate to Configuration > Credentials from the left-hand sidebar. Click the + Add button.
Fill out the form with the following details:
-
Credential Type: Select SSH Private Key.
-
Name: Enter a descriptive name for this credential set, such as do-scanner-creds.
-
Username: Enter sandfly-scanner.
-
Private Key: You now need the contents of the private key you generated on the sandfly-server. Go to your SSH session on the sandfly-server and run the following command:
cat ~/.ssh/sandfly_scanner_keyCopy the entire output, including the
-----BEGIN OPENSSH PRIVATE KEY-----and-----END OPENSSH PRIVATE KEY-----lines, and paste it into the Private Key field in the Sandfly UI. -
Sudo Password (optional): Enter the password you created for the sandfly-scanner user in Step 3 above. Sandfly will use this to elevate privileges via sudo when necessary.
Click the Finish button to save the credential.
Adding Hosts to Monitor
The final configuration step is to tell Sandfly which Droplets to monitor.
Navigate to Hosts > Add Hosts from the sidebar.
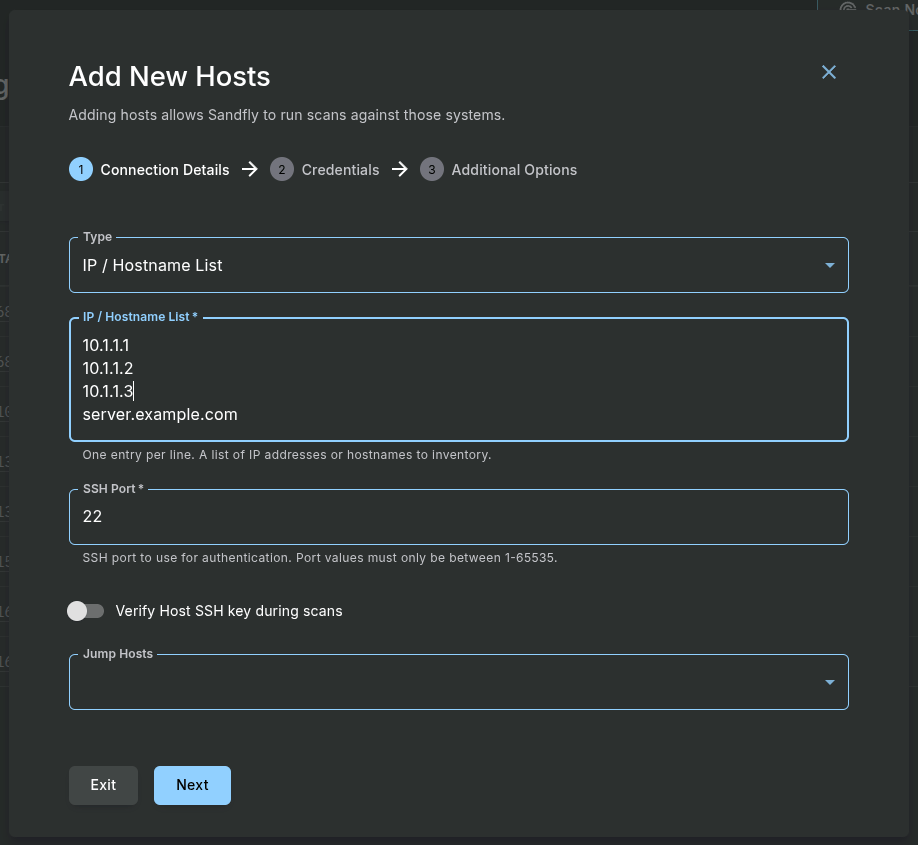
Configure the host addition form as follows:
- Type: Select IP / Hostname List.
- IP / Hostname List: Enter the public IP addresses of your target Droplets, with each IP on a new line.
- Add Credentials: Select Existing from the Credential Type dropdown. Then, select the do-scanner-creds you just created.
- Advanced users can select the Queue they want to use which is covered in scaling in the Sandfly documentation. The default of main is usually correct for default installs.
- Put in any Tags you want applied to the hosts that are found once added.
- Again for advanced users, you can override the scan director Sandfly uses on the remote system. This is normally used for embedded systems to prevent writing to SD cards and other write-limited storage by making Sandfly write to a RAM location such as
/dev/shm. For most users, you should leave this option alone.
Click the Finish button. Sandfly will queue a task to connect to these hosts, verify the credentials, and perform an initial inventory. After a minute, you can navigate to the Hosts page. You should see your target Droplets listed with a status of Active, indicating that Sandfly can successfully connect to them.
Step 6 — Configuring a DigitalOcean Cloud Firewall
To further harden your security posture, you should use a DigitalOcean Cloud Firewall to restrict SSH access to your target Droplets. A cloud firewall operates at the network level, providing a centralized and scalable way to enforce rules before any traffic reaches your Droplets.
For comprehensive firewall configuration guidance, refer to our Cloud Firewalls documentation.
The goal is to create a rule that denies all incoming SSH traffic by default and only permits connections from the specific IP address of your sandfly-server Droplet.
In the DigitalOcean Control Panel, navigate to Networking in the main menu, then click on the Firewalls tab. Click the Create Firewall button.
Give the firewall a descriptive name, such as sandfly-target-policy.
Under the Inbound Rules section, you will define a new rule. By default, cloud firewalls block all incoming traffic that isn’t explicitly allowed by a rule, which is the most secure configuration.
Configure the rule using the details in the table below. Delete any default rules that are not needed.
| Rule Type | Protocol | Port Range | Sources | Description |
|---|---|---|---|---|
| SSH | TCP | 22 | IP Address of the sandfly-server Droplet | Allows the Sandfly server to connect for scanning. |
This rule explicitly allows SSH traffic on port 22 only from the IP address of your Sandfly server. All other SSH connection attempts will be dropped at the firewall level.
Under the Apply to Droplets section at the bottom of the page, search for and select all of your target Droplets by name.
For a more scalable and manageable approach, it is highly recommended to use tags. You can create a tag named sandfly-monitored, apply this tag to all your target Droplets, and then apply the firewall rule to the tag instead of individual Droplets. This way, any new Droplet you create with this tag will automatically be protected by the firewall.
Click the Create Firewall button to save and apply the rules. Your target Droplets are now protected by a network-level firewall that strictly controls access for the Sandfly service.
Note: For simplicity’s sake, we suggest enabling the firewall after configuration and adding all of your hosts to sandfly. This will enable you to test connectivity and accessibility from the sandfly scanner to the node and then deploy the firewall.
Step 7 — Running and Scheduling Security Scans
With all the configuration complete, you are ready to run your first security scan and set up a recurring schedule for continuous monitoring.
Initiating a Manual Scan
A manual scan is a good way to verify that your entire setup is working correctly and to get an immediate security baseline of your systems.
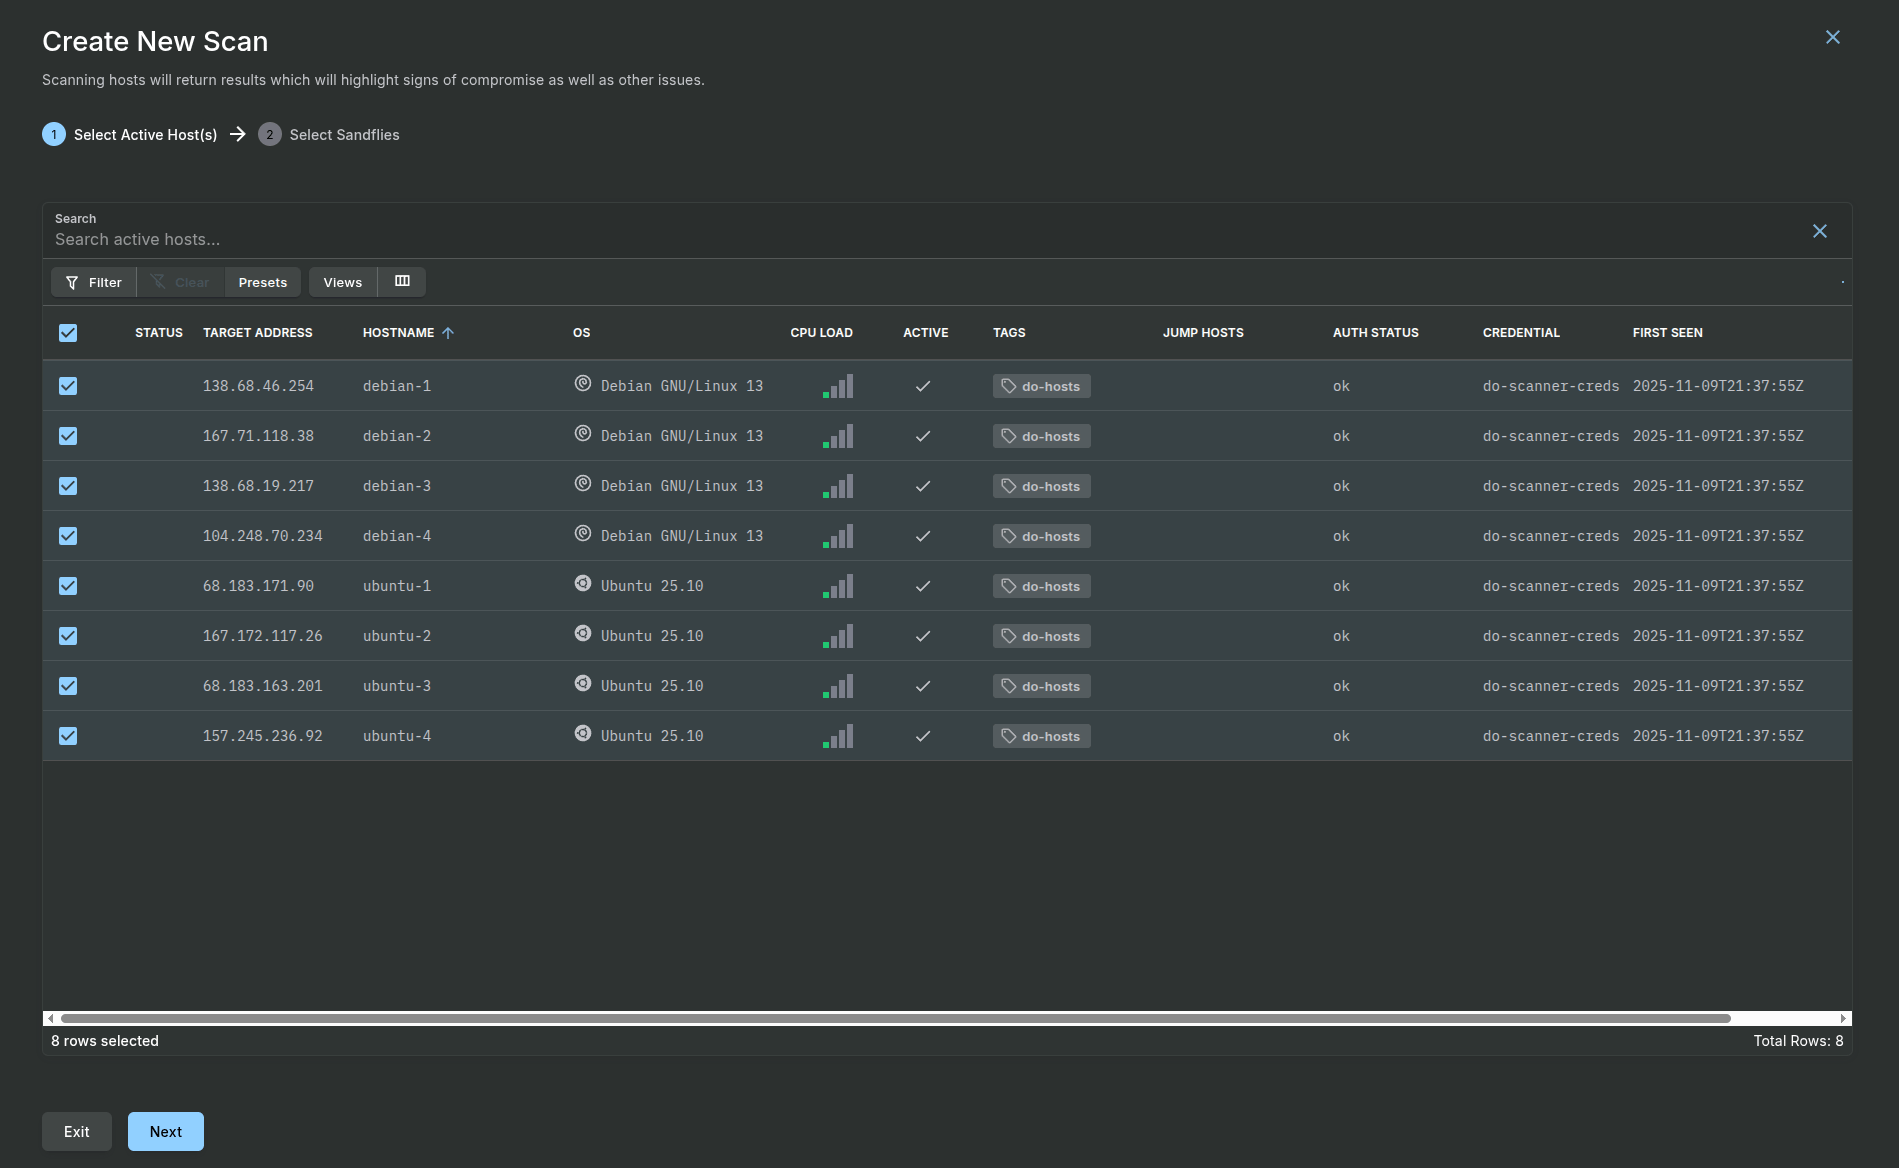
In the Sandfly UI, navigate to Scanning > Manual Scan from the sidebar.
- Step 1: Select Hosts to Scan: Check the box next to the target Droplets you added or select the checkbox at the top to select all hosts.
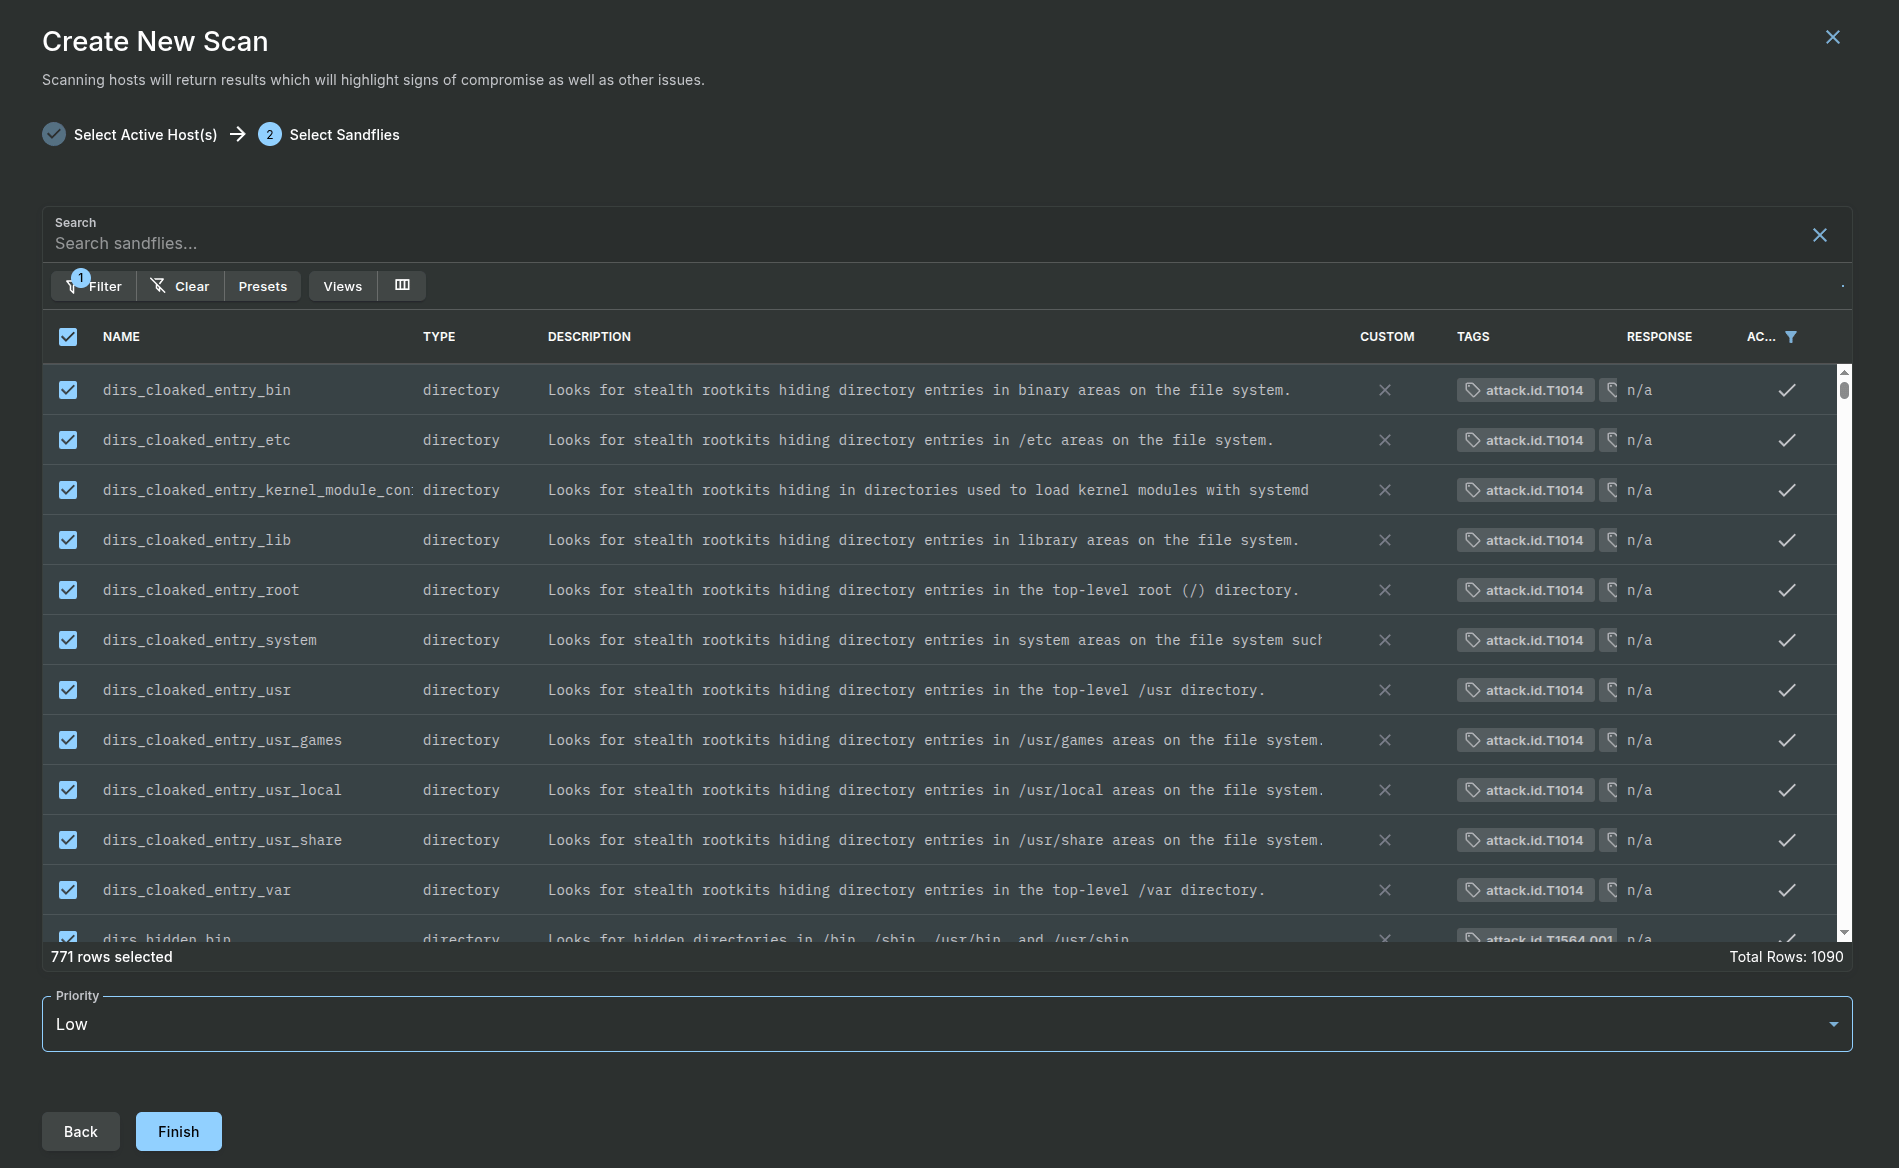
- Step 2: Select Sandfly Modules to Use: For your first scan, we recommend you use the default active Sandfly modules. Simply select the checkbox at the top to select all.
- For advanced users, you can select Sandfly to run at a higher priority on the target hosts, but normally this is not needed and it can be left at Low. Finish: Click the Finish button.
Sandfly will add the scan to its task queue and begin the analysis. You can monitor the progress from the Scanning > Task Queues page.
Viewing Initial Results
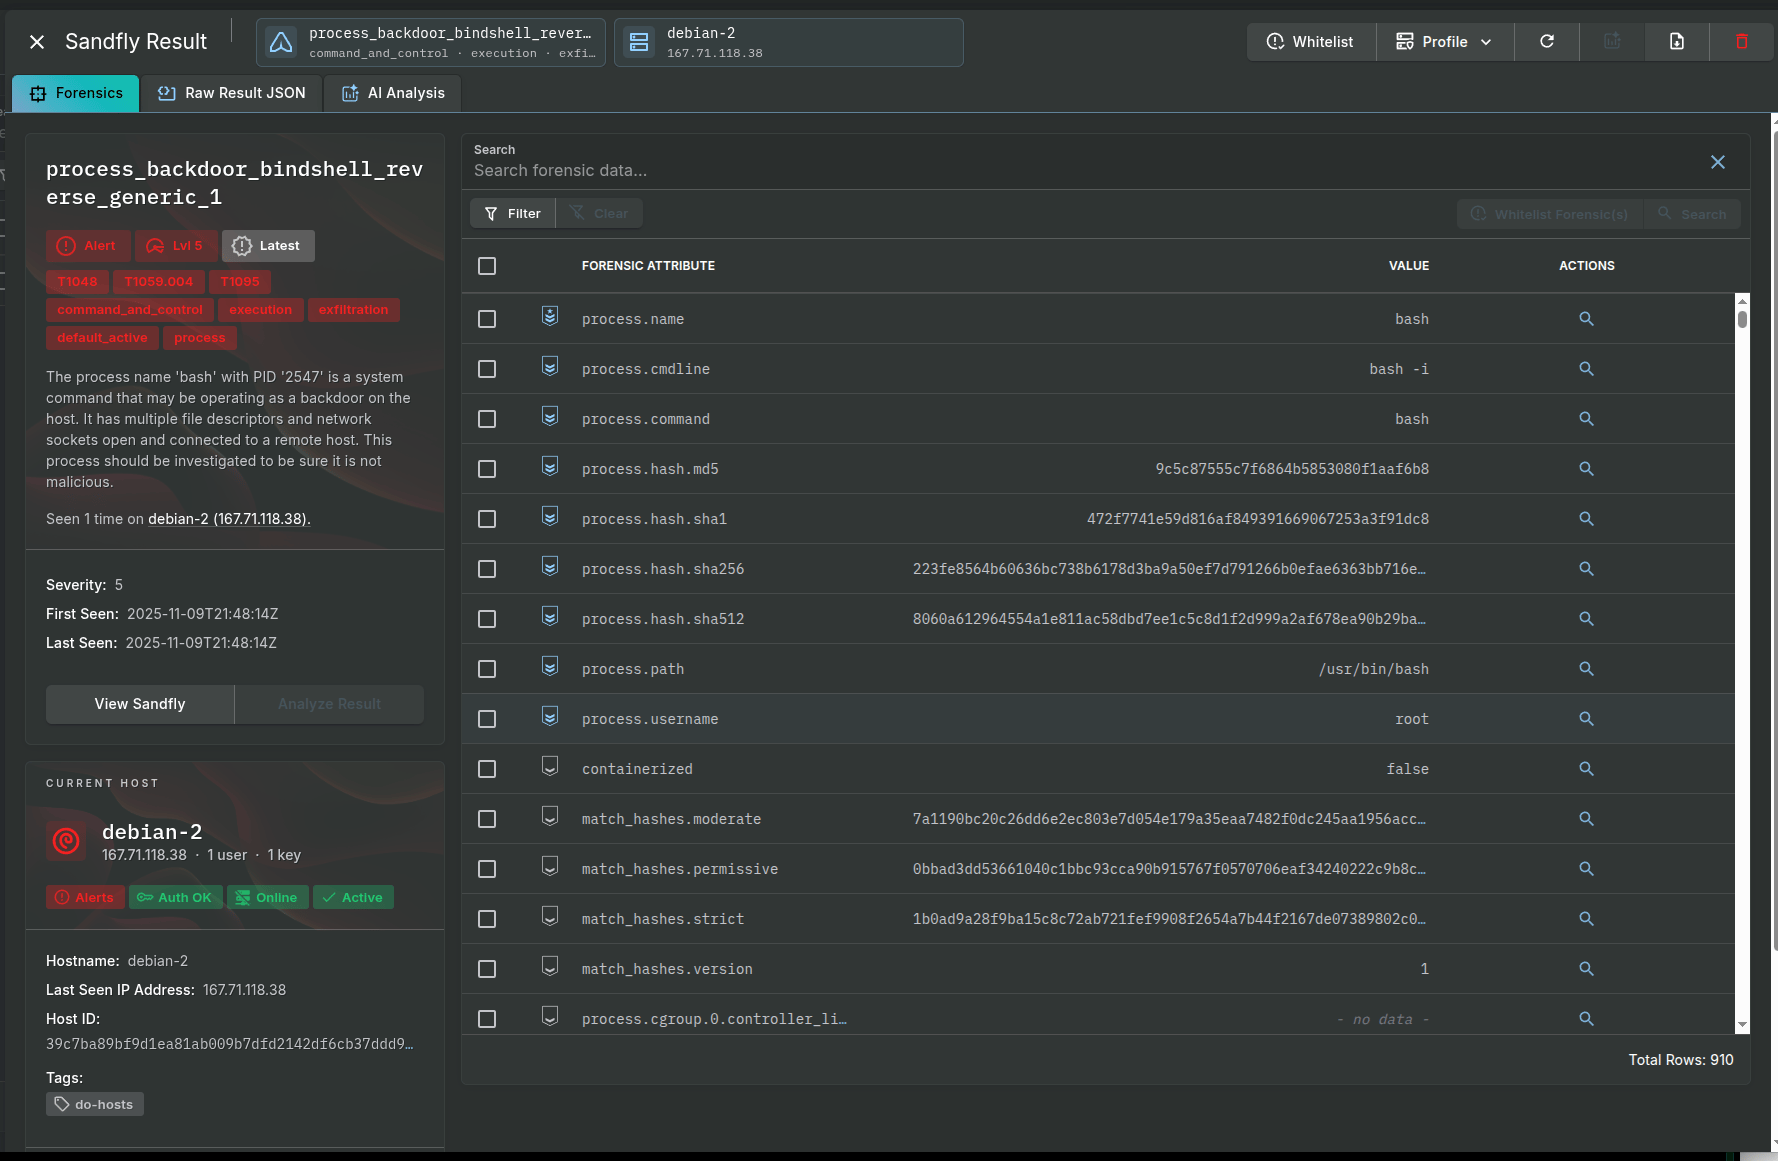
Once the scan is complete, navigate to the Results page. Here you will see a list of any alerts generated. It is common for initial scans to flag legitimate administrative tools or custom configurations as suspicious. Part of the ongoing security process is to investigate these alerts and “tune” them by whitelisting specific files, processes, or behaviors that are known to be safe in your environment.
Below we show a result from a sample backdoor process. You can review the result and raw forensic data. Alternatively, you may also want to enable the AI analysis feature using one of DigitalOcean’s private LLM instances to help you with forensic investigation and work as a virtual security analyst.
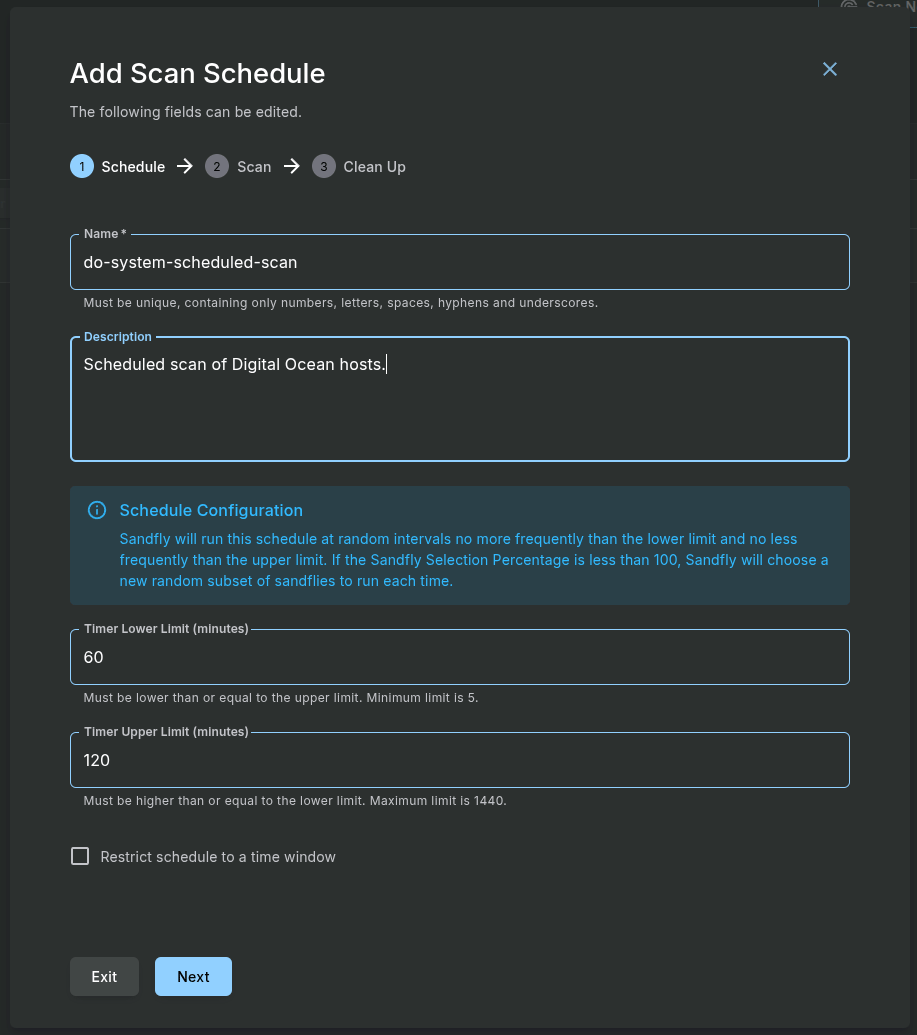
Creating a Scheduled Scan
The true power of Sandfly lies in its ability to perform automated, continuous monitoring. You will now create a schedule to run scans automatically.
Navigate to Schedules > Add Scan from the sidebar.
Configure the schedule with the following recommended settings for a robust production environment:
-
Step 1: Schedule
- Name: Give the schedule a descriptive name, such as daily-full-scan.
- Description: Provide a description of the schedule purpose if you want.
- Timer Lower Limit (minutes): This is the shortest time to wait between scans. The default is 60 minutes minimum. Set the minimum time between scans. We recommend a value low enough that multiple scans a day happen.
- Timer Upper Limit (minutes): This is the longest time to wait between scans. The default is 120 minutes. This value must be larger than the lower limit. The default values are always a great starting point. However, you may decide to space the scans out or limit to certain hosts using tag groups. Please check the Sandfly documentation for these advanced use cases.
- Restrict schedule to a time window: This is an optional value that will tell Sandfly to only scan during certain periods. While generally Sandfly will have no performance impact on protected hosts, this option ensures that it won’t run during critical business hours if customers require additional assurance.
-
Step 2: Scan
- Host Mode: Select Scan All Hosts to include all active hosts in this schedule. Again, please see the documentation if you wish to include or exclude hosts by tags.
- Sandfly Type: We recommend keeping the default values initially. As you use the product you may decide you want to scan more often for attack types such as processes, and less for file based threats in different schedules.
- Sandfly Selection Percentage: The default is 25%. This means each scan Sandfly will select 25% of the available checks at random to run. Over the day, a 25% selection happens over and over, providing complete coverage without causing system impacts. You can adjust this up or down as you see fit after seeing if performance impacts are or are not an issue. The default value is a good setting for the continuous scanning bands set in Step 1 above.
- Scan Mode: Select Trickle Scanning. This is a critical setting for production environments. Instead of scanning all hosts simultaneously (which could cause a “thundering herd” of resource spikes), Trickle mode intelligently spreads the scans out over the schedule’s time window. This minimizes performance impact and ensures your applications remain stable, demonstrating Sandfly’s design for operational safety in live systems. The Immediate Scanning mode is better reserved for urgent incident response scenarios.
-
Step 3: Host Maintenance: You can leave the default settings here for now. This feature can automatically remove hosts that have been offline for an extended period, which is useful in dynamic environments. This is designed to be paired with the Discovery Mode, which helps find hosts in dynamic address ranges. Together the Discover Mode adds hosts that appear with a new IP address, and the clean up removes them if they’ve gone dark for too long to free up a host license for use elsewhere.
Click the Finish button to create and activate the schedule. Sandfly will now automatically protect your Droplets according to the schedule you defined.
Frequently Asked Questions
1. What are the system requirements for deploying Sandfly Security on DigitalOcean?
Sandfly recommends a minimum of 8GB RAM for production deployments, though smaller environments can start with 4GB RAM and 2 vCPUs. The platform supports Ubuntu and other Linux distributions, with the 1-Click App handling all dependency management automatically.
2. How does Sandfly Security work without installing agents on target systems?
Sandfly operates entirely over SSH connections, deploying ephemeral scanners that perform forensic analysis and then remove themselves completely. This agentless approach eliminates the risks of kernel conflicts, performance degradation, and compatibility issues associated with traditional endpoint agents.
3. Can Sandfly Security integrate with existing security tools and SIEM platforms?
Yes, Sandfly provides a comprehensive REST API that enables integration with SIEM platforms like Splunk, Elasticsearch, SOAR tools, and custom security dashboards. The platform also supports alert forwarding and can export forensic data in standard formats for analysis by other security tools.
4. Is Sandfly Security suitable for both cloud and on-premises environments?
Absolutely. Sandfly’s agentless architecture makes it ideal for hybrid environments, supporting cloud Droplets, on-premises servers, network appliances, and embedded Linux devices. The platform can be deployed across multiple network segments and geographic locations. More importantly, Sandfly does not send any telemetry outbound to any third parties meaning it can run completely isolated from the Internet to protect high secure and air-gapped workloads.
5. How does Sandfly Security handle false positives and alert tuning?
Sandfly includes sophisticated whitelisting capabilities that allow security teams to tune alerts based on their specific environment. Initial scans may flag legitimate administrative tools, but the platform learns from these interactions to reduce noise and focus on genuine threats.
Conclusion
You have now successfully deployed and configured Sandfly Security on your DigitalOcean Droplets. By leveraging the 1-Click Marketplace App, you have established a powerful, agentless intrusion detection system.
You have followed security best practices by creating a dedicated service account, implementing strong SSH key-based authentication, and locking down network access with a DigitalOcean Cloud Firewall. Finally, you have configured an automated, continuous scanning schedule that will proactively hunt for threats across your Linux Droplets.
Your security journey does not end here. As you move forward, consider exploring more of Sandfly’s advanced capabilities:
- Alert Tuning: Investigate initial findings and use Sandfly’s whitelisting features to reduce noise and focus on true threats.
- SIEM Integration: Forward alerts to a Security Information and Event Management (SIEM) platform like Splunk for centralized logging and correlation.
- API Automation: Utilize Sandfly’s comprehensive REST API to automate host management, trigger scans, and integrate security into your CI/CD pipelines. For more information on API integration, see our API documentation.
For more in-depth information, refer to the official Sandfly Security Documentation. With Sandfly and DigitalOcean, you have a robust foundation for securing your cloud infrastructure.
We plan on more content and how-to’s related to Sandfly integration. Stay tuned for a tutorial on how to integrate your Sandfly scanner with DigitalOcean Gradient™ AI Platform that will help you interpret sandfly scan results.
Thanks for learning with the DigitalOcean Community. Check out our offerings for compute, storage, networking, and managed databases.
About the author(s)
I help Businesses scale with AI x SEO x (authentic) Content that revives traffic and keeps leads flowing | 3,000,000+ Average monthly readers on Medium | Sr Technical Writer(Team Lead) @ DigitalOcean | Ex-Cloud Consultant @ AMEX | Ex-Site Reliability Engineer(DevOps)@Nutanix
Still looking for an answer?
This textbox defaults to using Markdown to format your answer.
You can type !ref in this text area to quickly search our full set of tutorials, documentation & marketplace offerings and insert the link!
 This work is licensed under a Creative Commons Attribution-NonCommercial- ShareAlike 4.0 International License.
Become a contributor for community
Get paid to write technical tutorials and select a tech-focused charity to receive a matching donation.

DigitalOcean Documentation
Full documentation for every DigitalOcean product.

Resources for startups and AI-native businesses
The Wave has everything you need to know about building a business, from raising funding to marketing your product.
The developer cloud
Scale up as you grow — whether you're running one virtual machine or ten thousand.

Start building today
From GPU-powered inference and Kubernetes to managed databases and storage, get everything you need to build, scale, and deploy intelligent applications.
