
Introduction
Tahoe-LAFS is a distributed “least-authority” filesystem that can be easily scaled to provide a robust, network aware storage network. With benefits similar to those that RAID configurations gain at the disk level, Tahoe-LAFS leverages a similar model to encrypt and split up files among multiple servers.
In this guide, we will set up a Tahoe-LAFS system using three Ubuntu 14.04 VPS instances. This will allow us to distribute our data among 3 separate servers, giving us redundancy and a bigger storage pool than any single server.
Install the Tahoe-LAFS Components
The Ubuntu 14.04 repositories contain the most recent version of Tahoe-LAFS at the time of this writing (1.10.0). We can use this to install the components on each of our servers.
sudo apt-get update
sudo apt-get install tahoe-lafs
This will install the Tahoe-LAFS python package in a system accessible location.
To isolate our configuration, let’s create an unprivileged user specifically for dealing with our Tahoe-LAFS configuration:
sudo adduser tahoe_user
Choose a password for your user. Next, we’ll transition to our new user for the remaining of our guide:
su - tahoe_user
Configure an Introducer to Manage Node Connections
The first step that we need to take in configuring our cluster is to set up our “introducer”. The introducer is simply a node that functions as a hub to connect clients and storage nodes.
The introducer (or the introducer component if the machine also contains a storage node) does not actually transfer any files or store any data. Its sole responsibility is to collect the addresses of the storage locations and give them to the clients who request access to the cluster. The actual data does not pass through the introducer.
We will only need to run through this step on our first machine. All of the other servers will use this same introducer to connect to the cluster and discover each other.
To get started, we can run our first Tahoe command. This will initialize our Tahoe introducer within a hidden directory in our home directory called .introducer
tahoe create-introducer ~/.introducer
This will create the directory and put some configuration files inside. We won’t have to adjust any of these settings, because they’re pretty basic.
To bring the introducer online, we just need to tell Tahoe to start this component:
tahoe start ~/.introducer
STARTING '/home/tahoe_user/.introducer'
Your introducer is now up and you can begin creating and connecting your storage nodes to this “grid” (the name of the collective set of nodes working together).
But first, we need to extract one vital piece of information from our new introducer. This is the address that our storage nodes can use to connect. To find this, you can type this command:
cat ~/.introducer/private/introducer.furl
pb://kvhp5ynrbaiqw4ye2iagu4s2bkgj3dqb@107.170.41.189:57972,10.128.1.228:57972,127.0.0.1:57972/ysslmcvu23f7opkxj4db5r5mdan3pj6m
This is the network address that we need in order to configure our storage nodes, so copy and paste this somewhere that you will have access to later.
Configure Storage Nodes to Hold Data
Now that we have our introducer component configured and online, we need to start making our storage components so that we will actually have a pool of storage available to write to.
In a production environment, you’ll probably want to have your introducer node on a completely separate VPS instance from your storage units. You would also want to distribute your data across a much larger pool than we will be demonstrating. For this guide however, we will have 3 storage nodes, one of which also has our introducer.
On each of your servers, create a regular storage node by typing:
tahoe create-node
This will create the general folder structure similar to our introducer directory, but with different information. This is located in ~/.tahoe by default.
We need to adjust the configuration file before we can continue. Open it with your editor:
nano ~/.tahoe/tahoe.cfg
First, create a unique name for each node. This will be used to identify each server and can give you clues to debugging issues:
<pre> nickname = <span class=“highlight”>node-name</span> </pre>
Next, we’ll have to adjust the web.port parameter. Currently, it only accepts connections from the local computer. You can change it to 0.0.0.0 to allow connections from all of your interfaces, or bind it to your specific IP address:
web.port = tcp:3456:interface=0.0.0.0
Next, we need to find the introducer.furl parameter. We need to modify this with the introducer furl that we got during our introducer configuration. It should look something like this:
introducer.furl = pb://kvhp5ynrbaiqw4ye2iagu4s2bkgj3dqb@107.170.41.189:57972,10.128.1.228:57972,127.0.0.1:57972/ysslmcvu23f7opkxj4db5r5mdan3pj6m
The next parameters that we need to adjust are the commented out parameters shares.needed, shares.happy, shares.total. Let’s go into a bit more depth about what these parameters mean:
What do the Share Parameters Mean?
The shares.* parameters are perhaps some of the most important configuration decisions you’ll have to make while setting up your Tahoe-LAFS system. It configures the amount of redundancy you have and the amount of space your data will take up.
In short, when a file is uploaded, it is broken into “shares”. Each share, when combined with a certain number of other shares, can be used to recreate the file.
The shares.total parameter dictates exactly how many shares are created when the file is uploaded. By default, this is “10”.
The shares.needed is the number of shares needed to recreate the entire file. By default, this is “3”. So if this was set to “1”, you would have redundancy, but there would be a complete copy of the file created 10 times.
These two parameters combine to create the share policy for the client. The default values dictate that when a file is uploaded, it will be divided into 10 different shares. These shares will be redundant so that any 3 of them can be used to recreate the file.
This means that the shares.needed / shares.total will give us the amount of overhead needed to redundantly store the file when multiplied by the file size. In the default arrangement, your files will take up take up roughly 3.3 times as much storage space as storing the file on a regular disk.
This may seem like a lot, but you also have to realize you’re gaining the benefit of losing any 7 of those shares and still being able to reconstruct a complete file.
The last parameter, shares.happy is used to configure how your shares will be distributed between servers. While the shares.needed and shares.total parameters deal with “shares”, the shares.happy parameter specifies actual servers.
This sets the minimum number of servers available to receive a copy of the shares. If less than the number of servers is available, the upload will not be successful. This is used to ensure that your data is spread out over a reasonable amount of nodes. By default, this is set to “7”.
Since we only have 3 nodes available, we’ll need to adjust some of these properties. Since every server can house multiple shares of the same file, the only parameter we really need to adjust is shares.happy. This has to be the number of servers or fewer.
For our purposes, we will uncomment all of these, and we will change the shares.happy to “3”, our total number of servers:
<pre> shares.needed = 3 shares.happy = <span class=“highlight”>3</span> shares.total = 10 </pre>
These are fine for demonstration, but you’ll want to tune them more depending on your needs (do you need very high redundancy, or is disk space more of an issue?).
When you are finished editing the files on each node, you can start each storage node by typing:
tahoe start
Interacting with the Web Interface
After all of your nodes are up, you can access the Tahoe-LAFS file system by browsing to any of your VPS instances at port 3456:
<pre> http://<span class=“highlight”>your_ip</span>:3456 </pre>
You should get a web page that shows all of your nodes and an interface to your grid:

This is an overview of your nodes. Because Tahoe-LAFS doesn’t assume that you are running on your own hardware and does not assume that you are the only operator, it does not really include an interface to query data by name. It assumes that the owner will have the information to retrieve the file that is given upon uploading.
Let’s try to use the interface a little bit to demonstrate.
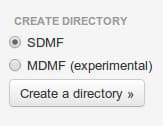
First, let’s create a directory by clicking the “Create a directory” button along the left-hand side. The default selection (SDMF) is fine for our purposes:
You will be taken to the directory page that looks something like this:
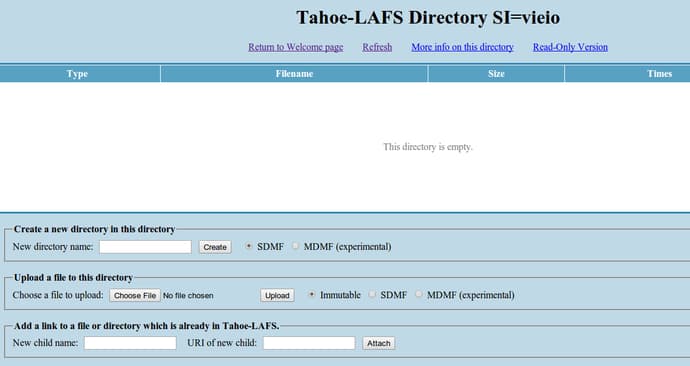
This directory does not have a name in the standard sense that we are used to. Instead, it pretty much has an ID (actually, a few IDs). Because it doesn’t have a name and Tahoe-LAFS doesn’t implement querying for security reasons, we will be unable to get back to this directory if we do not store the information about it now.
You can either bookmark this page in the browser, or you can record the IDs associated with the directory. To get the IDs, click on the “More info on this directory” link at the top of the page:

You will be taken to a page with the storage index, the object type, and most importantly, the access caps or Tahoe-URIs. These are listed in a table in the center of the page:
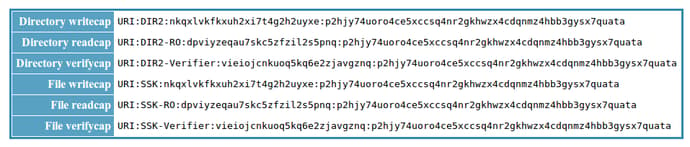
This might seem like a lot of information required to access a simple directory, and it is. For the directory, we have an access URI for read and write access, and a separate one for read-only access that we can give out.
This is the information that we need to come back to this directory. You can copy and paste this somewhere. Click on the “JSON” link for a more digestible presentation if you are scripting:
<pre> [ “dirnode”, { “rw_uri”: “URI:DIR2:nkqxlvkfkxuh2xi7t4g2h2uyxe:p2hjy74uoro4ce5xccsq4nr2gkhwzx4cdqnmz4hbb3gysx7quata”, “verify_uri”: “URI:DIR2-Verifier:vieiojcnkuoq5kq6e2zjavgznq:p2hjy74uoro4ce5xccsq4nr2gkhwzx4cdqnmz4hbb3gysx7quata”, “ro_uri”: “URI:DIR2-RO:dpviyzeqau7skc5zfzil2s5pnq:p2hjy74uoro4ce5xccsq4nr2gkhwzx4cdqnmz4hbb3gysx7quata”, “children”: {}, “mutable”: true } ] </pre>
Inside of the directory, we can upload files easily using the available buttons. You can make them immutable (read-only), or writeable by selecting the radio buttons. You will not have to keep track of all of the URIs for these files as long as they are kept in a directory you have the URI of.
If you want more capabilities, there are a variety of alternative front-ends to Tahoe-LAFS listed here. Of particular interest may be the command line interface and the SFTP interface, which can help you manage your files in a much easier way. For instance, the CLI allows you to create aliases for your directories and files so that you don’t have to keep track of URIs.
Conclusion
By now, you should have a good idea of how to set up a distributed, encrypted filesystem across a variety of different storage mediums, whether you trust the administrators or not. This allows you to avoid some of the issues of trust that are inherent with having others manage your data.
<div class=“author”>By Justin Ellingwood</div>
Thanks for learning with the DigitalOcean Community. Check out our offerings for compute, storage, networking, and managed databases.
About the author
Former Senior Technical Writer at DigitalOcean, specializing in DevOps topics across multiple Linux distributions, including Ubuntu 18.04, 20.04, 22.04, as well as Debian 10 and 11.
Still looking for an answer?
This textbox defaults to using Markdown to format your answer.
You can type !ref in this text area to quickly search our full set of tutorials, documentation & marketplace offerings and insert the link!
yo man great article. Is there any authentication component ? does node openly available on public ip ?
 This work is licensed under a Creative Commons Attribution-NonCommercial- ShareAlike 4.0 International License.
Become a contributor for community
Get paid to write technical tutorials and select a tech-focused charity to receive a matching donation.

DigitalOcean Documentation
Full documentation for every DigitalOcean product.

Resources for startups and AI-native businesses
The Wave has everything you need to know about building a business, from raising funding to marketing your product.
The developer cloud
Scale up as you grow — whether you're running one virtual machine or ten thousand.

Start building today
From GPU-powered inference and Kubernetes to managed databases and storage, get everything you need to build, scale, and deploy intelligent applications.
