By Lee Phillips
Dr.

Julia is a high-level, high-performance, general-purpose programming language. The "high level’’ refers to its expressive syntax, advanced data structures, and sophisticated type system, which are features that allow the programmer to solve complex problems with compact, readable programs. High performance is achieved with a unique just-in-time compilation system that turns high-level code into native machine instructions on any of Julia’s many supported architectures, including GPUs. Julia is a general-purpose language because it’s convenient to use in any problem domain. The only areas in which Julia might not be an ideal choice, because of the overhead of compiling, are embedded and real-time applications (although even this may change in the future).
Julia was originally envisioned as a new language for scientific and technical computing. Since its relatively recent public release in 2012, its unique melding of advanced concepts in language design with uncompromised performance has led to rapid and enthusiastic adoption across many science and engineering disciplines. It’s one of only four languages that have been deployed on supercomputers for petaflop computations (the others are Fortran, C, and C++).
Because of the emphasis on technical computing in the Julia community, most of the books and online documentation and tutorials are aimed at scientists and engineers who are interested in using the language for simulation, data analysis, and visualization of results; this is certainly true of my own book, for example. However, Julia is an excellent choice for other types of applications as well.
Key Takeaways
- Two Powerful Approaches: Julia offers two distinct methods for creating web applications - PlutoSliderServer for notebook-based interactive apps and HTMX + WebSockets for custom web applications with full control over frontend design
- High Performance Backend: Julia’s just-in-time compilation and scientific computing capabilities make it excellent for computationally intensive web applications, especially those involving data analysis, visualization, or mathematical calculations
- Easy Widget Integration: PlutoSliderServer provides a rich collection of pre-built widgets through PlutoUI, allowing developers to create interactive experiences without extensive HTML/JavaScript knowledge
- Real-time Communication: Both approaches leverage WebSockets for responsive, real-time interactions between frontend and backend, enabling smooth user experiences
- Scientific Computing Integration: Julia’s support for Unicode symbols, mathematical notation, and extensive scientific libraries makes it ideal for educational and research-oriented web applications.
- Flexible Deployment: Applications can be deployed using containers (systemd-nspawn, Docker) with reverse proxy configurations (Apache/Nginx) for secure, scalable hosting.
- Media Handling: The HTMX approach supports direct media embedding using Base64-encoded data URLs, eliminating the need for separate file storage and requests.
Julia on the Web?
Recently, I’ve used Julia as a back-end language for interactive websites to demonstrate concepts in physics. Because very little information was available explaining how to build such projects, I had to assemble the required knowledge from disparate sources and complete the picture with a great deal of experimentation and testing. This article is the culmination of this process and represents my desire to present, in one place, a complete guide to creating interactive web applications with Julia.
I found that Julia was an ideal language for this purpose. All of the virtues that make it so well suited for computational tasks in science make it delightful to use on the back end of a web application, especially one involving physics calculations. In addition to the features already mentioned, Julia permits the use of Greek letters and Unicode symbols in variable names, which lets the scientist-programmer impart a familiar appearance to lines of code, making them more closely resemble his or her beloved equations. Julia’s wide collection of graphics and audio libraries presents convenient solutions for the task of constructing diagrams, animations, or sounds to illustrate the science concepts that I seek to explain in my web pages.
It’s also almost trivially easy in Julia to spawn background tasks or perform calculations in parallel on multiple processors, which are factors that can improve responsiveness over the web. I discovered that Julia has excellent libraries for network communication, most critically for talking over WebSockets, which turned out to be a key element for my task. The parts of my programs for handling communication with the browser were surprisingly concise and easy to write, and the performance was excellent, which finally convinced me that the experiment was a success and made the techniques described here my favorite methods for building these types of interactive sites.
In this article, I document two methods for creating interactive web applications with Julia. The first uses the PlutoSliderServer web server, which allows you to transform a Pluto notebook into a web application that you can safely make available on the public web. You can use this method even if you’re unfamiliar with HTML or JavaScript, because you can build your application from a large collection of pre-made widgets that automatically set the values of variables in your Julia programs. The second method is more open-ended and allows you to build any type of web application that you can imagine. It’s based on HTMX and some simple (optional) JavaScript on the front end, communicating over WebSockets with your back-end Julia programs. I’ll explain all the terms and ideas in this paragraph in the following sections, so don’t be alarmed if I’ve mentioned some unfamiliar things. They’re all well worth learning.
PlutoSlideServer
Pluto is a computational notebook that uses the web browser as an interface. It’s an evolution of the popular Jupyter notebook, improving on the concept by fixing several problems in Jupyter’s design. Whereas Jupyter can serve as an interface to many different languages (the name is a mashup of Julia, Python, and R, its original partners), Pluto works, and will likely forever only work, with Julia.
Like Jupyter, Pluto was originally intended to provide a convenient interface to a language kernel running locally on the same machine as the web browser that handles the Pluto interface. Although some solutions allow Pluto to work over the web, I don’t want, for my purposes here, simply to expose a notebook to the user.
Ideally I want a simple means to translate a Pluto notebook to a web page, with interactivity provided by widgets with well-defined behavior; I don’t want the visitors to the page to be able to execute arbitrary Julia code, which is what the full Pluto interface enables.
PlutoSliderServer offers the perfect solution. With this approach, you create a Pluto notebook that includes any computations, media, and explanatory prose (with Markdown or HTML) you desire. User interactivity is provided by a large collection of widgets (including the popular slider control, whence the name) from the PlutoUI package. Each widget is bound to the value of a variable, and when the user manipulates the control to change the value of the variable, the relevant code is immediately executed on the server with the new value, displaying the results.
Here, I’ll go through every step required to create and serve a web application with this approach. The URLs lead you to two pages I made with this technology, as well as a link to an MIT intro course on computational thinking, which uses PlutoSliderServer extensively in its online lectures.
Installation and Setup
I’ll explain everything you need on this journey, but the trip will be a little smoother if you have just a little familiarity with Julia and its package system.
The first step is to install Julia if you don’t have it already. I recommend an upgrade if your installed version is older than version 1.8. I tested all examples in this article with version 1.10; version 1.11 recently became available, but I encountered some issues with package compatibility under that version with at least one of the examples, so version 1.10 might be smoother sailing, at least until the problems with Pluto under the most recent release have been resolved.
To install Julia on any operating system in common use, visit the Julia website and click the big green Download button. Once you have Julia up and running, you will need a few packages. A "package’’ in Julialand is a library of functions and data structures that you can import and use in your programs.
For developing a PlutoSliderServer application, you’ll need the Pluto package. Start up the Julia REPL (read-eval-print loop interactive terminal prompt) by typing julia in a terminal window. Of course, you can also use Visual Studio (VS) Code or your favorite development environment, and the procedure will be basically the same. Although you can now continue your development of PlutoSliderServer web applications in your default Julia environment, it’s a better practice to create a separate environment for each project to help prevent package conflicts down the road and keep your work organized. An "environment’’ in Julia is simply a directory in your filesystem containing two special files Julia maintains that list dependency-resolved packages needed in your project, along with all your program files. The latter are text files with the .jl file extension.
After deciding where in the filesystem you want your new project to live, press the right square bracket (]) key in REPL to activate package mode. The prompt changes from the green julia> to a blue pkg>. This new prompt is preceded by a notation in parentheses indicating your current environment. Initially, you’re in the default environment for the version of Julia in use (in this example, version 1.10).
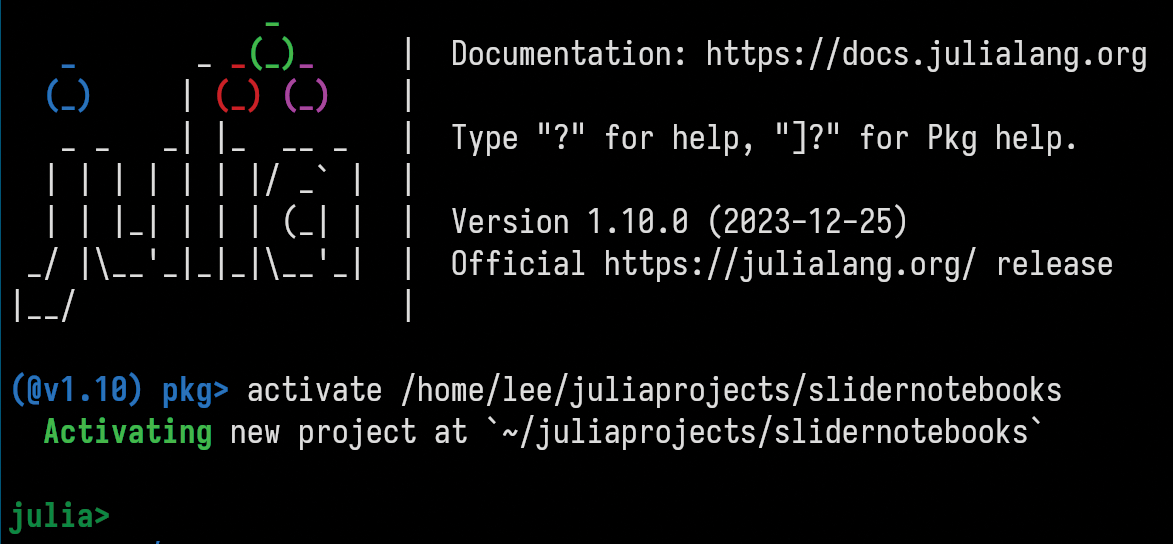
The next step is to activate the new environment you’ve settled on for your project; the command for this is also shown in the figure. At this point, if you press the backspace key, you’ll return to normal REPL mode. However, you want to remain in package mode a little longer to add the one package needed for all Pluto development: the Pluto package. In package mode, at the pkg> prompt, enter the command
add Pluto
to download and precompile the package’s program files (you need to be connected to the Internet). The process can take anywhere from less than a minute to several minutes, depending on the speed of your network connection and of your computer.
Pluto notebooks contain their own environments wholly encapsulated within the notebooks. This arrangement helps make them portable and their calculations reproducible, which is an important consideration for the scientists who comprise a good proportion of their user community. Therefore, any further packages needed for calculations in the notebook will not be added in the REPL but will be imported into the notebook. Julia and Pluto take care of these packages behind the scenes.
Developing a Notebook
You will be developing your notebook within the web interface provided by Pluto. The next step in starting up this interface, the connection between the web browser and the Julia process running on your computer, is to exit package mode in the REPL and, at the normal green julia> prompt, execute the commands:
using Pluto
Pluto.run()
After some messages in the REPL and a short delay, a new window opens in your default web browser displaying the Pluto interface.
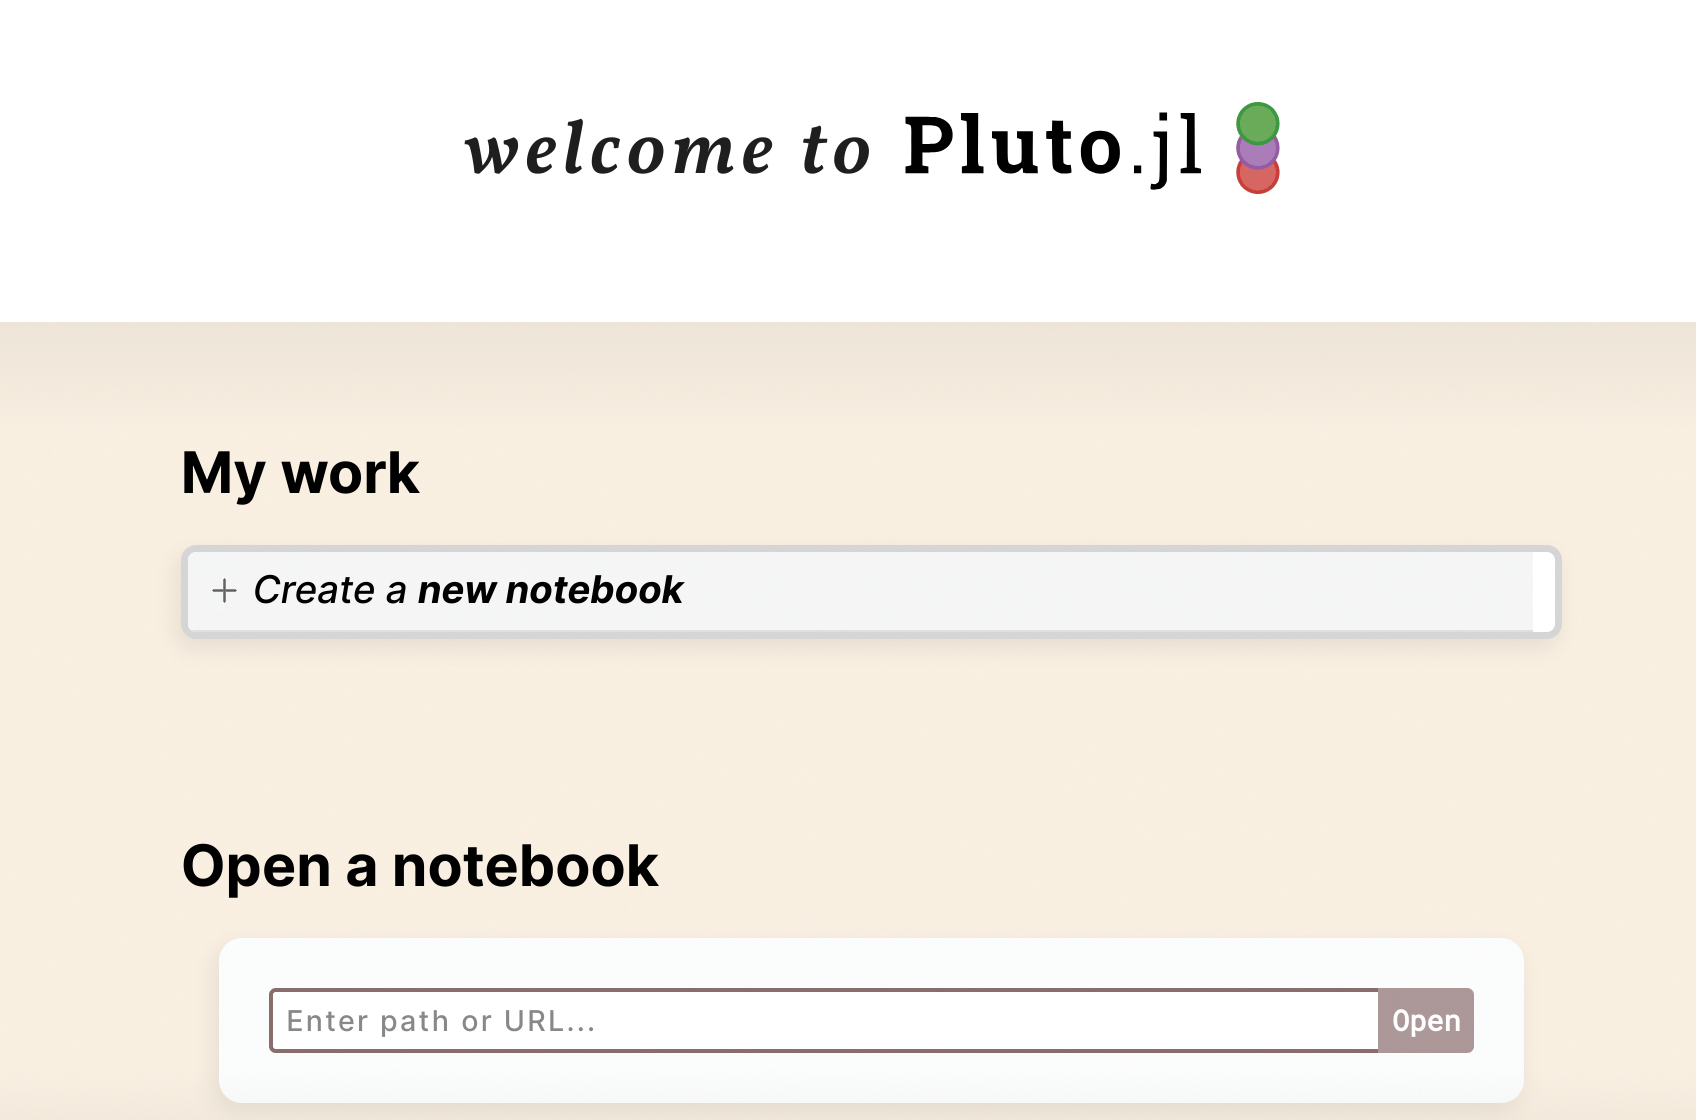
To replace this start page with an empty Pluto notebook, click the control that says Create a new notebook, where you’ll begin the development of your web application. The first step, to remain organized, should be to click on the Save notebook text near the top of the page to give the notebook a name and a place in the filesystem. Now you can put any code in any of the notebook cells; rearrange the cells to present the notebook in a logical, pedagogically useful manner; and click on the little eye icons at the left of focused cells to decide whether your users will see their content or merely their results. If you haven’t used Pluto or Jupyter (which follows similar conventions) before, it might be helpful at this point to consult one of the relevant articles or books linked elsewhere in this article; however, the interface and behavior are fairly intuitive.
If you have used Jupyter but have no experience with Pluto, you must be aware of one crucial difference: In Jupyter, cells are executed from the top down, but in Pluto, their order on the page has no effect on their execution. Cells in Pluto are executed in a logical order, following the graph of their dependencies. If you cause any cell to be executed, all the cells whose results depend on the outcome of that cell are automatically executed as well, following the chain of dependencies until everything is resolved. Therefore, you can order the cells to make the most presentational sense and even change your mind and the order later, without affecting the results. This freedom of cell ordering carries through to the web application that your notebook becomes: The user will be able to manipulate the controls in any order and will always see a reproducible, correct result.
You can use almost any package in the notebook by simply importing it with a using statement in any cell; the consequent downloads and compilations happen automatically. The one required package for any notebook destined for PlutoSliderServer is PlutoUI, which contains the code for the widgets with which users interact. In addition to the familiar slider, PlutoUI provides a large and useful collection of widgets with which you can design a huge variety of interactive experiences.
Each widget performs the same function: It sets, or binds, the value of a variable to a value determined from the user’s manipulation of the control. To insert a widget on the page, use the bind macro, supplying it with a first argument naming the variable to bind and a second argument describing the widget to use. Every time the user manipulates one of these widgets, the value of its associated variable is (potentially) changed, and any cell that depends on the value of that variable is run (followed by all cells that depend on the result of that cell). This technique is thus ideal for demonstrations of such things as showing how the solution to an equation depends on the value of a parameter.
The image below illustrates the use of the bind macro to create widgets. The notebook first does the necessary import in the first cell (this would normally be hidden from end users of the application). The second cell uses Julia’s macro syntax to invoke the macro to bind the value of a slider (which can take integer values from 1 to 10) to the variable x. In the figure, it’s set at the value 6 with the slider. The third cell shows the use of the NumberField macro, with a keyword argument supplying its default value. Note that in Pluto a cell’s result is displayed above the cell content.
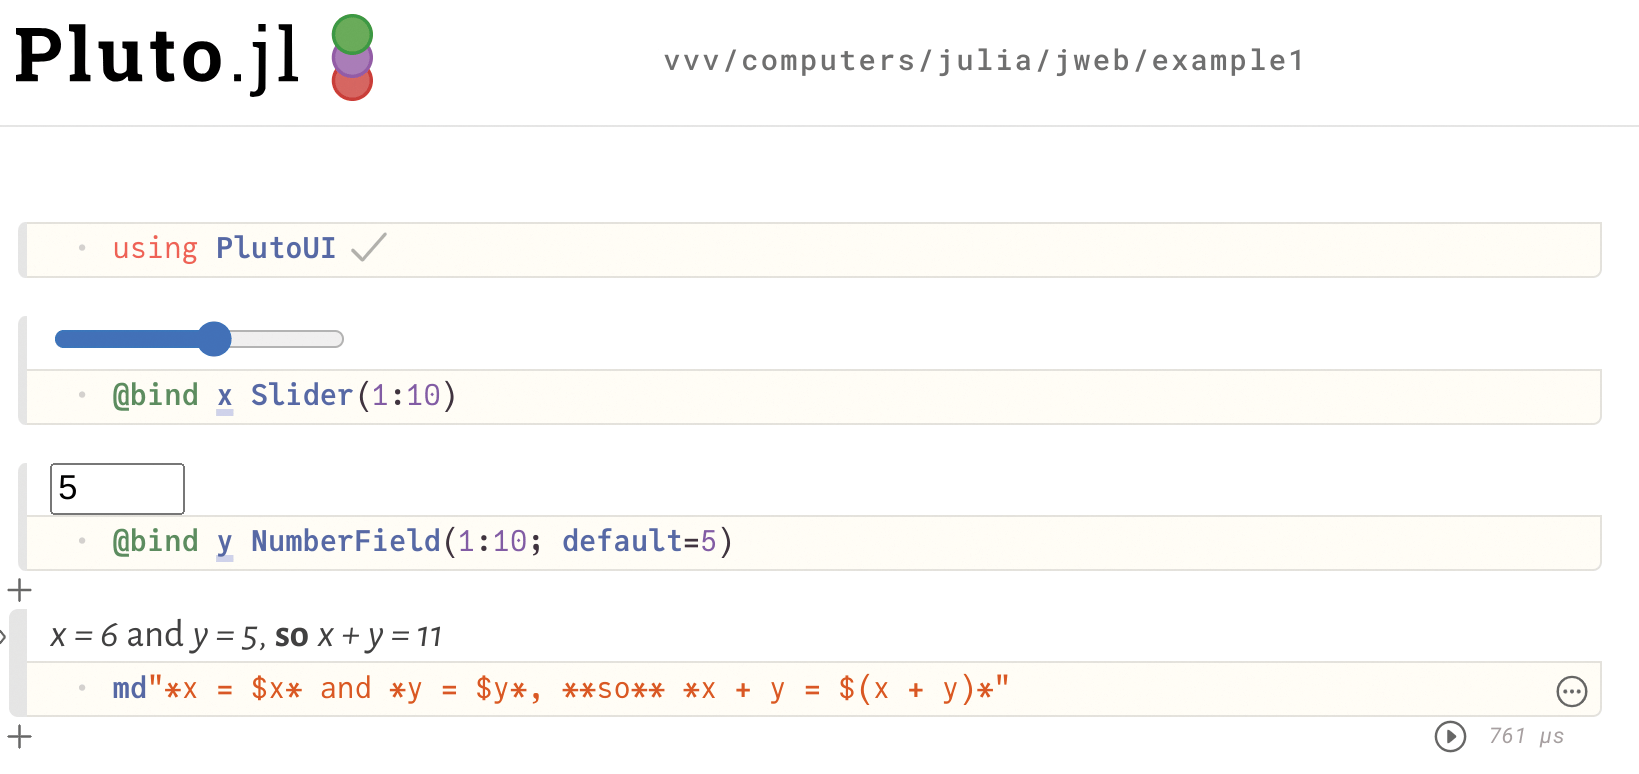
The final cell uses a Markdown "nonstandard string literal’’ to represent a Markdown string. The definition of this string literal is included neither in Julia nor in Pluto (nor in PlutoUI), but in another package that is automatically imported in all Pluto notebooks because the use of Markdown to create text cells is so common. The string has interpolated variables and uses Markdown syntax for italics and boldface. You can also use HTML if Markdown doesn’t provide everything you need, either with an HTML nonstandard literal (html"<markup goes here>") or with the HTML() function, which is able to incorporate interpolated variables that don’t work in an HTML literal. An even more flexible way to use HTML in Pluto is with the HypertextLiteral package, which I use extensively in my Ptolemy’s Universe example.
When this notebook is made available over the Internet by PlutoSliderServer, the user will be able to use the slider and the input box to set the values of x and y, but not be able to change the code in the cell that computes their sum. Whether that code is visible or not is your choice, depending on your purpose for the notebook.
Setting Up the Server
You are going to serve a web page on the public Internet that allows visitors to run Julia programs on a remote server. Although the interactions through PlutoSliderServer are deliberately constrained, the possibility is always present that a user will find a way, either maliciously or inadvertently, to do something that is not part of your plans (e.g., the Julia process running on the server potentially has access to the filesystem). This software comes with no security guarantees; it’s up to the developer to take measures to limit the scope of potential damage.
The best, and recommended, way of accomplishing this added security is to confine the Julia process on the server to some type of virtual environment, such as a container from which it is impossible to see the machine’s root filesystem. The use of such a container makes the worst-case scenario the destruction of the container itself; the server machine will be unaffected, and the administrator can start up the container again.
Among the several widely used container strategies is my favorite, which is built into most Linux systems: systemd-nspawn. If you’re using a Linux server and don’t already have a favorite container solution of your own, I suggest learning how to use systemd-nspawn to secure and isolate the server environment. Another popular option you might already know about is Docker. It’s not important what container technology you use, but it is important that you do something to isolate the Julia process on your server.
When merely testing out the notebook with the slider server, you can, of course, do everything on your local machine, where no container will be necessary.
After setting up your container and installing Julia on it, you should start a Julia REPL on the container, establish an environment as above (or simply use the default environment), and import the PlutoSliderServer package, which pulls in Pluto as a dependency.
The next step is to configure the web server on the host machine (not within the container). The following instructions will be specific to Apache, because that’s where I tested my solutions. The configuration for Nginx will be quite similar.
The goal is to configure Apache to act as a gateway, or reverse proxy, to intercept normal HTTPS web requests to your public server and relay them to the PlutoSliderServer web server running in your container. Your visitors will not have to know anything about the slider server; they’ll interact with your web application just as with any normal web page.
For Apache, first install or enable the required modules to enable proxying: the proxy, proxy_html, and proxy_http modules. These might already be installed; check in the /etc/apache2/mods-enabled directory. Next, add the lines in Listing 1 to the appropriate section of the configuration file for your virtual domain, if you have one, or for the default. For Apache, the files live in /etc/apache2/sites-enabled/.
- ProxyRequests Off
- AllowEncodedSlashes On
- ProxyPass "/sliders/" "http://127.0.0.1:2345/" nocanon
- ProxyPassReverse "/sliders/" "http://127.0.0.1:2345/" nocanon
The listing shows the proxy configuration for my slider pages, where I use /sliders/ in the URLs. Adjust those lines as needed for your server configuration. The directives pass requests from the user’s browser to port 2345 on the local machine, which is the default port used by the PlutoSliderServer package. You can change the port if you happen to be using that one for something else (see below). The 127.0.0.1 address refers to the local machine and is how you can talk to the slider server running on the container. Note that communication within the server machine is over http -- hence, in plain text. Although OK for now, you should set up Apache (Nginx, etc.) so that communication over the Internet uses https.
The final step is to write some small scripts to start Julia and PlutoSliderServer in the container. You should be logged in as root within the container to complete this final step.
Just running Julia from the terminal won’t quite work, because the process exits when you log out of the container. Even using nohup is not a reliable way to keep Julia running. For this purpose, use the systemd-run command, which, like systemd-nspawn, is built in to most modern Linux distributions (at least those that use systemd, which, although far from beloved by all, has become a standard).
Specifically, create a file with the startup script:
#! /usr/bin/bash
echo "Notebook server starting"
julia
echo "Done."
Name it (say) servenotebooks, and make it executable with:
chmod 755 servenotebooks
As you can see, all the script does is start Julia. Invoking it with systemd-run makes the Julia process persistent; that’s its entire reason for existing.
One wrinkle might pop up that you will have to iron out, depending on the packages you use in your notebook. Some packages assume that Julia is being run on a computer with a graphical display (e.g., the X Window System); however, typically, this is not the case when running Julia on a server. It happens to be a problem with one of my example notebooks, which uses the Javis package for creating animations. Javis will not even compile unless it detects a system for graphical output.
One solution to this problem, if you encounter it, is to install X Windows on the server. Another solution is to install the program xvfb-run, which creates a virtual X Window environment for a program to run within. To use this solution, simply replace julia in the startup script above with xvfb-run julia.
When Julia starts, it runs the .julia/config/startup.jl Julia script in your home directory. Because Julia will start in this container only for the purpose of running PlutoSliderServer, you can handle it in the startup script. Create (or edit, if it already exists) a file with the path mentioned here, providing it with the content:
using PlutoSliderServer
run_directory(
  "/<the/notebook/directory>/";
  Export_offer_binder=false)
The first line imports the only package needed to serve the notebooks; the package was added in a previous step. The second line starts the slider server in a mode where it monitors the directory in which you want to put your notebooks (replace /<the/notebook/directory>/ with this location). In this mode, you can add, delete, or upload updated versions of all your notebooks, and the slider server will take note and serve the current state of the directory. You won’t need to restart the server or take any other action.
The keyword argument (the bit after the semicolon) to run_directory tells the server not to put a particular button on the notebooks you don’t want. To see a list of all available options for this function, enter help mode in the Julia REPL by typing ? <function name>.
With this step completed, your server is ready and running. You can check its status with the journalctl command or kill it with the systemctl kill command. Use the
julia --startup-file=no
command if you ever want to start Julia in your container without executing the startup script.
HTMX Web Applications
PlutoSliderServer is ideal if you already have a Pluto notebook that you want to turn into a web application, or if the application you have in mind fits well with the PlutoUI set of widgets and the notebook framework.
In this section, I describe another way to create interactive web applications that use Julia on the back end for computations. With these methods, you don’t need Pluto or any other Julia package aside from those used for your calculations and the HTTP package, which provides functions for communication over a WebSocket.
The front-end interactions are designed around HTMX, which is a small JavaScript library that enhances HTML by allowing more elements to send messages to the server and by easily allowing fragments of the page to be replaced with the server’s response, rather than having to reload the entire page on each request (similar to the AJAX method of request-and-response handling, but extended and made easier to use, with no explicit JavaScript required). This enhancement is exactly what’s needed for a smooth interactive experience.
The method also uses the WebSocket extension to HTMX. PlutoSliderServer uses WebSockets to make interactions snappier, although you didn’t have to be aware of that when setting up your client and server. The method described in this section also uses WebSockets for the same reason.
Visit the sites under the HTMX Examples section in Table 1 for two examples of web applications I made with the methods from this section. These examples give you some idea of the kinds of things you can make, although your imagination is the only limitation.
You’ll need to import the small HTMX library and its WebSocket extension into your HTML page. You can import directly from their source URLs provided in the documentation, but I prefer to download them to my server and load them locally to avoid potential problems, including when accessing the HTMX website. If the visitor can get to your page, then the HTMX library is guaranteed to load. The drawback is losing the potential advantage of the user’s browser cache on the first visit, but this is not a huge consideration because these JavaScript libraries are quite compact.
Put something like the following two lines near the top of the HTML page of your web application:
<script src="/htmx.js"></script>
<script src="/ws.js"></script>
This example is for when you’ve placed the files at the root of your web directory, but of course, you can put them elsewhere. The second line loads the WebSocket extension.
Because you won’t have access to the PlutoUI collection of widgets, you’ll need to have some familiarity with HTML to be effective with the method described here. Additionally, it’s useful to know a little bit of plain JavaScript, in case you’d like to customize the user interactions beyond what HTMX and HTML can provide on their own (although you can go pretty far with these two technologies without the need for any JavaScript at all).
The next example illustrates the differences in defining widgets between PlutoUI and HTML. The previous examples created a slider in the Pluto notebook with
@bind x Slider(1:10)
In HTML, the closest equivalent is:
<input type="range" name="s"
       min="1" max="10">
However, the two examples already show a big difference in behavior. The @bind macro invocation in the Pluto notebook sets the value of x directly when the user manipulates the slider, and any notebook cells that depend on the value of that variable are immediately executed (as well as all those further down in the chain of dependencies). All you need to do is write the programs that use x and put in the @bind macro for the slider anywhere it makes sense in your presentation.
In the HTML case, the <input> tag merely puts a slider on the page. You have to do a bit more to make anything happen when the user slides the control. Listing 2 shows a fragment of an HTML page for a minimal slider that adds three attributes to the input tag for the slider (the tag is broken over three lines here).
- <label> Pick a number
- <input data-hx-ext="ws" data-ws-send
- data-ws-connect="wss://<your/server/url>/"
- type="range" name="s" min="1" max="10">
- </label>
- <p id='sr'></p>
All of these attributes invoke functions from the HTMX WebSocket extension (see the ``Validation and the Data Prefix’’ box). The new attributes in Listing 2 specify, respectively, that the element (the slider) uses the extension, that it sends data over a websocket, and that it will send the data to the specified address. The WSS protocol is for encrypted WebSocket communication (analogous to HTTPS), which you should always use when communicating over the public Internet. For testing on your local machine, you can replace the address with ws://127.0.0.1:PORT
Validation and the Data Prefix: The data prefix in the three new attributes in the <label> tag of Listing 2 is optional, in the sense that its omission will not affect the behavior of the client. It is there to make the page valid HTML; custom attributes such as hx-ext are not part of HTML, so validators will complain; however, they will ignore any attribute beginning with data-. Allowing the data prefix is a feature of HTMX. Note that PlutoSliderServer pages do not pass validation, and their sources cannot be usefully inspected by a curious user, which is a disadvantage. Pages made with HTMX can be valid HTML, and their code is legible with View Source.
and use the port number that you’ve set up in place of PORT. Finally, the element is wrapped in a label, which associates the instruction with the slider. Following the labeled slider is an empty paragraph with an id that is there to receive the response from the server.
Every time the user changes the position of the slider, a value associated with name s is packaged into a message and transmitted over the open WebSocket to Julia running on the server. The client sends the message after the user stops interacting with the control (e.g., by moving the mouse away), so you needn’t worry about a massive cascade of messages being transmitted while the slider is in motion.
Listing 3 shows a minimal working Julia program that defines a server that can respond to the slider in the previous example. To begin, create an environment for your Julia project in the REPL’s package mode, as before, and add the HTTP and JSON packages.
- using HTTP, JSON
- const PORT = 8660
-
- function startserver()
- WebSockets.listen("127.0.0.1", PORT) do ws
- for msg in ws
- d = Meta.parse(JSON.parse(msg)["s"])
- WebSockets.send(ws, """<p data-hx-swap-oob='true' id='sr'> You picked $d </p>""")
- end
- end
- end
The JSON package is here for one function: JSON.parse(), which extracts variables from the messages sent by the client. The information returned by the server is always in the form of HTML fragments, not JSON: This is the philosophy behind HTMX.
Variables extracted from browser messages are always strings. In this example, the string is passed to Meta.parse(), part of Julia Base, which converts strings to Julia expressions; in this case, it’s used to convert the string to an Int.
The HTTP package provides the two communication functions around which you will build your applications. WebSockets.listen() takes a second argument giving the IP number on which to listen, and a third argument for the listening port. This function opens a WebSocket connection on the given address and port. The address shown in the listing refers to the local machine, either your development computer or the server container on which you’ll eventually deploy.
You’ll notice when you run this or similar code that the REPL blocks with a message that Julia is listening on the WebSocket. If you’d prefer to continue to work in the REPL while this program is running, perhaps to start further servers, the HTTP package provides another, non-blocking version of the function. It’s the same, but using an exclamation mark; the call becomes:
WebSockets.listen!("127.0.0.1", PORT)
In the program you run on the server with the systemd-run command, you can start up any number of listening WebSocket servers with the non-blocking version of the call, but the final one should use the blocking version to keep the program alive and listening for connections.
The first argument to WebSockets.listen() is a handler function that takes a single Websocket argument; it’s provided here as an anonymous function constructed with Julia’s do keyword. This function is the one that does things with the incoming messages, so it should include the command that sends the result back to the client, which is accomplished by the WebSockets.send() call. The for loop keeps the connection open until the user closes it, which normally happens on closing the web page. Listing 3 shows the typical pattern for using the HTTP package to communicate over WebSockets and is the pattern I use in the more complicated examples listed under HTMX Examples in Table 1.
In more detail, the function startserver() in Listing 3:
- Begins to listen for WebSocket messages on the local machine coming through PORT
- Parses each message received, extracts the value associated with the names, and assigns that to the variable d
- Immediately sends a message back to the client consisting of an HTML fragment with the value assigned to d interpolated
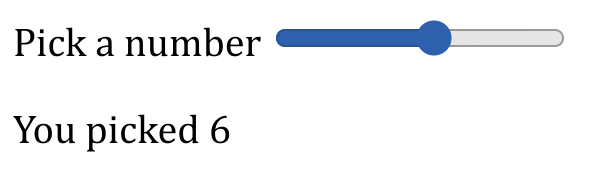
The example returned by the HTML fragment has a paragraph element with two attributes. The first, hx-swap-oob (with the optional data prefix to help keep the HTML standards compliant), tells HTMX that the fragment is to be inserted out of band and should replace the existing element with id=‘sr’. In the context of HTMX, ``out of band’’ means that the element to be replaced is not the same as the element that sent the message: The slider itself is not to be replaced, but a different element -- in this case, a paragraph.
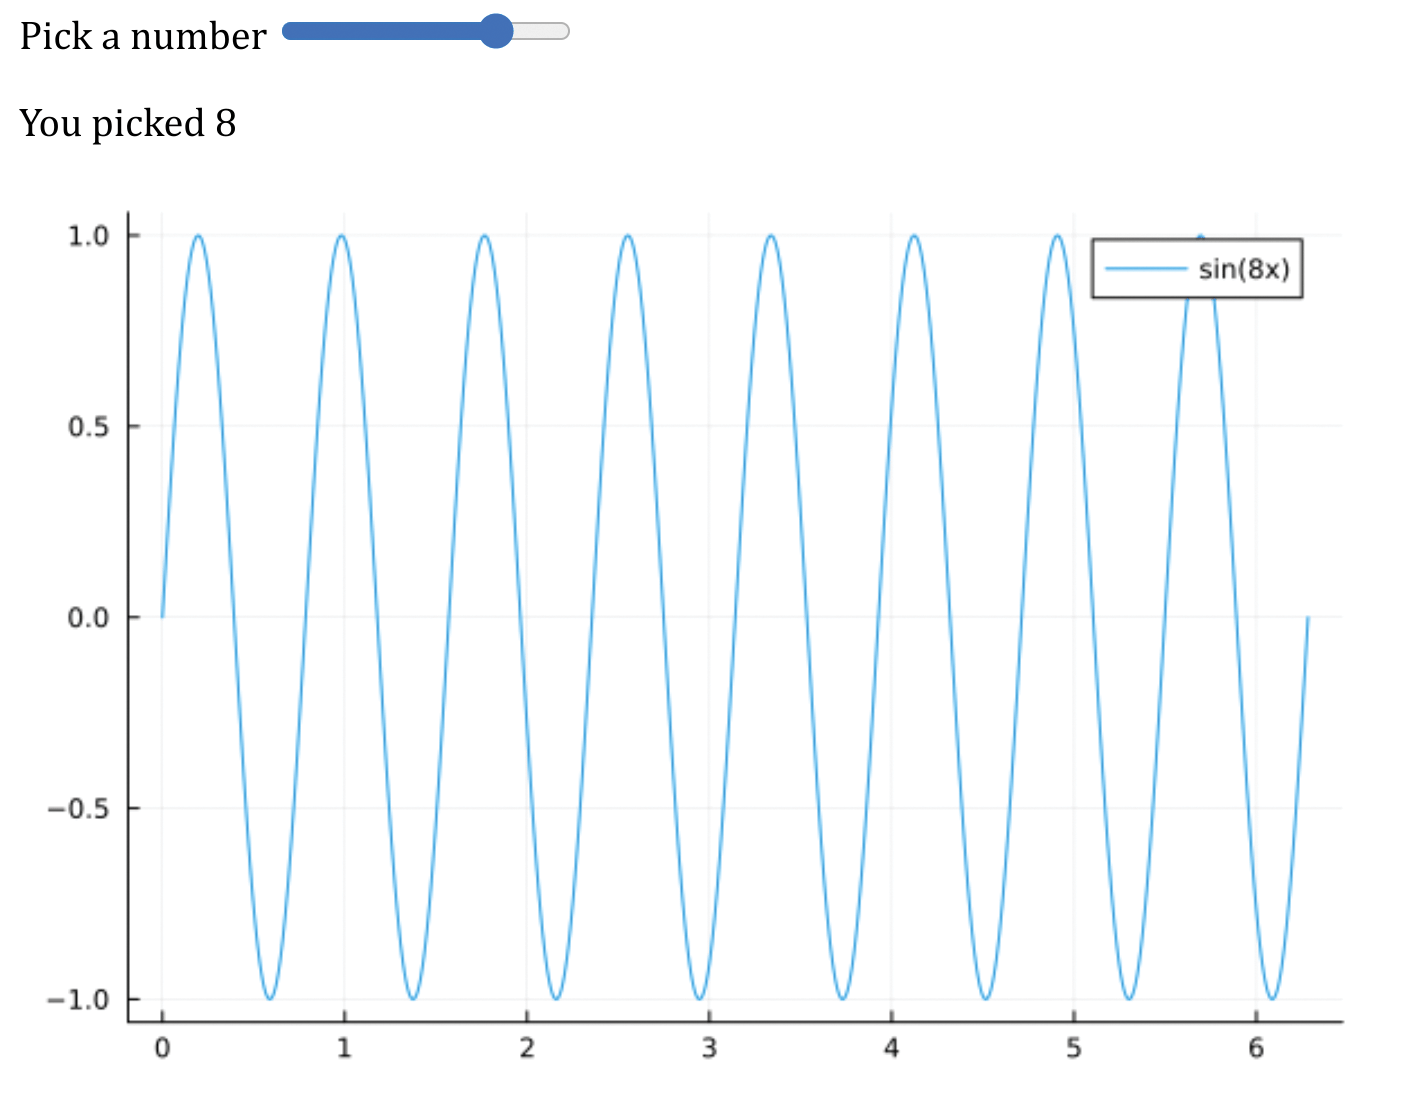
Referring back to Listing 2, notice the existing empty paragraph with id=‘sr’. It’s there as a placeholder, ready to be replaced after the user manipulates the slider. The image below shows what this minimal example looks like in the browser after the user has placed the slider in a position corresponding to the number 6. The empty paragraph has been replaced by that constructed in Listing 3, containing the text You picked 6.
Listings 2 and 3 illustrate the mechanics of using the JavaScript HTMX library and the Julia HTTP package together to build an interactive page backed by Julia computations on a server. By using this method with a little HTML and JavaScript knowledge, you can create any application you can imagine. Often in these applications, you will want to insert something other than text into the page: perhaps images, video, or sound. One obvious way to accomplish this is to have your Julia program save the media that it generates in a file on the server and send an element to the page that loads the file. This is the usual way that, for example, an image tag works, referring to the URL of the image to be loaded in its src attribute.
This reasonable approach has at least two minor disadvantages: It requires an extra request to be sent by the client, which adds an interaction delay, and it litters your server with media files that you will need to clean up. If you delete them too soon, your users’ pages might wind up trying to load resources that no longer exist, and if you leave them around too long, they will eat into the space on your server.
An elegant solution to these problems is to exploit an underutilized feature built into HTML: the data URL. With this feature ,you can send any kind of media a web browser can support (e.g., images, sounds, etc.) directly down the wire as part of the server’s response, rather than sending the URL of a file that the browser subsequently has to request. No files need be created or stored. The media becomes part of the page, just as its text content is, rather than a separate resource.
To use this feature in your web applications, you’ll need a way to encode the binary media data as text. Among the myriad ways to do this, the standard in browsers is Base64 encoding, provided in Julia by the IBase64 package.
Listing 4 shows the server program from Listing 3 with a few lines added that create a plot from user input on the slider, encode it, and send it to the client for insertion on the page. The program imports the Plots and Base64 packages to create and encode the graphics. At the beginning of startserver() an input-output buffer is assigned to the variable io. You’ll need this buffer object as part of the conversion from a binary stream to a block of text.
- using HTTP, JSON, Plots, Base64
- const PORT = 8660
-
- function startserver()
- io = IOBuffer();
- x = 0.0:2PI/1000:2PI
- WebSockets.listen("127.0.0.1", PORT) do ws
- for msg in ws
- d = Meta.parse(JSON.parse(msg)["s"])
- @info d
- @info typeof(d)
- WebSockets.send(ws, """<p hx-swap-oob='true' id='sr'>You picked $d</p>""")
- p = plot(x, sin.(d .* x); label="sin($(d)x)")
- show(io, MIME"image/png"(), p)
- data = base64encode(take!(io))
- WebSockets.send(ws, """<img data-hx-swap-oob='true' id='plot' src='data:image/png;base64,$data' alt='sin(1/x)'>""")
- end
- end
- end
Within the for loop you can see four new lines. First, the program creates a simple plot of the sin() function that incorporates the value selected by the user, assigning this plot to the variable p. The next two lines read the plot data into io as a PNG image, convert it to text (Base64-encoded), and store it in the variable data.
The final line in the for loop has an additional send() call that sends the plot to the client, replacing the existing image element (identified by its id) with an image element that embeds the plot in its src attribute. As you can see in the example, you have to tell the browser the mime type of the data and mention that it uses base64 encoding.
Listing 4 also illustrates that you are not limited to sending one response for each message received but can send any number of them, targeting any set of elements on the page.
The client code for this example would be the same as in Listing 2, with the addition of the line
<img alt='' src='' id='plot'>
to create a placeholder element for the plot.
The image below shows a screenshot of the browser after the user has manipulated the slider to select the number 8. If you implement the client and server from Listings 3 and 4 and play with the slider in your browser, you’ll see that the plot updates quickly, providing a good interactive experience, especially if you run the server on the same machine as your browser. Naturally, if the server and client are communicating over the Internet, the experience will be affected by the speed of the network, and the response will not always be smooth and interactive, which is an unavoidable drawback of all applications that depend on calculations carried out on a remote server. The principal way to minimize such issues is to avoid sending massive amounts of data in response to user actions. If you’re sending an image, for example, take advantage of compressed file formats (e.g., JPEG) and limit the resolution to reduce the quantity of data as much as possible.
The other source of delays in interactivity is the time needed to carry out the calculations on the server. In this case, Julia’s speed helps and is one reason it’s a good choice for these applications: For the typical calculations supporting the types of pedagogical purposes that my examples serve, the calculations are sub-second, and calculation time is not a major factor limiting the experience of interactivity.
You can implement the example in this section with the PlutoSliderServer method, as well; which one you might choose depends on your plans for further development, whether you enjoy working with Pluto notebooks, and whether having an HTML page that can pass validation is important to you. For an example of an application that uses the techniques described in this section but that would be cumbersome to build with PlutoSliderServer, see the vortex dynamics example in Table 1. You can examine the source of the client in the usual way, and the page explains how to obtain the source code for the server component.
A Final Example
One more example, expanding a bit on the previous one, will serve to demonstrate a few more controls and show how to use styles to lay out the page. Additionally, this example actually does something almost useful.
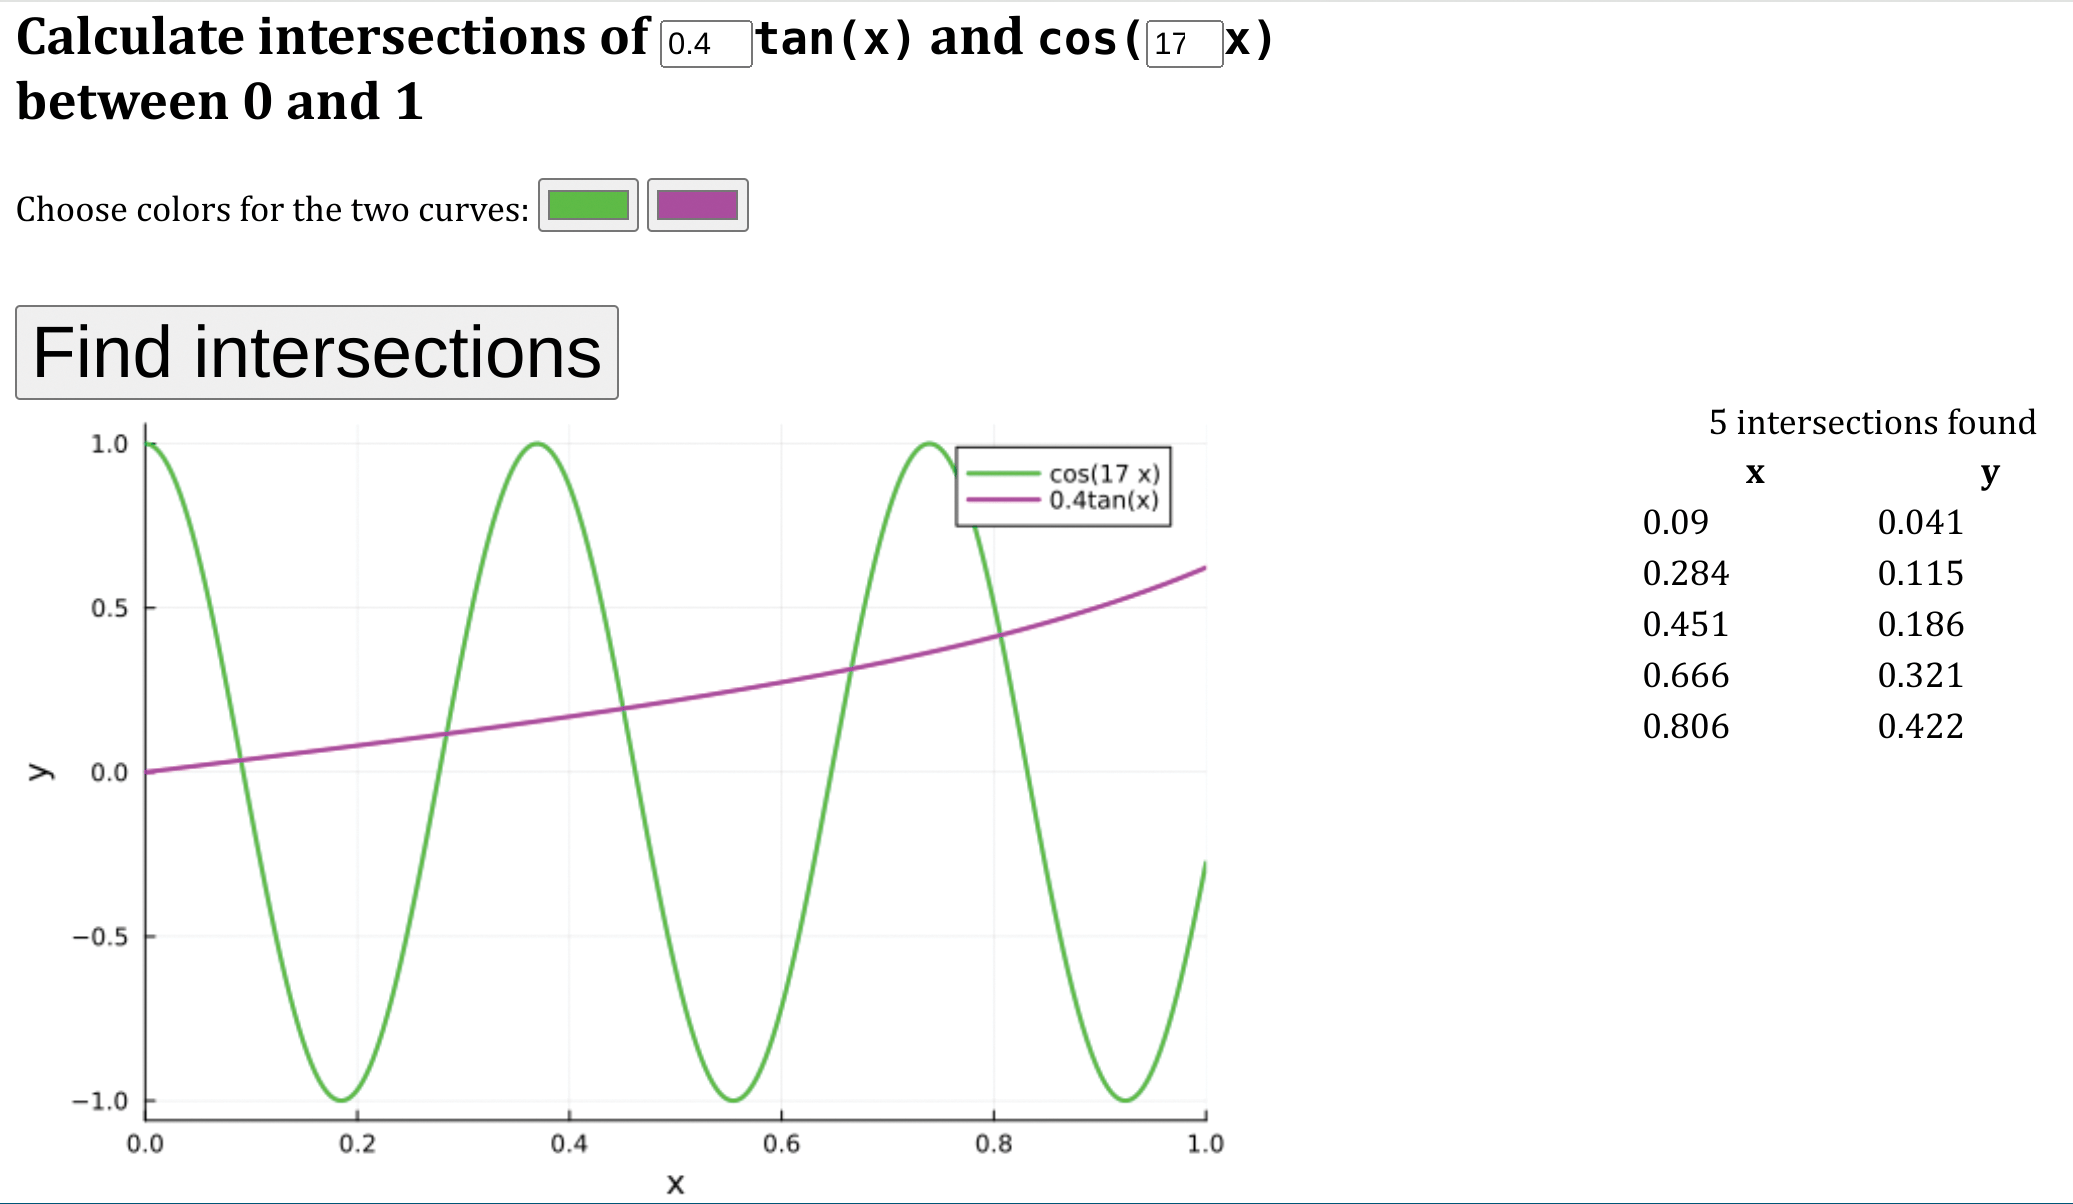
The mathematical problem of finding the intersections of trigonometric functions typically has only numerical solutions. The image below is a browser screenshot showing an application that lets the user pick two parameters: one for the amplitude of the tangent function and the other for the frequency of a cosine function. The user can also select two colors with two color pickers. On clicking the Find intersections button, two new elements appear on the page: a graph of the two functions in the selected colors and a table listing all of their intersections within the range (0, 1).
Listing 5 contains the complete HTML code for the client page, aside from the header and other HTML administrivia, and Listing 6 has the complete server program.
- <form data-hx-ext="ws" data-ws-send data-ws-connect="ws://127.0.0.1:8660">
- <h2>Calculate intersections of <code><input style='width:3em;' type="number" name="t" min="0.1" max="1" value='1' step='0.1'>tan(x)</code> and <code>cos(<input style='width:2.5em;' type="number" name="c" min="1" max="40" value='4'>x)</code><br> between 0 and 1</h2>
- Choose colors for the two curves:
- <input type='color' name='c1' value='#990000'>
- <input type='color' name='c2' value='#000099'><br>
- <input type='submit' style='font-size:2em; margin-top:1em;' value='Find intersections'><br>
- <img alt='' src='' id='plot'>
- <table id='ztable'></table>
- </form>
- using HTTP, JSON, Base64, Roots
- const PORT = 8660
-
- function startserver()
- io = IOBuffer();
- x = 0.0:0.001:1.0
- WebSockets.listen("127.0.0.1", PORT) do ws
- for msg in ws
- lc1 = JSON.parse(msg)["c1"]
- lc2 = JSON.parse(msg)["c2"]
- c = Meta.parse(JSON.parse(msg)["c"])
- t = Meta.parse(JSON.parse(msg)["t"])
- f1(x) = cos(c * x)
- f2(x) = t * tan(x)
- f(x) = f1(x) - f2(x)
- z = round.(find_zeros(f, (0, 1)), digits=3)
- y = round.(f1.(z), digits=3)
- ztable = []
- for zero in zip(z, y)
- append!(ztable, "<tr><td>$(zero[1])</td><td>$(zero[2])</td></tr>")
- end
- ztable = join(ztable)
- p = plot([f1 f2]; xrange=(0, 1), lc=[lc1 lc2], lw=2, xlabel="x", ylabel="y", label=["cos($c x)" "$(t)tan(x)"])
- show(io, MIME"image/png"(), p)
- data = base64encode(take!(io))
- WebSockets.send(ws, """<img data-hx-swap-oob='true' id='plot' src='data:image/png;base64,$data' alt='sin(1/x)'>""")
- WebSockets.send(ws, """<table data-hx-swap-oob='true' id='ztable' style='width:13em; float:right;'> <caption> $(length(z)) intersections found </caption> <tr><th>x</th><th>y</th></tr> $ztable </table>""")
- end
- end
- end
By this point, the function of most of what’s in these programs should be clear. The server code contains nothing fundamentally new: just some additional variables and the use of the Roots package to calculate the function intersections. Note the inclusion of style attributes in the returned HTML fragments and the incorporation of variables in plot labels and the table caption. The first two lines in the outer for loop extract the two variables set by the color selectors, leaving them as strings for direct insertion in the plot() call.
Listing 5 illustrates the use of forms with HTMX. Rather than placing the HTMX communication attributes in an input element, as you saw in Listing 2, you can place them in an opening form tag. When the user hits the form submission button, all the variables defined by input controls within the form are sent over the WebSocket in a single message.
Frequently Asked Questions
1. Is Julia good for web development?
Yes, Julia is excellent for web development, especially for applications that require:
- High-performance computational backends
- Scientific computing and data analysis
- Real-time mathematical visualizations
- Educational and research applications
Code Example - Simple Julia Web Server:
using HTTP

function handle_request(req::HTTP.Request)
    return HTTP.Response(200, "Hello from Julia Web Server!")
end

HTTP.serve(handle_request, "127.0.0.1", 8080)
Advantages:
- Fast execution due to JIT compilation
- Excellent scientific computing libraries
- Easy parallelization for performance
- Clean, readable syntax
- Strong type system
2. How do I choose between PlutoSliderServer and HTMX for Julia web apps?
Choose PlutoSliderServer when:
- You want to convert existing Pluto notebooks to web apps
- You need quick prototyping with minimal frontend code
- Your app fits well with notebook-style interactions
- You prefer pre-built widgets over custom HTML
Choose HTMX + WebSockets when:
- You need full control over frontend design
- You want to create custom user interfaces
- You need complex interactions beyond basic widgets
- You want valid HTML that passes validation
Code Example - PlutoSliderServer Setup:
using PlutoSliderServer

# Start server monitoring a directory
run_directory(
    "/path/to/notebooks/";
    Export_offer_binder=false
)
Code Example - HTMX WebSocket Server:
using HTTP, JSON

WebSockets.listen("127.0.0.1", 8660) do ws
    for msg in ws
        data = JSON.parse(msg)
        response = "<p>Received: $(data["value"])</p>"
        WebSockets.send(ws, response)
    end
end
3. How do I handle WebSockets in Julia web applications?
Julia provides excellent WebSocket support through the HTTP.jl package. Here’s how to implement WebSocket communication:
Server-side WebSocket Handler:
using HTTP, JSON, Base64

function start_websocket_server()
    WebSockets.listen("127.0.0.1", 8660) do ws
        for msg in ws
            # Parse incoming message
            data = JSON.parse(msg)

            # Process the data (example: create a plot)
            x = 0:0.1:2π
            y = sin.(x .* parse(Float64, data["frequency"]))

            # Create plot and encode as Base64
            io = IOBuffer()
            p = plot(x, y, label="sin($(data["frequency"])x)")
            show(io, MIME"image/png"(), p)
            plot_data = base64encode(take!(io))

            # Send response back to client
            response = """
            <img src='data:image/png;base64,$plot_data'
                 style='max-width: 100%; height: auto;'>
            """
            WebSockets.send(ws, response)
        end
    end
end
Client-side HTML with HTMX:
<script src="/htmx.js"></script>
<script src="/ws.js"></script>

<input type="range"
       data-hx-ext="ws"
       data-ws-send
       data-ws-connect="ws://127.0.0.1:8660"
       name="frequency"
       min="1" max="10"
       value="1">
<div id="plot-container"></div>
4. What are the best practices for deploying Julia web applications?
Security Best Practices:
# Use containers for isolation
sudo systemd-nspawn -D /path/to/container

# Set up reverse proxy with Apache
ProxyPass "/app/" "http://127.0.0.1:8660/" nocanon
ProxyPassReverse "/app/" "http://127.0.0.1:8660/" nocanon
Containerization is crucial for Julia web applications because they execute arbitrary code on your server. systemd-nspawn creates an isolated environment that prevents malicious code from accessing your host system. The reverse proxy configuration ensures that external traffic goes through Apache’s security features (SSL termination, rate limiting, etc.) before reaching your Julia application.
Deployment Script Example:
#!/bin/bash
# Start Julia web server with systemd
systemd-run --unit=julia-webapp \
    --setenv=JULIA_PROJECT=/path/to/project \
    julia --project=/path/to/project \
    -e "using MyWebApp; start_server()"
Using systemd-run ensures your Julia web server runs as a proper system service with automatic restart capabilities, logging, and process management. The --setenv=JULIA_PROJECT flag ensures Julia uses the correct package environment, preventing dependency conflicts.
Performance Optimization:
# Use non-blocking WebSocket listeners for multiple services
WebSockets.listen!("127.0.0.1", 8660) do ws
    # Handle first service
end

WebSockets.listen!("127.0.0.1", 8661) do ws
    # Handle second service
end

# Final blocking listener to keep process alive
WebSockets.listen("127.0.0.1", 8662) do ws
    # Handle main service
end
The non-blocking listen! function allows you to start multiple WebSocket services simultaneously without blocking the main thread. This is essential for microservices architectures where different Julia processes handle different aspects of your web application. The final blocking listen call keeps the main process alive.
Key Considerations:
- Security: Always use containers or virtual environments for production
- Scalability: Consider load balancing for high-traffic applications
- Monitoring: Implement logging and health checks for production deployments
- SSL/TLS: Always use HTTPS in production with proper certificate management
- Resource Limits: Set memory and CPU limits to prevent resource exhaustion
5. How do I integrate Julia’s scientific computing capabilities with web applications?
Julia excels at combining scientific computing with web development. Here’s how to leverage this:
Mathematical Visualization Example:
using Plots, Base64, HTTP, JSON

function create_interactive_plot(params)
    # Complex mathematical computation
    x = range(0, 4π, length=1000)
    y = sin.(params.frequency .* x .+ params.phase) .* exp.(-params.damping .* x)

    # Create publication-quality plot
    p = plot(x, y,
             title="Damped Oscillation: f=$(params.frequency), φ=$(params.phase)",
             xlabel="Time", ylabel="Amplitude",
             linewidth=2, color=:blue)

    # Convert to web-compatible format
    io = IOBuffer()
    show(io, MIME"image/png"(), p)
    base64encode(take!(io))
end

# WebSocket handler for real-time updates
WebSockets.listen("127.0.0.1", 8660) do ws
    for msg in ws
        params = JSON.parse(msg)
        plot_data = create_interactive_plot(params)

        html_response = """
        <img src='data:image/png;base64,$plot_data'
             style='max-width: 100%; border: 1px solid #ccc;'>
        """
        WebSockets.send(ws, html_response)
    end
end
Key Benefits:
- Direct access to scientific libraries (Plots.jl, DifferentialEquations.jl, etc.)
- High-performance mathematical computations
- Easy integration of research code into web interfaces
- Support for complex data types and mathematical notation
Go Forth and Code
The virtues that have made Julia so successful in the realm of scientific computing and engineering – ease of development combined with uncompromised performance – also make it a good choice for the back end of web applications. In this article, you’ve learned about two approaches to making interactive websites for education, information, and entertainment. You might decide to adopt one or the other (or neither!) or, like me, apply the two approaches to different projects. I’ve found working with Julia in concert with web technologies to be one of my most enjoyable and rewarding adventures in programming. I hope you will have as much fun as I did with my projects in building things that I can’t imagine. Please share news of your creations by dropping me a line through email or in comments on my website.
This content is based on an article from ADMIN and is available to you through a collaboration with DigitalOcean.
Thanks for learning with the DigitalOcean Community. Check out our offerings for compute, storage, networking, and managed databases.
About the author
Dr. Lee Phillips is a theoretical physicist and writer who has worked on projects for the Navy, NASA and DOE on laser fusion, fluid flow, plasma physics, and scientific computation. He has written numerous popular science and computing articles and research papers. His most recent books are “Practical Julia” and “Einstein's Tutor”.
Still looking for an answer?
This textbox defaults to using Markdown to format your answer.
You can type !ref in this text area to quickly search our full set of tutorials, documentation & marketplace offerings and insert the link!
 This work is licensed under a Creative Commons Attribution-NonCommercial- ShareAlike 4.0 International License.
Become a contributor for community
Get paid to write technical tutorials and select a tech-focused charity to receive a matching donation.

DigitalOcean Documentation
Full documentation for every DigitalOcean product.

Resources for startups and AI-native businesses
The Wave has everything you need to know about building a business, from raising funding to marketing your product.
The developer cloud
Scale up as you grow — whether you're running one virtual machine or ten thousand.

Start building today
From GPU-powered inference and Kubernetes to managed databases and storage, get everything you need to build, scale, and deploy intelligent applications.
