
Introduction
When you’re using AI to code, it’s easy to get caught up in the excitement of creating something new and innovative. However, it’s crucial to remember that security should always be a top priority. Without a “security-first” approach, you might inadvertently create vulnerabilities that hackers can exploit. This is especially important when working with APIs, as they can be vulnerable to rate limiting or even DDoS attacks. By prioritizing security from the start, you can ensure that your project is not only innovative but also safe and reliable.
We have all heard about at least one of these scenarios where:
- A developer builds a sleek frontend with React/Next.js but forgets to implementing API rate limiting.
- A team focuses on feature velocity but neglects basic security measures.
- An application goes live with beautiful animations but no protection against DDoS attacks.
- A developer launches their MVP without considering how to handle API abuse.
In this tutorial you will learn how to tackle these security gaps by implementing a rate limiter using Valkey (a Redis-compatible database) on DigitalOcean’s managed database service.
What is a Rate Limiter?
A rate limiter is a tool that controls the amount of requests a user or client can make to your API within a specific time window. It acts as a gatekeeper, monitoring incoming traffic and enforcing predefined limits to prevent abuse.
Benefits of Rate Limiting
- Protection Against Abuse: Prevents malicious users from overwhelming your system with excessive requests.
- DDoS Mitigation: Helps defend against distributed denial-of-service attacks by limiting request volume.
- Resource Management: Ensures fair resource distribution among all users of your application.
- Cost Control: Reduces infrastructure costs by preventing unnecessary traffic spikes.
- API Stability: Maintains consistent performance by preventing server overload.
This is where Valkey comes in - its in-memory data structure and atomic operations make it an ideal solution for implementing fast, reliable rate limiting.
What are you building today?
We will build an API rate limiter using the Chuck Norris jokes API. When you visit our application, you can request a random Chuck Norris joke from the API, and you can do this up to 5 times within a 60-second window. Each time you request a joke, our system tracks your IP address and keeps count. If you try to get a sixth joke within that same minute, you’ll receive a “Rate limit exceeded. Please wait a minute” message instead (as shown in the image below). After the 60-second window expires, your counter resets, and you can start requesting jokes again.
Here’s how the application works: Rate.mp4

Prerequisites
- A DigitalOcean account to create a Valkey database.
- Basic understanding of REST APIs and HTTP methods.
- Familiarity with Valkey concepts.
- Working knowledge of Next.js to build the frontend (if you wish, you can also build it with Vanilla JS or just test the solution locally with
curl).
Understanding how the rate limiter works
Before we get straight into writing code and building the rate limiter, let us understand how the requests are processed and how it works in the backend with this diagram:
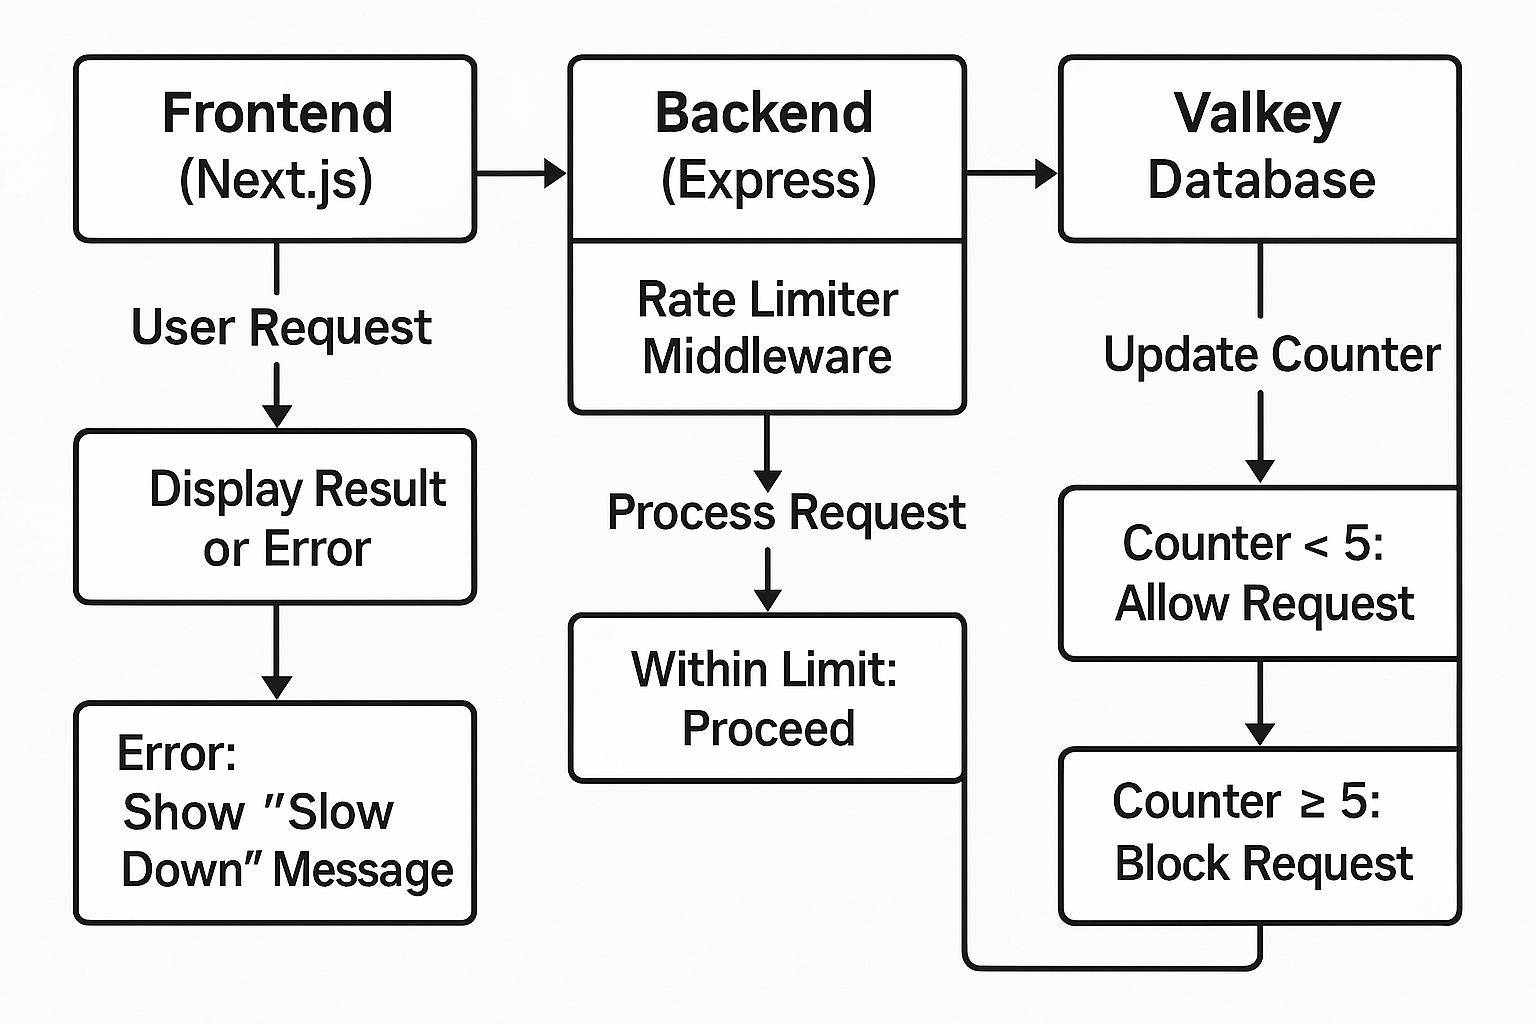
Our rate limiter application is built with three main components working together:
- The frontend - This is where users interact with the application. It shows the number of requests that are being made to our API, outputs the joke from our joke API, and displays an error message when the rate limit is hit.
- The backend - This acts as our traffic controller. It processes requests and implements the rate limiting logic.
- Valkey (DigitalOcean’s managed database) - This is our rate limit tracker. It keeps count of requests using atomic operations, automatically forgets old counts (TTL-based expiration), and does all this very quickly because it runs in memory.
Creating a DigitalOcean Valkey Database
Since Valkey will handle the logic part of the rate limiter, let’s get started with creating it first.
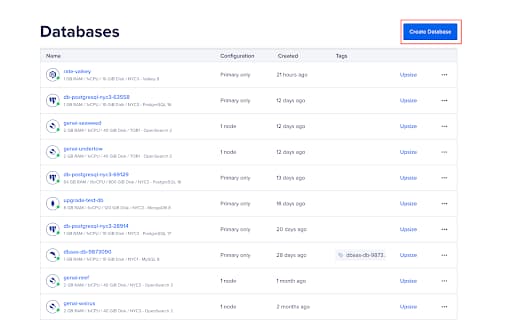
- Login to DigitalOcean and then navigate to Databases and then click on
Create Database.
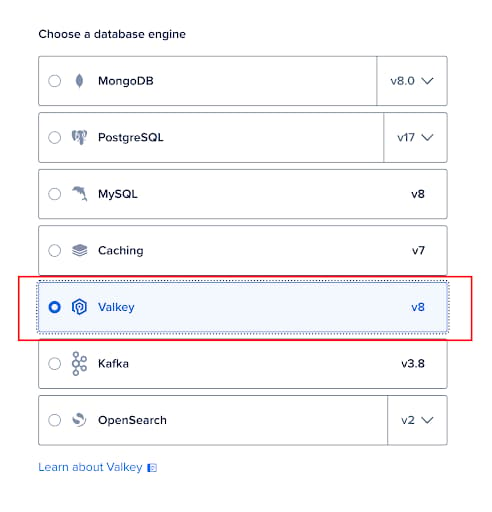
- Then to create a database cluster, choose a region and scroll down to choose
Valkeyas the database engine.
- Select a pricing plan of your choice (for this demo, we can choose a basic $15 one) and then click on the
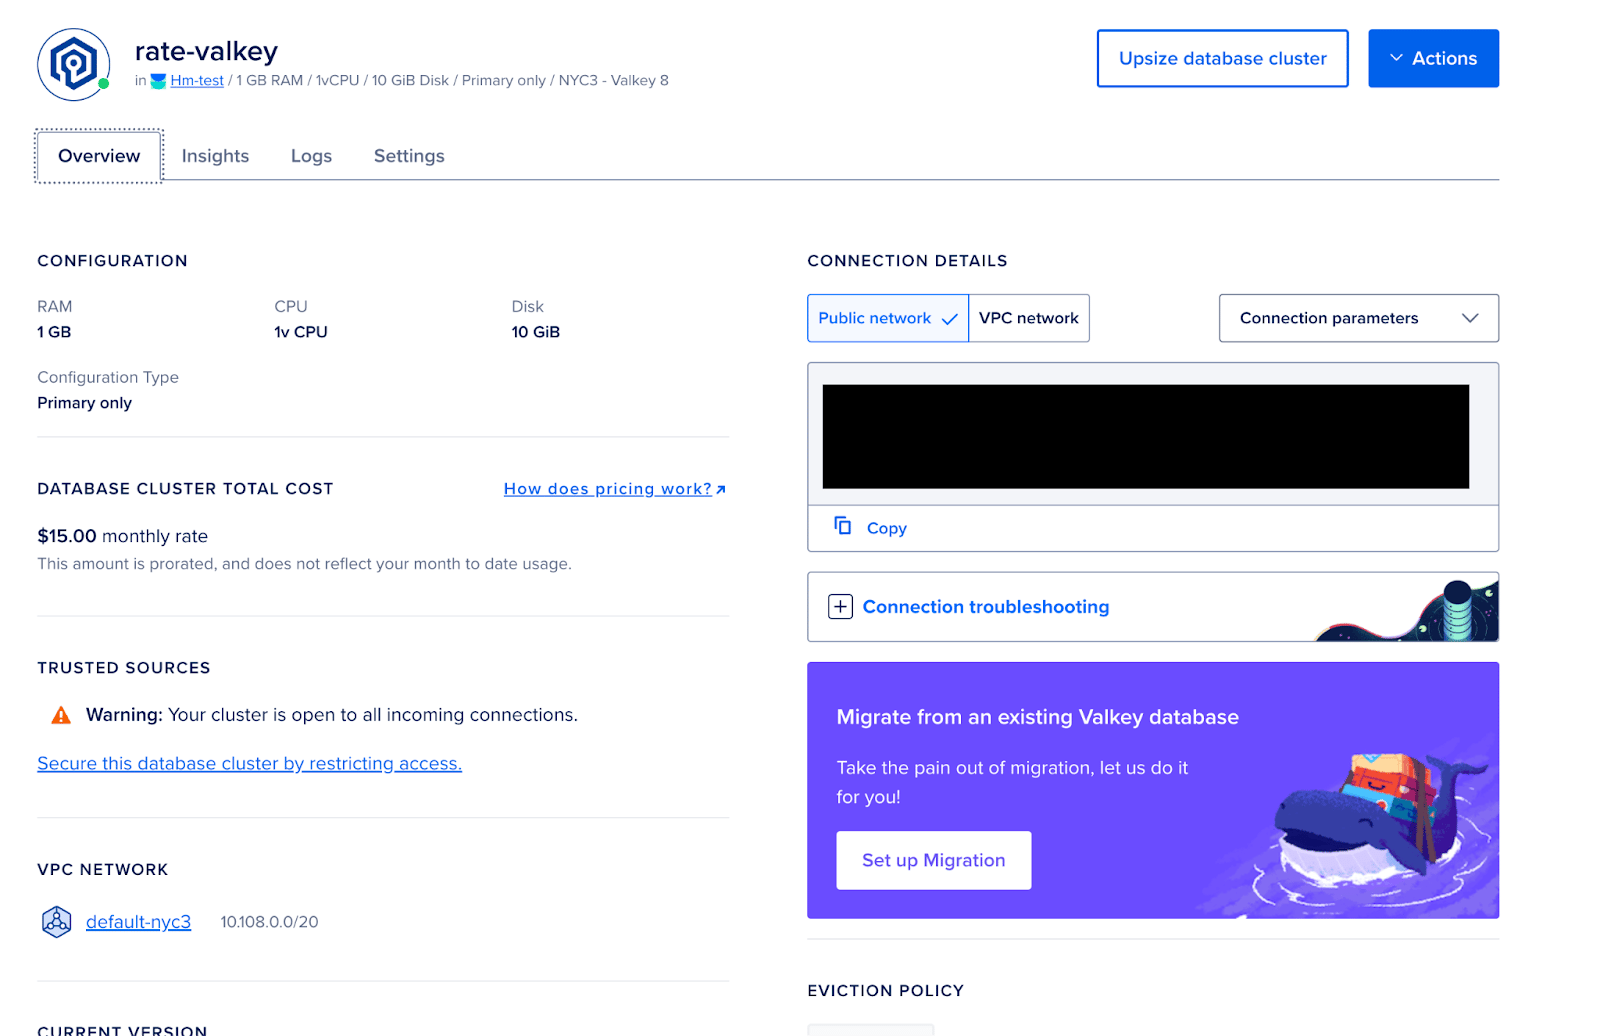
Create Database Clusterbutton to start creating the database. - Once the database is provisioned, you will see a screen similar to the one shown in the picture below. You will need the port, password, and host URL to connect to Valkey. You can check its
Overview,Insights,Logs, andSettingsfrom the tabs.
Building the Backend
Now that we have our Valkey database set up on DigitalOcean, let’s build our Express.js backend that will connect to it and implement our rate limiter.
- To connect to the Valkey Database in DigitalOcean, you need to create a
.envfile with your DigitalOcean Valkey credentials that you can get from the control panel:
VALKEY_HOST=your-db-host.db.ondigitalocean.com
VALKEY_PORT=25061
VALKEY_PASSWORD=your-password
- Now, let’s create our main
index.jsfile and set up the Valkey connection:
const fetch = (...args) => import('node-fetch').then(({ default: fetch }) => fetch(...args));

require('dotenv').config();

const express = require('express');

const Redis = require('ioredis');

const cors = require('cors');

const app = express();

app.use(cors());

const PORT = process.env.PORT || 3001;

// Create Redis (Valkey) client

const redis = new Redis({

  host: process.env.VALKEY_HOST,

  port: Number(process.env.VALKEY_PORT),

  password: process.env.VALKEY_PASSWORD,

  tls: {}, // Required for DigitalOcean Valkey

});
The tls: {} configuration is crucial here as DigitalOcean’s Valkey requires a secure connection.
- Next, we will use a Lua script for atomic operations to ensure our rate limiting is thread-safe:
// Lua script for atomic rate limiting
const rateLimiterLuaScript = `
  local current
  current = redis.call("INCR", KEYS[1])
  if tonumber(current) == 1 then
    redis.call("EXPIRE", KEYS[1], ARGV[1])
  end
  return current
`;

// Rate limiter middleware
const rateLimiter = async (req, res, next) => {
  const ip = req.ip || 'global';
  const limit = 5;
  const windowInSeconds = 60;
  const key = `rate:${ip}`;

  try {
    const current = await redis.eval(rateLimiterLuaScript, 1, key, windowInSeconds);
    console.log(`[RateLimit] IP: ${ip} - Count: ${current}`);

    if (current > limit) {
      return res.status(429).send('🚫 Rate limit exceeded. Please wait a minute.');
    }

    next();
  } catch (err) {
    console.error('[Valkey error]', err);
    res.status(500).send('Valkey error');
  }
};
-
This middleware:
- Tracks requests by IP address.
- Allows 5 requests per minute.
- Uses atomic operations to prevent race conditions.
- Automatically expires counters after 60 seconds.
-
Next, we will create our rate-limited API endpoint (in this case it is the Chuck Norris joke API):
// Chuck Norris joke route (rate limited)
app.get('/api/joke', rateLimiter, async (req, res) => {
  console.log("✅ Incoming request to /api/joke");

  try {
    const response = await fetch('https://api.chucknorris.io/jokes/random');
    const data = await response.json();
    console.log("✅ Joke fetched:", data.value);
    res.send(data.value);
  } catch (err) {
    console.error("❌ Failed to fetch joke:", err);
    res.status(500).send('Failed to fetch joke');
  }
});
And that’s it! The backend is now ready to handle requests with rate limiting. In the next section, we’ll build the front end to interact with this API.
Building the Frontend
Now that we have our backend running, the next part is to create a frontend to see it working visually. In this section we’ll focus on the core integration with our backend API, you can find the entire code on GitHub.
Frontend-backend Integration
Here’s our main page component that handles the communication with our rate-limited backend:
// pages/index.js
import { useState } from 'react';

export default function Home() {
  const [joke, setJoke] = useState('');
  const [error, setError] = useState('');
  const [loading, setLoading] = useState(false);

  const fetchJoke = async () => {
    setLoading(true);
    setError('');
    try {
      // Make request to our rate-limited backend
      const response = await fetch('http://localhost:3001/api/joke');

      // Handle rate limit response (429)
      if (response.status === 429) {
        setError('🚫 Too many requests! Please wait a minute.');
        return;
      }

      // Handle successful response
      const data = await response.text();
      setJoke(data);
    } catch (err) {
      setError('Failed to fetch joke. Please try again.');
    } finally {
      setLoading(false);
    }
  };

  return (
    <div>
      <h1>Chuck Norris Joke Generator</h1>
      <button
        onClick={fetchJoke}
        disabled={loading}
      >
        {loading ? 'Loading...' : 'Get a Joke'}
      </button>

      {error && <p>{error}</p>}
      {joke && <p>{joke}</p>}
    </div>
  );
}
How it works
When a user clicks the “Get a Joke” button, our front end sends a request to the backend API, which checks the rate limit in Valkey - if the user is within their 5-requests-per-minute limit, they get a Chuck Norris joke; if they’ve exceeded the limit, they receive a friendly “too many requests” message. The front end handles all responses, showing loading states during requests and displaying appropriate error messages if something goes wrong, while managing the application state to keep track of the current joke, any errors, and the loading status.
Why Valkey?
Valkey support is added on DigitalOcean to replace the existing Managed Caching service. Let’s see how it has helped us in building the rate-limiter:
1. Better support and features
Valkey is based on a fork of Redis, but with significant improvements:
- New dictionary structure with experimental RDMA support for better memory efficiency
- Enhanced multi-threading capabilities for better scalability
- Improved observability with per-slot metrics
- Dual-channel replication for lower latency during synchronization
In our rate limiter, we benefit from these features through our connection setup:
const redis = new Redis({
  host: process.env.VALKEY_HOST,
  port: Number(process.env.VALKEY_PORT),
  password: process.env.VALKEY_PASSWORD,
  tls: {}, // Required for DigitalOcean Valkey
});
2. Performance Benefits
Valkey’s multi-threading capabilities shine in our rate limiting implementation. When multiple users hit our API simultaneously, Valkey can handle the concurrent requests efficiently:
const rateLimiterLuaScript = `
  local current
  current = redis.call("INCR", KEYS[1])
  if tonumber(current) == 1 then
    redis.call("EXPIRE", KEYS[1], ARGV[1])
  end
  return current
`;
This Lua script runs atomically, and Valkey’s improved threading ensures it can process many of these operations concurrently without performance degradation.
3. Memory Efficiency
Valkey’s new dictionary structure helps our rate limiter be more memory-efficient. Each rate limit counter is stored with minimal overhead:
const key = `rate:${ip}`;
const windowInSeconds = 60;
The combination of efficient memory usage and automatic expiration (TTL) means our rate limiter can handle millions of unique IP addresses without consuming excessive memory.
4. Better Observability
Valkey’s improved observability features help us monitor our rate limiter’s performance. We can track:
- Number of rate-limited requests
- Memory usage per rate limit counter
- Latency of rate limit checks
This is visible in our logging:
console.log(`[RateLimit] IP: ${ip} - Count: ${current}`);
5. Migration Path
For users currently using Managed Caching, Valkey provides a smooth migration path. Our rate limiter implementation is compatible with both services, making it easy to transition:
// Works with both Managed Caching and Valkey
const redis = new Redis({
  host: process.env.VALKEY_HOST,
  port: Number(process.env.VALKEY_PORT),
  password: process.env.VALKEY_PASSWORD,
  tls: {}, // Required for both services
});
All of these together make Valkey the ideal choice for implementing scalable, efficient rate limiting in production environments.
FAQs
1. What is Valkey and how does it work?
Valkey is a cloud-based service that provides a scalable and efficient way to implement rate limiting. It works by using a combination of atomic operations and a new dictionary structure to store rate limit counters, allowing for millions of unique IP addresses to be handled without consuming excessive memory.
2. How does Valkey help implement a scalable rate limiter?
Valkey helps implement a scalable rate limiter by providing a cloud-based service that can handle a large number of requests without performance degradation. Its atomic operations ensure that rate limit checks are accurate and efficient, even in high-traffic environments. This is achieved through a combination of efficient memory usage and automatic expiration (TTL), allowing for millions of unique IP addresses to be handled without consuming excessive memory.
3. What are the benefits of using Valkey for rate limiting?
The benefits of using Valkey for rate limiting are numerous and significant. Firstly, Valkey’s cloud-based service offers improved scalability, allowing it to handle a large number of requests without performance degradation, making it ideal for high-traffic environments. Additionally, Valkey’s memory efficiency ensures that rate limit counters are stored with minimal overhead, enabling the handling of millions of unique IP addresses without consuming excessive memory. Furthermore, Valkey’s observability features provide valuable insights into the performance of the rate limiter, including tracking the number of rate-limited requests, memory usage per rate limit counter, and latency of rate limit checks. This allows for better monitoring and optimization of the rate limiter. For more information on Valkey’s features and how they can benefit your application, refer to the Valkey documentation.
4. Can Valkey be used for both Managed Caching and Valkey services?
Yes, Valkey can be used for both Managed Caching and Valkey services. Its implementation is designed to be compatible with both services, ensuring a seamless transition between the two. This compatibility allows users to leverage Valkey’s features and benefits without worrying about the underlying service infrastructure. Whether you’re currently using Managed Caching or planning to migrate to Valkey, the rate limiter implementation remains consistent and effective, making it an ideal choice for managing traffic and ensuring a smooth user experience.
5. How does Valkey ensure memory efficiency in rate limiting?
Valkey ensures memory efficiency in rate limiting by using a new dictionary structure to store rate limit counters. This structure has minimal overhead, allowing for millions of unique IP addresses to be handled without consuming excessive memory.
6. What are Valkey’s observability features for rate limiting?
Valkey’s observability features for rate limiting are designed to provide a comprehensive understanding of the rate limiter’s performance. These features include:
- Tracking the number of rate-limited requests: This metric helps in identifying the frequency of rate-limited requests, enabling you to adjust your rate limits accordingly.
- Memory usage per rate limit counter: This feature allows you to monitor the memory usage per rate limit counter, ensuring that your rate limiter is not consuming excessive memory resources.
- Latency of rate limit checks: By tracking the latency of rate limit checks, you can identify performance bottlenecks and optimize your rate limiter for faster response times.
These observability features provide valuable insights into the performance of the rate limiter, enabling you to make data-driven decisions to optimize your application’s traffic management. For more information on Valkey’s observability features, refer to the Valkey documentation.
Conclusion
In this tutorial, we’ve built an API rate limiter using Valkey on DigitalOcean. This shows how to protect your APIs from abuse while maintaining a good user experience. You have learnt how to implement rate limiting using Valkey’s atomic operations and how to integrate all of these in a simple frontend.
Resources
Thanks for learning with the DigitalOcean Community. Check out our offerings for compute, storage, networking, and managed databases.
About the author(s)
A Developer Advocate by profession. I like to build with Cloud, GenAI and can build beautiful websites using JavaScript.
Anish is a Sr Technical Content Strategist and Team Lead at DigitalOcean with 7+ years of experience as an DevOps SRE at Nutanix and Cloud consultant at AMEX, and technical writing at DOCN, and shipping deep infra and AI inference tutorials that help developers deploy production‑ready applications on DigitalOcean.
Still looking for an answer?
This textbox defaults to using Markdown to format your answer.
You can type !ref in this text area to quickly search our full set of tutorials, documentation & marketplace offerings and insert the link!
 This work is licensed under a Creative Commons Attribution-NonCommercial- ShareAlike 4.0 International License.
Become a contributor for community
Get paid to write technical tutorials and select a tech-focused charity to receive a matching donation.

DigitalOcean Documentation
Full documentation for every DigitalOcean product.

Resources for startups and AI-native businesses
The Wave has everything you need to know about building a business, from raising funding to marketing your product.
The developer cloud
Scale up as you grow — whether you're running one virtual machine or ten thousand.

Start building today
From GPU-powered inference and Kubernetes to managed databases and storage, get everything you need to build, scale, and deploy intelligent applications.
