
Introduction
Now that we have our example application setup, we should devise a recovery plan. A recovery plan is a set of documented procedures to recover from potential failures or administration errors within your server setup. Creating a recovery plan will also help you identify the essential components and data of your application server setup.
A very basic recovery plan for a server failure could consist of the list of steps that you took to perform your initial server deployment, with extra procedures for restoring application data from backups. A better recovery plan might, in addition to good documentation, leverage deployment scripts and configuration management tools, such as Ansible, Chef, or Puppet, to help automate and quicken the recovery process.
In this part of the tutorial, we will demonstrate how to create a basic recovery plan for the example WordPress application that we set up. Your needs will probably differ, but this should help you get started with devising a recovery plan of your own.
Recovery Plan Requirements
Our basic requirements are that we are able to recover from the loss of any server in the setup, and restore the application functionality and data (up to a reasonable point in time). To fulfill this goal, we will create an inventory of each server, determine which data needs to be backed up, and write a recovery plan based on our available assets. Of course, if any of these recovery plans are executed, the application should be tested to verify that it was restored properly.
We will come up with a recovery plan for each type of server that our application consists of:
- Database Server
- Application Servers
- Load Balancer Server
Let’s get started with the database server.
Database Server
By retracing our steps (and looking at the preceding tutorial), we know that our database server was created by following these steps:
- Install MySQL
- Configure MySQL
- Restart MySQL
- Create database and users
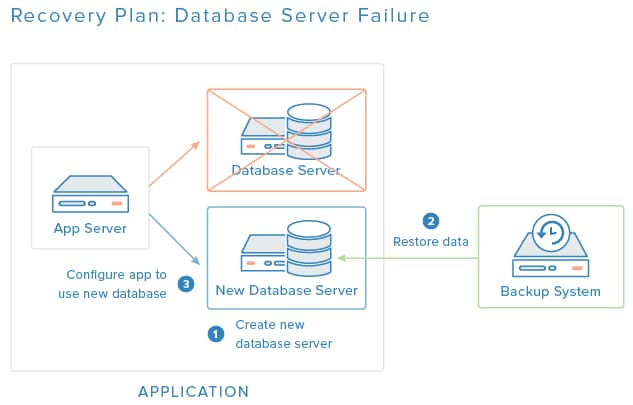
Database Server Recovery Plan
By looking at how we created the database server, we know that it can be recreated from scratch aside from the contents of the database itself (created in step 4). In our WordPress example, most of the application data (i.e. blog posts) is stored in the database. This means that we must maintain backups of the database if we want to be able to recover the database server. We will also back up the MySQL configuration file since it was modified slightly.
Based on our inventory of the database server, here is an outline of our database server recovery plan:
Required Backups:
- MySQL database
- MySQL configuration
Recovery Steps:
- Install MySQL
- Restore MySQL configuration file, and (if it changes) update listening IP address
- Restore database
- Restart MySQL
Now that we have an outline of the database server recovery plan, we should work out the details of the recovery steps and ensure that we maintain the required backups. We will leave it as an exercise to the reader to detail the recovery steps, as they will differ depending on the actual setup. In the example case, we can use the application deployment tutorial as the documentation to base our recovery steps on.
Application Servers
By retracing our steps (and looking at the preceding tutorial), we know that the application servers were created by following these steps:
- Install and configure Apache and PHP
- Download and configure application (WordPress)
- Copy application files to DocumentRoot
- Replicate application files across all application servers
Application Server Recovery Plan
By looking at the set up steps, we know that our application server can be recreated from scratch aside from the application files. In our WordPress example, the application files include the WordPress configuration files (which includes the database connection information), installed WordPress plugins, and file uploads. This means that we must maintain backups of the application files if we want to be able to recover an application server.
Because the application files are set up to be replicated across multiple application servers, we only need to restore the data from backups if all of the application servers fail or if the data is corrupted somehow. If at least one application server is running fine, with the correct application files, setting up file replication again will restore the proper files to the new application server.
Based on our inventory of the application servers, let’s make an outline of our application server recovery plan:
Required Backups:
- Application files (
/var/www/html/, in our example)Recovery Steps:
- Install and configure Apache and PHP
- Replicate application files from working application server
- If application files can’t be replicated (all application servers are dead), restore from backups
Now that we have an outline of the application server recovery plan, we should work out the details of the recovery steps and ensure that we maintain the required backups. We will leave it as an exercise to the reader to detail the recovery steps, as they will differ depending on the actual setup. In the example case, we can use the application deployment tutorial as the documentation to base our recovery steps on.
Load Balancer Server
By retracing our steps (and looking at the preceding tutorial), we know that the load balancer server was created by following these steps:
- Obtained SSL Certificate and related files
- Installed HAProxy
- Configured HAProxy
- Restarted HAProxy
Load Balancer Server Recovery Plan
By looking at this inventory, we know that our load balancer server can be recreated from scratch aside from the files related to the SSL certificate. This means that we must maintain backups of the SSL certificate files if we want to be able to recover the load balancer server. We will also include the HAProxy configuration file in our backups.
Based on our inventory of the load balancer server, let’s make an outline of our load balancer server recovery plan:
Required Backups:
- SSL Certificate (PEM) and related files
- HAProxy configuration file
Recovery Steps:
- Restore SSL Certificate files
- Install HAProxy
- Restore HAProxy configuration file
- Restart HAProxy
Now that we have an outline of the load balancer server recovery plan, we should work out the details of the recovery steps and ensure that we maintain the required backups. We will leave it as an exercise to the reader to detail the recovery steps, as they will differ depending on the actual setup. In the example case, we can use the application deployment tutorial as the documentation to base our recovery steps on.
Other Considerations
If the recovery of one of the components requires you to reconfigure any other components, e.g. the database server IP address changes, make sure to include the appropriate steps in your recovery plans.
You will also want to write up recovery plans for all of the other components that exist in your setup, such as your DNS, and for all the components that you will add in the future, such as your backups servers, monitoring, and logging. As your server setup evolves, you should iterate on your existing recovery plans.
We also haven’t covered how to create and restore backups yet, so we will have to fill those details in later. We will cover backups in the next part of this tutorial.
Conclusion
After preparing the recovery plans for your various servers, you should keep this information somewhere that is accessible to whoever needs to be able to perform a recovery, completely separate from your server setup.
Continue to the next tutorial to start setting up the backups that are required to support your new recovery plan: Building for Production: Web Applications — Backups.
Thanks for learning with the DigitalOcean Community. Check out our offerings for compute, storage, networking, and managed databases.
Tutorial Series: Building for Production: Web Applications
This 6-part tutorial will show you how to build out a multi-server production application setup from scratch. The final setup will be supported by backups, monitoring, and centralized logging systems, which will help you ensure that you will be able to detect problems and recover from them. The ultimate goal of this series is to build on standalone system administration concepts, and introduce you to some of the practical considerations of creating a production server setup.
About the author
Software Engineer @ DigitalOcean. Former Señor Technical Writer (I no longer update articles or respond to comments). Expertise in areas including Ubuntu, PostgreSQL, MySQL, and more.
Still looking for an answer?
This textbox defaults to using Markdown to format your answer.
You can type !ref in this text area to quickly search our full set of tutorials, documentation & marketplace offerings and insert the link!
I always make a list of installed packages on Linux servers. It help a lot when migrating/restoring servers. Especially on webservers because of various language modules. (PHP extensions for example)
Make a list of packages on CentOS:
rpm -qa > installed.dump
Install from that list:
yum install $(cat installed.dump)
 This work is licensed under a Creative Commons Attribution-NonCommercial- ShareAlike 4.0 International License.
Become a contributor for community
Get paid to write technical tutorials and select a tech-focused charity to receive a matching donation.

DigitalOcean Documentation
Full documentation for every DigitalOcean product.

Resources for startups and AI-native businesses
The Wave has everything you need to know about building a business, from raising funding to marketing your product.
The developer cloud
Scale up as you grow — whether you're running one virtual machine or ten thousand.

Start building today
From GPU-powered inference and Kubernetes to managed databases and storage, get everything you need to build, scale, and deploy intelligent applications.
