By Fredrick Adhing'a and Rachel Lee

The author selected the Free and Open Source Fund to receive a donation as part of the Write for DOnations program.
Introduction
Authentication is the process of verifying authentic or registered users into the system, which helps to secure your software applications against unauthorized access. There are several techniques used to authenticate users like username/password verification, human biometrics, or image passwords. In the Django web framework, authentication handling can be hard-coded or you can use ready-made modules like django-allauth, django-rest-social-auth, django-registration, and more.
django-allauth is an integrated set of Django applications dealing with account authentication, registration, management, and third-party (social) account authentication. It is one of the most popular authentication modules due to its ability to handle both local and social logins. You can add support for additional OAuth/OAuth2 providers with the app’s common code base. Not only does it handle the authentication logic, but it is also customizable to suit your design needs.
In this tutorial, you will build a Django application that uses django-allauth to authenticate using a DigitalOcean account.
Prerequisites
For this tutorial, you will need:
- A DigitalOcean account. If you do not have one, sign up for a new account.
- Python 3.5+ installed on your machine, which you can do by following the tutorial How To Install Python 3 and Set Up a Programming Environment for your machine.
- Basic knowledge of the Django web framework, which you can find in our series on Django Development.
Step 1 — Setting up the Development Environment
In this step, you will set up your Django app development environment. You will activate a virtual environment and install the project’s dependencies.
First, create a new directory and change into it. This tutorial uses Django-Allauth:
- mkdir Django-Allauth
- cd Django-Allauth
Make sure to use this folder for the remainder of this tutorial.
Next, create a virtual environment using Pipenv, a packaging tool for Python. First, install pipenv:
- pip3 install pipenv
Next, activate the virtual environment:
pipenv shell
Next, install the dependencies you’ll use for development (django and django-allauth) using pipenv:
- pipenv install django
- pipenv install django-allauth
You have now finished setting up your development environment. Next, you will start developing your Django application.
Step 2 — Creating your Django Application
In this step, you will create a simple one-page Django application to use with django-allauth authentication.
The first step to creating your application is to create the project application, called Authentication in this tutorial:
- django-admin startproject Authentication
Next, access the project directory’s path and create an app for your application; this tutorial uses main:
- cd Authentication
- python manage.py startapp main
In the project’s directory, use nano or your favorite text editor to open settings.py for editing:
- nano Authentication/settings.py
To the list of installed apps, add the main app as shown:
INSTALLED_APPS = [
'django.contrib.admin',
'django.contrib.auth',
'django.contrib.contenttypes',
'django.contrib.sessions',
'django.contrib.messages',
'django.contrib.staticfiles',
'main', # new app
]
Since we are rendering a single page for the website, there is no need to make changes to the models.py file.
Next, open the project’s urls.py file for editing and make the following changes:
from  django.contrib  import  admin
from  django.urls  import  path, include

urlpatterns = [
path('', include('main.urls')),
path('admin/', admin.site.urls),
]
The urls.py file is used for routing Django apps.
Next, in the main app, create another urls.py file and add the following lines:
from  django.urls  import  path
from . import views

urlpatterns = [
path('', views.homepage, name='homepage'),
]
This new urls.py file is used to route the main app’s files.
Next, open the views.py file and add the following lines:
from  django.shortcuts  import  render

def  homepage(request):
    return  render(request=request,
    template_name= 'home.html',)
The views.py file is used to render the home.html page in the template’s directory.
Next, on the project’s root folder (Authentication), create a new directory called templates. In the templates directory, create an HTML page called home.html and add the following lines:
-
- <html>
- <head>
- <style>
- h3 {text-align: center;}
- p {text-align: center;}
</style>
- </head>
- <body>
- <!-- Compiled and minified CSS -->
- <link rel="stylesheet" href="https://cdnjs.cloudflare.com/ajax/libs/materialize/1.0.0/css/materialize.min.css">
-
- <!-- Compiled and minified JavaScript -->
- <script src="https://cdnjs.cloudflare.com/ajax/libs/materialize/1.0.0/js/materialize.min.js"></script>
-
- <nav>
- <div class="nav-wrapper"style="background-color: teal">
- <a href="#" class="brand-logo">Django-Allauth</a>
- </div>
- </nav>
- <h3 style=center>Welcome Home</h3>
- <div class="row">
- <div class="col s12 m6">
- <div class="card whitedarken-1">
- <div class="card-content blue-text">
- <span class="card-title">Lorem Ipsum</span>
- <p>{% lorem 1 p %}</p>
- </div>
- </div>
- </div>
- <div class="col s12 m6">
- <div class="card white darken-1">
- <div class="card-content blue'-text">
- <span class="card-title">Lorem Ipsum</span>
- <p>{% lorem 1 p %}</p>
- </div>
- </div>
- </div>
- </div>
- <div class="container text-dark mt-5">
- <div class="row justify-content-md-center">
- <div class="col md-5 p-3">
- {% if user.is_authenticated%}
- <p>Welcome, {{user.username}}</p>
- <a href="http://127.0.0.1:8000/accounts/logout/">Logout</a>
- {%else%}
- <p>Please <a href="http://127.0.0.1:8000/accounts/login/">Login</a></p>
- {%endif%}
- </div>
- </div>
- </div>
- </body>
- </html>
This demo webpage includes sample text rendered in cards and a login area to use with authentication in a later step.
The web page is styled using Materialize CDN, a free and open-source content delivery front-end framework based on Material Design. It helps load Materialize CSS, JavaScript, and jQuery libraries to make beautiful and responsive projects. Make sure to have an internet connection for the CDN to load the styling files.
From the directory path, Django-Allauth/Authentication, launch the web app using the following command:
- python manage.py runserver
You will see output similar to the following:
OutputPerforming system checks...

System check identified no issues (0 silenced).
June 10, 2022 - 13:35:20
Django version 4.0.4, using settings 'Authentication.settings'
Starting development server at http://127.0.0.1:8000/
Quit the server with CONTROL-C.
Navigate to the URL http://127.0.0.1:8000/. You should see a website that looks like this:
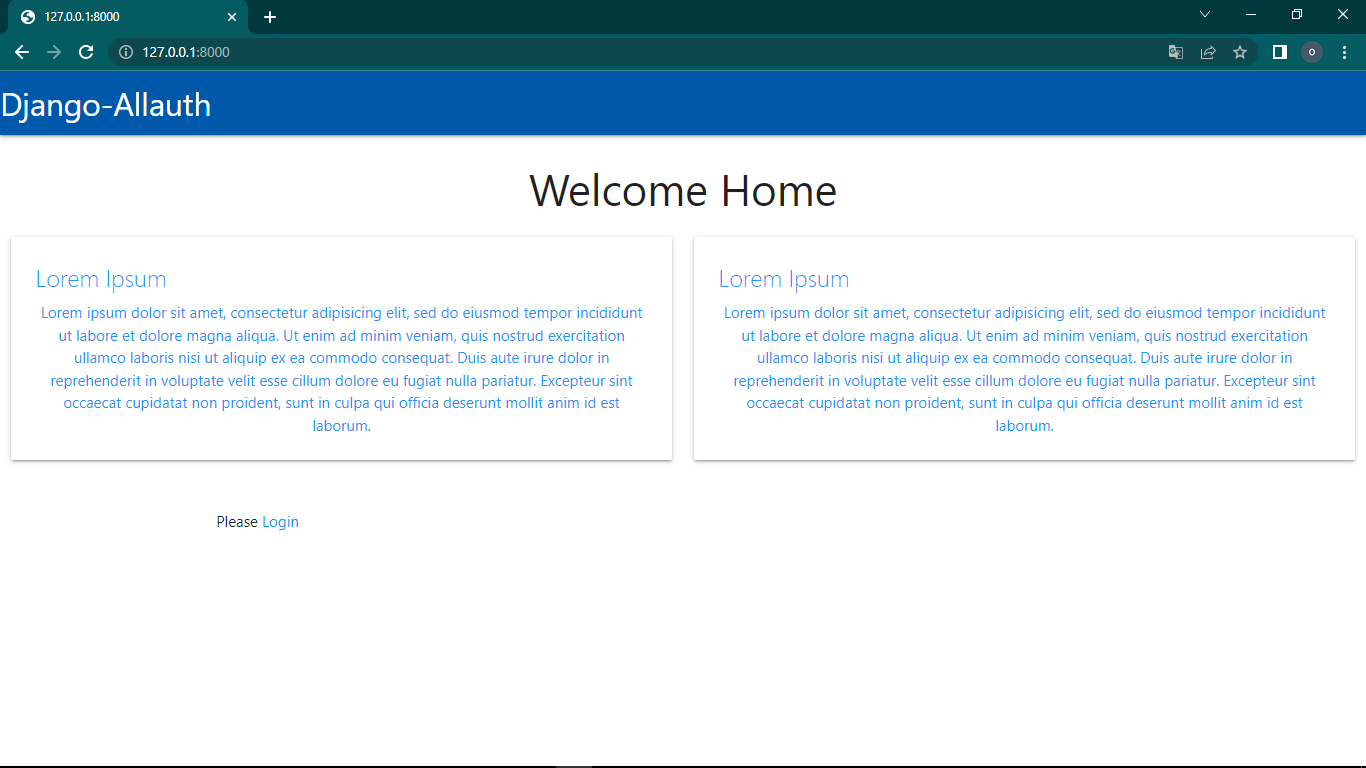
The sample website displays filler text and includes a login area at the bottom. Once you’ve set up authentication, you will use the Login link on the webpage at a later step.
In this step, you built a one-page application. Next, you will now handle authentication using django-allauth.
Step 3 — Configuring django-allauth
django-allauthTo authenticate using django-allauth, you first have to set it up. This is done by making a few changes to the project’s files.
Open Authentication/settings.py for editing. Under INSTALLED_APPS, add the highlighted lines to register the django-allauth apps and DigitalOcean as the social login provider:
INSTALLED_APPS = [

    # Make sure to add these required apps
    'django.contrib.sites',
	  # Django-allauth apps
    'allauth',
    'allauth.account',
    'allauth.socialaccount',
    # Social/third party login provider for Digital Ocean
    'allauth.socialaccount.providers.digitalocean',
]
Next, update the TEMPLATES section as shown:
[label Django-Allauth/Authentication/Authentication/settings.py]
# Context processors specifications:
TEMPLATES = [
    {
        'BACKEND': 'django.template.backends.django.DjangoTemplates',
        'DIRS': [],
        'APP_DIRS': True,
        'OPTIONS': {
        'context_processors': [
	 'django.template.context_processors.request',
            ],
        },
    },
]
The new line handles HTTP requests from Django-Allauth.
Next, create a section for AUTHENTICATION_BACKENDS and add the following lines:
AUTHENTICATION_BACKENDS = [
    'django.contrib.auth.backends.ModelBackend',
	  'allauth.account.auth_backends.AuthenticationBackend',
    ]
The first line is used to log in a user by a username through the Django admin dashboard, which you’ll do in a later step. The second line is used for django-allauth-specific authentication methods, such as a login by an OAuth provider.
Next, add two authentication redirects as shown:
LOGIN_REDIRECT_URL = 'homepage'
LOGOUT_REDIRECT_URL = 'homepage'
These lines redirect the user to the homepage after authentication and after logging out of the website.
The last edit to settings.py is to set the ID of your site’s URL. At the end of your file, add the following line:
# Sets the ID of your site's URL.
SITE_ID =1
This line specifies the database ID of the Site object associated with the settings.py file.
Save and close your file.
Next, open the root urls.py file for editing. Add the path to the Allauth apps as follows:
urlpatterns = [
	...
	path('accounts/', include('allauth.urls')),
]
This new line is used to route the allauth app’s URL file. The django-allauth app comes with a set of URLs for its HTML pages. Some URLs provided by allauth include: account_login, account_logout, account_set_password, among others. Check out the django-allauth product documentation for more information.
Save and close your file.
In this step, you set up django-allauth on your application and are ready to use it for authentication.
Step 4 — Adding a Third-Party Authentication Provider
In this step, you will add third-party authentication for your Django app using django-allauth. There are many third-party authentication providers you can use with django-allauth, including social logins from Google, Facebook, Twitter, and others listed in the django-allauth list of providers.
For this tutorial, you will use DigitalOcean as your social login. To add an authentication provider like DigitalOcean, first, you have to register them.
Log in to your DigitalOcean account and navigate to the DigitalOcean cloud platform, where you’ll access a dashboard that looks like this:
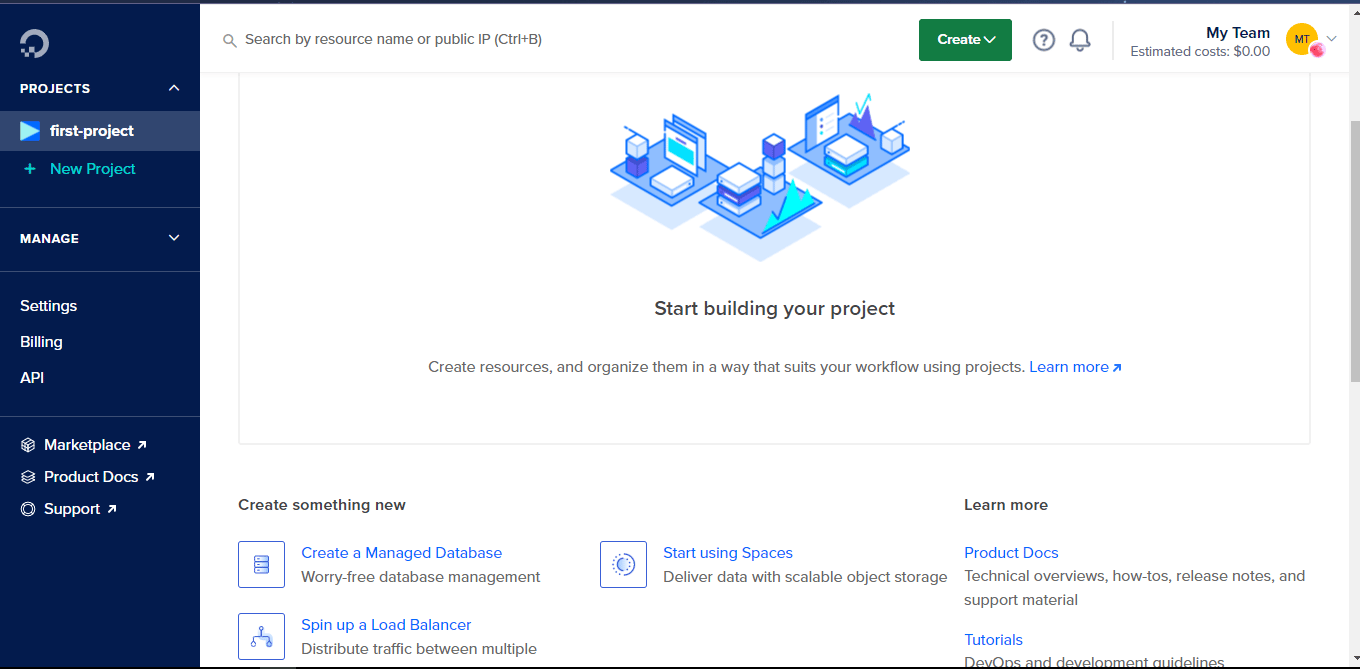
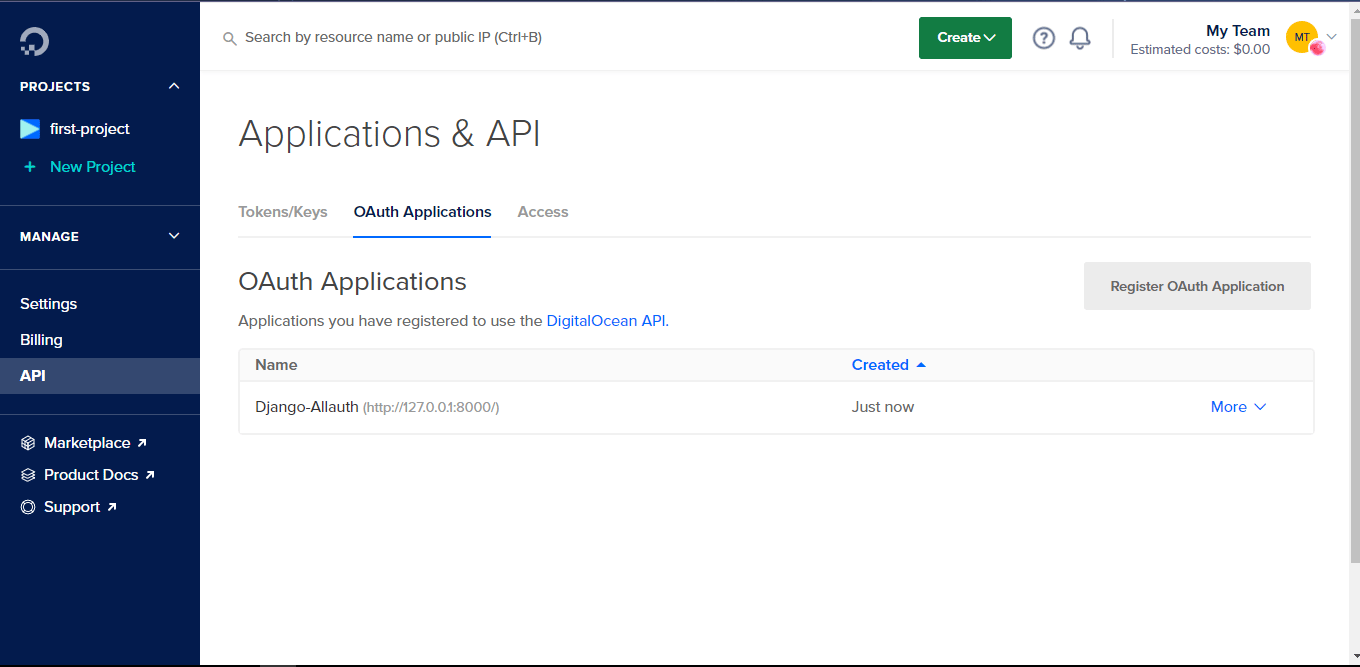
Click on the API button on the left of the dashboard to create your OAuth Application. On the Applications & API dashboard, click on the OAuth Application button to access the OAuth registration for your site. You will see a dashboard that looks like this:
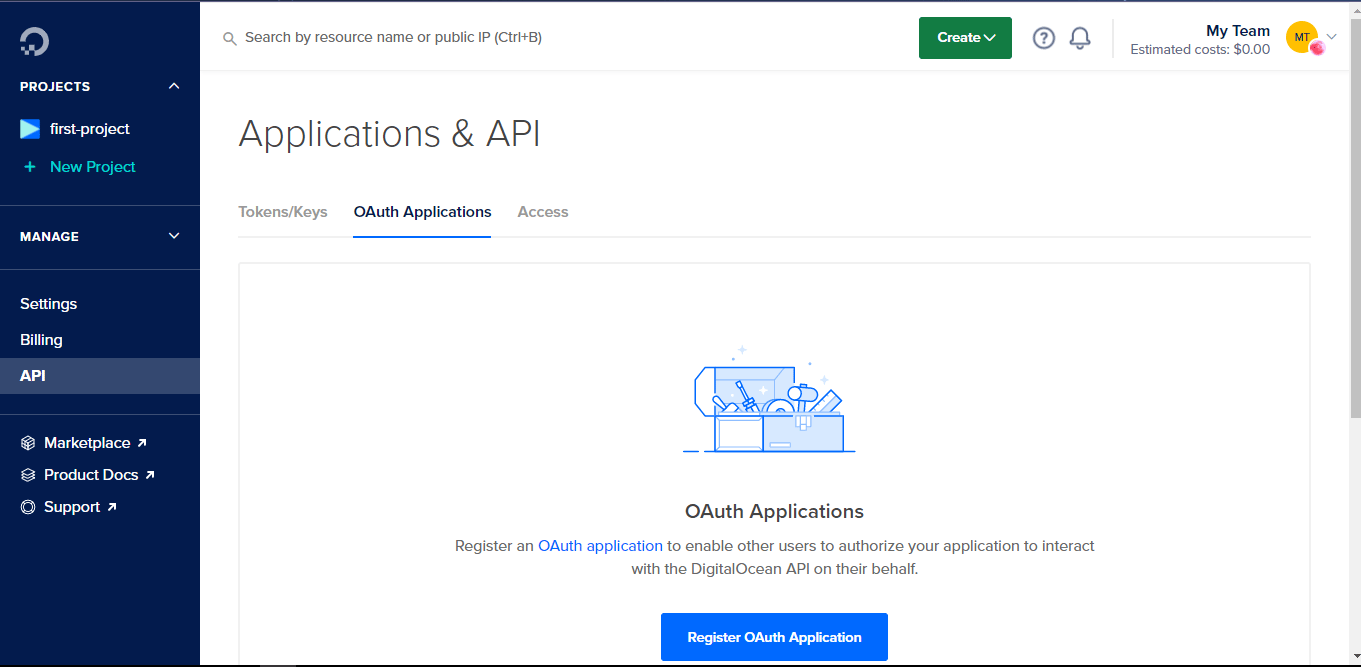
Next, click on the Register OAuth Application button to start your app’s OAuth application registration. A pop-up form will appear:
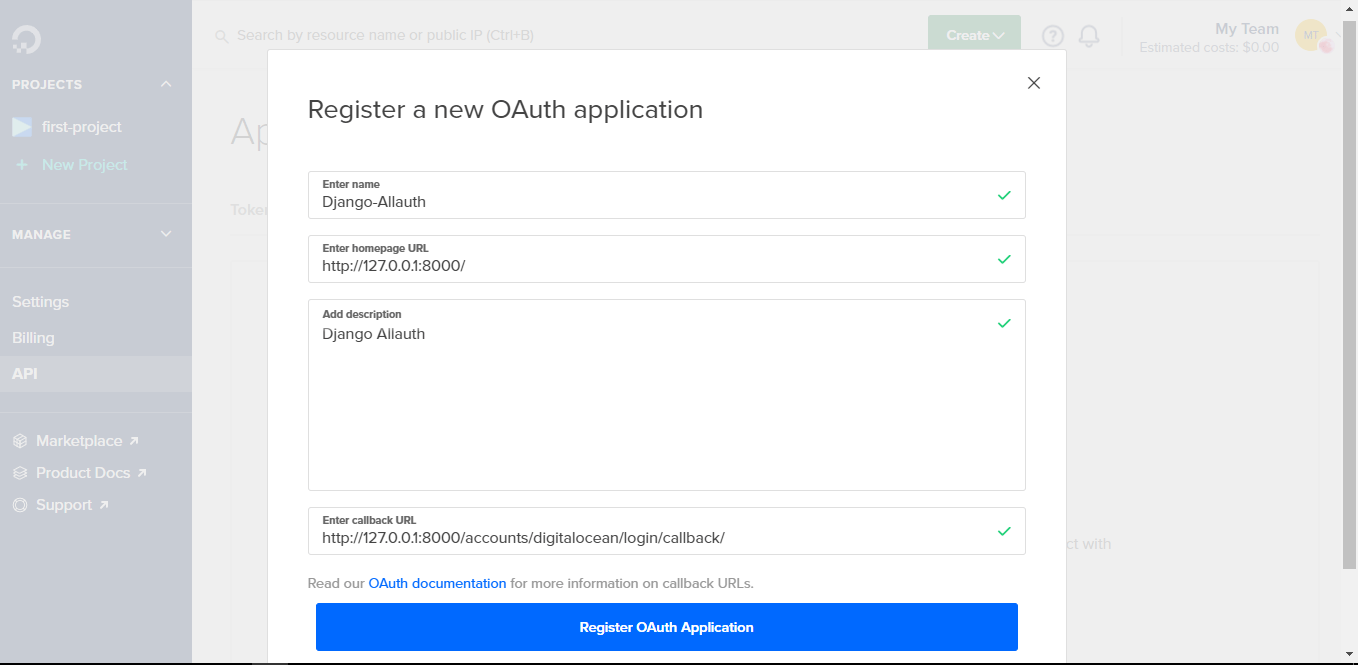
Enter the project name (Django-Allauth) and any description you’d like. For the Enter homepage URL section, enter one of the following URLs:
http://127.0.0.1:8000http://localhost:8000
On the Enter Callback URL section, enter one of the following redirect URLs:
http://127.0.0.1:8000/accounts/digitalocean/login/callback/http://localhost:8000/accounts/digitalocean/login/callback/
Note: For demonstration purposes, this tutorial uses localhost:8000 or 127.0.0.1:8000. When deploying an app to production, the URLs should be changed to include the domain name instead.
After you’ve entered the project information, click Register OAuth Application to save the changes. You will then be redirected back to the application’s dashboard with your application created as shown below:
Click on the application’s name to access the Client ID and Client secret:
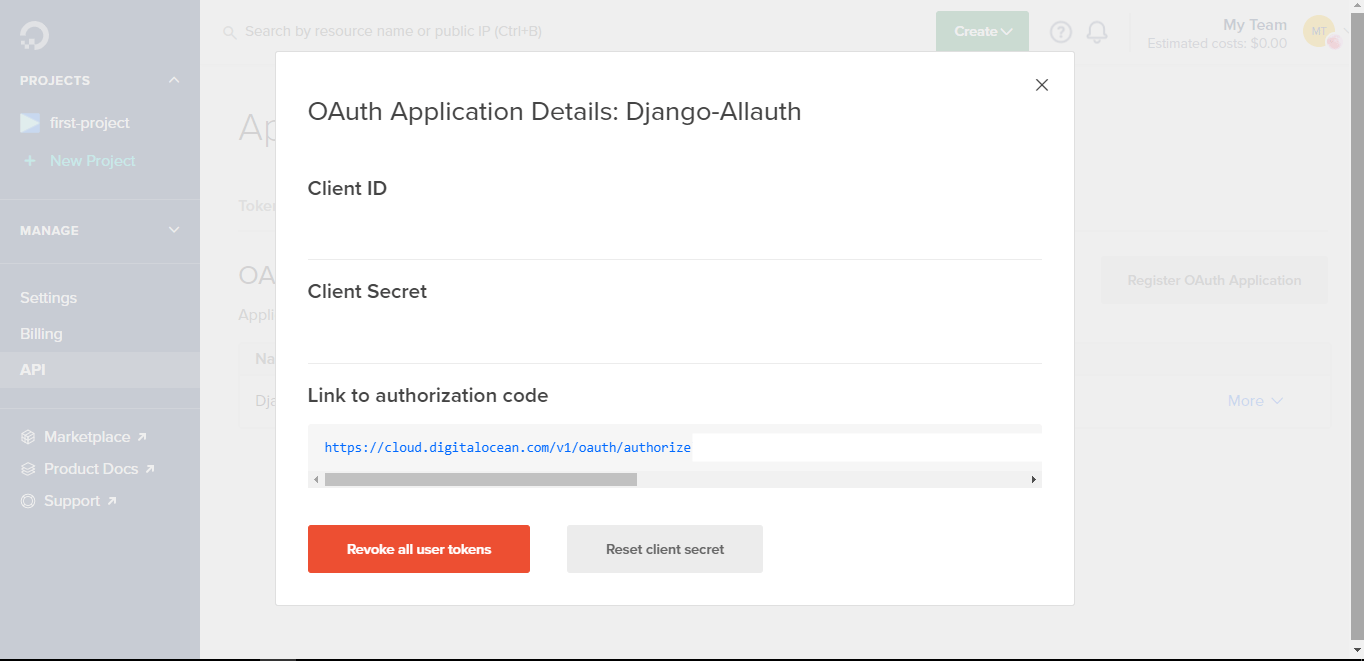
Copy and save these details for later use.
After setting up the API on DigitalOcean, you can now add it to your Django application’s admin panel. To access the Django admin panel, you first need to have a superuser, which you can create using the following command:
- python manage.py createsuperuser
Enter the requested details and run the server once again.
Access the admin panel using the URL, http://127.0.0.1:8000/admin/. Log in with your superuser details and you’ll access the admin dashboard that looks like the following:
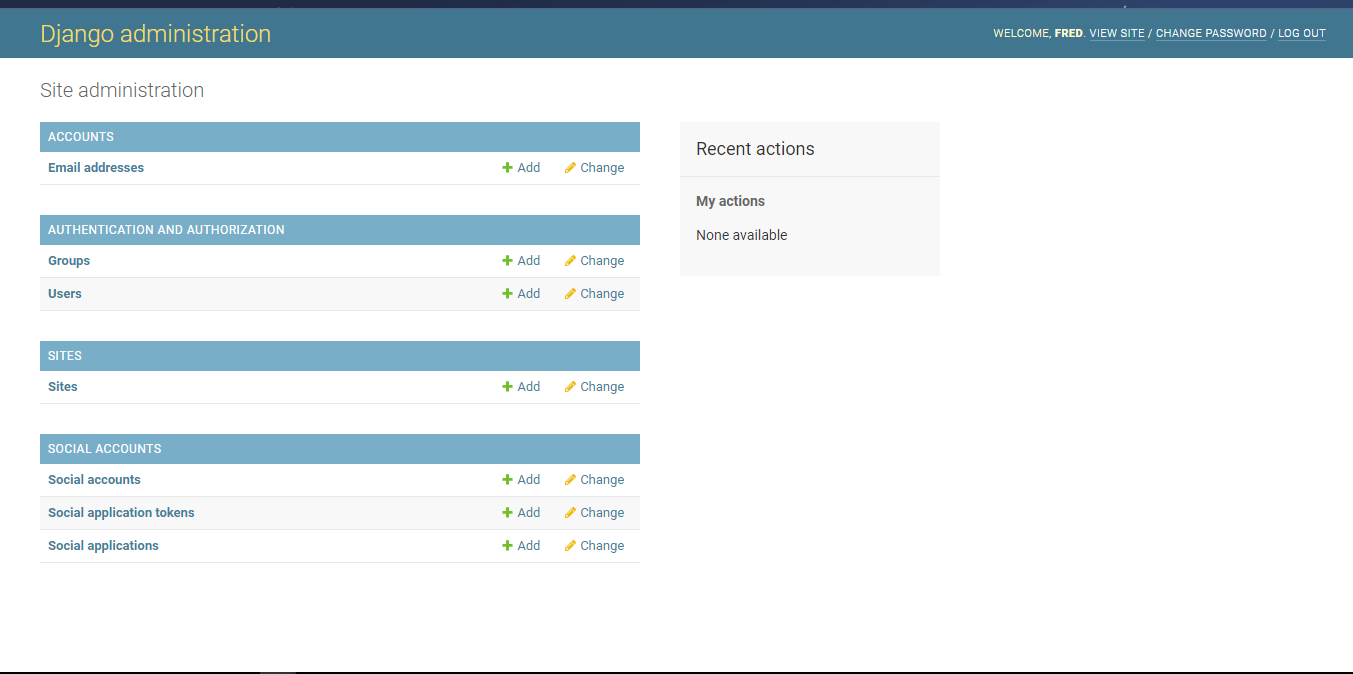
On the left panel, click Sites, and then Add Site + to add edit an existing site (example.com) or add a new one using http://127.0.0.1:8000 as shown below:

This configuration sets your site’s URL server where DigitalOcean’s authentication will be implemented. In this case, it is http://127.0.0.1:8000.
Click Save.
Next, navigate back to the main dashboard by clicking Home. On the Social Accounts section, click Social Applications, and then click Add Social Applications +. Using the details you copied from the DigitalOcean Console, enter the required details for the service provider, name of the app, client ID, and client secret key. Under Sites, select the site you just created under Available sites and click the arrow (—>) to move it into the Chosen sites panel. Click the Save button to save the details.
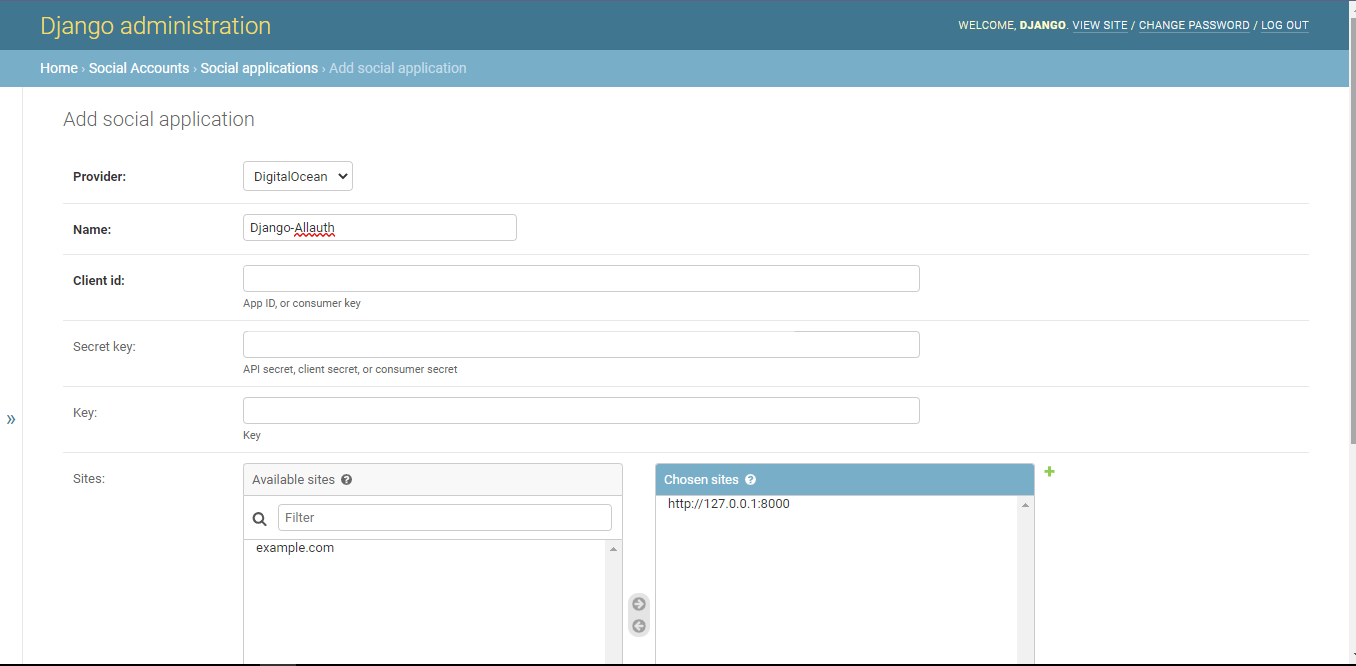
This configuration is used to connect the social login provider by using the Client id and the Secret Key, which are used as a public identifier of your application and as a confidential identifier, respectively. They are used to authenticate your application and make requests to DigitalOcean’s APIs.
In this step, you configured DigitalOcean as the third-party authentication provider for your Django app. In the final step, you’ll log in to your site using your DigitalOcean account.
Step 5 — Testing Authentication
In this step, you will log in to your Django site using your DigitalOcean account. First, log out as an admin and navigate to the sign-in page (http://127.0.0.1:8000/accounts/login/):
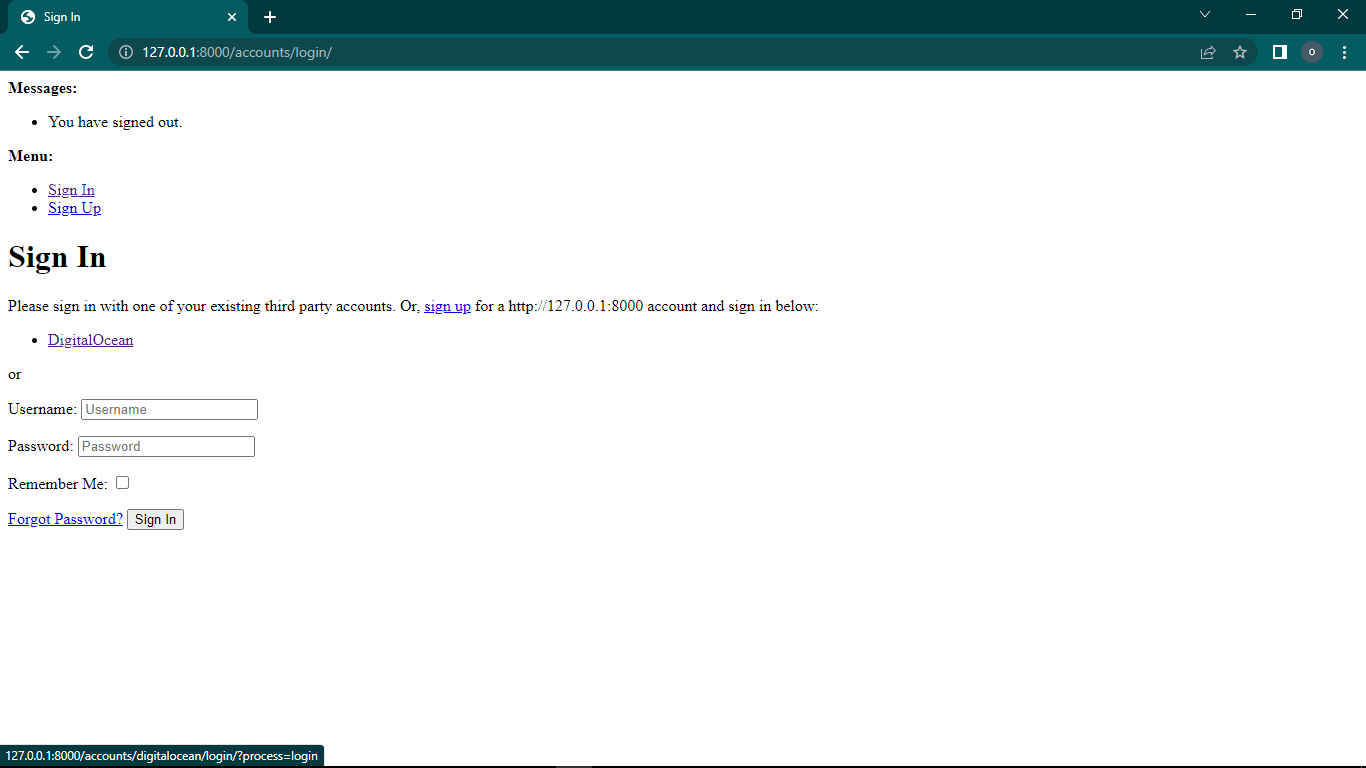
Click on the DigitalOcean link to log in using DigitalOcean. (As shown in the screenshot, another way to authenticate is to sign up using a username and a password.)
On the next screen, click Continue. A new page will appear where you will be required to select your DigitalOcean Team account and click the button Authorize application.
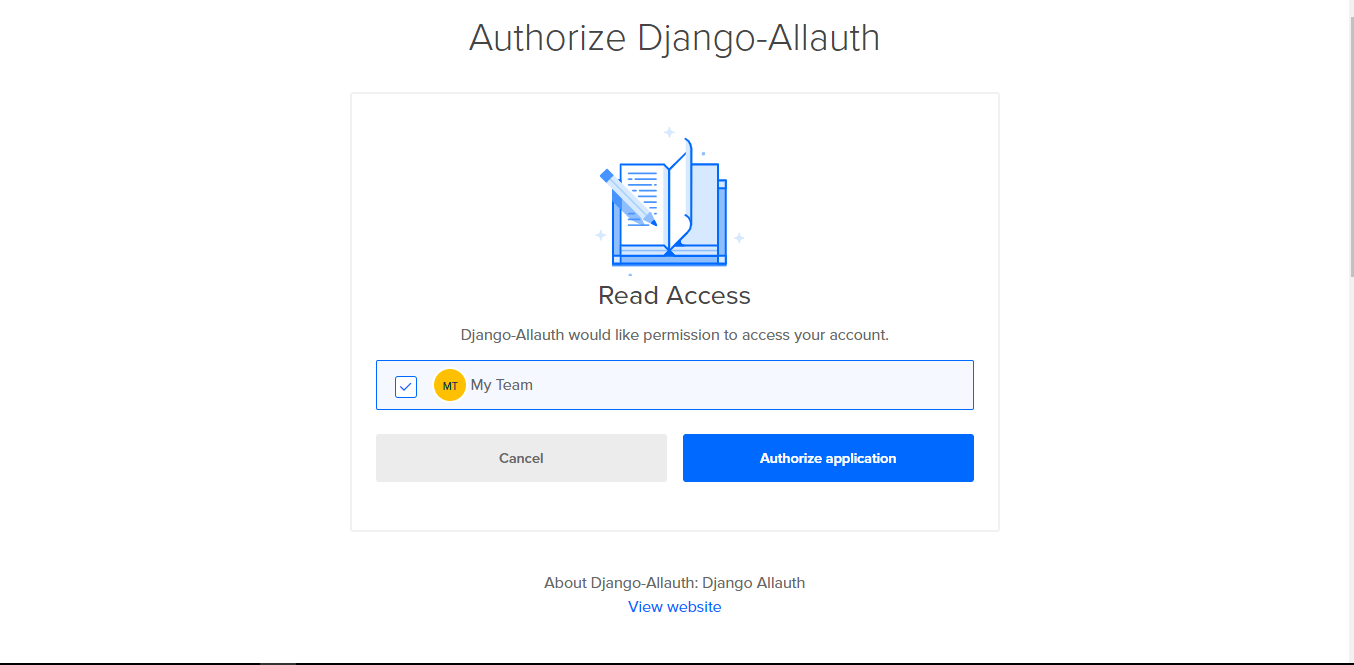
Authorization is the process of granting a person the ability to access a resource. In this case, you are granting your website access to your login credentials from DigitalOcean to authenticate you.
After logging in, you should see your homepage as shown below:
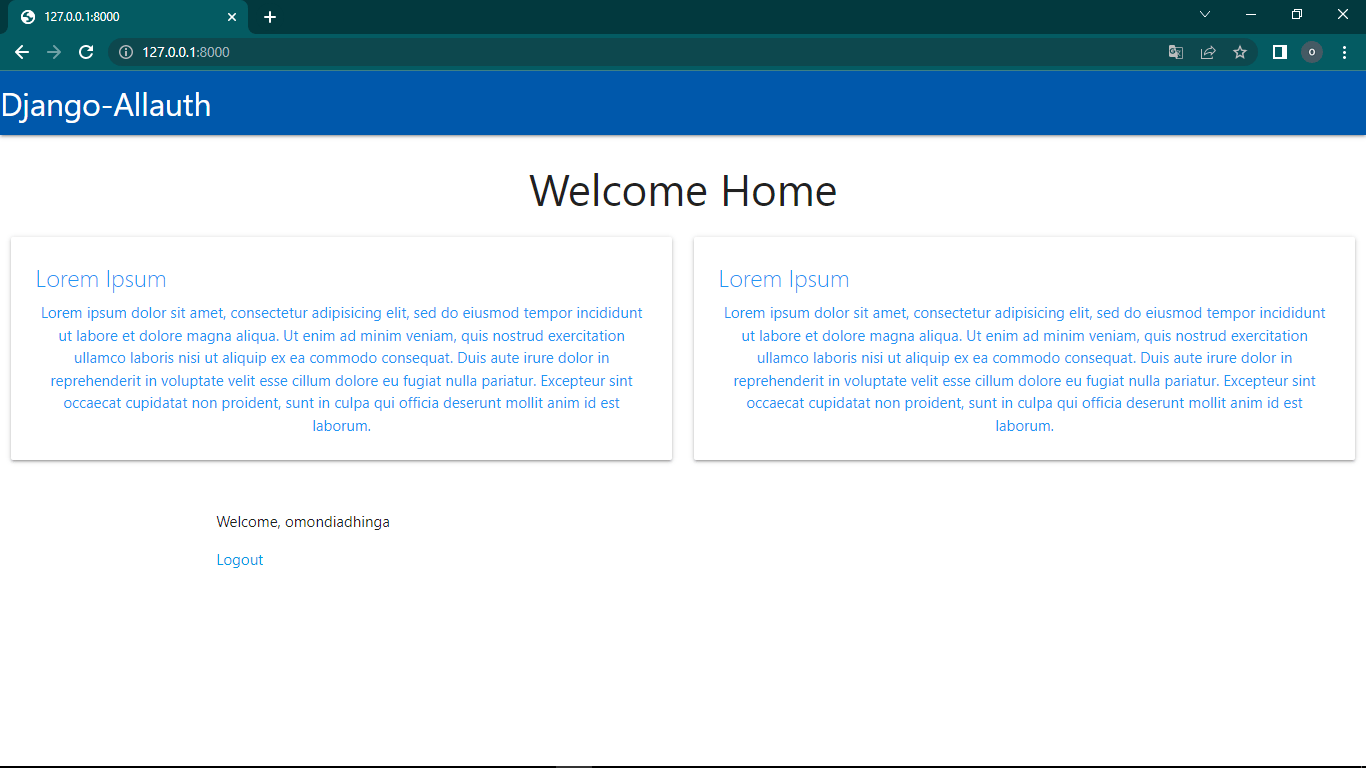
After a successful login, your username and the Logout link will be displayed on the website.
NOTE: During this process, you may get the error message, SocialApp matching query does not exist:
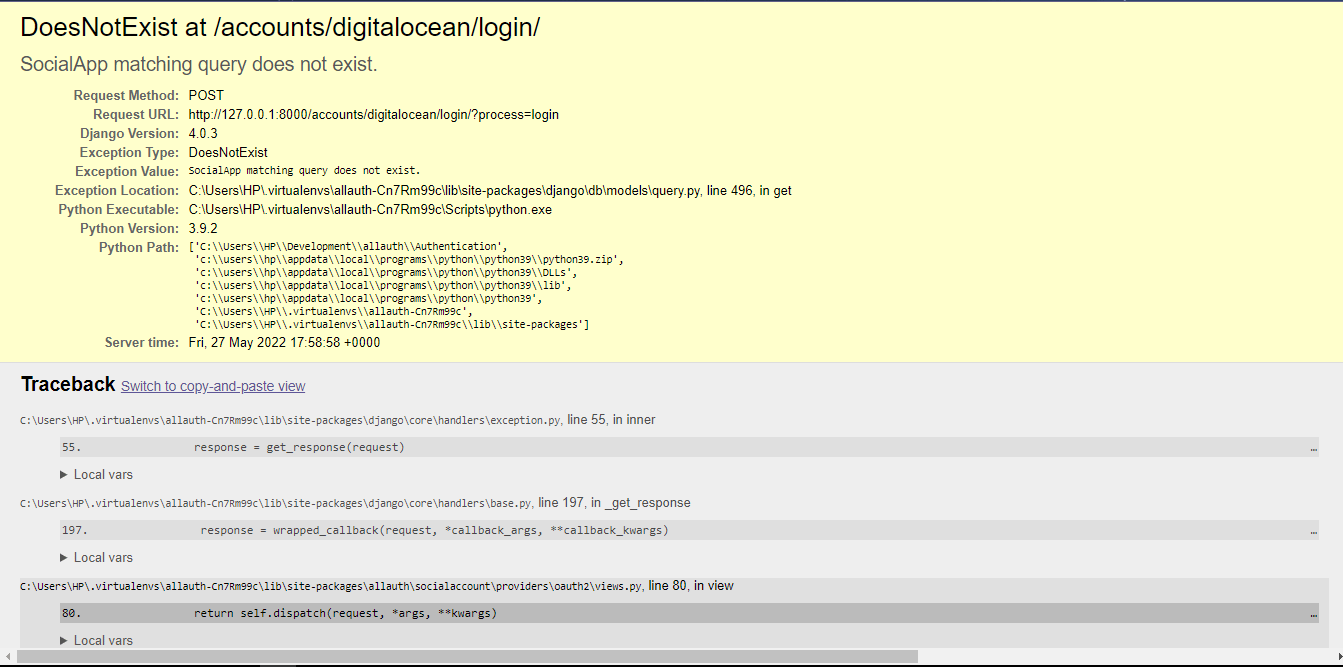
This problem normally occurs when you wrongly reference your site ID number, such as if you have example.com as the first site on your site. To resolve it, find SITE_ID in settings.py and increase its value by 1 until the error disappears.
In this step, you tested your authentication configuration by logging into your site using DigitalOcean login information.
Conclusion
In this tutorial, you built a Django app that handles social authentication using django-allauth. You incorporated a DigitalOcean social login and tested it by logging in to your site. You can access the project code on GitHub.
As a next step, you could use django-allauth to authenticate any of your other Django application projects with any of the django-allauth providers. For more about Django authentication with django-allauth, check out the Django-Allauth official documentation and the Django official documentation on authentication.
You could also add styling to the allauth pages, which have a basic default styling. To add style to the allauth pages, you can clone the django-allauth project from GitHub and use the django-allauth/allauth/templates directory from the cloned repository to style your pages.
Thanks for learning with the DigitalOcean Community. Check out our offerings for compute, storage, networking, and managed databases.
About the author(s)
Fredrick is a self-disciplined individual, who writes code full time, goes on adventures for fun and teaches part-time to give back to the community.
Still looking for an answer?
This textbox defaults to using Markdown to format your answer.
You can type !ref in this text area to quickly search our full set of tutorials, documentation & marketplace offerings and insert the link!
Follow this if you’re getting a 404 template not found error:
- open
settings.py - Find the templates section
- type
BASE_DIR/'templates'in the ‘DIRS’ list. You will end up with something like this:
TEMPLATES = [
    {
        'BACKEND': 'django.template.backends.django.DjangoTemplates',
        'DIRS': [BASE_DIR / 'templates',],
        'APP_DIRS': True,
        'OPTIONS': {
            'context_processors': [
                'django.template.context_processors.debug',
                'django.template.context_processors.request',
                'django.contrib.auth.context_processors.auth',
                'django.contrib.messages.context_processors.messages',
                'django.template.context_processors.request',
            ],
        },
    },
]
This will tell django to check that directory for templates.
Also, on line 21 of home.html, remove style:center. I believe it’s a typo.
Finally, I ran into errors when I used http://localhost:8000 but when I changed it to http:127.0.0.1:8000/ in all places, the errors went away.
 This work is licensed under a Creative Commons Attribution-NonCommercial- ShareAlike 4.0 International License.
Become a contributor for community
Get paid to write technical tutorials and select a tech-focused charity to receive a matching donation.

DigitalOcean Documentation
Full documentation for every DigitalOcean product.

Resources for startups and AI-native businesses
The Wave has everything you need to know about building a business, from raising funding to marketing your product.
The developer cloud
Scale up as you grow — whether you're running one virtual machine or ten thousand.

Start building today
From GPU-powered inference and Kubernetes to managed databases and storage, get everything you need to build, scale, and deploy intelligent applications.
